Bohemian Romance Jewelry

steampunk diy

Update an Old Pair of Gloves

D-I-Y-Samantha ExtanceComment

With Halloween coming up soon, I've been dreaming up new steampunk costume DIYS.  The easiest way to create a Halloween costume is to simply update an older one. Many costumes include a pair of gloves. Gloves are a versatile accessory and easily updated. Here's what you'll need:
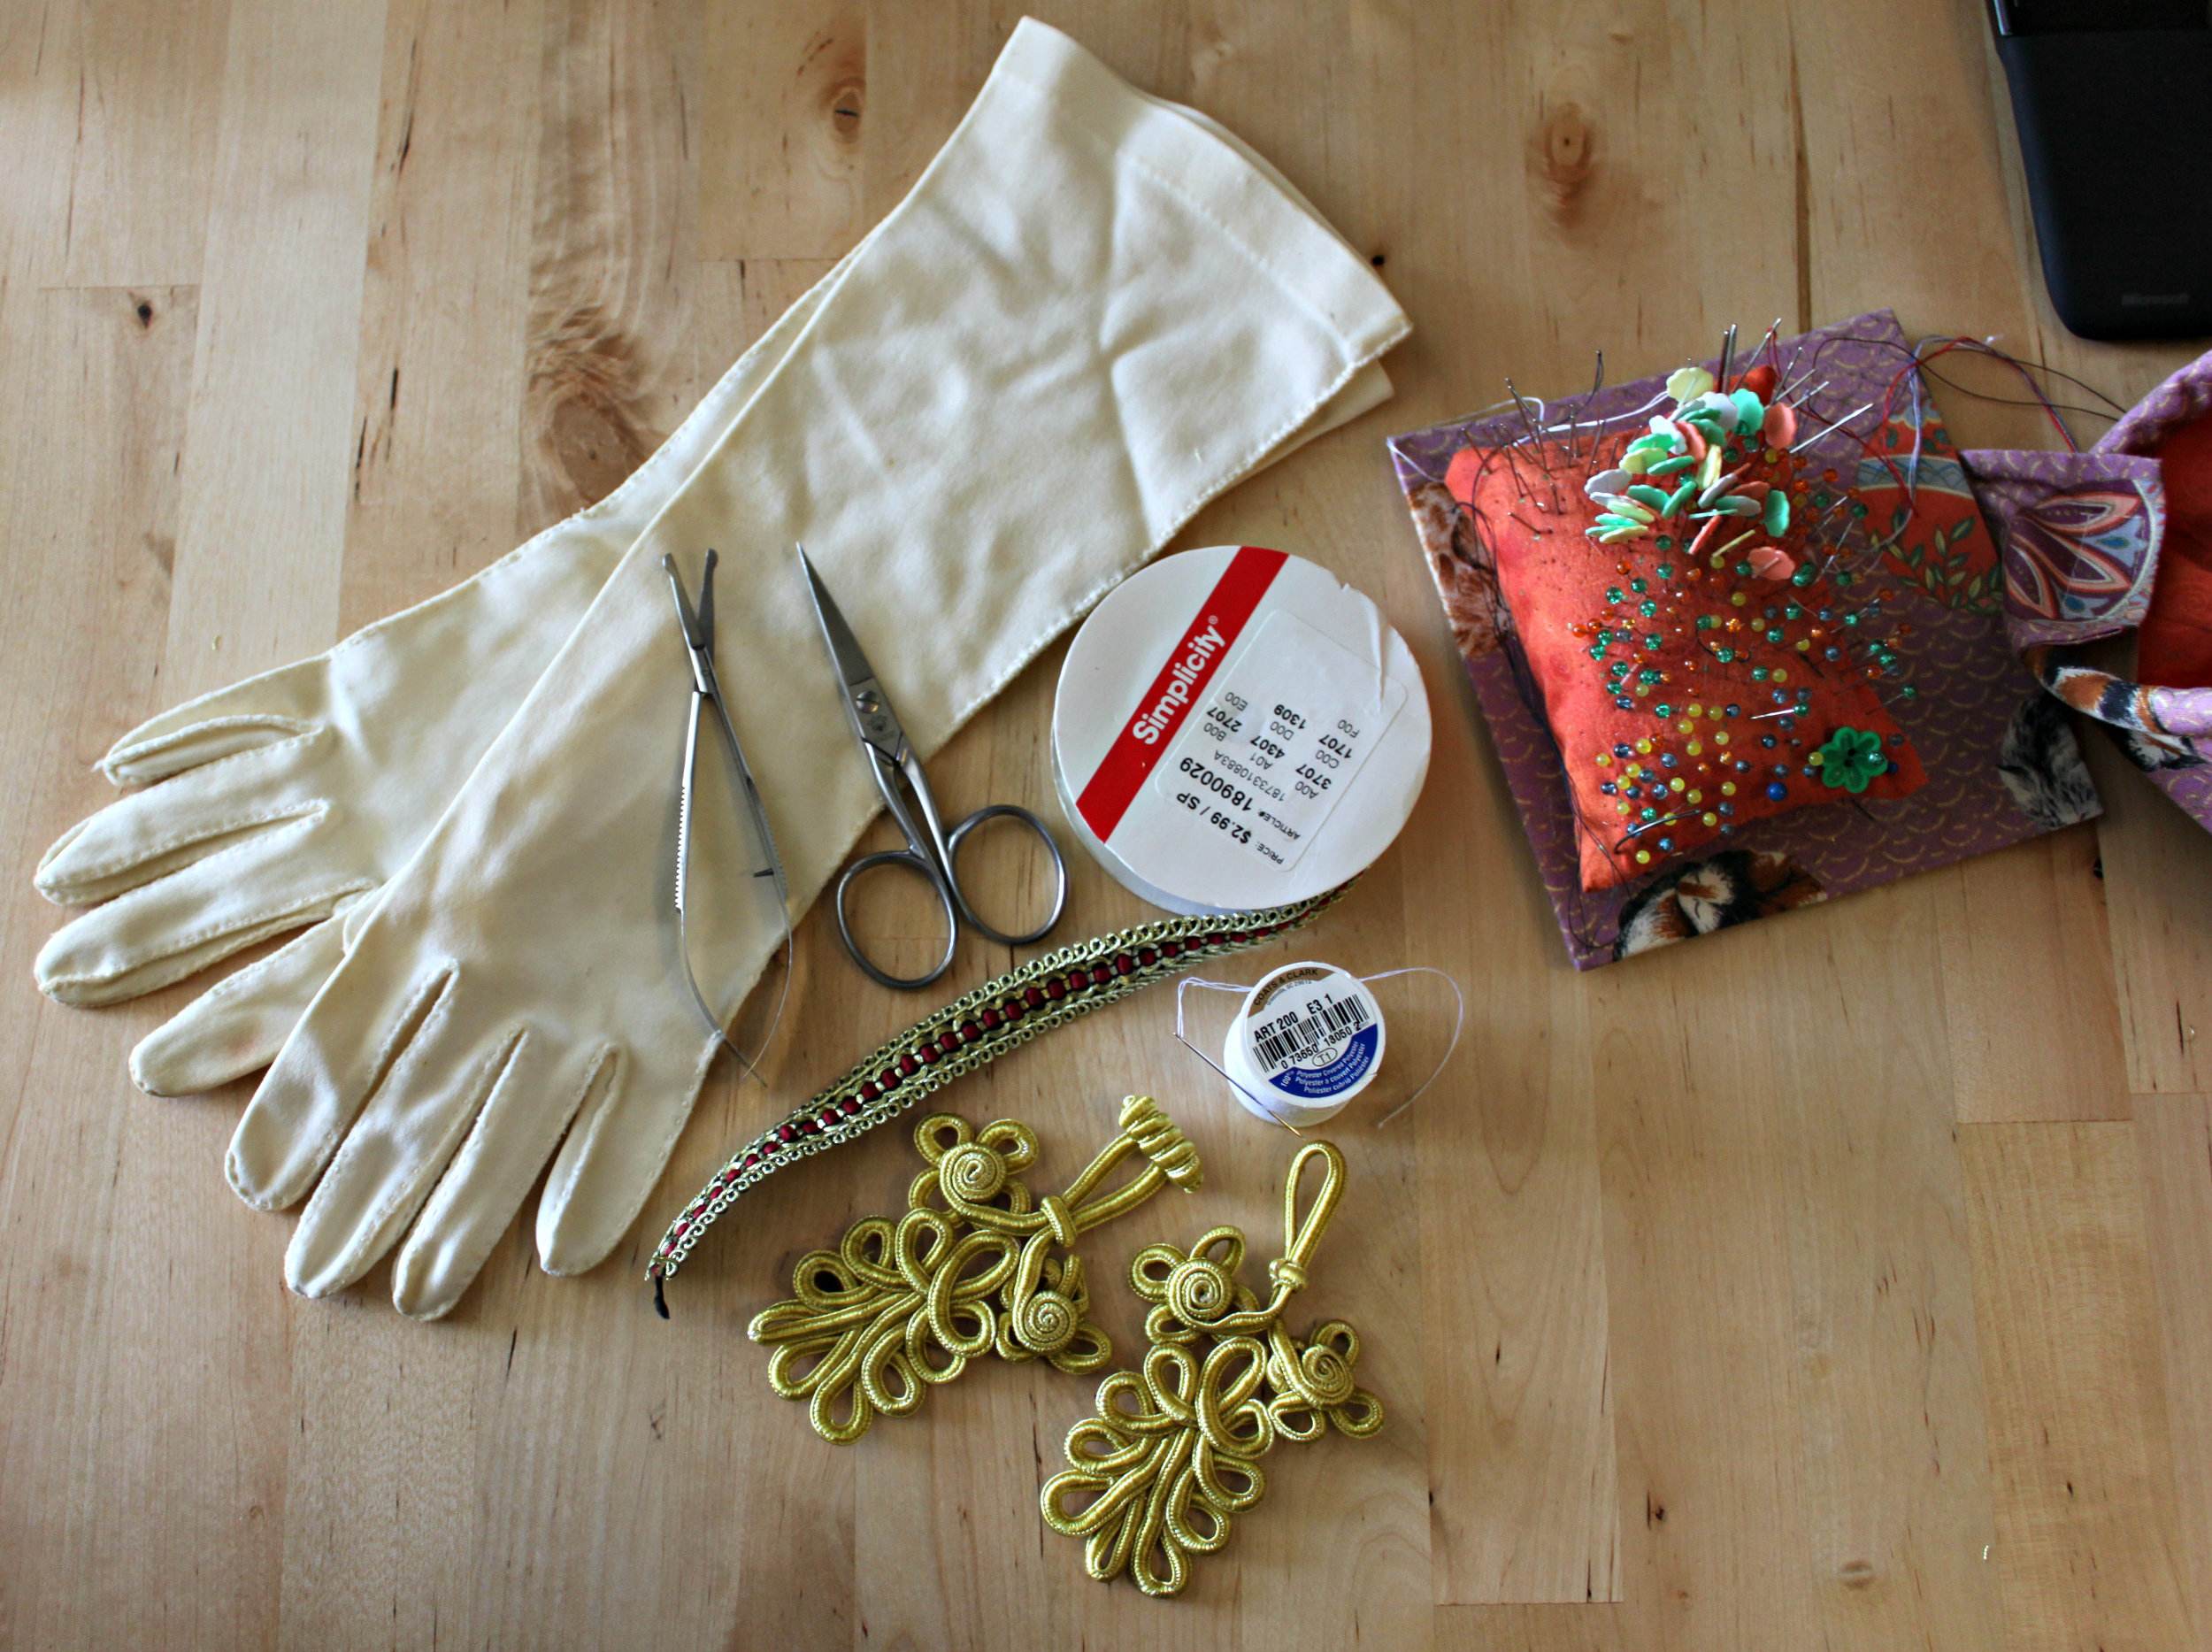
IMG_3415

  • Pair of gloves
  • Scissors
  • Needle & Thread (the thread should match the color of your gloves)
  • Pins
  • Decorative ribbon (I purchased mine from JoAnn's for just $2.99)
  • Embroidered Ribbon Clothing Toggle (you can find these in any sewing or fabric store in the belt & fasteners aisle)
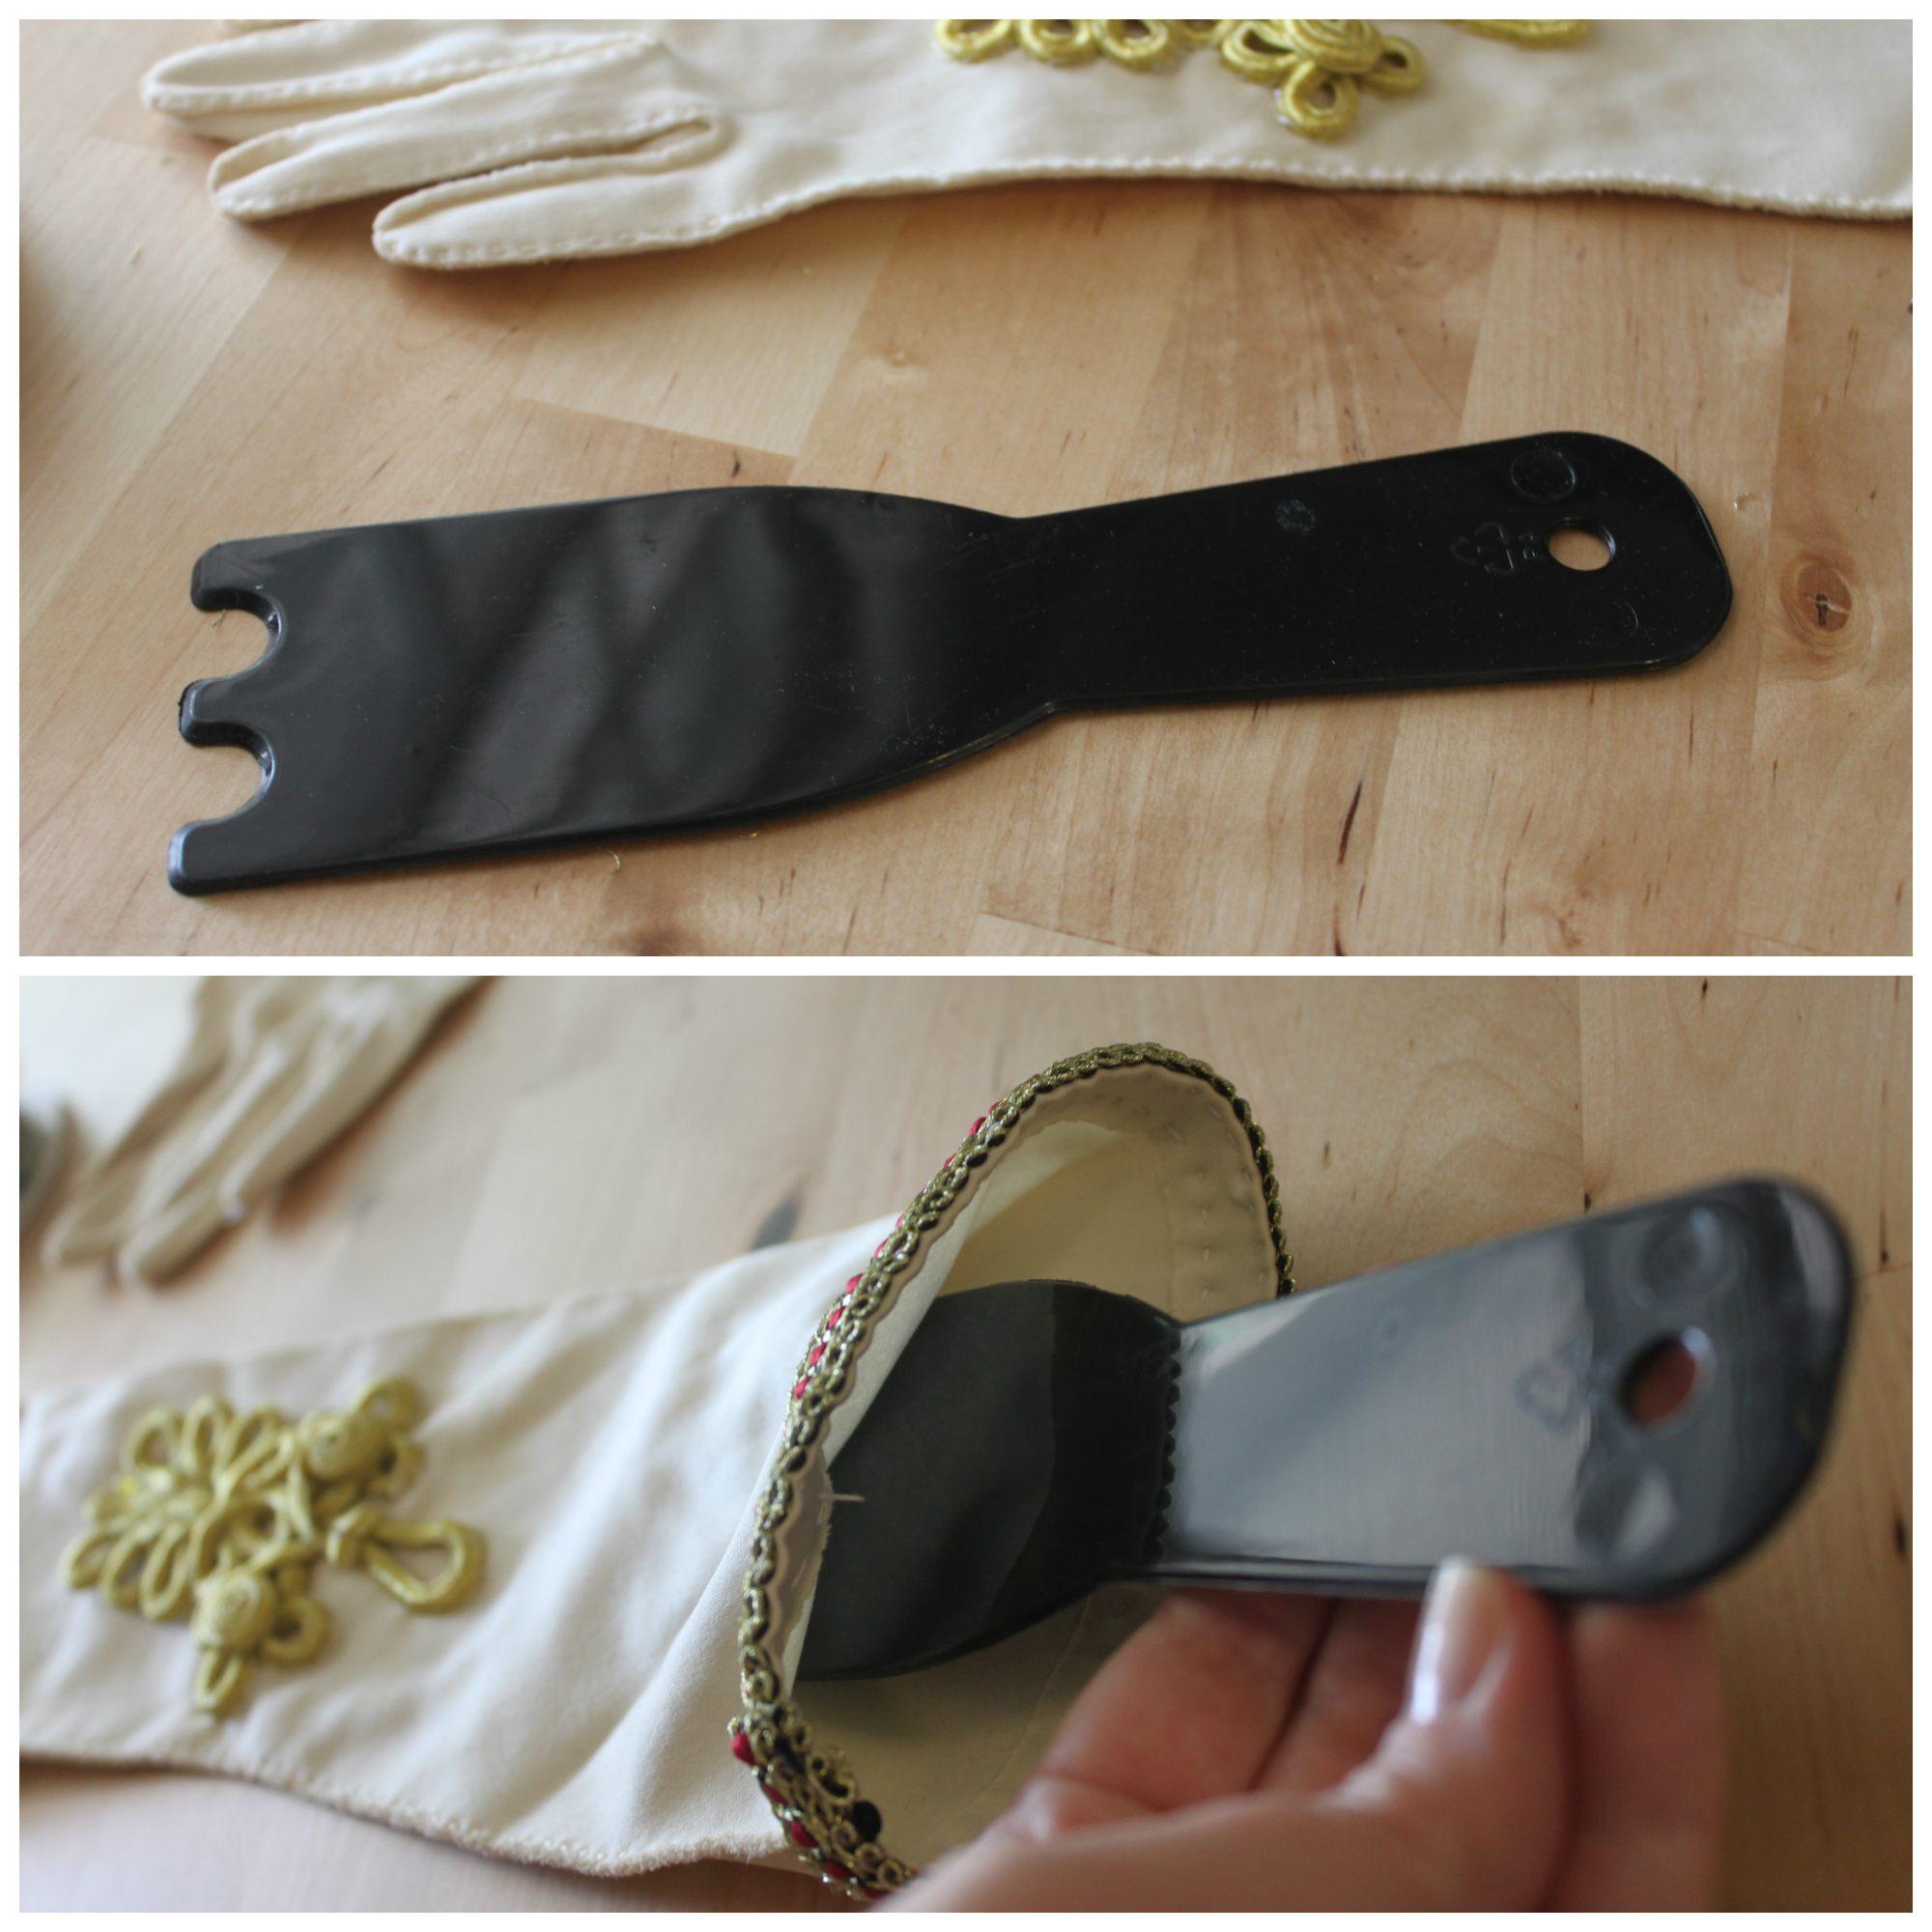
  • Piece of plastic that fits inside your gloves (You may need to get creative with this supply--I used a kitchen utensil. You want something that will fit inside your glove & is preferably plastic so that you don't sew through both sides of your glove when attaching the clothing toggle. Plastic is smooth and so your needle will slide once it hits it)

Steps:

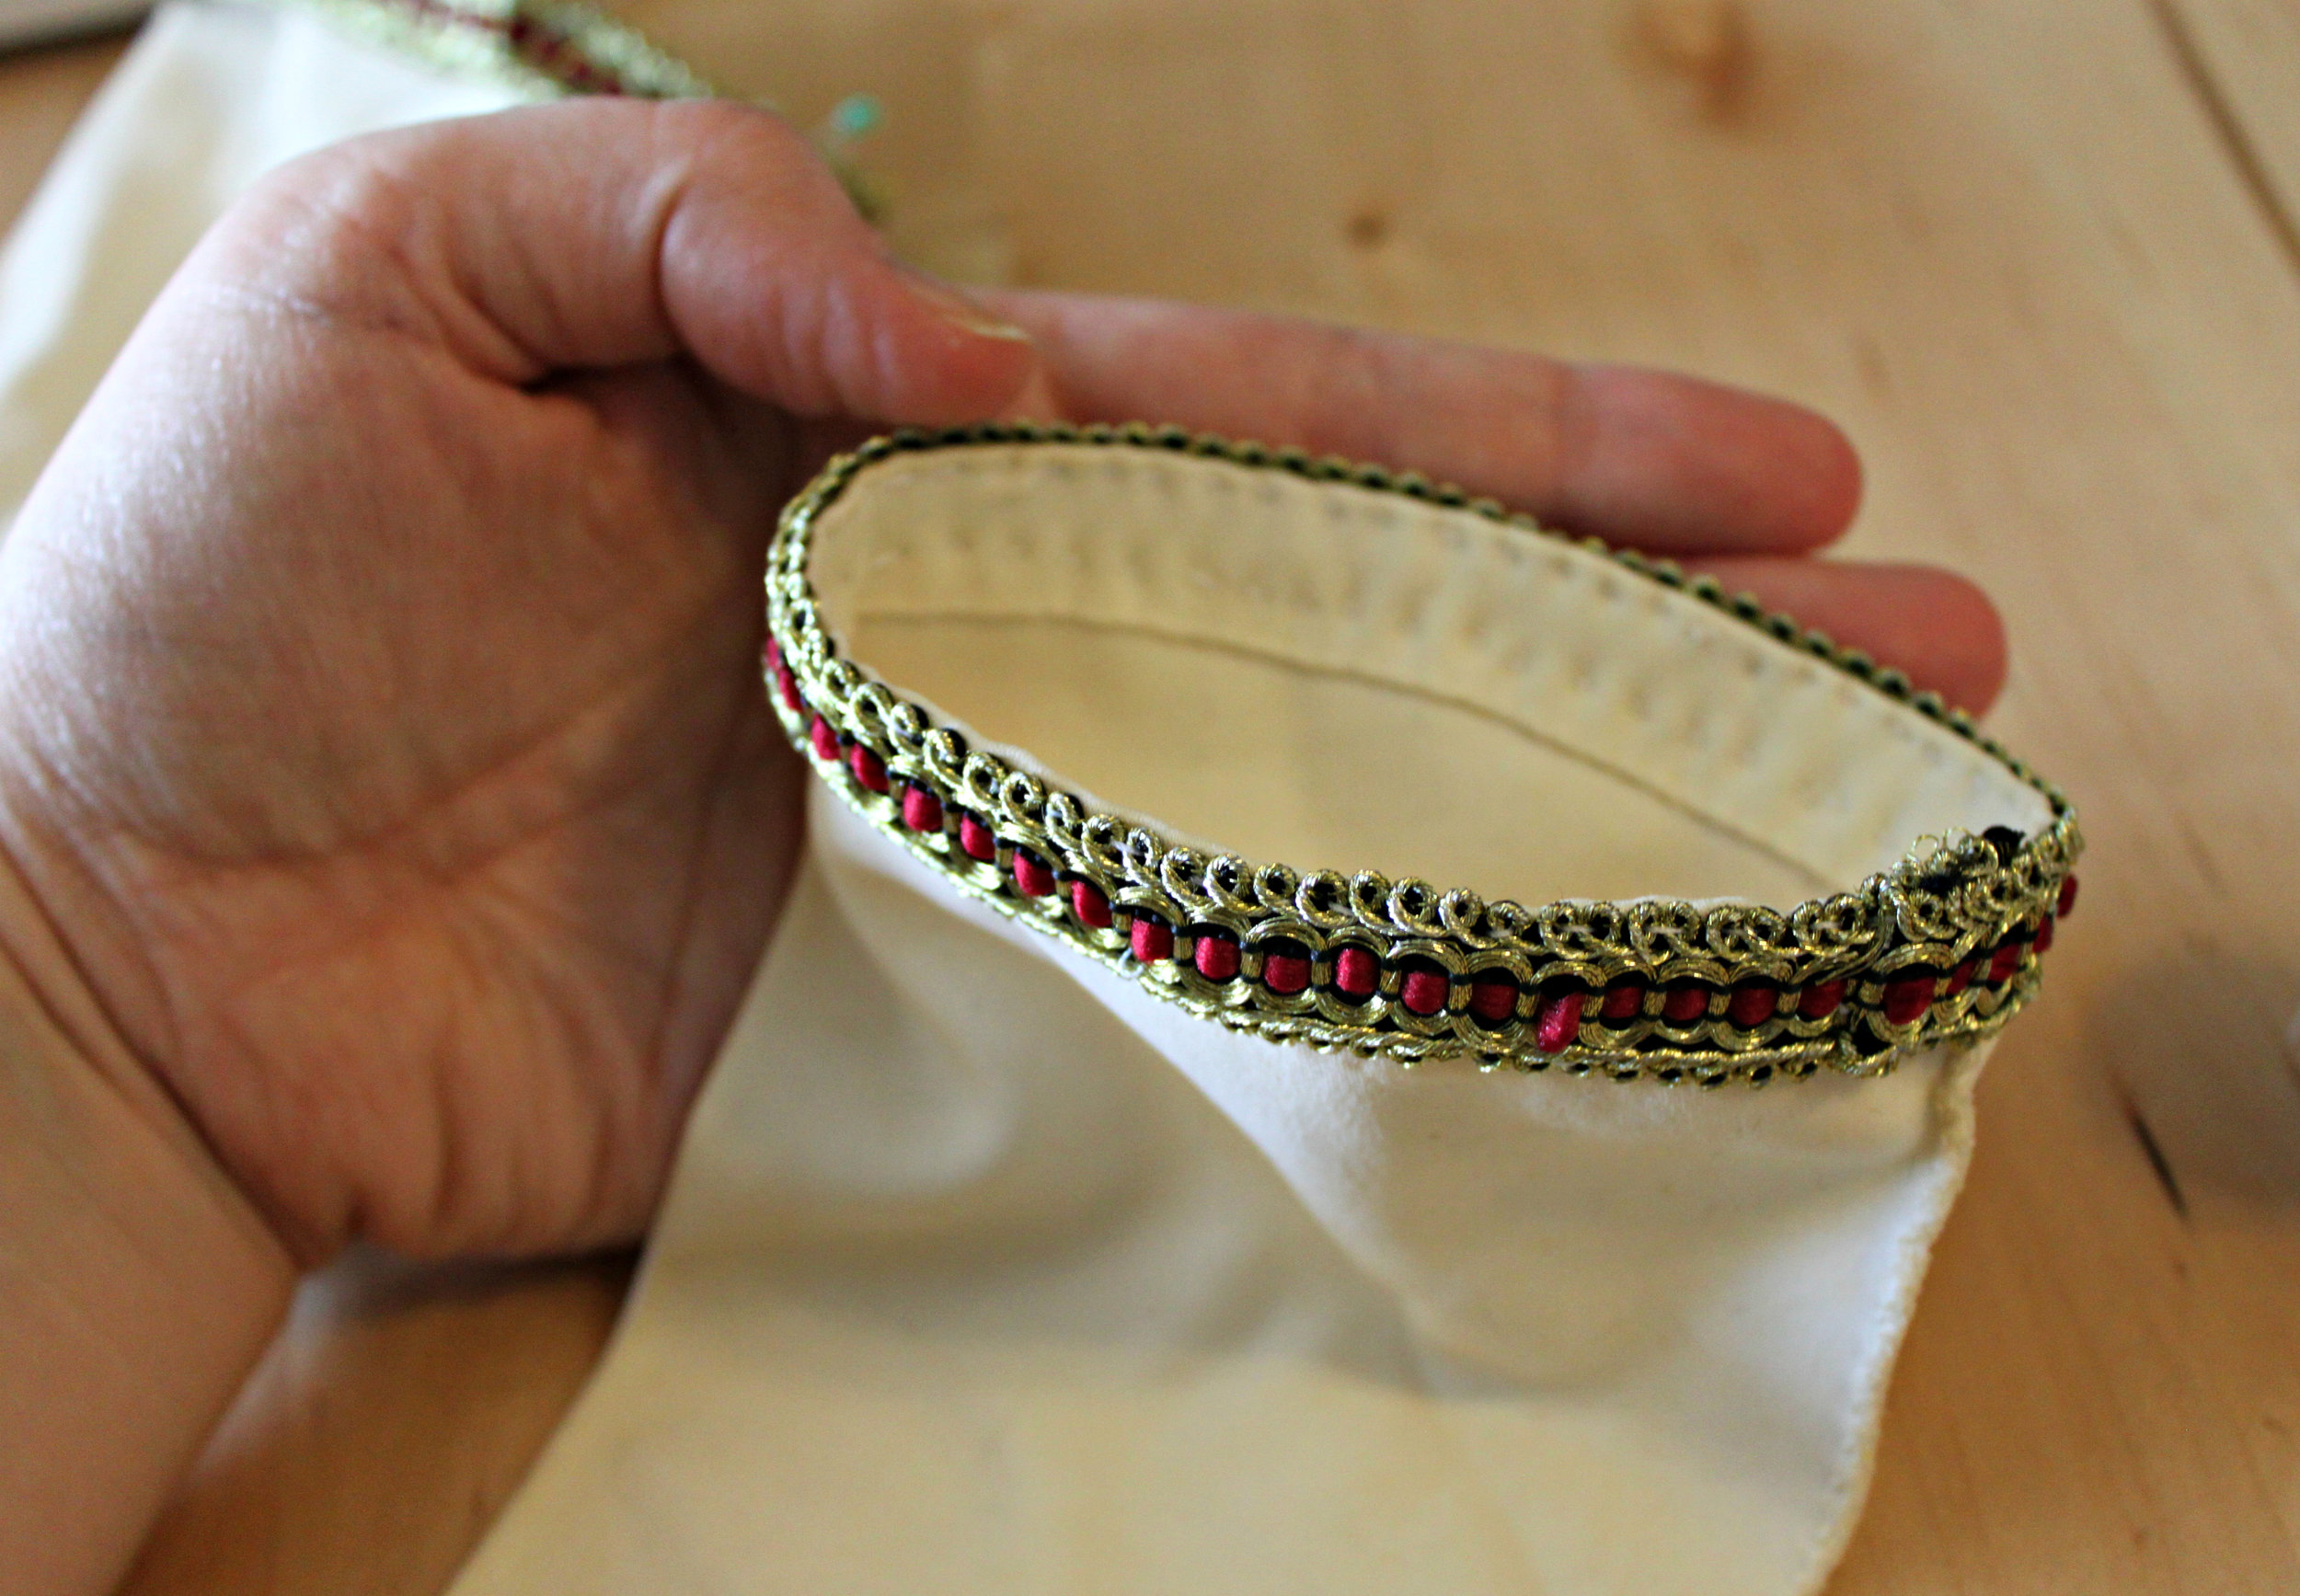
  1. Begin by pinning your decorative ribbon in place. To ensure that you place your ribbon evenly, line up the edge of your ribbon with the edge of your glove. Also, to hide your seam, begin pinning your ribbon on the part of the glove that will be closest to your body. Leave 1/4 inch of extra ribbon at the end. Fold this extra 1/4 inch of ribbon under & be sure that it covers up any raw edges. Pin in place.IMG_3416
  2. Using your needle & thread, sew your ribbon onto your glove. Any style of stitch will do. Be sure to keep your stitches neat & even. (Also, try to hide your stitches in the pattern of your ribbon or use a matching thread.) Remove the pins as you go.IMG_3419
  3. Repeat Steps 1 & 2 for the other glove. IMG_3421
  4. Next, put on the glove and determine where you would like to place your embroidered ribbon clothing toggle piece. (Do not pin the piece in place while you are wearing the glove...unless of course you want the Halloween gore to be real.)IMG_3422
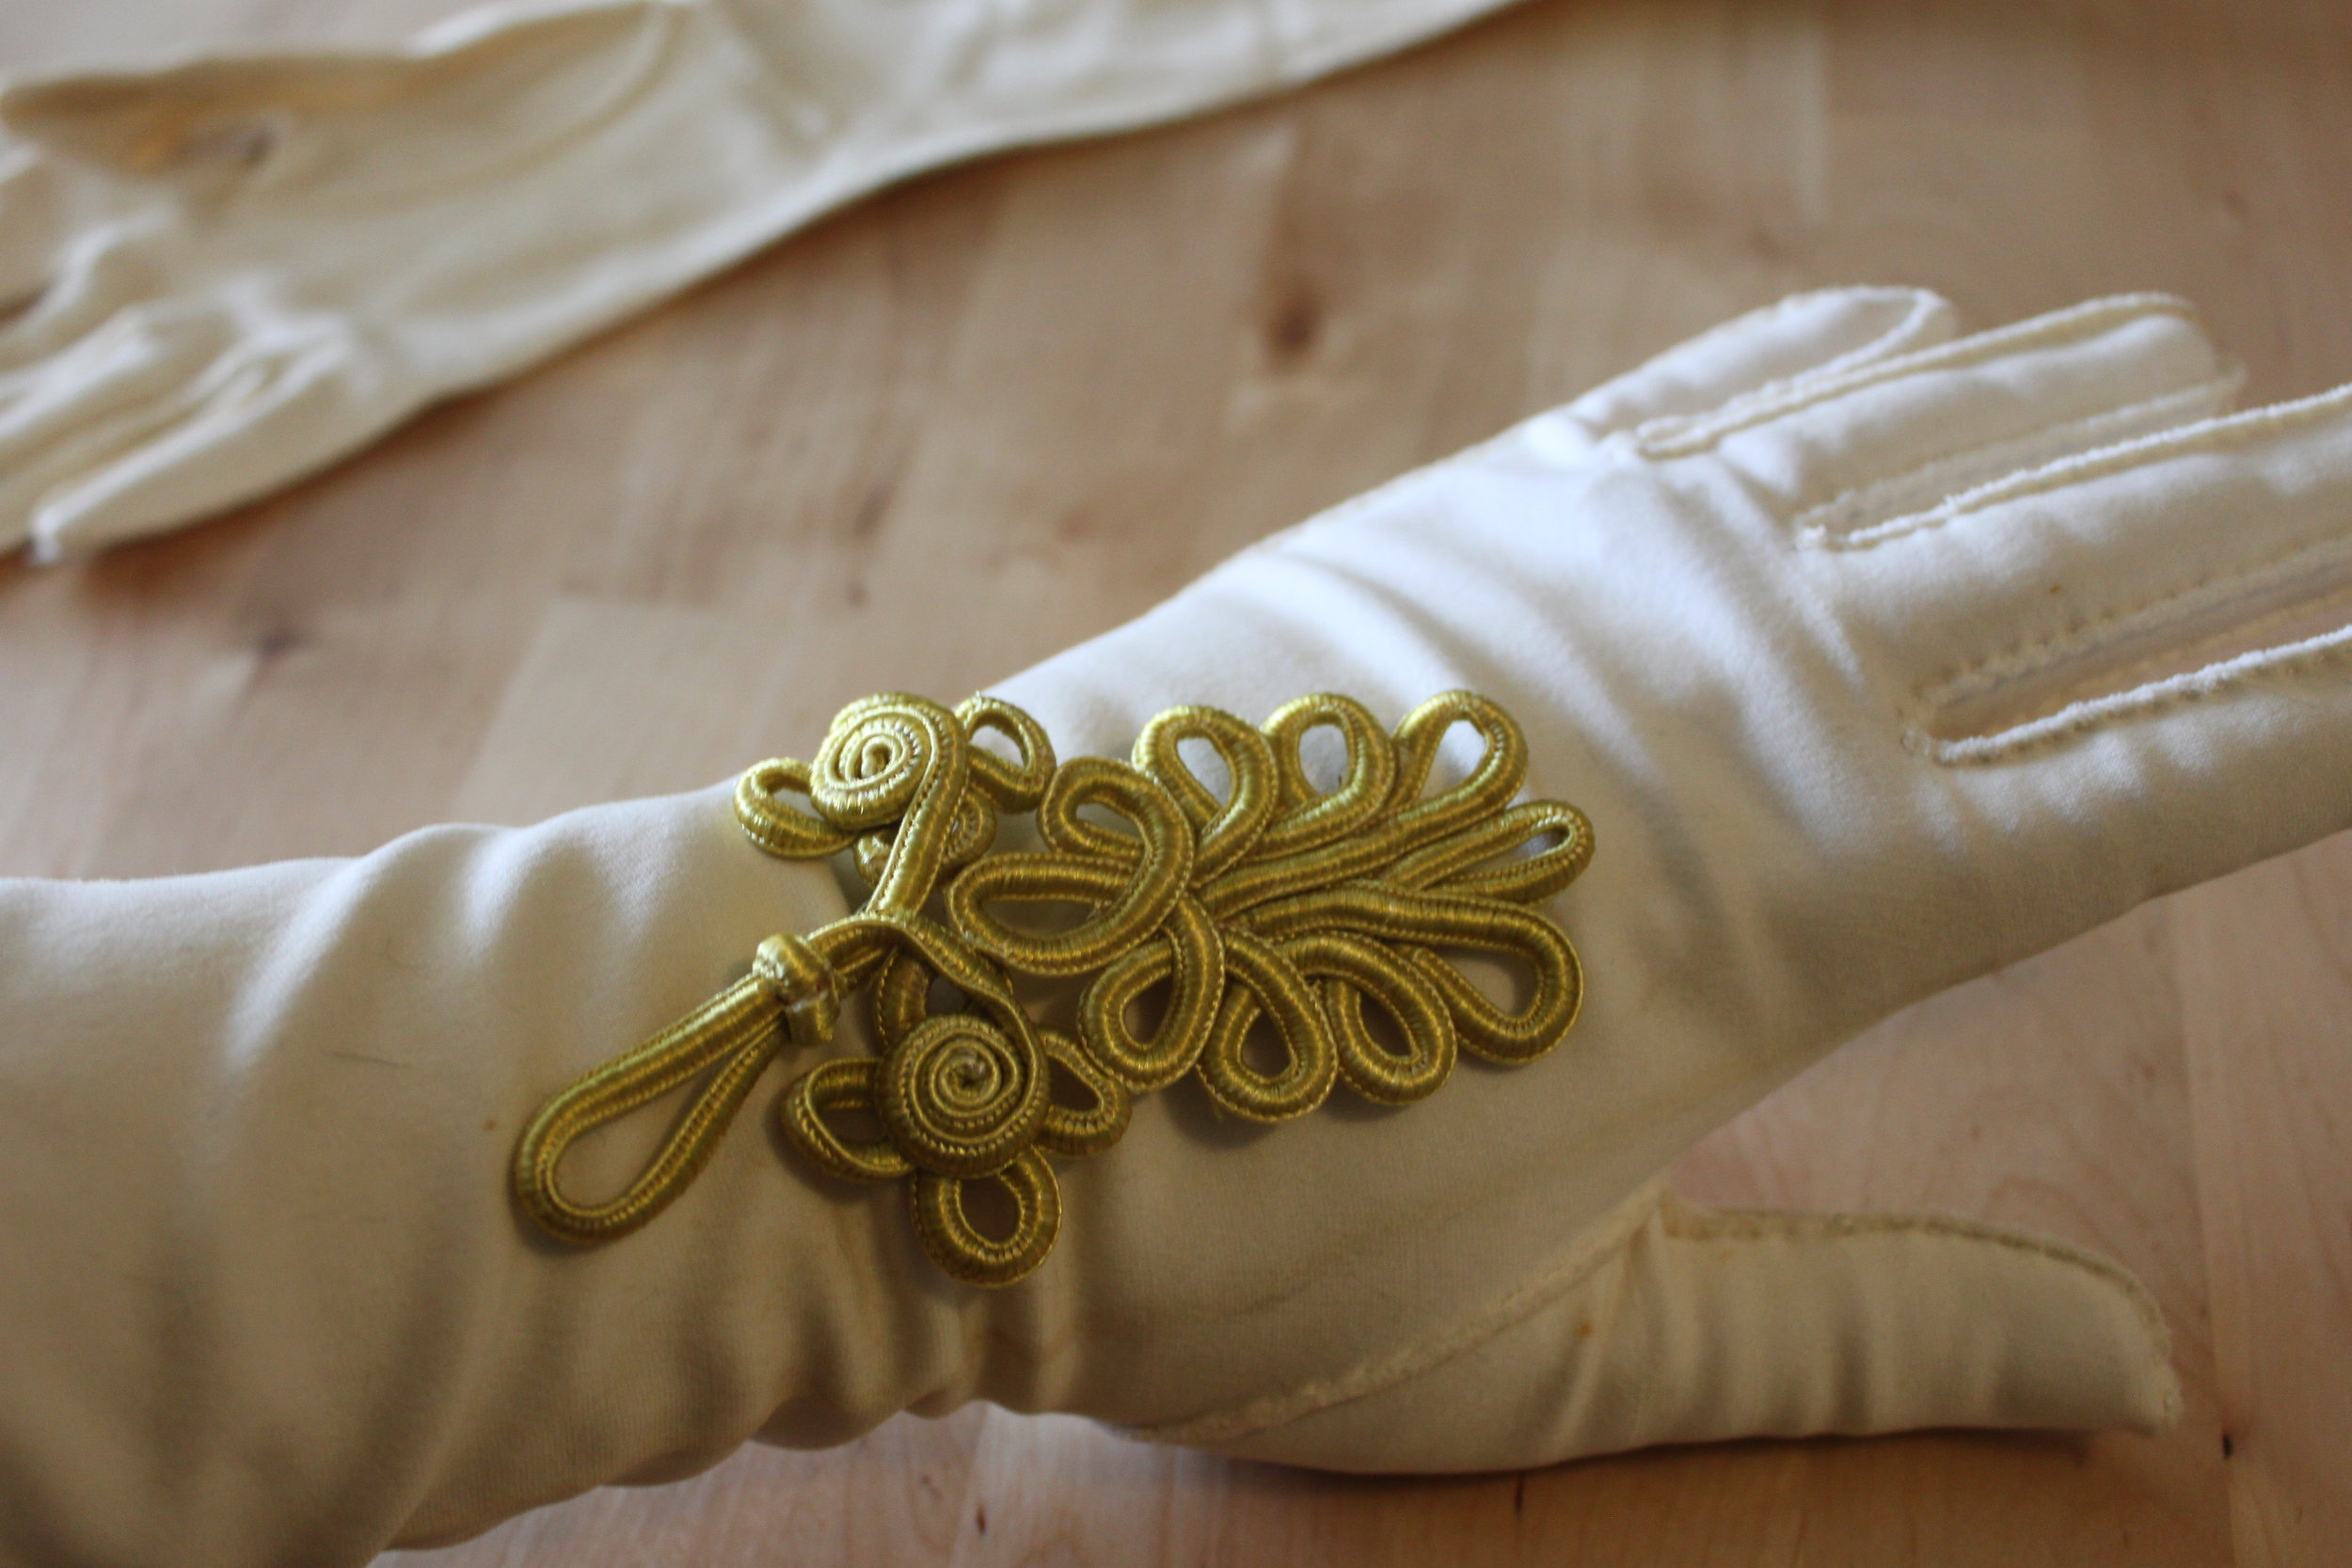
  5. After removing the glove, pin the toggle piece in place.
  6. Before sewing, insert the piece of plastic into your glove. This will ensure that you do not sew your glove shut/together. PicMonkey Collage2
  7. Using your needle & thread, sew your toggle piece to your glove. The best stitches to use are: slip stitch, blanket stitch, or an oversewing stitch. PicMonkey Collage
  8. Repeat Steps 4-7 for the other glove. IMG_3430
  9. Now your gloves are like new! Hope they'll keep you warm & feeling fancy this Halloween! IMG_3444

As always, Merry Making! Check back again soon for more Steampunk Halloween Costume DIYS--I have 3 already in the works on how to steampunk a mask! IMG_3436

DIY Steampunk Medals

D-I-Y-Samantha Extance1 Comment

Steampunk Medal DIY CollageMake your own steampunk medal! A perfect, easy addition to any Halloween costume! Materials & Tools Needed:

  • Medal Ribbon (any length you desire)
  • Bicycle Gear (from a cassette)
  • Pocketwatch part (preferably one of the cover pieces which are more ornamental)
  • Pin
  • Safety pin
  • EE3000 or 5000 glue
  • Needle & Thread (if you prefer to hand sew) or Sewing Machine (which I'd suggest)
  • Scissors

Steps:

  1. Cut ribbon for the medal.
  2. Place your bike gear in the middle of your ribbon.
  3. Grab your pocketwatch part (the piece I used is the cover which you can detach by removing the hinge pin which attaches the cover to the rest of the watch).
  4. Glue a pin to the back of your pocketwatch part with EE3000 or 5000 (or another kind of glue that fuses to metal).
  5. Fold your ribbon (lining up the 2 ends evenly).
  6. Fold over the top of your ribbon (toward the back side of your medal ribbon). Place your safety pin inside the fold.
  7. Sew (by either hand stitching or machine sewing) along your fold. Be sure to stitch and back stitch if you are using a sewing machine.
  8. Cut off the excess thread.
  9. Pin your pocketwatch part to the front of your ribbon.

You're finished! Wear with pride!


DIY Steampunk Gun Holster

D-I-Y-Samantha Extance1 Comment

For those who know me, my fetish for hip holsters (regardless of who's wearing them--men & women alike are somehow more attractive to me with a hip holster strapped around their waist & leg-I blame Han Solo for this) but I digress. I've always wanted a hip holster and this Halloween I was determined to steampunk one of my very own. IMG_9234Steampunking on a budget can be tricky and oftentimes we have to sacrifice quality for fit. I found a really great holster for 9.99 at a local Halloween store. It was imitation leather, but that worked to my advantage. I was able to easily manipulate the fabric and sew on accessories. IMG_9196So let's get started! Here's what you'll need:

  • Imitation leather gun holster (sourced from your local Halloween store; mine is a kid's Indiana Jones holster--very appropriate, since I seriously love both Solo & Dr. Jones!) Mine came with a gun too; if yours does not, then you will need to purchase a toy gun. Water guns make excellent steampunk guns when painted. Here is a DIY that I love on steampunking toy guns.
  • Needle & Heavy thread (to match your leather and preferably, the kind used for coats)
  • Long Springs (upcycled from a local flea market)--You can substitute any straight metal material here: wire, typewriter keys, or even chain
  • Medium Grandfather clock gear (or reproduction gear)
  • 2 large jump rings (and flat nosed pliers)
  • 15-20 small Clothing Snaps (sourced from flea markets, but you can also go to any Fabric or Sewing store)--Mine are black, but you can also use silver
  • 1 large Clothing Snap (optional)--I used mine to disguise the modern plastic snap on my holster. You could also substitute an ornate button here if you wish
  • 1 Long metal pin (optional)--This gives your holster a little feminine flair. Choose any pin or brooch you like.

Steps:

  1. Before sewing, lay out your springs on your holster & figure out their placement. I wanted mine to create a striped pattern so I spaced them a 1/4 inch apart. Once you've got all of your springs placed, sew your springs onto your holster. Be sure to tie sturdy knots & cut off any excess thread. Hide all of your knots on the inside of your holster. IMG_9198(Side note: I wanted one of my springs to curve a bit, and so I placed a couple of stitches in the middle of the spring so that it would keep a curved shape.) holster sew collage
  2. Place your pin above your springs. A large, long pin works best because it covers the tops of your springs. IMG_9213  IMG_9216
  3. Next, sew on your clothing snaps. Sew them in a pattern that you like. I alternated larger & smaller clothing snaps for a more textured look. IMG_9217    IMG_9224
  4. If desired, sew on your large sewing snap or button (over the holster's plastic snap to hide it). This step is optional. IMG_9226
  5. Last, using your flat nosed pliers--attach your gear to your pin with your 2 jump rings.IMG_9228        IMG_9233Now hook to your belt & rustle up some trouble like the airship cowgirl (or cowboy) you are!

Halloween Steampunk Costume CollageHave a Happy Halloween everyone!


My Booth at Springfest

ShowsSamantha Extance3 Comments

I set up at Springfest this year--thank you to everyone who came out--and got the chance to show off my new displays. (The DIYs of which you can find here, and here, and also here). I am incredibly proud of my booth display as I put a lot of thought behind it. So whenever someone gets excited about it too or oohs and ahs over it I feel a sense of accomplishment at having successfully transported them (even if only for a moment). IMG_7360

The light from the window created a soft Spring glow and it shone brilliantly on the metals of my table.

IMG_7349This inkwell, which I purchased from one of my favorite antique & junk shops in Tulsa--Delman's on 15th street--is always a conversation starter. IMG_7357IMG_7351Shoe horns are among my favorite display objects because they are great for draping & showing off tiny, dainty, and intricate pieces.IMG_7348Among my display pieces are a number of tools--like my old drill, jeweler's anvil, wrench, and blade sharpener. Many men (and tough tomboys & tinker-type ladies too) who might normally pass by a jewelry booth without giving it a second glance--stop by.

I have a lot of fun setting up my booth because I know that throughout the whole show I will meet tons of new people (as well as see  familiar, friendly faces) and stories will be exchanged sparked by the various objects in my booth.

For those of you who have your own crafty business and are looking for more information & inspiration on how to create booth displays & how to set up for a show--check out my friend Jill's (of Favoring Brave) new website: CraftFairology! I'll be guest posting one of these days I hope!

DIY Jewelry Display, Style No. 3

D-I-Y-Samantha ExtanceComment

If you have a steampunk crafty business, or perhaps an old-timey aesthetic, your booth should convey the feeling of your products. This is something I feel that I do quite well and I am quite proud of. Many people stop by my booth just to look at the curiosities inside. This is the last in a series of 3 blog posts on how to recreate 3 of my newest displays for yourselves! Too see Style No. 1, click here & Style No. 2, click here. For Style No. 3, read on!

Style No. 3IMG_7232

What You'll Need: 4 boxes (1 large and 3 small); 4 screws; drill & screwdriver; Murphy's Oil; medium-large cup hooks, as many as preferred; awl; 3 c-clamps; photo; shoe horn; decorative hook (mine's actually part of an old naval navigation piece); and decorative metal bracket

A Note on Where to Find Boxes: Flea Markets; Garage Sales; Antique Malls; and ReStores (which benefit Habitat for Humanity)--Look for sewing machine drawers & old produce crates especially. Avoid any boxes with mold, badly split sections of wood, or water damage. They will not be as structurally sound and may break with minor hammering.

Instructions:

  1. Clean your boxes with soap and water (be careful not to soak your boxes). Shine them with a little bit of Murphy's Oil. Let dry completely.
  2. Place your sewing drawers (or small boxes), hook/navigation piece and metal bracket where you'd like them. Mark with pencil where you need to screw your metal bracket in place. Also, mark the corners of your sewing drawers so if you choose for it to be removable you can place it back in the same spot. (I would suggest making your drawer removable because when you transport these kinds of displays, they can shift and it is much easier to adjust a c-clamp than having to re-screw the box on location).IMG_7230
  3. The Box that you want the hook/navigation piece on: Make starter holes where you've marked using your awl (for softer woods) or your drill (for harder/thicker woods). Then screw your hook/navigation piece in place. Set aside.IMG_7235
  4. The Box that you want the decorative metal bracket in: Repeat step 3.IMG_7223
  5. Clamp your sewing drawers in place using your c-clamps. IMG_7233
  6. Make starter holes for your cup hooks and then screw your cup hooks in place to hang your jewelry off of. IMG_7227
  7. Place your shoe horn in the bottom box (optional). IMG_7234
  8. Place the photo in your bottom box (optional).
  9. Hang your product proudly inside!IMG_7251

DIY Steampunk Jewelry Display, Style No. 2

D-I-Y-Samantha ExtanceComment

If you have a steampunk crafty business, or perhaps an old-timey aesthetic, your booth should convey the feeling of your products. This is something I feel that I do quite well and I am quite proud of. Many people stop by my booth just to look at the curiosities inside. This is the second in a series of 3 blog posts on how to recreate 3 of my newest displays for yourselves! Too see Style No. 1, click here. For Style No. 2, read on!

Style No. 2IMG_7219

What You'll Need: 2 boxes (1 large and 1 small); 2 screws; drill & screwdriver; Murphy's Oil; medium-large cup hooks, as many as preferred; awl; c-clamp; and decorative metal bracket

A Note on Where to Find Boxes: Flea Markets; Garage Sales; Antique Malls; and ReStores (which benefit Habitat for Humanity)--Look for sewing machine drawers & old produce crates especially. Avoid any boxes with mold, badly split sections of wood, or water damage. They will not be as structurally sound and may break with minor hammering.

Instructions:

  1. Clean your boxes with soap and water (be careful not to soak your boxes). Shine them with a little bit of Murphy's Oil. Let dry completely.
  2. Place your sewing drawer (or small box) and metal bracket where you'd like them. Mark with pencil where you need to screw your metal bracket in place. Also, mark the corner of your sewing drawer so if you choose for it to be removable you can place it back in the same spot. (I would suggest making your drawer removable because when you transport these kinds of displays, they can shift and it is much easier to adjust a c-clamp than having to re-screw the box on location).IMG_7230
  3. Clamp your sewing drawer to your large box with your c-clamp.IMG_7241
  4. Next,  make starter holes in your large box for your screws. If your box is oak or another hard wood use a drill rather than your awl. And vice versa for a more pliant or less sturdy wood.
  5. Affix your metal bracket to your large box with your screws.
  6. Last, make starter holes on your display where you'd like to place your cup hooks. Screw your cup hooks in.IMG_7227
  7. Hang your jewelry with pride!IMG_7251

DIY Steampunk Illumination, Live Demo

D-I-Y-Samantha ExtanceComment

I had so much fun Thursday morning on Great Day Green Country filming a live DIY! I made 2 versions of Steampunk Candle Holders (one for tea candles & one for candlesticks). They are easy, elegant, and cheap to reproduce (bet. $5-10 to make). In case you missed it, here it is! Enjoy! And as always, Happy Making! http://eplayer.clipsyndicate.com/embed/iframe?aspect_ratio=3x2&auto_next=1&auto_start=0&page_count=4&pf_id=9204&pl_id=26017&rel=3&show_title=0&tags=GDGC&va_id=3969819&volume=8&windows=1

Make your own Steampunk Valentine's Day Cards

D-I-Y-Samantha Extance6 Comments

I love Valentine's Day, mostly because it's one of the few times I see handmade cards exchanged. Here a a couple of DIY Stemapunk Valentine's Day cards that are easy & cheap to reproduce. As always, merry making! IMG_6737The Valentine's Day Magnifies My Love for You Card

  • Plain card & envelope (your choice of color)
  • Bakers Twine (your choice of color)
  • Small Magnifying Glass
  • Small Heart Stamp (or you can draw your heart)
  • Scissors, pink or red marker & Pen

Total Cost: approximately: $3.50

  1. Using your pink or red marker color in your heart stamp and then place the stamp firmly onto the middle of your card. If you are drawing your heart, draw it in the center of your card. Be careful not to draw your heart larger than your magnifying glass. IMG_6733
  2. Place your magnifying glass on the card over your stamped/ drawn heart. Make two tiny dots with pen on both sides of the magnifying glass. This tells you where to poke holes in the card. You want your holes to be close to your magnifying glass's hook or ring.
  3. Poke out your holes where you've already marked. IMG_6735
  4. Cut a length of bakers twine (approximately 1 inch) and thread it through your paper so that both ends meet at the front of your card.IMG_6734
  5. Next thread the twine through your magnifying glass's hook. The twine on the left should thread to the right and vice versa.
  6. Tie a knot securely on the front of the magnifying glass's hook. And then tie a decorative bow. Cut off any excess twine.
  7. Last, write your message & the card's quirky phrase: "Valentine's Day magnifies my love for you."

The You Really Get My Gears Going Card

  • Plain card & envelope (your choice of color)
  • 3 gears (I used reproduction gears which you can purchase at Michaels in their jewelry section)
  • 3 brads (also available at your local craft store in the scrapbooking section)
  • Scissors & Pen

Total Cost: approximately $1.75 IMG_6745

  1. Place your gears on your card. Figure out which placement you like best.
  2. Once you've got your gears where you want them, mark the center of each gear with your pen. A small dot will do.IMG_6740
  3. Next, poke holes in your card with your scissors. Be sure not to make a large hole, a small one is sufficient. IMG_6741
  4. After you've finished making all of your holes, affix each gear to the card with a brad. To do so, place your gear (face up) onto your bard and then through your card. Place your thumb over the brad to hold it firmly in place and pry the brad's 2 metal prongs out. Repeat for each gear.IMG_6742
  5. Last, write your message of love and the card's fun little phrase: "You really get my gears going."

The You are the Gear that Keeps my Heart a Pumping Card

  • Plain card & envelope (your choice of color)
  • 1 gear (I used a reproduction gear which you can purchase at Michaels in their jewelry section)
  • 1 brad (also available at your local craft store in the scrapbooking section)
  • A Heart Stamp (or you can draw your own heart)
  • Scrap piece of paper (to stamp the heart on)
  • Scissors, pink or red marker & Pen

   Total Cost: approximately 80 centsIMG_6753

  1. Stamp (or draw) the heart  onto your scrap piece of paper. Once you are done, cut it out. Poke a hole in the center of your heart using your scissors. Set aside.
  2. Poke a small hole in the center of your card.
  3. Next load your brad with the following (in this order): heart cut out, gear, and card. IMG_6754
  4. Close the brad by placing your thumb over it to keep it firmly in place and pry the brad's 2 metal prongs out.
  5. Last write your message of affection and the card's fun phrase: "Happy Valentine's Day" and "You are the gear that keeps my heart a pumping."

The I Only Have Eyes for You Card

  • Plain card & envelope (your choice of color)
  • Glasses (just the front piece of the frame, or  a monocle would work too)--local thrift stores have tons of old frames so check them out first if you don't have a broken pair lying around the house
  • Embroidery thread & needle
  • An "XOXO"  Stamp (or you can  write "XOXO" yourself)
  • Scissors, pink or red marker & Pen

                                  Total Cost: (depends entirely on the glasses you chose and their cost) for mine, $8.00 IMG_6748

  1. Place your glasses on your card.
  2. Once you're happy with the placement of your glasses color one half of your "XOXO" stamp with your pink or red marker (so only one "XO"). Flip up your frame and stamp the "XO" where the lens is on your card. Repeat for the other lens. IMG_6746
  3. Next, thread your needle and secure your eyeglasses frame to the card by threading it through available holes. Be careful to keep your stitches neat, small, and close. Knot on the back side of your card. Repeat for another hole on your eyeglasses frame. You should stitch your frame securely in at least 2 places.
  4. Last write your message of adoration and the fun little phrase: "I only have eyes for you."

Have fun telling those you love just how much you love 'em. If you want more ideas for DIY Valentine's Day Cards check out my post from last year where I use upcycled items readily available around your home.

Steampunk Home Decor: Silhouette Pictures

D-I-Y-Samantha ExtanceComment

Steampunking your home can be a little pricey--especially if you are searching for antiques & oddities to display throughout; however, that doesn't have to be the case. Here is a simple DIY that can give your walls a little whimsy. Now, let's get creative! Here's what you'll need:

  • Oval picture frame & mat (I purchased mine from Michaels when they had a frame sale, full price this frame is $19.99)
  • Felt (1-2 pieces), the felt I choose had an ornate pattern which made it appear like leather. I recommend using a patterned felt to create your silhouette because it offers up another element of texture (.79 cents ea, $1.58)
  • 1 piece of Scrapbook paper (any color/pattern of your choosing) Personally, I love DCWV (they even have Steampunk scrapbook paper) (1 sheet, $1.00)
  • Tacky Glue
  • Scissors
  • Exacto Knife
  • Paper & Pencil (for tracing)
  • Black Sharpie Maker (optional)

Total Cost (excluding tools): $20.99 (per silhouette)

Steps:

  1. After you've purchased your supplies, download  the silhouette head (or feel free to draw your own). Re-size it to fit your frame. This is how I re-sized my silhouette: I eye-balled it and enlarged the image on my computer. I then pulled out the stock photo from the frame and placed it over the silhouette on the computer screen. If your silhouette fits inside of the stock photo's parameters (with a little room left over for the embellishments [the hat, bubble pipe, etc.] you'll be making), then you can print your image. (If the silhouette doesn't fit, keep re-sizing your image.) Here is the silhouette template:  Steampunkin Template--BohemianRomanceSilhouette
  2. Once you've printed your silhouette, trace her onto the wrong size of your felt with your pencil. Remember your silhouette will be flipped (facing the opposite direction once you've cut her out and flipped the silhouette over).
  3. Now it's time to draw her embellishments. Draw on a hat, or a pipe with bubbles, or anything else you fancy! For more intricate embellishments, for instance, the microscope, it's better drawn on paper. Keep that in mind as you are drawing on your felt.
  4. Once you are done drawing & tracing, use your scissors to cut out your silhouette & embellishments. Set aside.
  5. Grab your stock photo from the frame and your sheet of scrapbooking paper. On the wrong side of your scrapbooking paper, trace the stock photo's oval outline. Cut out and set aside. If your stock photo sheet fills the whole frame, and is not just a photo taped to the mat, be sure to trace lightly the photo's outline (on the right side of your scrapbooking paper) so you know where to place your silhouette and embellishments.
  6. Next, glue your silhouette and embellishments in place on your scrapbooking paper. Let it dry for 5-10 mins.
  7. Place your scrapbooking paper in your frame and close.
  8. Hang on the wall and brace yourself for the flood of compliments you'll be getting! (People love whimsy!)

To make the Microscope (or any other intricate embellishment or prop):

  1. Find an image of the object you desire, in this case a microscope. Be aware of copyright. I used an image of a microscope from The Graphics Fairy. Her images are free for creative use (and she has a steampunk collections of images).
  2. Re-size accordingly (as detailed in Step 1 above).
  3. Trace from your computer screen (or you can print it and cut it out). I choose to trace the image so that I could use heavy cardstock which jams in my printer.
  4. Once you've finished tracing, cut out the image.
  5. Color (optional). I colored my microscope with a sharpie marker so that it would also look like a silhouette.
  6. Glue in place.

If you don't want to make one of your own, you can also purchase a print of either of my silhouettes from me on my Etsy shop (coming soon). Then assemblage is super simple, 1. Purchase 2. Pull out of package 3. Place in frame! For all the rest of you, Happy Making!

DIY Steampunk Curtain Ties

D-I-Y-Samantha Extance1 Comment

6 Different Steampunk Curtain Tie DIYS to subtly transform your decor! Materials & Tools are listed below by project. So let's get to makin'! Spring & Gear Steampunk Curtain Tie

  • 8-12 springs (depending on the thickness of your curtain)
  • Grandfather clock gear
  • Flat nosed pliers & jump rings

Steps:

  1. Link the springs together. (My springs are open ended, but if yours are closed ended connect your springs with a jump ring using your flat nosed pliers.) Link 4-6 springs together then add your grandfather clock gear.
  2. Next, add the remaining 4-6 springs to your gear & spring chain.
  3. Gather your curtain and place your spring & gear chain around it, connecting the two spring ends. (Again, mine are open ended so connecting them was simple; however, if your springs are closed ended, use a jump ring as detailed in Step 1.)

Skeleton Key & Chain Steampunk Curtain Tie

  • Skeleton key
  • Chain
  • 4 jump rings
  • Flat nosed pliers
  • Measuring tape
  • lobster claw or hook

Steps:

  1. Gather your curtain and measure out how much chain you need. Cut the amount needed.
  2. Add your lobster claw or hook to the end of your chain using a jump ring and your flat nosed pliers.
  3. Next, attach your skeleton key to your chain wherever you desire using your jump rings and your flat nosed pliers.
  4. Last, gather your curtain and place the chain around it and secure by connecting your lobster claw or hook to the last loop of your chain.

Ribbon & Gear Steampunk Curtain Tie

  • Ribbon
  • Grandfather clock gear
  • Needle & thread
  • Scissors
  • Clamp-hook
  • Measuring tape

Steps:

  1. Gather your curtain and measure its gathered width. Add a 1/2 inch. This width will equal the length of your ribbon.
  2. Cut your ribbon to your needed length.
  3. Next, fold one end of your ribbon around your grandfather clock gear. This is where your 1/2 inch allowance is used.
  4. With your needle & thread, sew the fold in place. Be sure to tie a sturdy knot. Cut off the excess thread.
  5. Place your clamp-hook on the other end of the ribbon.
  6. Gather your curtain once again and wrap the ribbon around it. Secure the tie in place by fishing the hook onto your gear.

Lightbulb, Velvet Ribbon & Gear Steampunk Curtain Tie

  • Velvet ribbon (or an old choker: if you do use an old choker you can skip ahead to Step 3)
  • Grandfather clock gear
  • Chain
  • Wire & wire cutters
  • Flat nosed pliers
  • Scissors
  • Measuring tape
  • Lightbulb or (lightbulbs)
  • 2 ribbon ends (or crimps)
  • 4 jump rings

Steps:

  1. Gather your curtain and measure its gathered width. Next measure your gear. Subtract your gear's width from your curtain width. This width is equal to the length of your ribbon.
  2. On each end of your velvet ribbon, place a ribbon end (or crimp) using your flat nosed pliers.
  3. Attach your gear to one end of your velvet ribbon with a jump ring using your flat nosed pliers. Set aside.
  4. For this step you'll need wire and wire cutters. Grab your lightbulb and begin wire wrapping its base. Be sure to create a loop so that you can connect the lightbulb (or lightbulbs) to your gear (and/or chain). Cut off excess wire.
  5. Connect your lightbulb to your gear using a jump ring and your flat nosed pliers (through the wire loop). Optional: you can attach another lightbulb to your gear. I suggest attaching the 2nd lightbulb to chain and then attaching the chain to your gear. It will give your curtain tie another added dimension.
  6. Last, wrap your velvet ribbon (or choker) around your gathered curtain and secure by connecting the loose end of your ribbon to the other side of your gear with a jump ring using your flat nosed pliers.

Clamp, Chain & Gear Steampunk Curtain Tie

  • C-Clamp
  • Grandfather clock gear
  • Chain (approximately 1-2 inches)
  • 2 jump rings
  • Flat nosed pliers

Steps:

  1. Attach your grandfather clock gear to the middle of your c-clamp with a jump ring and flat nosed pliers.
  2. Next, attach your chain to the bottom of the gear with a jump ring and flat nosed pliers.
  3. Attach the loose end of the chain to the hoop part of the c-clamp with a jump ring and pliers.
  4. Gather your curtain and hook your c-clamp around it. Last, clamp your curtain in place.

Clamp Simply Steampunk Curtain Tie

  • C-Clamp

Steps:

  1. Gather your curtain and position your c-clamp around it.
  2. Screw closed!

Enjoy your fabulous Steampunked Curtains!


DIY Steampunk Wedding Bouquet

D-I-Y-Samantha ExtanceComment

Materials & Tools:

  • Flowers, real or synthetic (your choice)
  • Floral wire (or any green colored wire) & wire cutters (or toenail clippers)
  • Needle & thread & scissors
  • Lace & ribbon (or you can choose any kind of fabric you'd like instead of lace)
  • clock gear
  • Pin


Steps:

  1. Arrange your flowers.
  2. Cut your floral wire using your wire cutters/toenail clippers. Wrap your flowers tightly with the wire to secure them.
  3. Measure your lace by wrapping it around your flowers' stems for your desired width/look. I wrapped the lace 2-3 times around the stems. Once you are done wrapping your lace tuck the end into the top of your lace. 
  4. Next, measure  the amount of ribbon you'll need to fit tightly around your bouquet. Be sure to leave yourself at least a 1/2 inch on one side for sewing the ribbon to your gear.
  5. Loop your ribbon through the gear. Sew your ribbon to your gear. Keep your stitches small and close. (You can also secure the ribbon to your gear with a hot glue gun.)
  6. Next, wrap the ribbon around your bouquet. Be sure to hold the gear in place in the front of your bouquet when you pull the loose end of the ribbon through the gear. Pin it in place with your pin (or hatpin). Cut off excess ribbon and tuck it under.
  7. Promenade proudly down the aisle!Variations:

Instead of a gear, maybe pin a cameo to your bridal bouquet. It's a romantic & nostalgic twist and yet is elegant & simple.

Or look for any other kinds of pins that you could attach to your fabric or lace that ties into your wedding's theme, your heritage, or your story as a couple. Here is another variation that combines both the cameo pin & clock gear, ribbon, and simple pastel pink fabric. It's more textured & intricate--offering a much more Stemapunk vibe.

This last variation is more simple than the above pictured cameo & gear bouquet & offers a hint of sparkle. Clip-on earrings are easy enough to find at vintage stores, flea markets, & estate sales which makes them even more appealing as materials for your bridal bouquet.

Happy Wedding Planning (or day-dreaming)!

D.I.Y. Steampunk Flower Vase

D-I-Y-Samantha Extance1 Comment

Here is a simple & elegant way to steampunk your dinner table or wedding reception--a clock part vase!

Materials Needed: Bud vase (or any glass or metal vase that fits inside your clock's mechanism), flowers & clock (or machine) part.

1) Fit your bud vase inside of your clock mechanism. (If you want to conceal the vase, choose a metal one that blends in with your clock part's metal. Also for another variation, you can use test tubes too & fix them throughout your clock's mechanisms for a wilder, more overgrown look). Fill with water.

2) Arrange your flowers!

And for a completely different look for your wedding or dinner table, you can either make paper flowers or purchase beautiful fake bouquets and splay them across your clock mechanism.

As always, Happy Making!