
Oklahoma 100 Mile Yard Sale. Mother-Daughter Road Trip. Happy Mother's Day!
Steampunk
Steampunk Hallow's Eve Party~Decorations (Re-blogged)
D-I-Y-3 CommentsHaving a Halloween party? Want to Steampunk it up? Here are a few ideas that won't break your wallet (gotta have money for all that candy right?)! Jars of candy are a given for any Halloween party--to add just a touch of mystery & oddness you can attach labels like the one below from VectoriaDesigns. They are much classier than your average Halloween labels, indicating the jar's contents are brains, zombie boogers, blood, etc. VectoriaDesign's labels, for instance, help set a Steampunk/Sci-Fi mood with labels like: Anti-Time Tablets, Steam Engine Oil, Octopus Ink, and my favorite Time Traveler Pills to name a few.

The labels are a digital download. Total cost: $3.50 label images (15 total), $11.99 label printer paper...$15.49
Another great digital downloadable decoration for your party are Victorian style paper dolls with a Halloween & Steampunk twist. My favorite paper doll artist is RhondasOrignials. Her dolls are by far the most unique and strikingly odd. She has over 50 paper dolls for Halloween alone. These dolls make excellent centerpieces for your table or to fill up empty space on your mantle or shelves.

What makes Rhonda's paper dolls so special is the accessories that come with each doll and the characters that she creates. You can download her dolls on her Etsy shop, click here to follow the link. Rhonda also has specials where she bundles a number of her dolls together for Halloween. The bundle costs $23.25 or you can purchase individual doll patterns for $6.00 each. The instructions on how to assemble your dolls is very easy to follow and the colors are true to how they print on your home printer. Total Cost: (for a bundle) $23.25, brads (found in your local arts & crafts store in the scrapbooking aisle) $1.39, Aleene's Tacky Glue $2.50...$27.14
Aside from digital downloads, hit your local flea markets, garage sales, and estate sales for old jars & bottles. You can fill these bottles & jars with an assortment of items to fit the mood of your party. Inkling for a bit of twisted romance, dry some red roses beforehand and place them in your jars for a pretty bit of decay to display or paint them black (how very Alice in Wonderland of you to do so!). Want your party to look like a Mad Scientists Laboratory, fill those jars up with an assortment of colored liquids & place glow sticks inside so that they give off an eerie luminescence. There's also my DIY on steampunk candles--they're perfect for a Hallow's Eve Bash!

There are other items you can make to give your party a steampunk feel. Craft recently posted a DIY on how to make your own miniature hot air balloon.

You can suspend them from the ceiling to give your party-goers the feeling that they are on an airship deck among the clouds--you can even make clouds! Click here to find out how!

If you do not have a specific steampunk theme in mind, you can be more general and decorate using broken machines, machine parts, clocks, and other mechanicals you may already have or ones that you can thrift. Great items to pick up: tea cups & saucers, china, clocks of any kind (you can line them all up on your mantle, table, or along your stairs), jars of light bulbs, globes or old maps, or springs (to make a garland to hang in your doorway or off your fire place).
These are just a few ideas to get you started! Stay tuned for the rest of October for my Steampunk Halloween DIY series and get ideas on steampunkins and how to make your own steampunk halloween costumes for adults & kids.
DIY Steampunk Monocle Bowler
D-I-Y-CommentA fun DIY for Halloween! Great for a steampunk Sherlock Holmes or Watson!
 This DIY is relatively simple though it can be expensive (if you can't find a bowler for cheap). Here's what you'll need:
Bowler hat (preferably thrifted); Thick Chain (I used 4 inches); Safety Pin; Needle & Thread; Ribbon (mine was ribbon made to look like measuring tape); Small leather pouch; Magnifying glass; Game Spinner; Clock Gear; Jumps Rings; Pliers; Scissors, an Awl; Pins; and a medium Bike Gear (from a cassette)
Steps:
- Measure the amount of ribbon you'll need to fit snugly around the base of your bowler hat. Be sure to leave at least a 1/2 inch on each side to fold over your bike gear. Once you've measured the amount of ribbon you'll need, cut it. Set aside.
- Pick up your leather pouch, using your scissors (or an exacto knife), cut 2 slits on the back of your pouch (about 1/4 inch from one another in the same direction--either horizontally or vertically), then thread your ribbon through the slits. Next, using your awl, poke a hole in the front of your leather pouch (so that you can affix your chain to the pouch with a jump ring). Using your flat nosed pliers, attach the chain and the magnifying glass with a jump ring. Optional, also add a game spinner and a clock gear with jump rings for further decoration.

- Next, thread your ribbon (with the right side facing up) through your bike gear's holes on one side. Pin in place. Hold your bike gear in place (where you want it situated on your bowler hat and then wrap the ribbon around the base of your hat. Thread the end of the ribbon through the bike gear and pin in place. When you are pinning your ribbon, be sure that you are only pinning the ribbon together and not the ribbon to the hat.

- Next, slide the ribbon off of the base of your bowler hat and sew the ribbon in place. Keep your stitches small and close together. Be sure to tie a sturdy knot and hide that knot on the side of the ribbon that will go against your hat (and therefore not be seen). Cut off any excess ribbon in the back. Repeat for the other side.
- Slide your ribbon down onto your bowler hat in place around the base. Place the magnifying glass inside the leather pouch and see how far the chain dangles off of the hat's brim. If desired, using your safety pin, pin the chain to the opposite side of your bowler hat's brim until you want to use the "monocle"/magnifying glass.

- Wear proudly!
 As always, happy crafting!


DIY Steampunk Halloween Candelabra
D-I-Y-CommentI love Halloween! It's a great excuse to go over-the-top and get a little campy. This year I made a cool Steampunk Candelabra that you could easily make for yourself. It's easy to make, relatively inexpensive (if you're making only one), and you can use either re-purposed materials or reproduction materials and the outcome is still impressively spooky! Perfect for any Halloween decor!
Materials & Tools:
- 2 bike gears, cleaned (free)
- 1 candelabra (I purchased mine from Michaels for 24.99)
- 2 skeleton keys (mine are fake metal keys, also purchased from Michaels in the dollar section: 4.00)
- Chain (1 pkg., 2.99)
- 4 large swivel hooks (1 pkg. of 4, 1.99) *Be sure to purchase hooks that are: easy to open (like a partial split ring) and large enough to fit around your candelabra's arm with enough space leftover to dangle your skeleton key comfortably
- Ideology brand reproduction gears (2 pkgs., 4.99 ea.)
- Jump rings
- 4 candlesticks (1.00 ea.)
- Wire cutters
- Flat nosed pliers
Note on the materials: You can use actual gears & keys that your re-purpose, but for those looking for a cheaper version reproduction gears & keys are fine too.
Steps:
- Measure the amount of chain you need by taking a piece of string and configuring it to hang in between your candelabra's arms. Keep in mind how far down you'd like your chain to hang. Cut and then measure against a ruler. You may even want to bring the piece of string with you to the store to purchase your chain.
- Cut your chain pieces using your wire cutters. You want 4 total.
- Once you've cut your chain, decorate it with your gears. To fasten a gear to a chain link, use your flat nosed pliers. Open a jump ring, load the gear onto it, and then load the chain link onto the jump ring. Close your jump ring. Do the "shake test" to make sure your jump ring is firmly closed. Repeat for all chain pieces. (I put 6 gears on each chain piece.) Once you are finished, set your chain links aside.

- Next, attach your large swivel hooks onto your candelabra's arms.

- After all of your hooks are in place, load your skeleton keys onto your swivel hooks.

- Once your keys are in place, attach your decorated chain pieces to the swivel hook with a jump ring. You are connecting your chain to one hook as well as the hook across from it. Repeat for each chain piece.

- Next, place your bike gears onto your candelabra. Mine fit comfortably over the middle candelabra arm and pedestal. Place yours where you like.


- Last, affix your candlesticks in their holders.


Steampunk Costume Ideas for Ladies & Lil' Ladies
InspirationCommentThe best part about making your own costume is that you have total aesthetic control. The greatest benefit to a handmade Halloween is that you are not inhibited by a limited selection (and do not have to weigh those unappealing options--like deciding between a slutty nurse costume or a ladybug for you or your child). It seems like most costumes these days for women fall into 2 categories: hyper-sexual or infantile. This is precisely the kind of social issue that drives the Take Back Halloween project. Take Back Halloween is a blog & website that offers up ideas on how to create costumes for women & girls that are not only imaginative, fun, and yes even macabre but empowering and inspiring. Their costumes are based on real women (a smattering of scientists, queens, explorers, and entrepreneurs) and also strong female figures from world mythologies. I've been a fan of their blog for some time, I find its dedication to positivity and multiculturalism refreshing and I wanted to share it with those of you who are figuring out what you'd like to be this Halloween.
Here are some Victorian women--who you could either emulate or steampunk (I offer a couple of steampunking suggestions for each lady)!
1) Ada Lovelace: Aristocrat Scientist & Daughter of Lord Byron

Steampunk Suggestions: "Nowadays she’s recognized as 'the world’s first computer programmer,'" drawing from this fact you create a cool accessory (a fan, necklace, or pair of earrings perhaps) out of an old computer circuit board or if you feel daring--a masquerade style mask made out of computer parts!
2) Carlota of Mexico: Renowned Beauty & Empress of Mexico

Steampunk Suggestions: Carlota was famous for her jewels and in fact Take Back Halloween points out that "(They’re still famous—one of her diamonds sold at auction in 2010 for 1.7 million dollars.)." Steampunking Carlota would be simple & elegant--painting gears over crystal glass beads (which you would then use to make a pair of dangly earrings) or a pearl necklace with a cog/gear pendant & pearl dangling from the bottom. If you feel particualrly adventurous, you might even create a cog & gear crown for yourself.
3) Emma Goldman: American Anarchist & Activist, nicknamed “Red Emma”

Steampunk Suggestions: Accessorizing to look like Emma Goldman is steampunk enough! It's be easy. Pince-Nez glasses, button up boots, & her fantastic Victorian style hats.
4) Jane Austen: Needs No Introduction! Technically she's not Victorian, but regency costumes are fun too!

Steampunk Suggestions: Why not be Jane Austen, Vampire Hunter or Zombie Killer?! Accessorize with not only a deadly pen but a broadsword or stake!
5) Lise Meitner: Nuclear Physicist who discovered Nuclear Fission

Steampunk Suggestions: To accompany your outfit, grab tubes & bottles and fill them up with various liquids & stick a glow stick inside to give them a radioactive luminescence and goggles are a must (laboratory safety after all!).
6) Lizzie Borden: Murderess (hey, it’s Halloween!)

Steampunk Suggestions: Leg-o-mutton sleeves are a must, blood spattered spats, and an axe!
7) Madam C.J. Walker: Self-Made Millionaire & One of America’s first Female (and Female African American) Entrepeneurs

Steampunk Suggestions: My favorite picture of Madame C.J. is of her driving--such an empowering image of a mobile woman--a force to be reckoned with! I suggest some driving goggles, gloves, and a large opulent hat!
8) Susan B. Anthony: Suffragist Extraordinaire!

Steampunk Suggestions: Keep it simple--wear a Votes for Women sash or bring a sign or soap box to stand on throughout the night!
9) Queen Victoria: I'd recommend that you watch the movie The Young Victoria starring Emily Blunt for good ideas
 Steampunk Suggestions: This is another costume that is easy to steampunk--you hardly have to do anything or you could re-interpret Queen Victoria into your own steampunk narrative--how about a robot Queen Victoria? You could draw gears on your skin (particularly at your joints) with henna or face paint and make a huge wind up key out of cardboard and run 2 lengths of ribbon on each side of the cardboard pieces so that you could fasten to your back like a belt!
10) Annie Oakley:Nicknamed "Little Sure Shot," Annie Oakley was a force to be reckoned with. She could hit any target no matter how small and was a part of Buffalo Bill's traveling Wild West Show. Annie designed and sewed all of her own clothes for the show too!
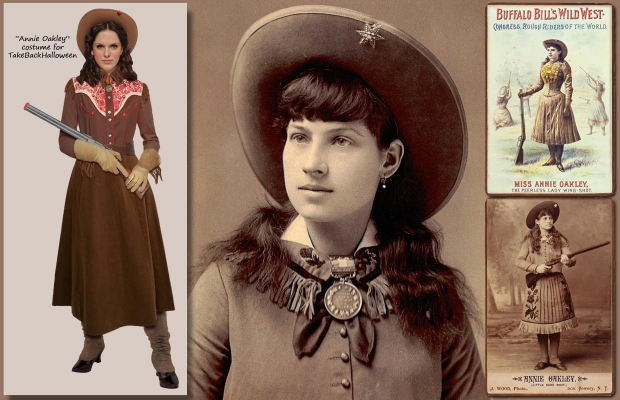
Steampunk Suggestions: A steampunk version of Annie Oakley would be fun and rather simple. You could keep the costume relatively the same, and just create a steampunk blunderbuss or rifle. Other ideas are using steampunk gear buttons, like the kind you can purchase at JoAnn Fabrics, in lieu of traditional wood or brass buttons in her costume.
11) Marie Curie: Who wouldn't want to dress up as the first woman to win a Nobel Prize?! Marie Curie is a famous scientist, best known for discovering radiation/radium. A costume of Curie would also be simple, but there are certainly ways to steampunk it!
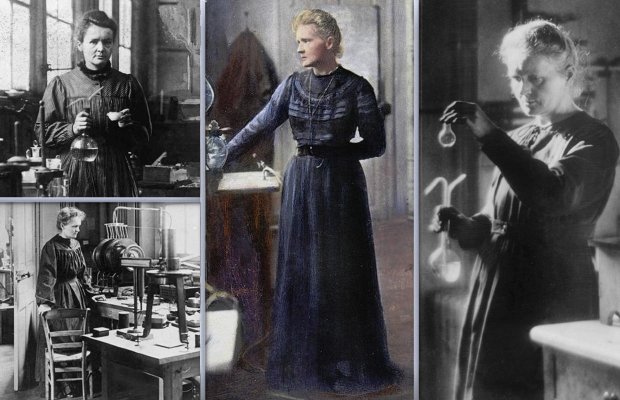
Steampunk Suggestions: You could 'punk it up with accessories like a steampunk eyeglass or monocle. Props are key--a couple of old beakers filled with glow in the dark liquids would be really cool. You could also paint your costume with glow in the dark paint for a radioactive Marie Curie. It would make the costume a bit more spooky and macabre since Curie died of radiation poisoning.
12) Queen Liliuokalani: Liliuokalani was the last reigning monarch of Hawaii. According to Take Back Halloween, "She came to the throne in 1891 as a pro-native, pro-woman advocate for her people, and quickly found herself at odds with the American businessmen (sugar barons, pineapple planters) who wanted to annex the islands to the United States."

Steampunk Suggestions: Steampunk through accessories--a steampunk rhinestone necklace and sash!
Good luck brainstorming & creating your Halloween costumes! Check out Take Back Halloween for more ideas!
Custom Order Spotlight:Wedding Earrings
UncategorizedCommentI love custom orders, especially custom orders for weddings. I am always so honored that someone trusts me to create jewelry for their special day. It's also a great excuse to sing sappy love songs in my studio at the top of my lungs and just have a good time making. Besides singing "Chapel of Love" and "Will You Still Love Me Tomorrow," one of the other things I love about custom orders is the challenges they present. Fitting the jewelry to the person, their style and their personality and often keeping within certain parameters.
My latest custom wedding order came from one of my co-workers, Sarah. She had a jewelry set from her grandmother that she wanted to wear on her wedding day. The necklace and earrings were beautiful, but the earrings were posts and not the dangle-ly, long earrings that Sarah wanted for her wedding.
So, my challenge was how to turn posts into long, dangle-ly earrings. That itself is not much of a challenge, but creating temporary dangles are a different matter.
In a lot of my pieces I try my best to respect the original object, and not create new holes or altering it, and thereby keeping the original piece in tact.
To create dangle-ly earrings out of posts the answer was to build on top of filigree and essentially fasten (as you would to your ear) the earring to the filigree--keeping the earring in its original state and not altering it. Especially since Sarah will want to wear these again.
What's fun about fastening earrings posts to filigree is that you have 2 pairs of earrings, 2 different styles, and 2 different looks that you can easily change up yourself.
Here's the "After":
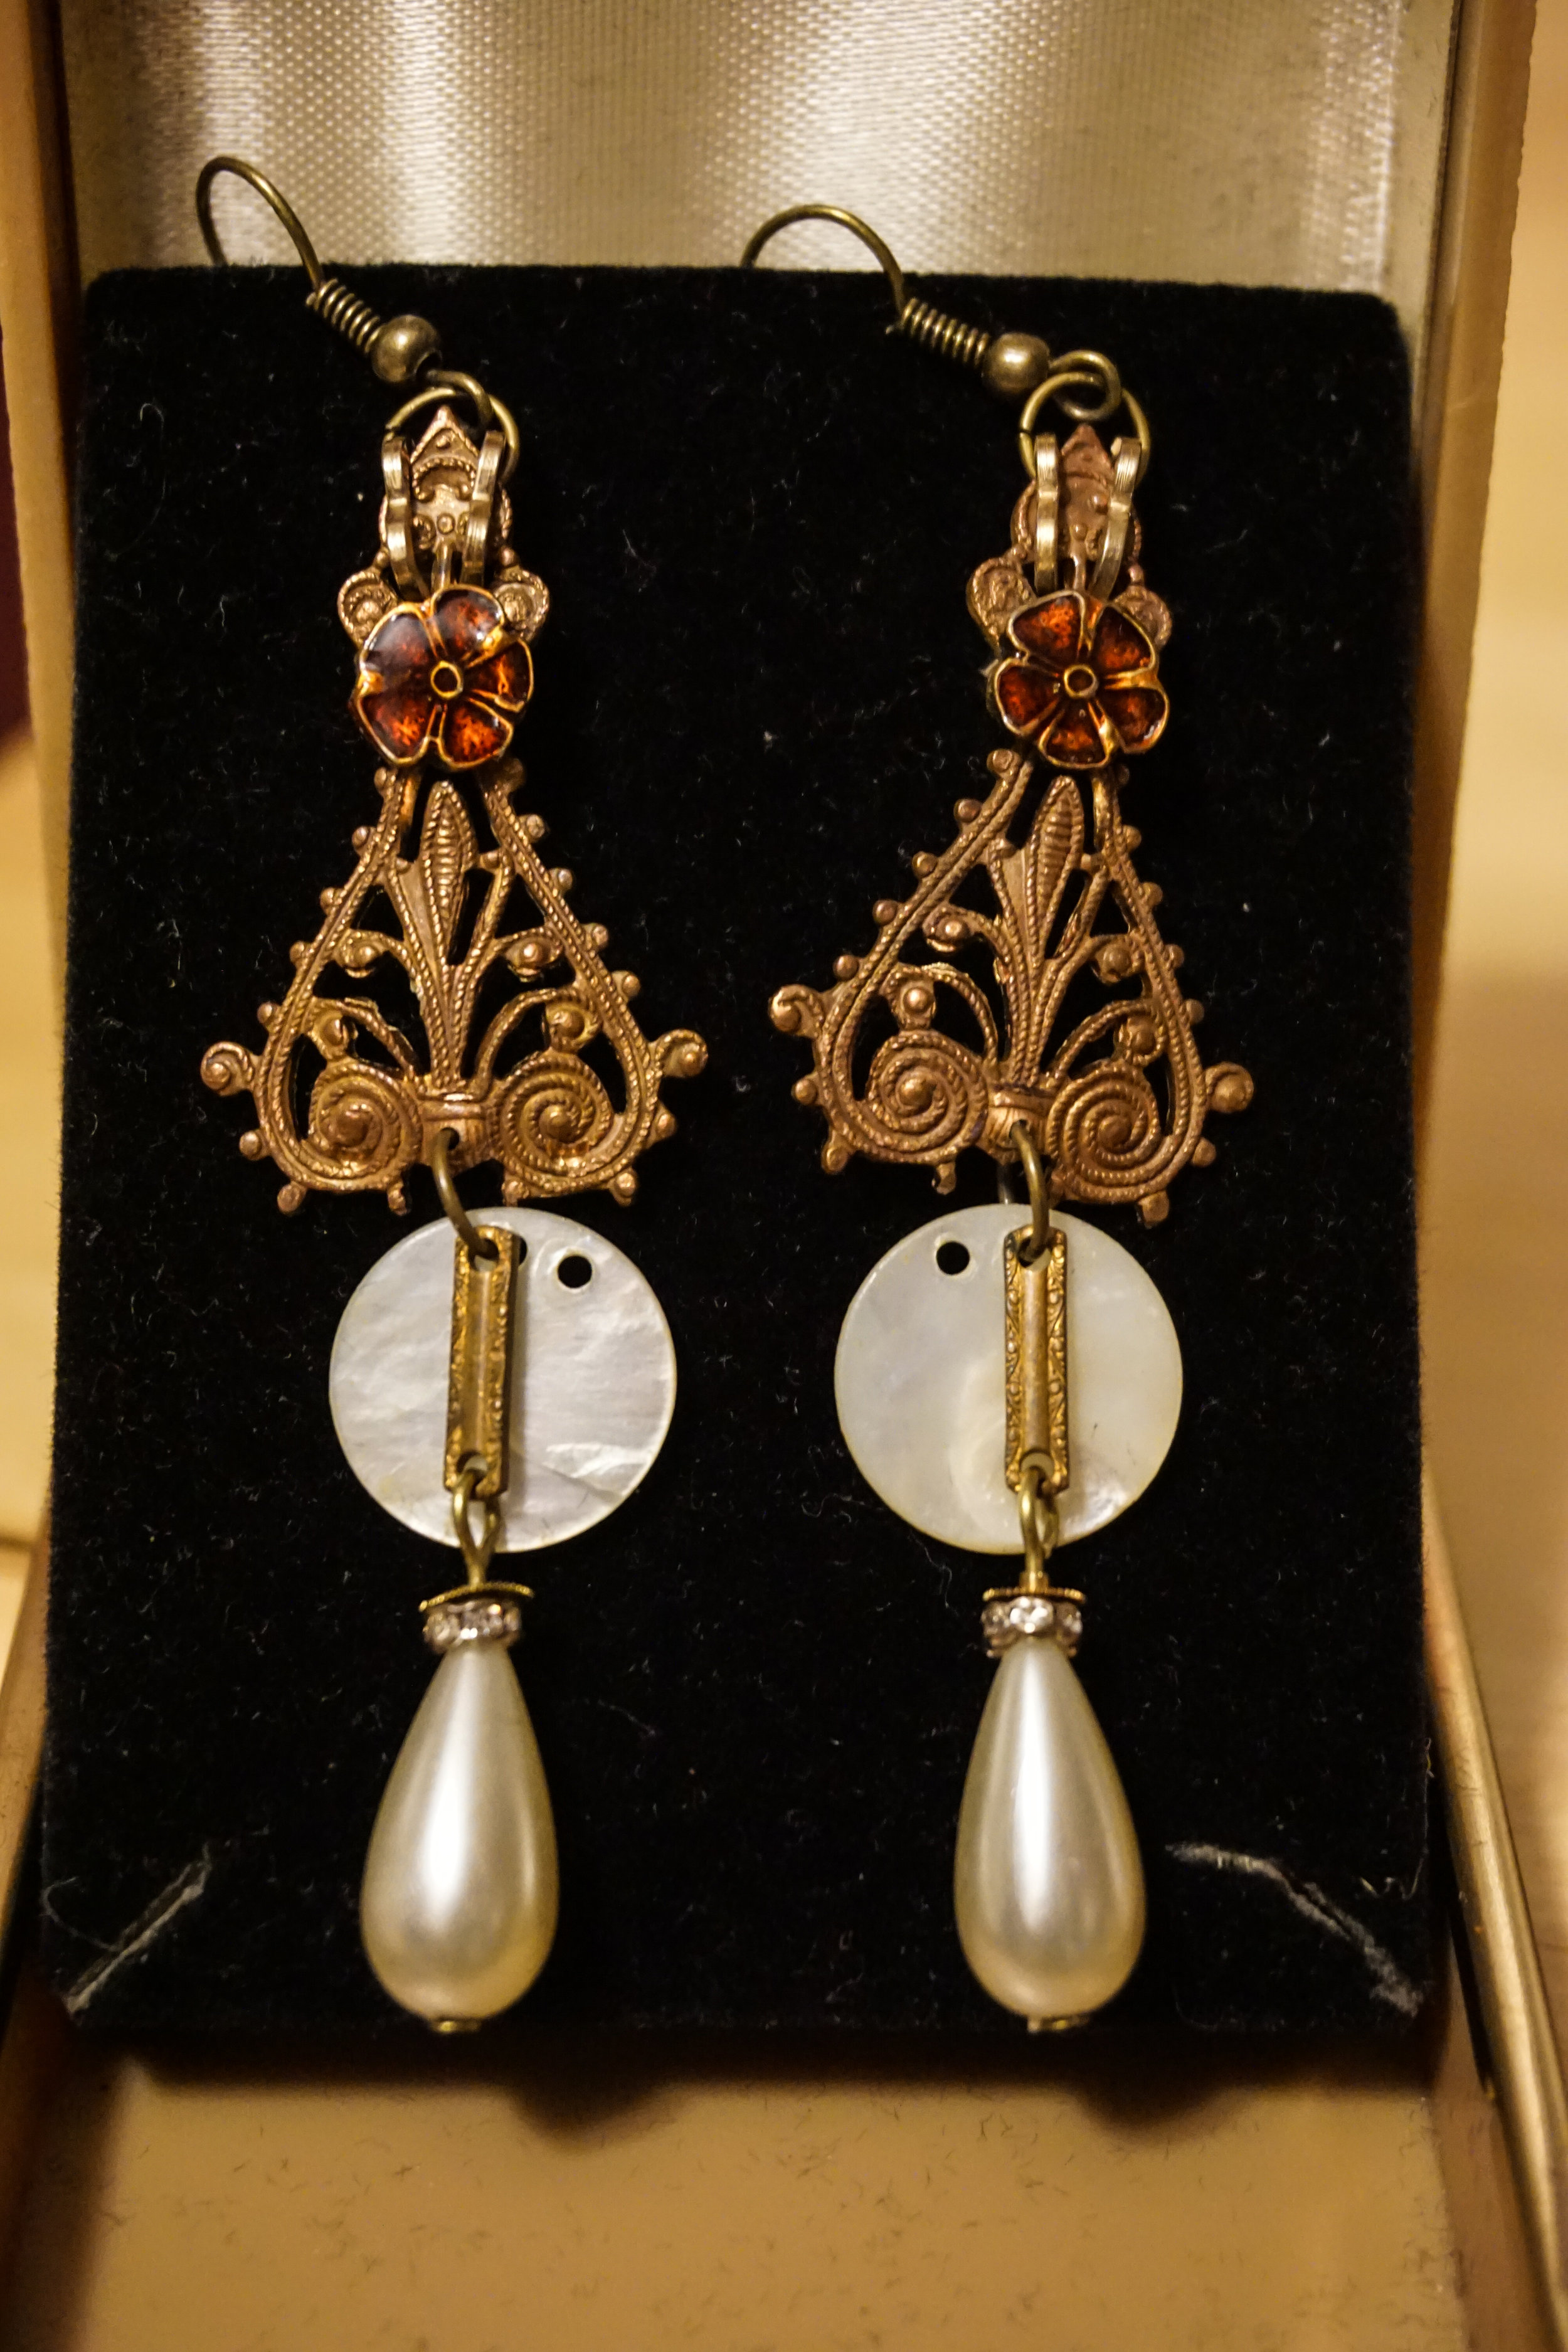
Sarah's wedding earrings are made with vintage brass filigree that my mom and I found at a Paris flea market (I used some of my private stash because the metals matched perfectly!), antique gold watch chain links, clock cogs, rhinestone rondeles, brass chain links (that matched the necklace's chain links), flat mother of pearl buttons, pear shaped pearls, and Sarah's grandmother's crimson flower earrings.
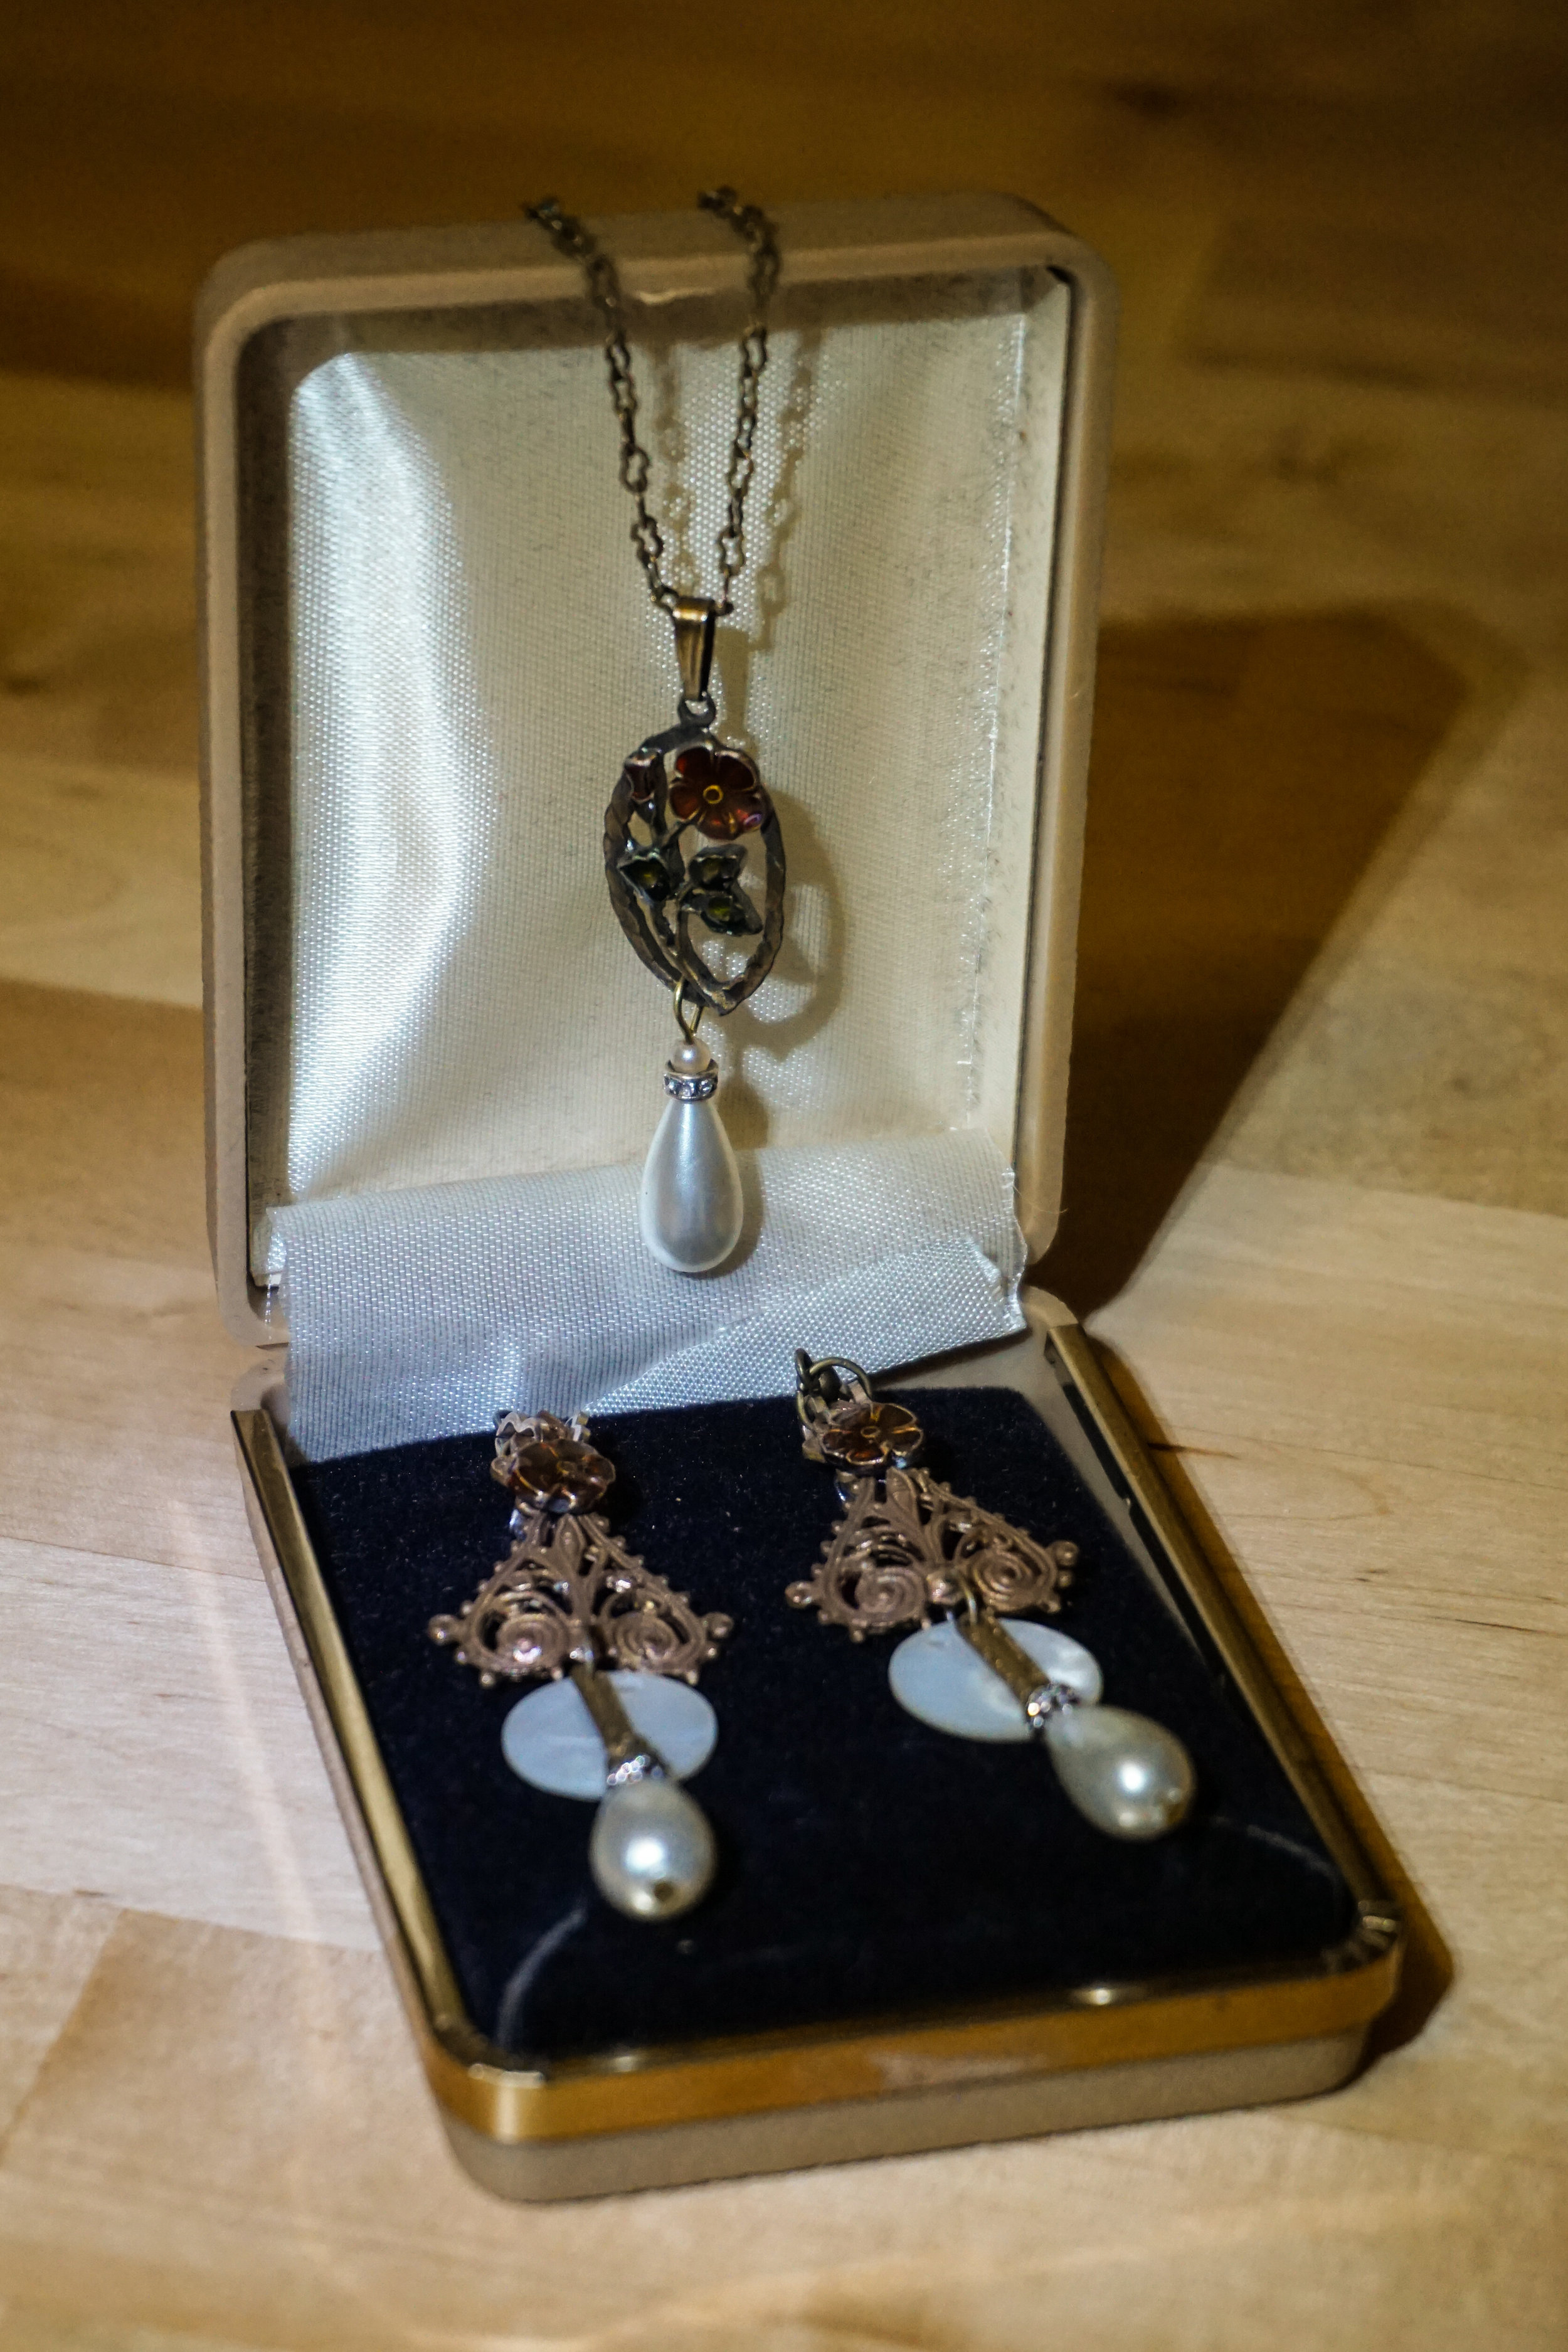
To match the earrings, I added pearls and a rhinestone rondele to the bottom of her grandmother's necklace.
I couldn't wait to go to work Monday morning and see Sarah's face. She is someone with such a big heart and I am so happy that she is getting married in September. She is going to be a beautiful bride. Congratulations Sarah!
For those of you who are interested in custom orders, email me at bohemianromancejewelry@gmail.com. I'm ready for the next fun challenge!
Something Old, Made New
InspirationCommentFirst off, I'd like to thank my lovely friend Irina. She donated her old jewelry & accessories to me and I have been having a wonderful time re-inventing these treasured pieces. I am fortunate that many of my friends, family members, and fans will occasionally send me things to upcycle. It is the greatest kind of support & it brightens my day. And best of all, I encounter pieces that I might not otherwise come across. So thanks to anyone who's ever donated materials to me. I truly enjoy breathing new life into old objects--especially classic or traditional jewelry. Here's a before & after look at one such piece.
 Before
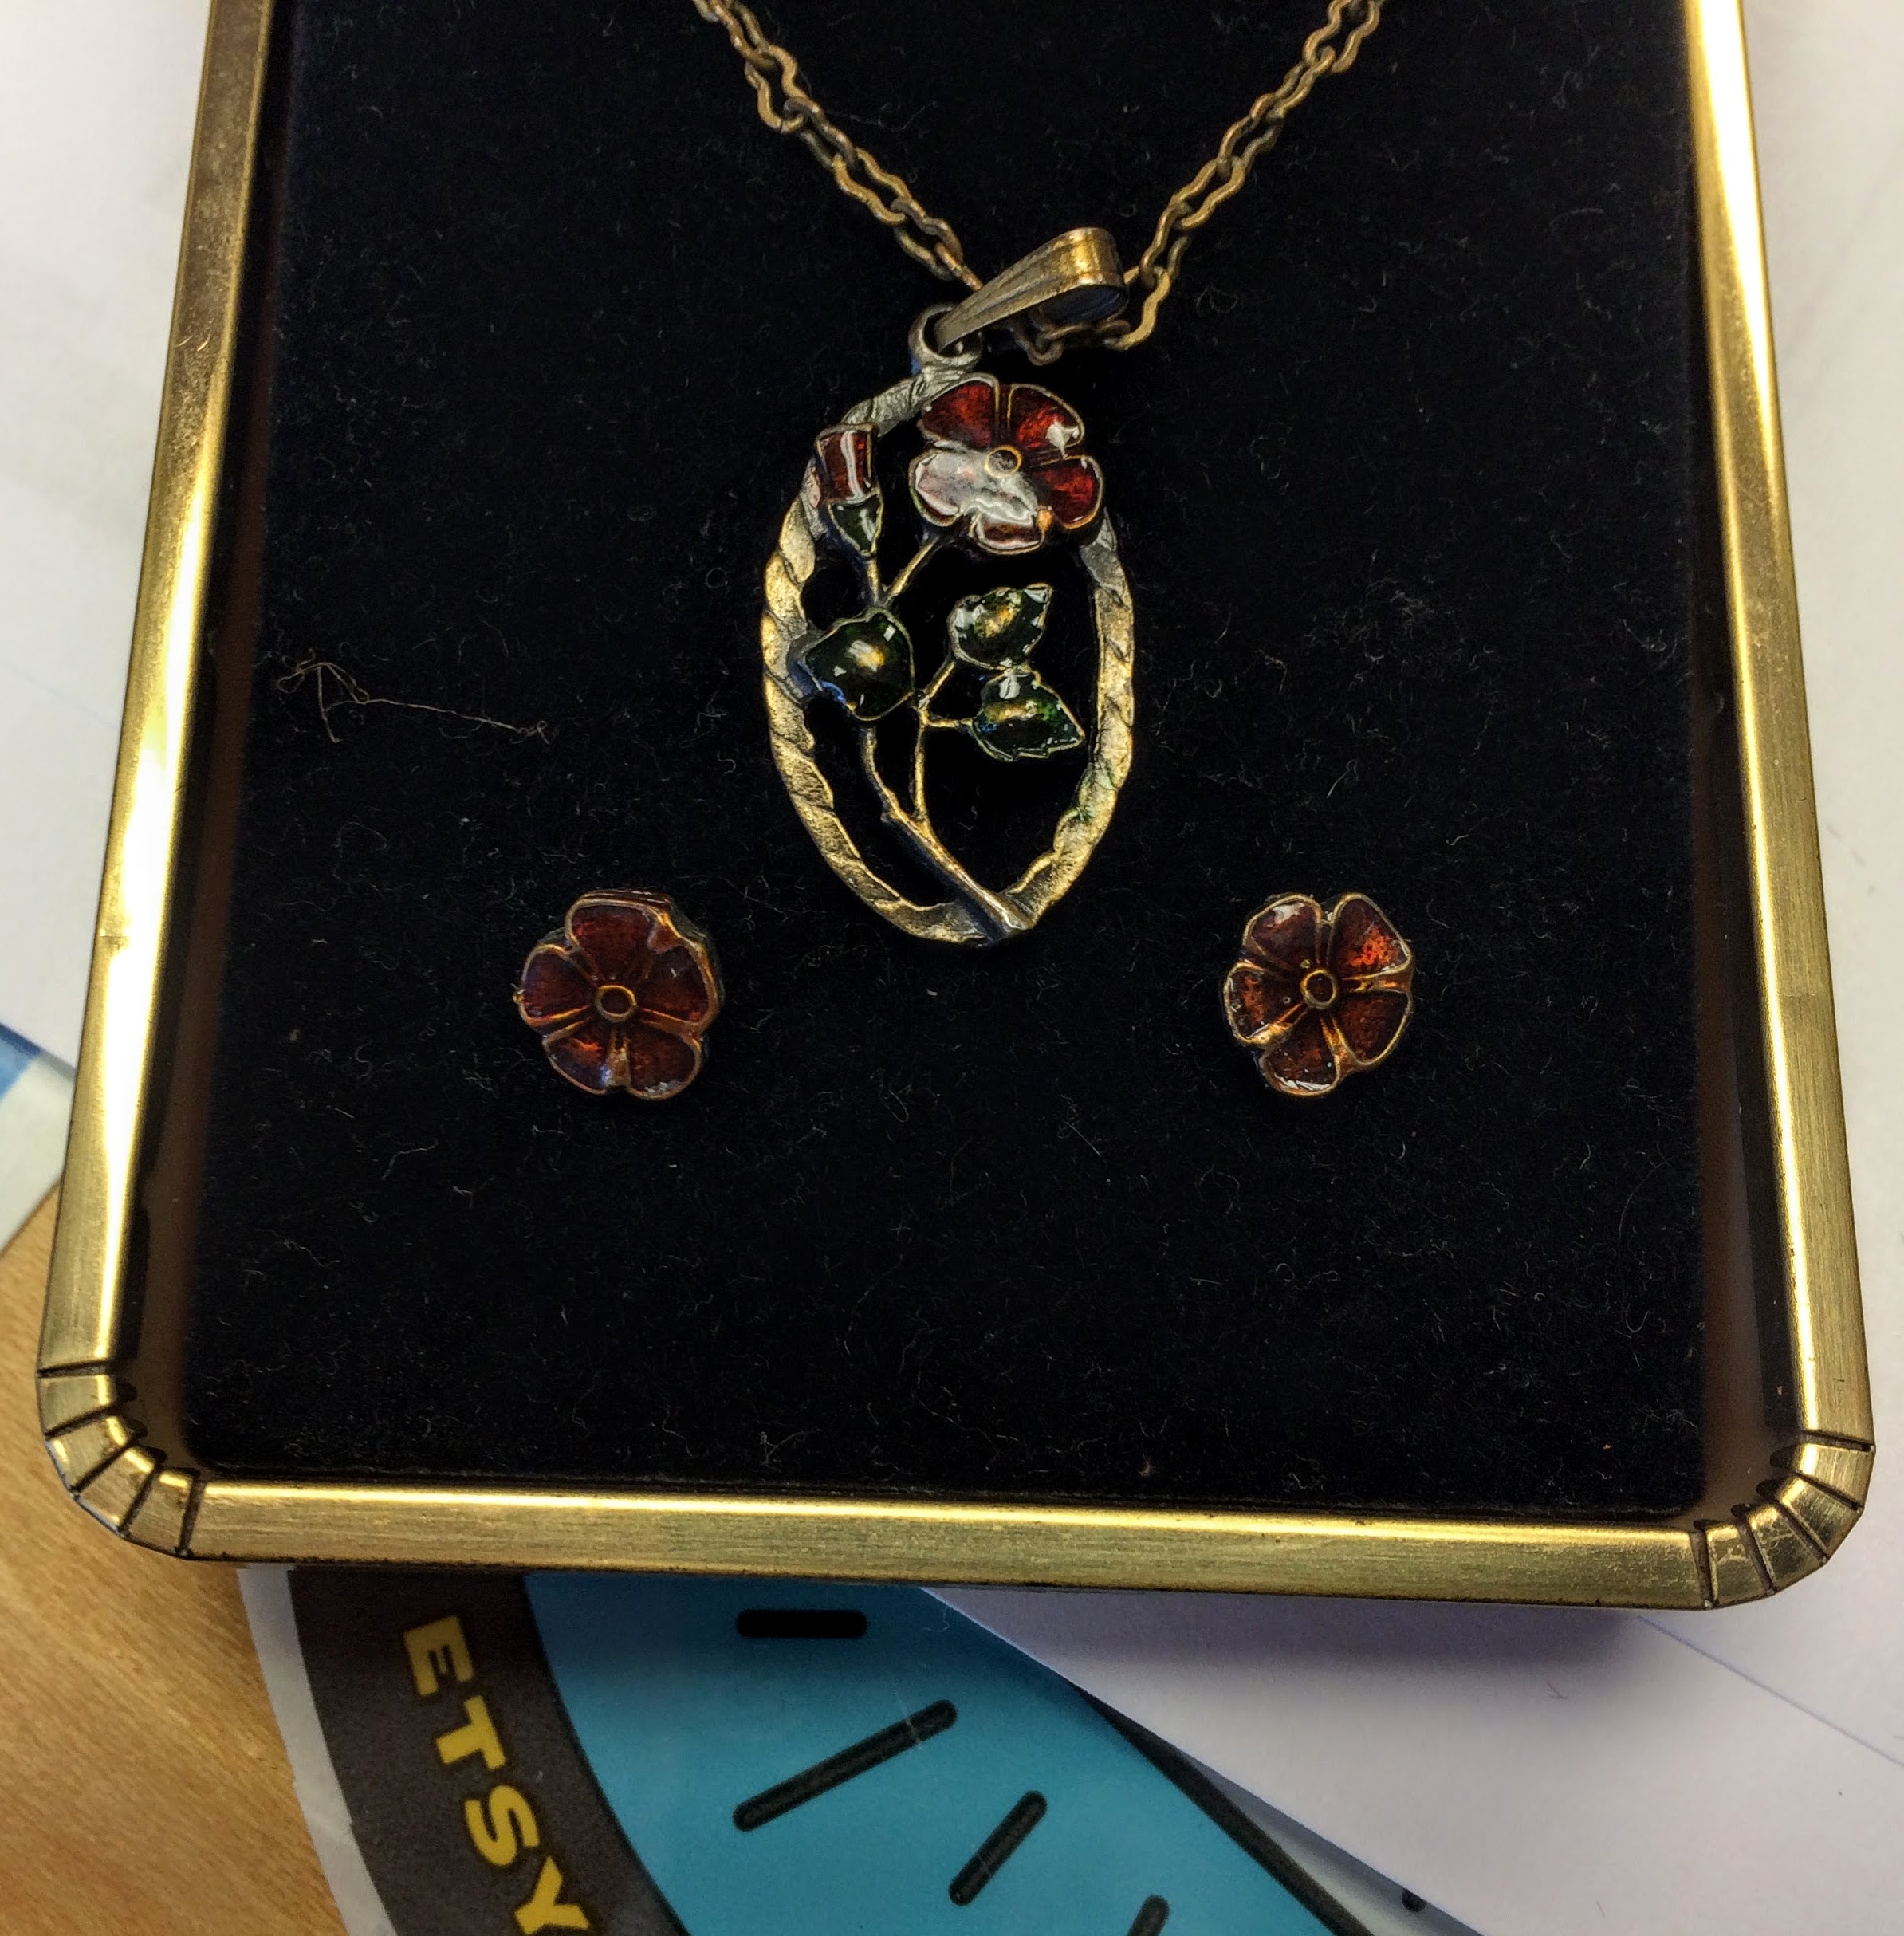
 What I love about the original piece is its color contrast: the rich red against a muted silver. It's also reminiscent of a Indian style of jewelry.
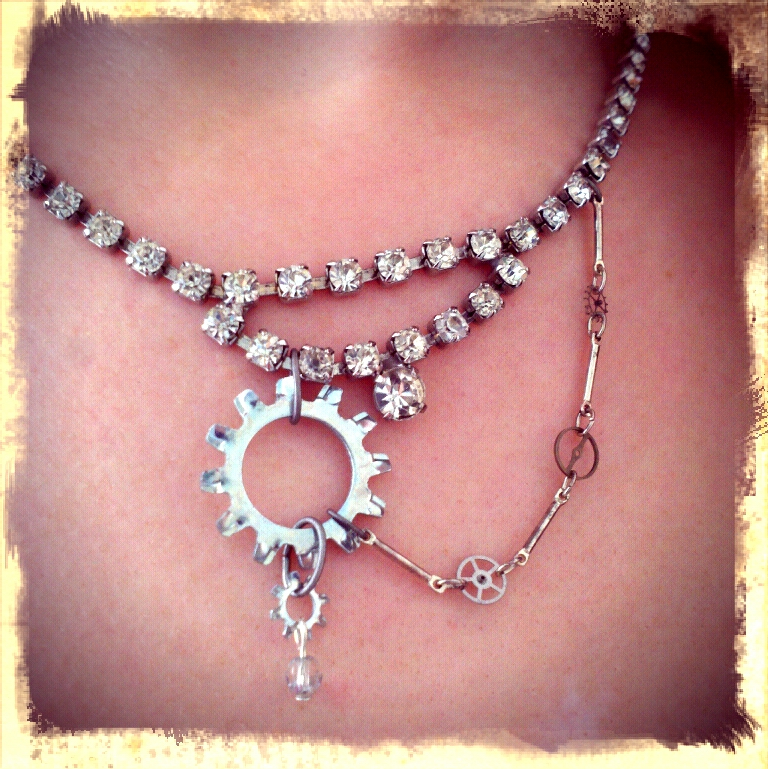
 After
After
 In altering this piece, I wanted to stay true to the multicultural feel of the original. I added two grandfather clock gears, muted silver chain that closely matches the silver in the rest of the necklace, and the large metal cabinet decoration. In lengthening this piece, and by giving it a large textured focal point, it is more of a statement piece of jewelry. The disruption of the pattern is what really transforms this necklace into an one-of-a-kind piece. If you want to transform or update an old favorite, think about changing or even disrupting your necklace's pattern, introducing another color or texture, or even combining two favorites together to form something new!
DIY Steampunk Cupcakes
D-I-Y-5 CommentsI am fascinated with steampunk cakes! I am an amateur baker myself and I recently purchased some great silicone food molds from an Etsy seller, MoldMuse. She has a bunch of molds available--a ton of which are steampunk! I love the ones that I purchased and I highly recommend them! They were super easy to use and yielded perfect geary confections. 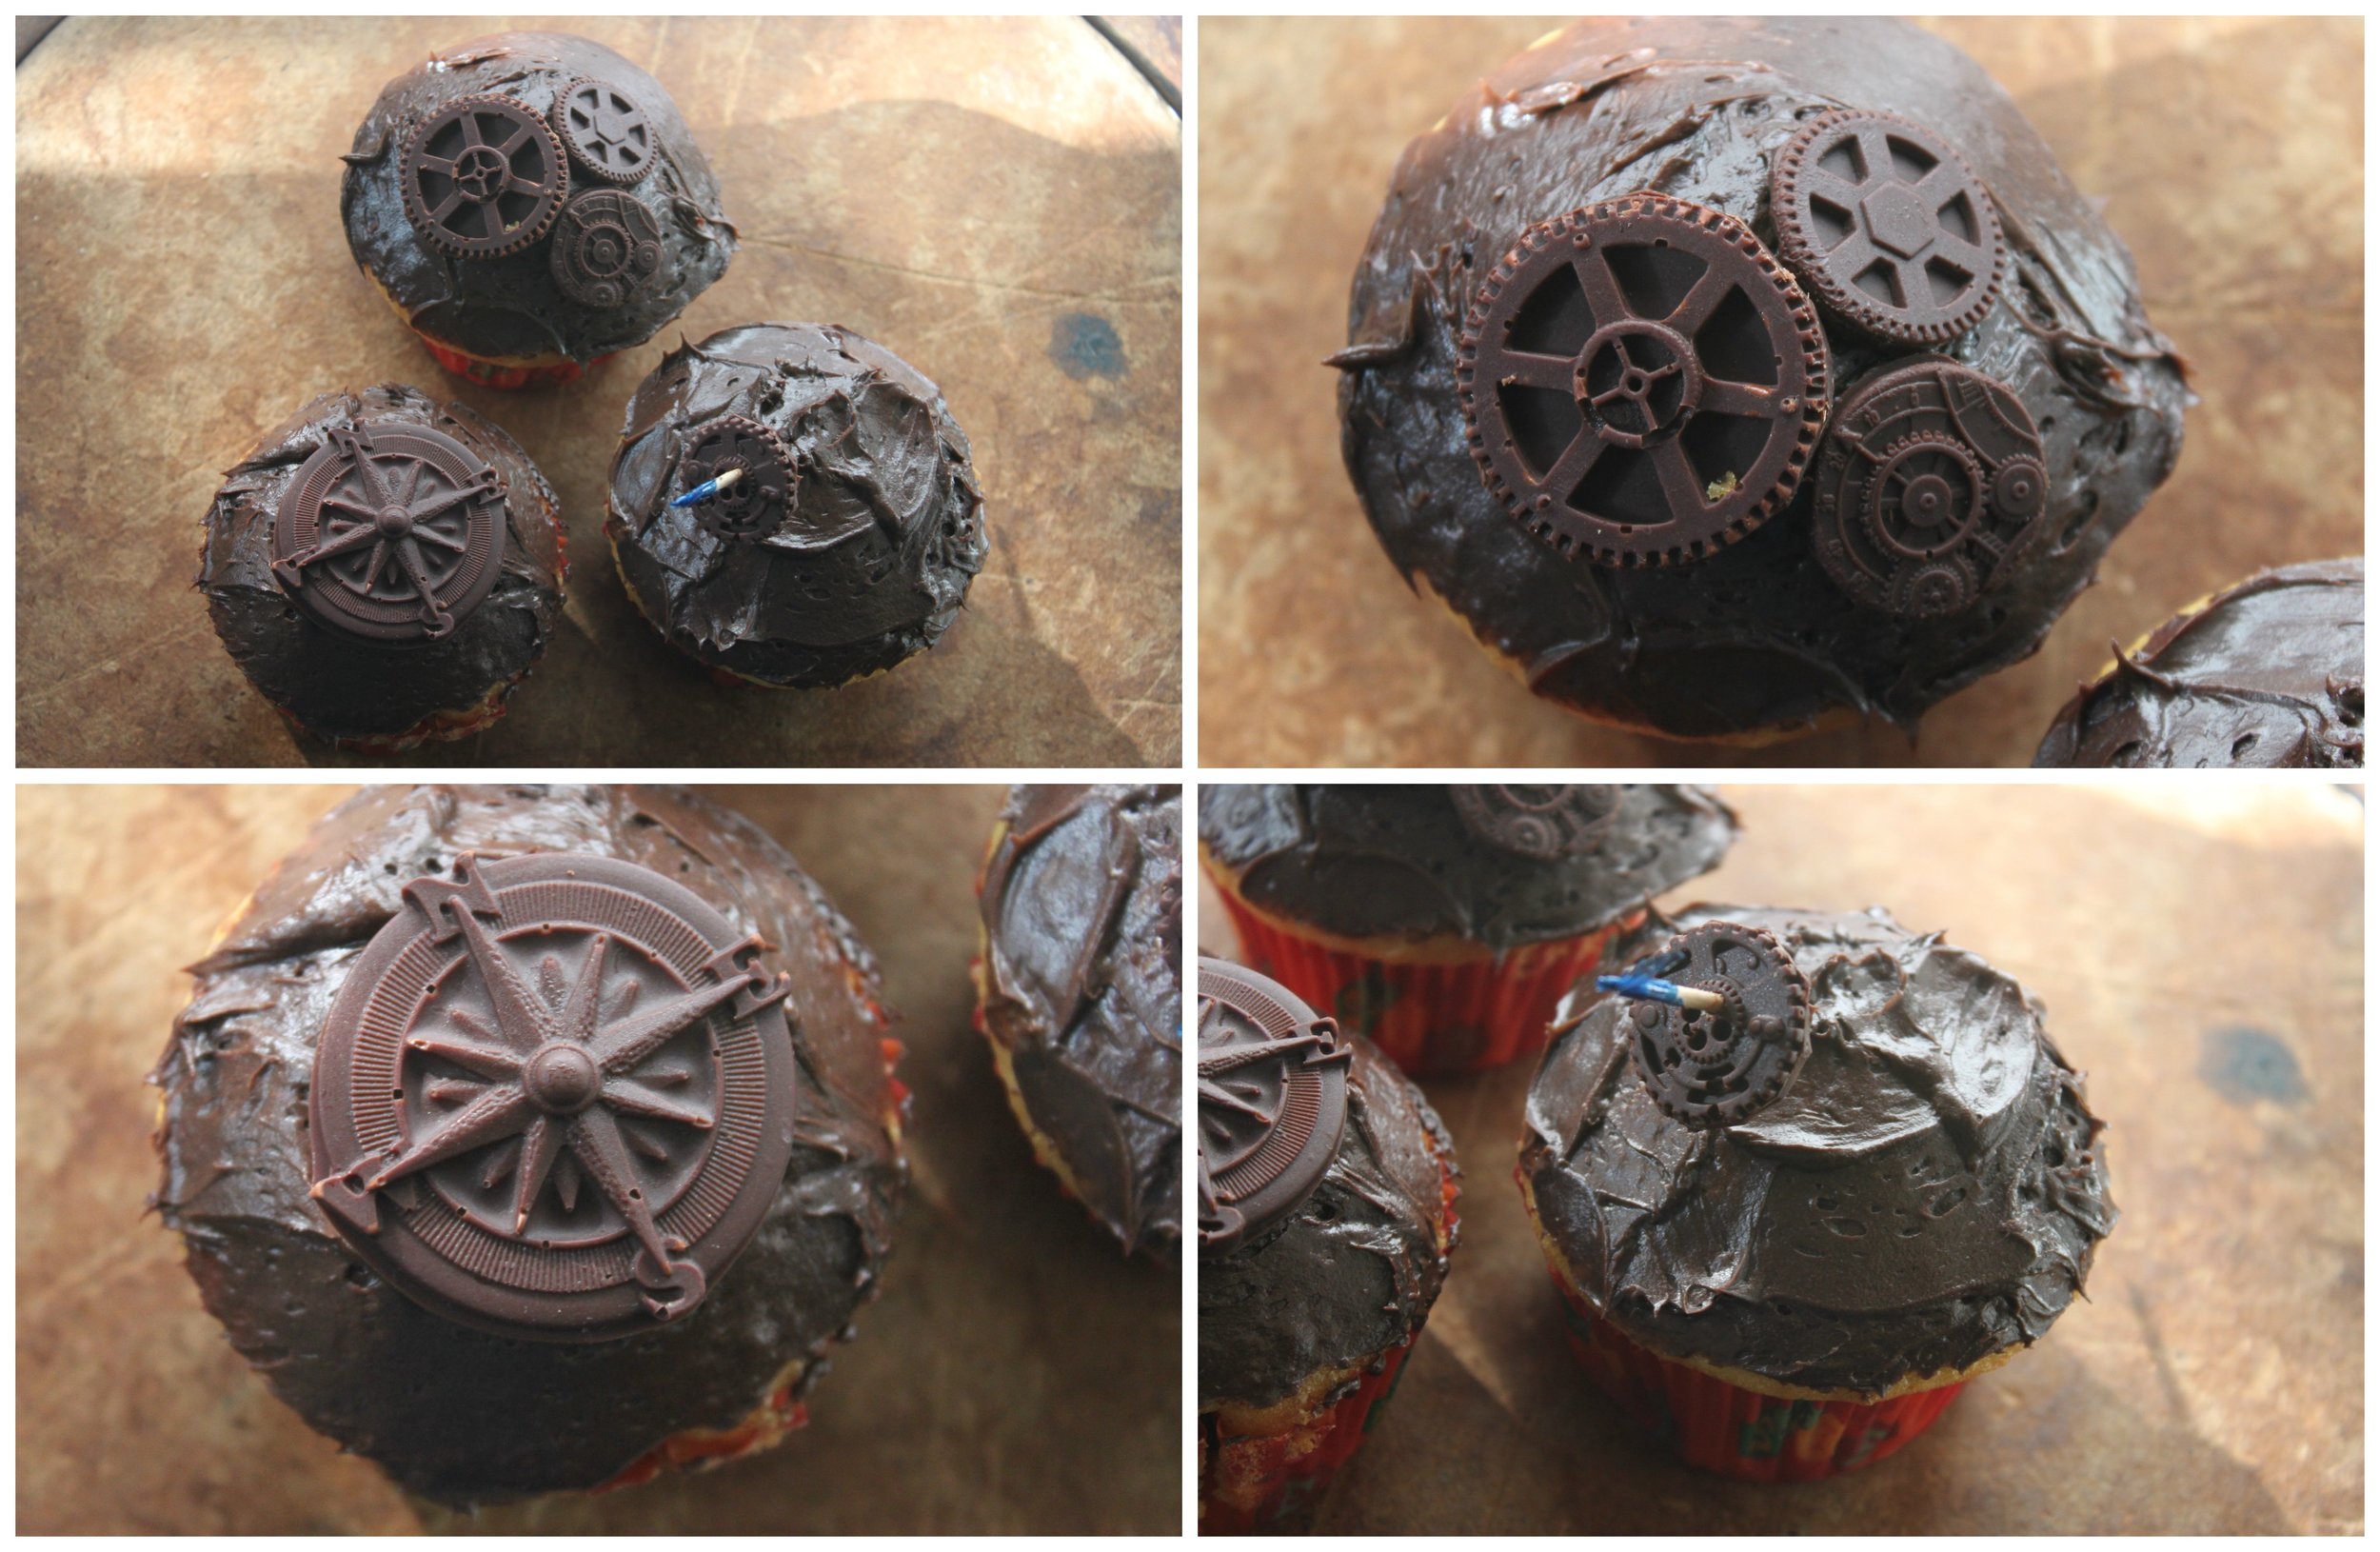 You'll need:
- Steampunk molds, safe for food. I highly recommend MoldMuse.
- Cake mix (or a cake recipe that you love)
- Frosting
- Bittersweet chocolate
- Pyrex measuring cup
- Sauce pan
- Vanilla extract (optional)
- Finely shaved orange peel (optional)
- Sandwich Toothpicks (optional)
- Oven and other baking supplies--bowls, spoons, etc.
 Steps:
For your steampunk chocolate pieces:
- Melt your bittersweet chocolate in a double-dutch pan (or if you don't own one, in a Pyrex measuring cup placed in the middle of a sauce pan filled with water). This prevents your chocolate from burning.
- Once your chocolate has melted, add vanilla extract and finely shaved orange peel if desired. Add to taste.
- Next, pour your chocolate into your molds. Be careful not to overfill your molds otherwise you will have to cut them down to shape.

- Once your molds are filled, place them in your refrigerator to set.
- Once your chocolate has hardened (about an hour or so), pop them out of your molds. Mine were very easy to pop out because MoldMuse's molds are flexible.
- If you did overfill your molds, grab a sharp knife and trim around the edges of your chocolate gear.
- Set aside in refrigerator while you bake your cupcakes.
Cupcakes:
- Bake as directed by your cake recipe or box instructions.
- Frost when cooled.
Steampunking your Cupcakes:
There are 2 ways you can steampunk your cupcakes: 1) By arranging your chocolate molds on top of your cupcakes and, 2) Making a gear rotatable with a sandwich toothpick through your cupcake.
Option 1:
- Arrange your chocolate gears on top of your cupcakes artfully.
Option 2:
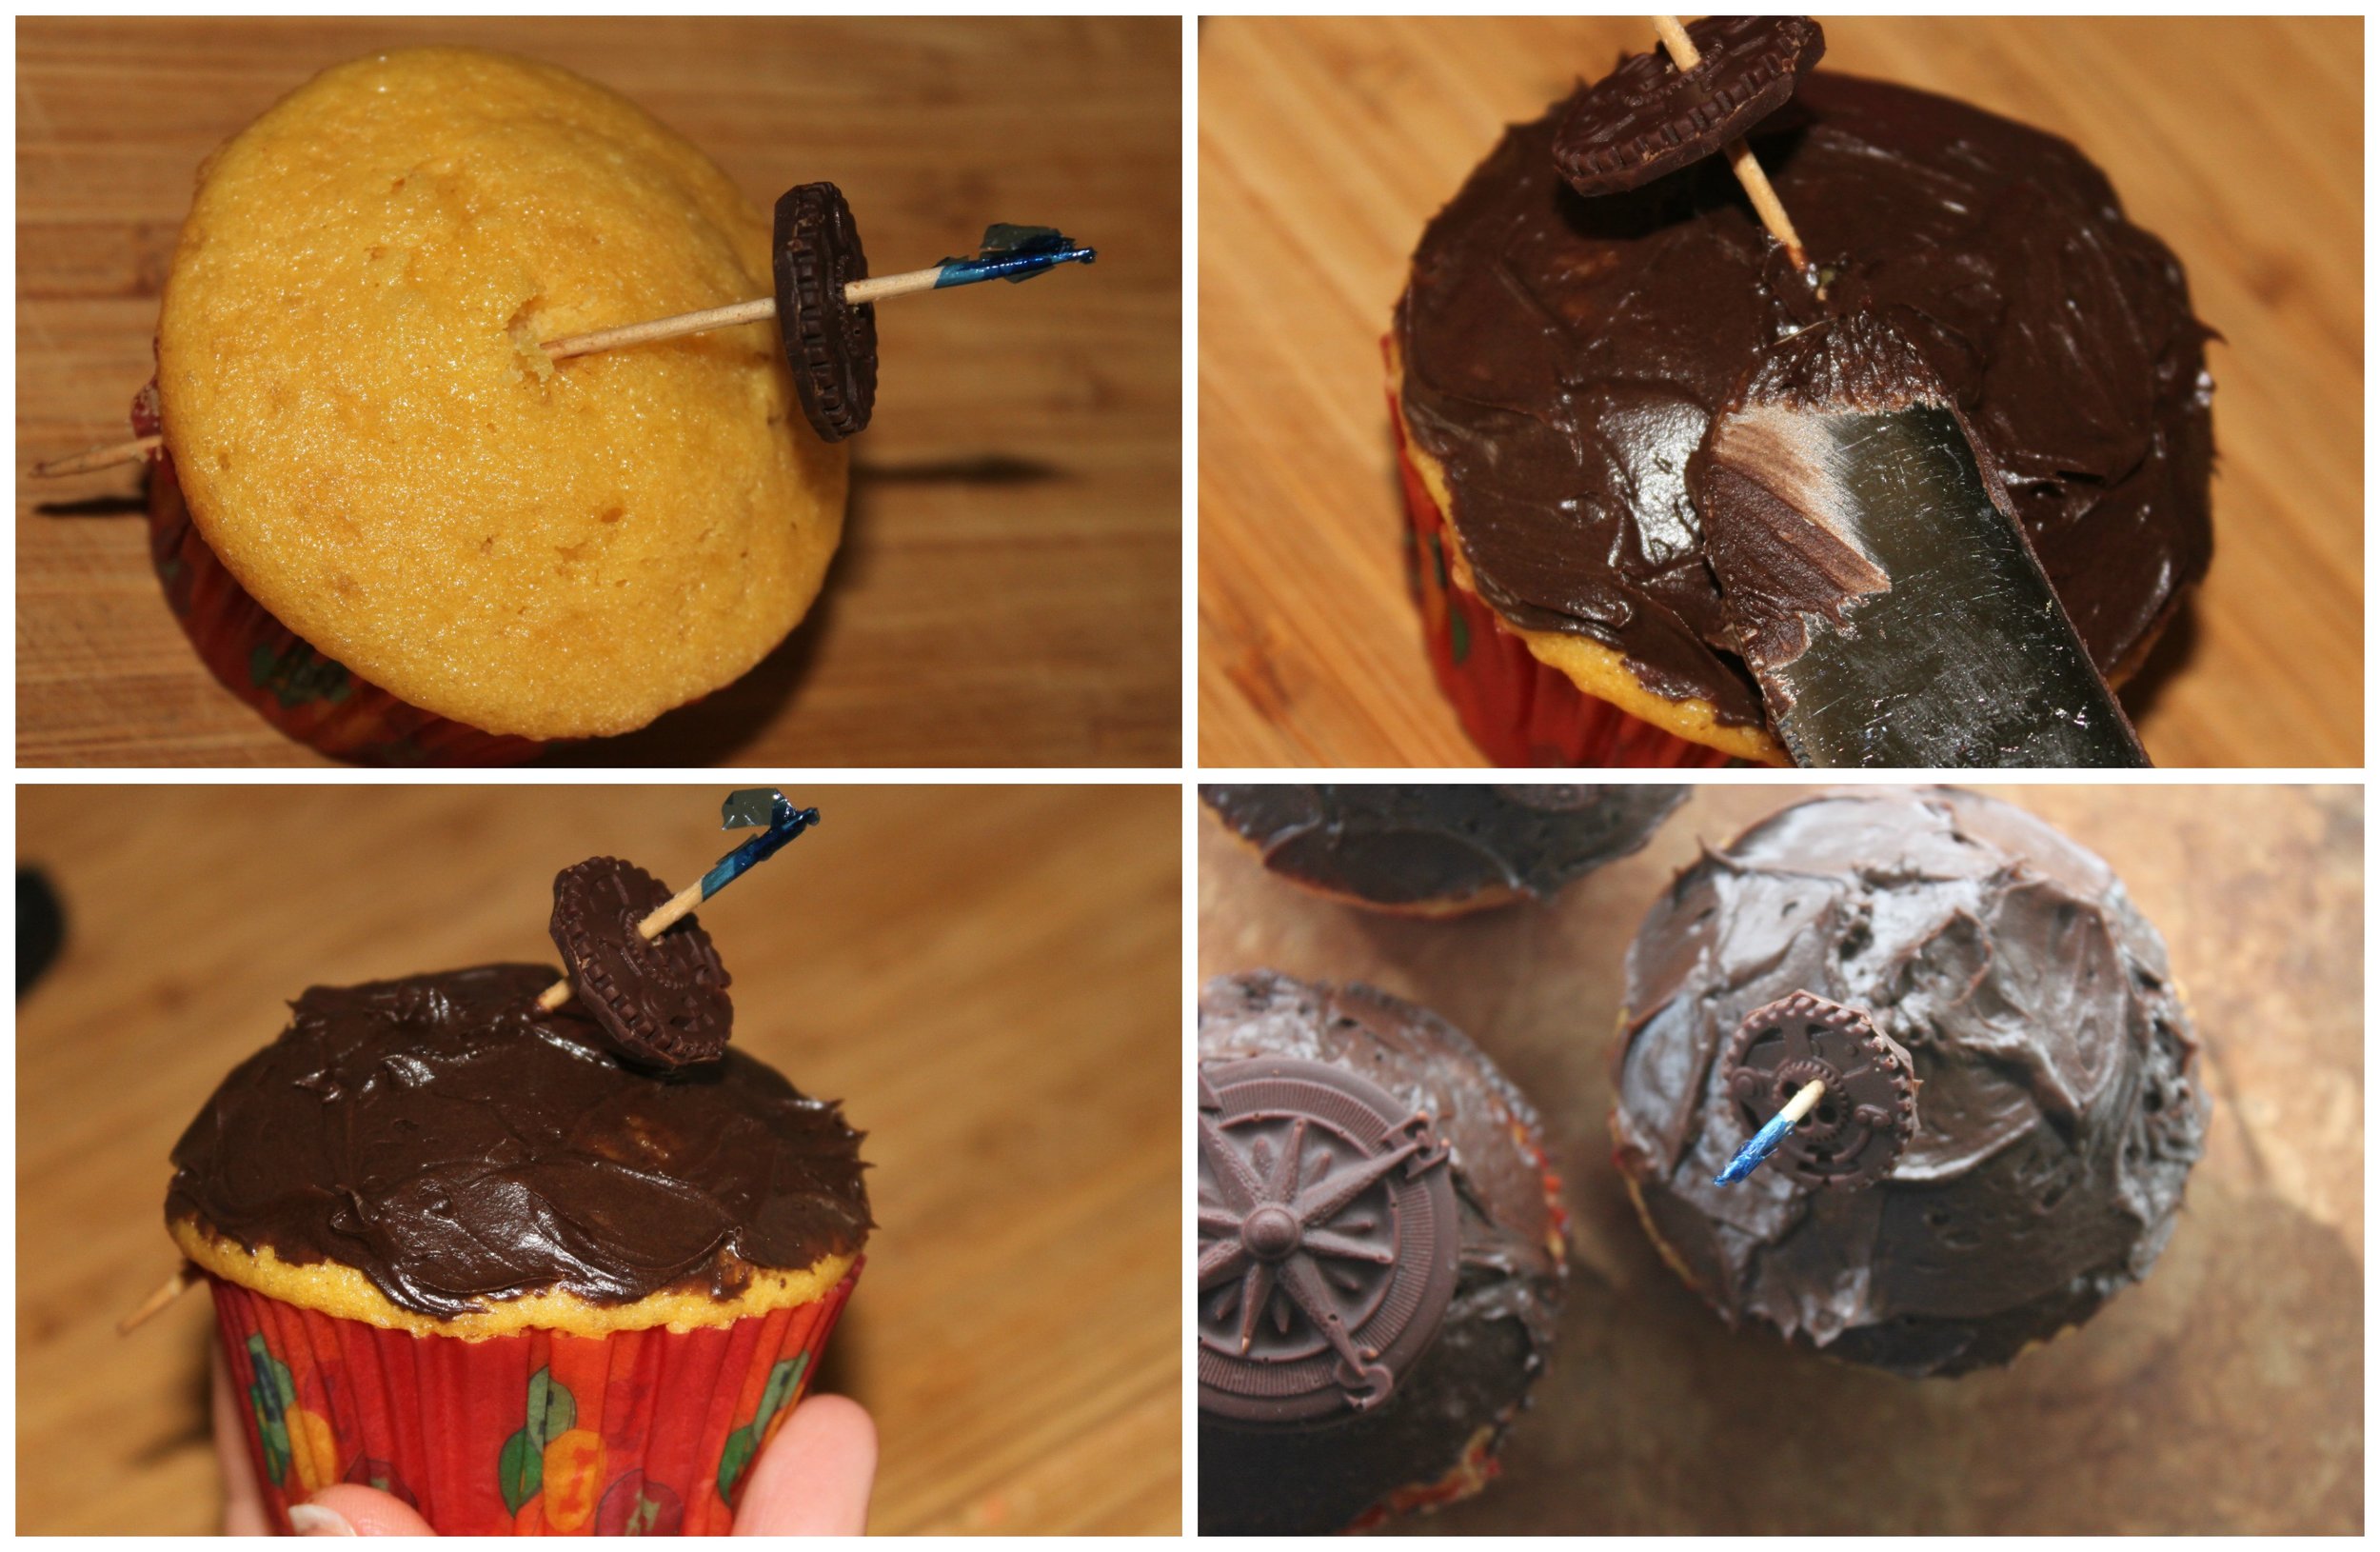
- Poke a hole in your chocolate gear (large enough for your toothpick to go through).
- Slide the toothpick through the hole in the chocolate gear and then diagonally through your frosted cupcake (so that the toothpick comes out of the side). Clean any icing off of the toothpick with a wet cloth.
- Now your cupcake's gear turns! Watch the video to see![youtube=http://www.youtube.com/watch?v=C4PA6fucCqk]
Intercast Gries Reproducer Corp. Jewelry
Flea Market Finds5 CommentsI found these really great tool charm that actually move! I thought they were perfect for steampunking! First, a little bit of history: the Gries Reproducer Corporation operated out of New York and from the 1950s to 1960s ran giveaways of tool charms (like these) in Cracker Jacks! Pretty neat, huh? 

 The pliers are perhaps my favorite since I do work with them often myself. I made a cute pair of earrings for my mom & I.

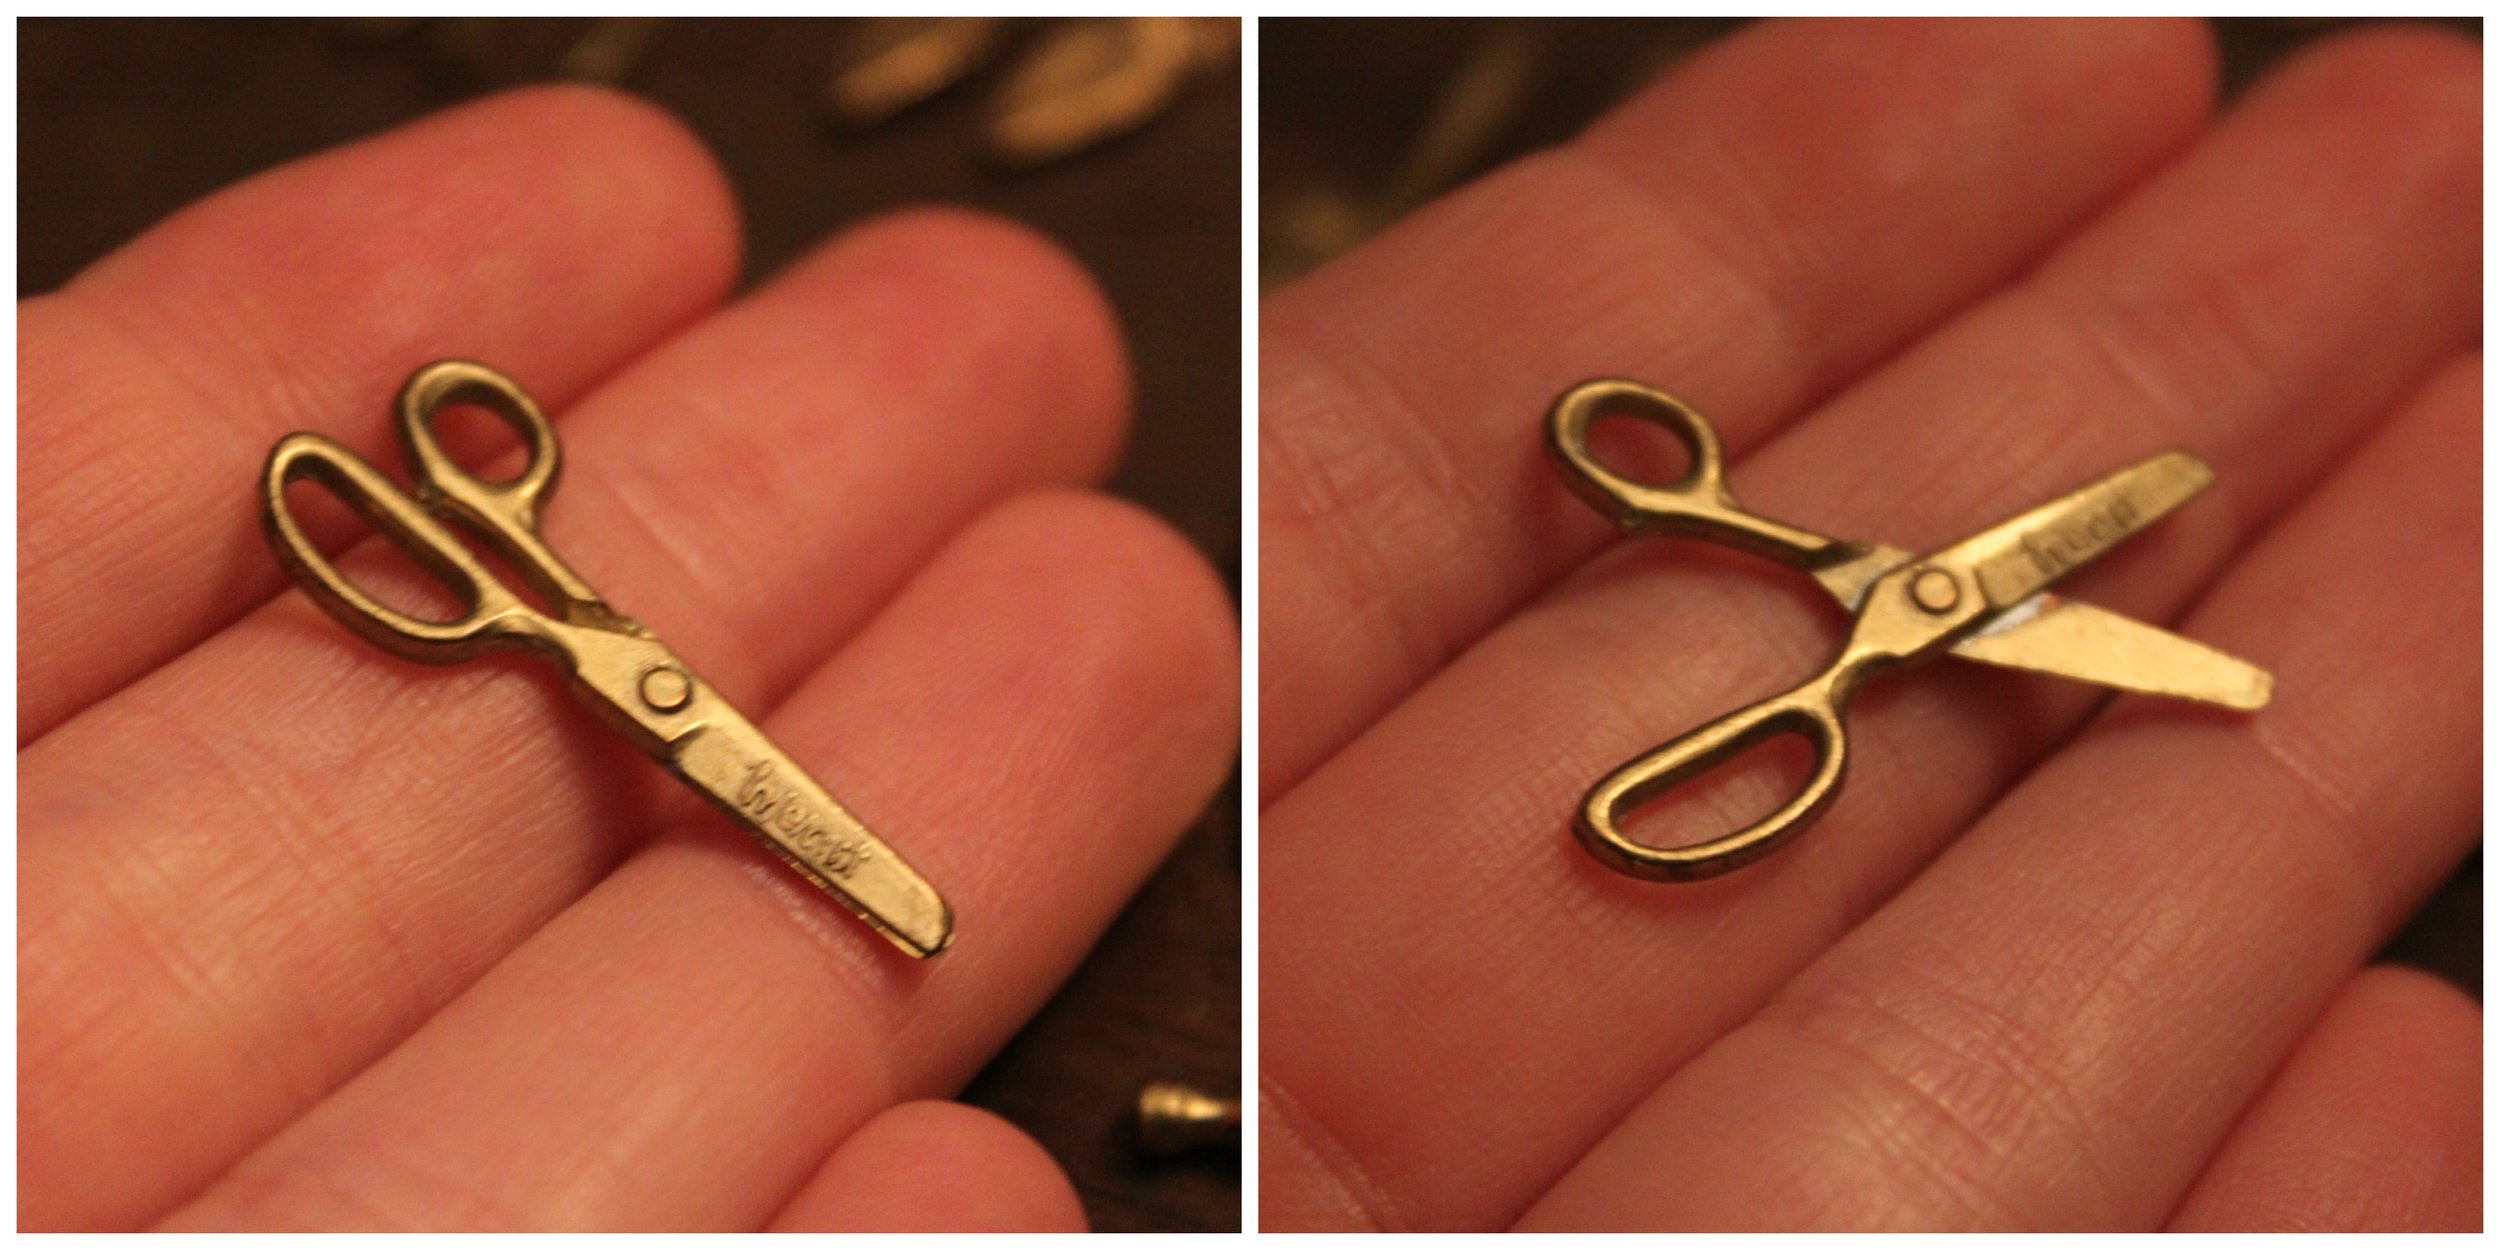 The scissors are cute too! They remind me of a steamstress!
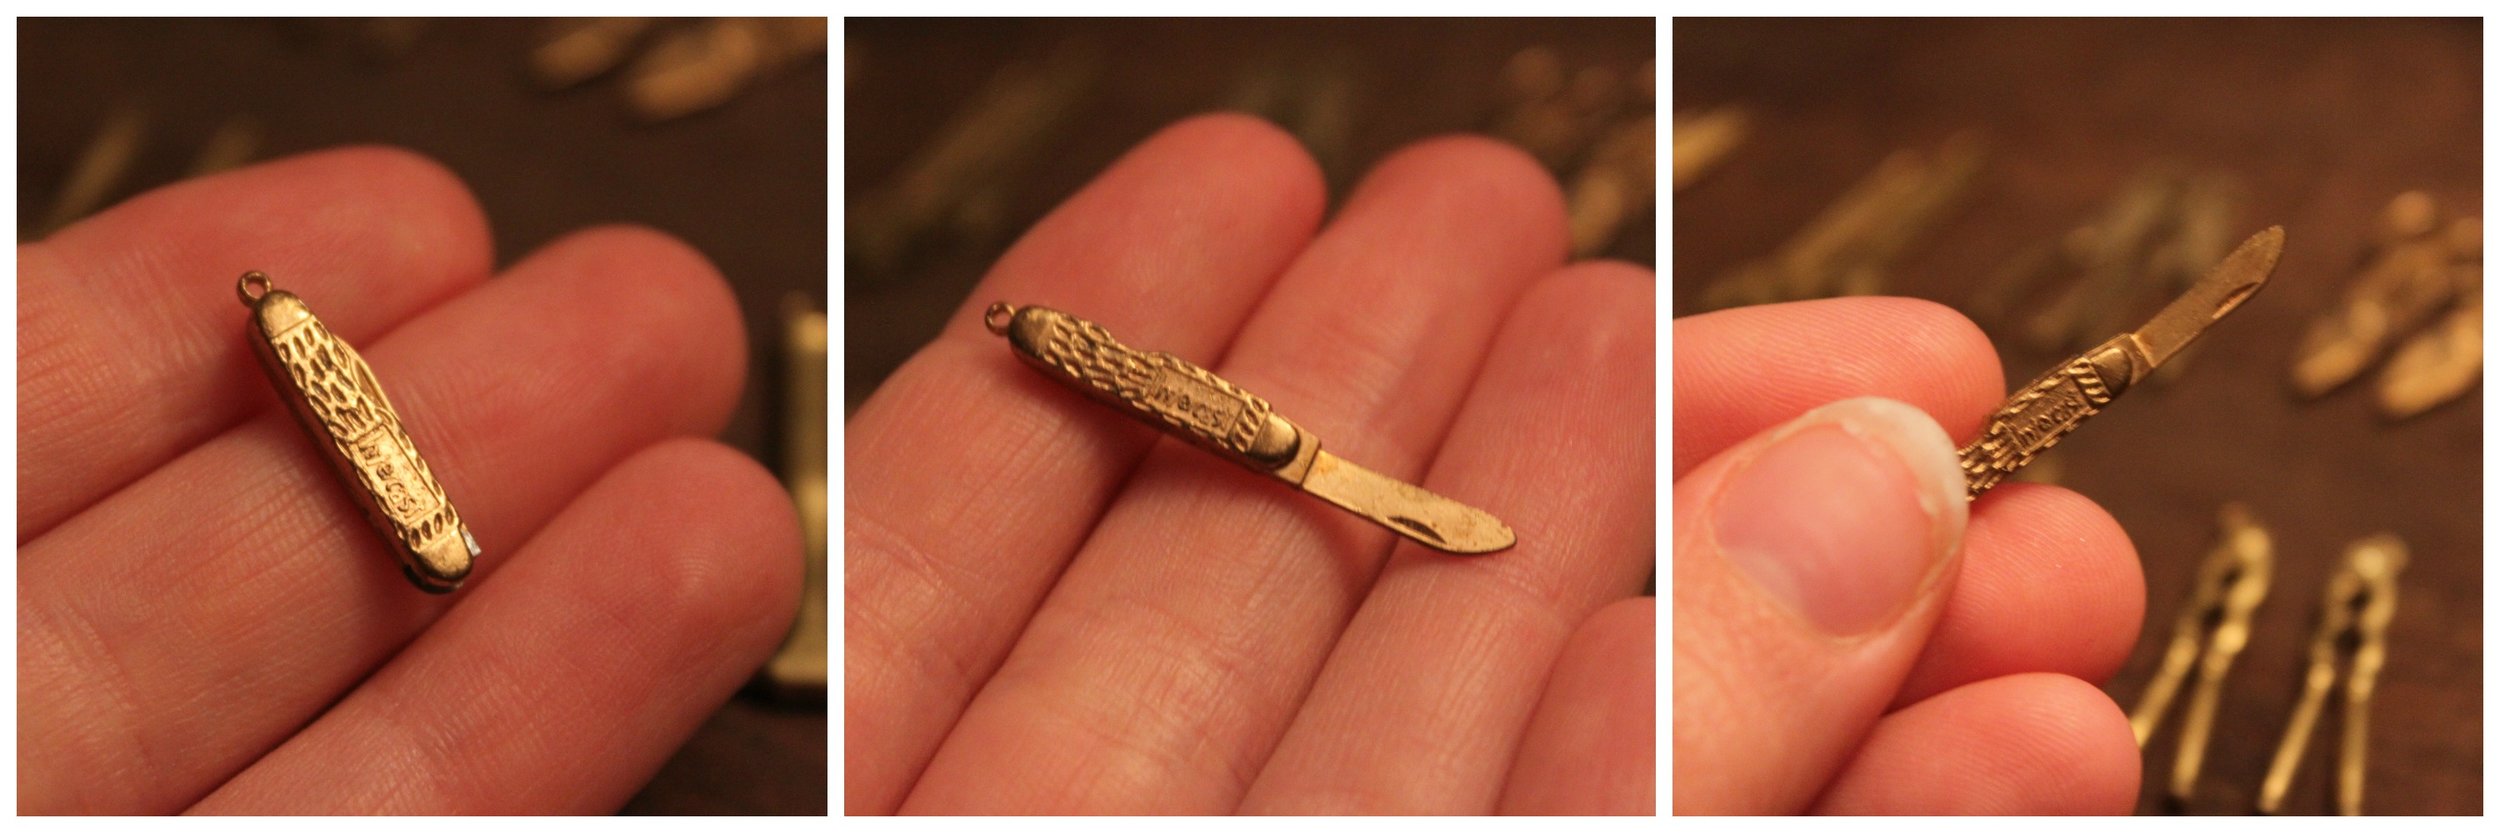 And last, but not least, the pocketknife which is by far the most intricate & dainty. Here's what I made with them!
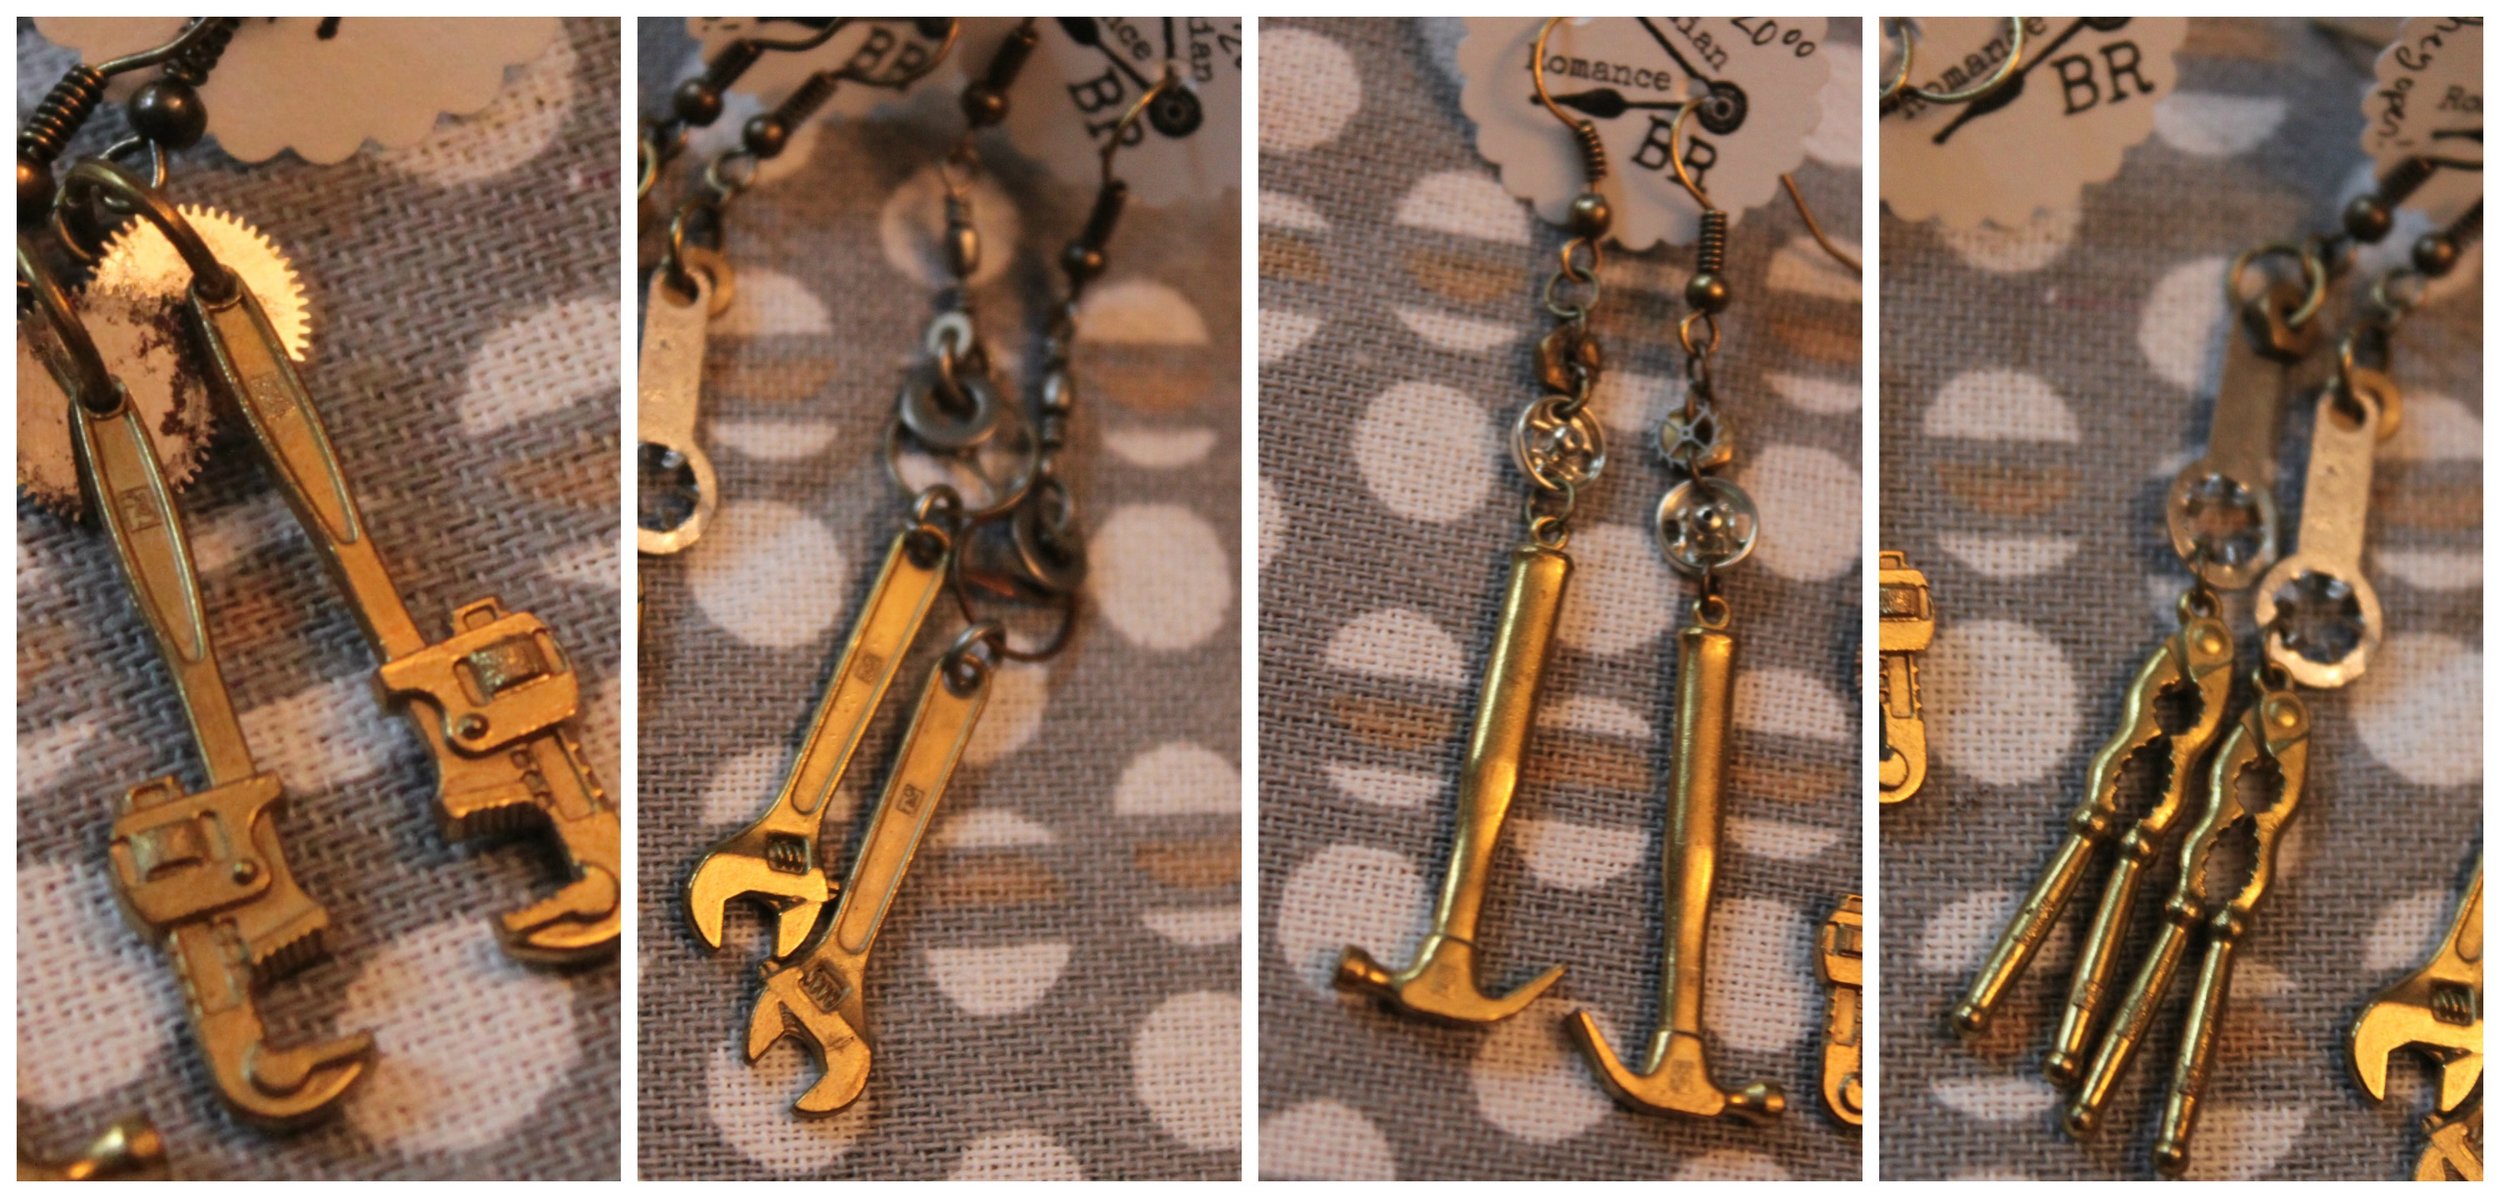 I just love gearrings--especially gearrings that appeal to the airship mechanic & tinkerer in all of us!
A Lazy Day in my Steampunk Studio
Flea Market Finds2 CommentsFirst off, I would like to say thanks for reading my blog! I've noticed that there are a number of you reading in other parts of the world--so hi to my neighbors in Canada, Bonjour France, Cheerio England, How are things Australia? Ciao Italy, Hei Finland, Guten Tag Germany, and Cześć Poland! It's a lazy day here in my little steampunk studio. I received a care package of flea market treasures from my family yesterday and today I have set down to research some of the oddities they sent.
Pictured below is a tiny toy bust of a woman, an early 19th century Fireman's medal (marked Station no. 2), and transistors (which are so breathtakingly intricate & add pops of color to the monotone metal that they are a frequent staple in my jewelry).
 Among the many neat bits & bobs sent were 2 medals. The first is for Second Prize in the All Round Contest of the Outing Club, located in Hartford, Connecticut. It was issued and engraved with the year, 1891. The Outing Club was one of many gentleman's clubs in America. Men would gather for excursions outdoors, namely hiking, fishing, hunting, and swimming. On the back of the pin the name of the medal-maker is imprinted: a Mr. John Harriott of Boston, Massachusetts (located at 3 Winter Street). Mr. Harriott was a silversmith, enameler, engraver and jeweler who even made 2 medals for J.P. Morgan's son, Evan on behalf of the Loon Lake Historical Society.
 The other medal, made to mark someone's membership to the Woodstock Council No. 147, was made by The M.C. Lilley & Co. who operated out of Columbus, Ohio. According to the Columbus Metropolitan Library, M.C. Lilley & Co. was "[f]ounded in the mid-1860s, the M. C. Lilley Company was world renowned as manufacturers of regalia." They made a number of items: swords, flags, emblems, uniforms, and of course, medals. Among their many customers were the Freemasons, Knights of Pythias, West Point & Annapolis, and a number of fraternities. The company was founded by 4 veterans of the Civil War: Mitchell Campbell Lilley, John Siebert, and Charles & Henry Lindenberg.
 The greatest surprise of all was the 9 tintype photos that I found wrapped up in a piece of crinkly tissue paper. I have no clues as to who these souls were, where they came from (except to hazard a guess that they were from Connecticut or New York), or what their names were. I love old photographs just the same--despite their endless mystery.
 Last but certainly not least, out of this marvelous box I pulled out a pair of children's goggles. My favorite part of these goggles is that they were marked by the little adventurer--Billy--who wrote his name on one of the flaps. These motorcycle/automobile goggles were made in France, marked on the metal rim as "L'express Brevet L.C.B.F. 433606."
 I am lucky that I have such a supportive family--who are also avid flea marketers & junk-lovers themselves! Who are your partners in crime when it comes to thrifting, flea markets, & antiquing?
The Beauty of Collaboration
Fashion, InspirationCommentThis weekend my jewelry & accessories were used in a steampunk fashion shoot & workshop for photographers. Here is a selection of stunning photographs taken by the very talented Chuck Coleman, of CCI Agency and Steamers World, to whom I owe a tremendous Thank You. Chuck captured photos that seem as if they were plucked from one of the many fictional worlds that inspire me! I can't wait to see how Chuck's artistry grows and hope that this will be the start of many more collaborations!  Pictured above is the Frankly Scarlet Top Hat, Skeleton Umbrella, Golden Gear Cameo Necklace, and Spring Earrings!
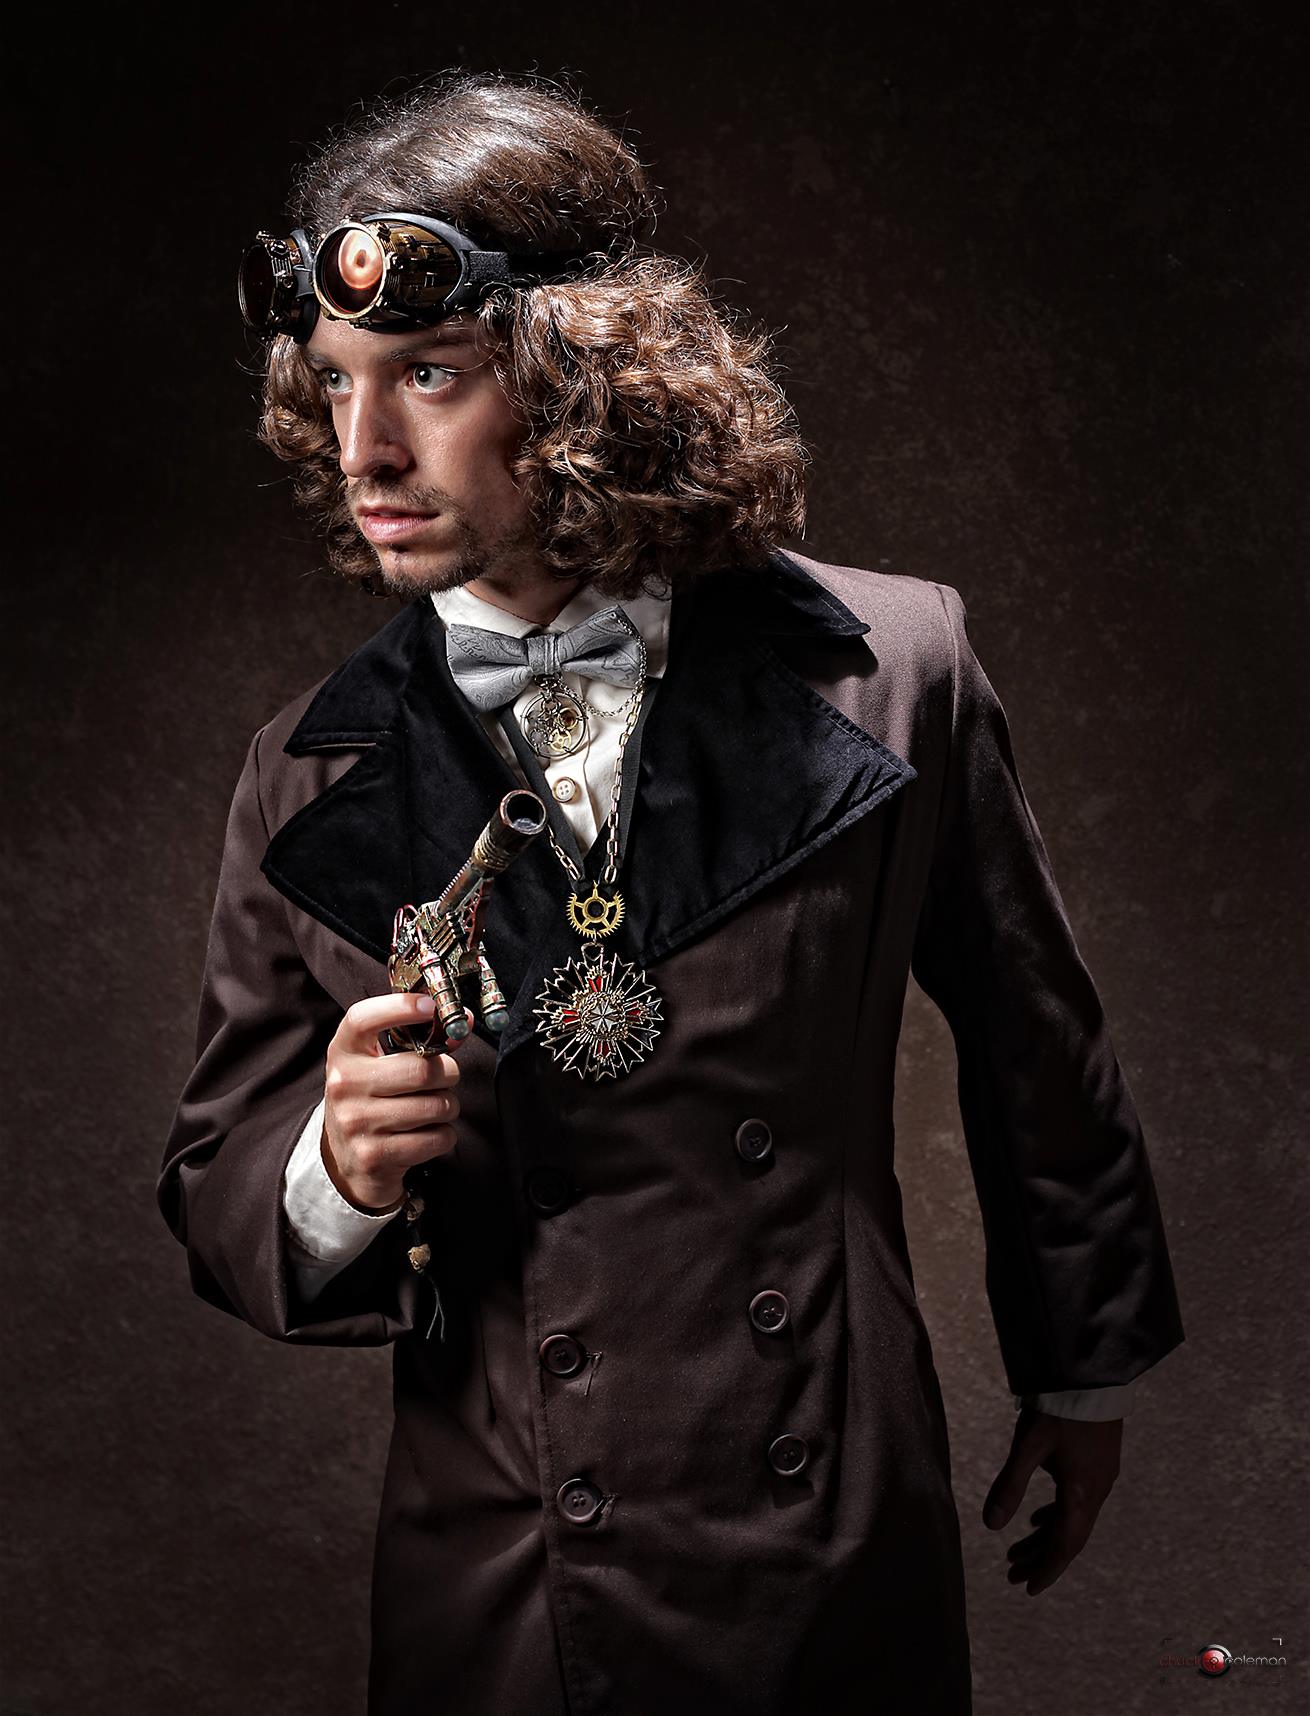 Pictured above is the Pocketwatch Bow Tie (a favorite of mine!) and a Royal Steampunk Medallion. Is this chap dashing?
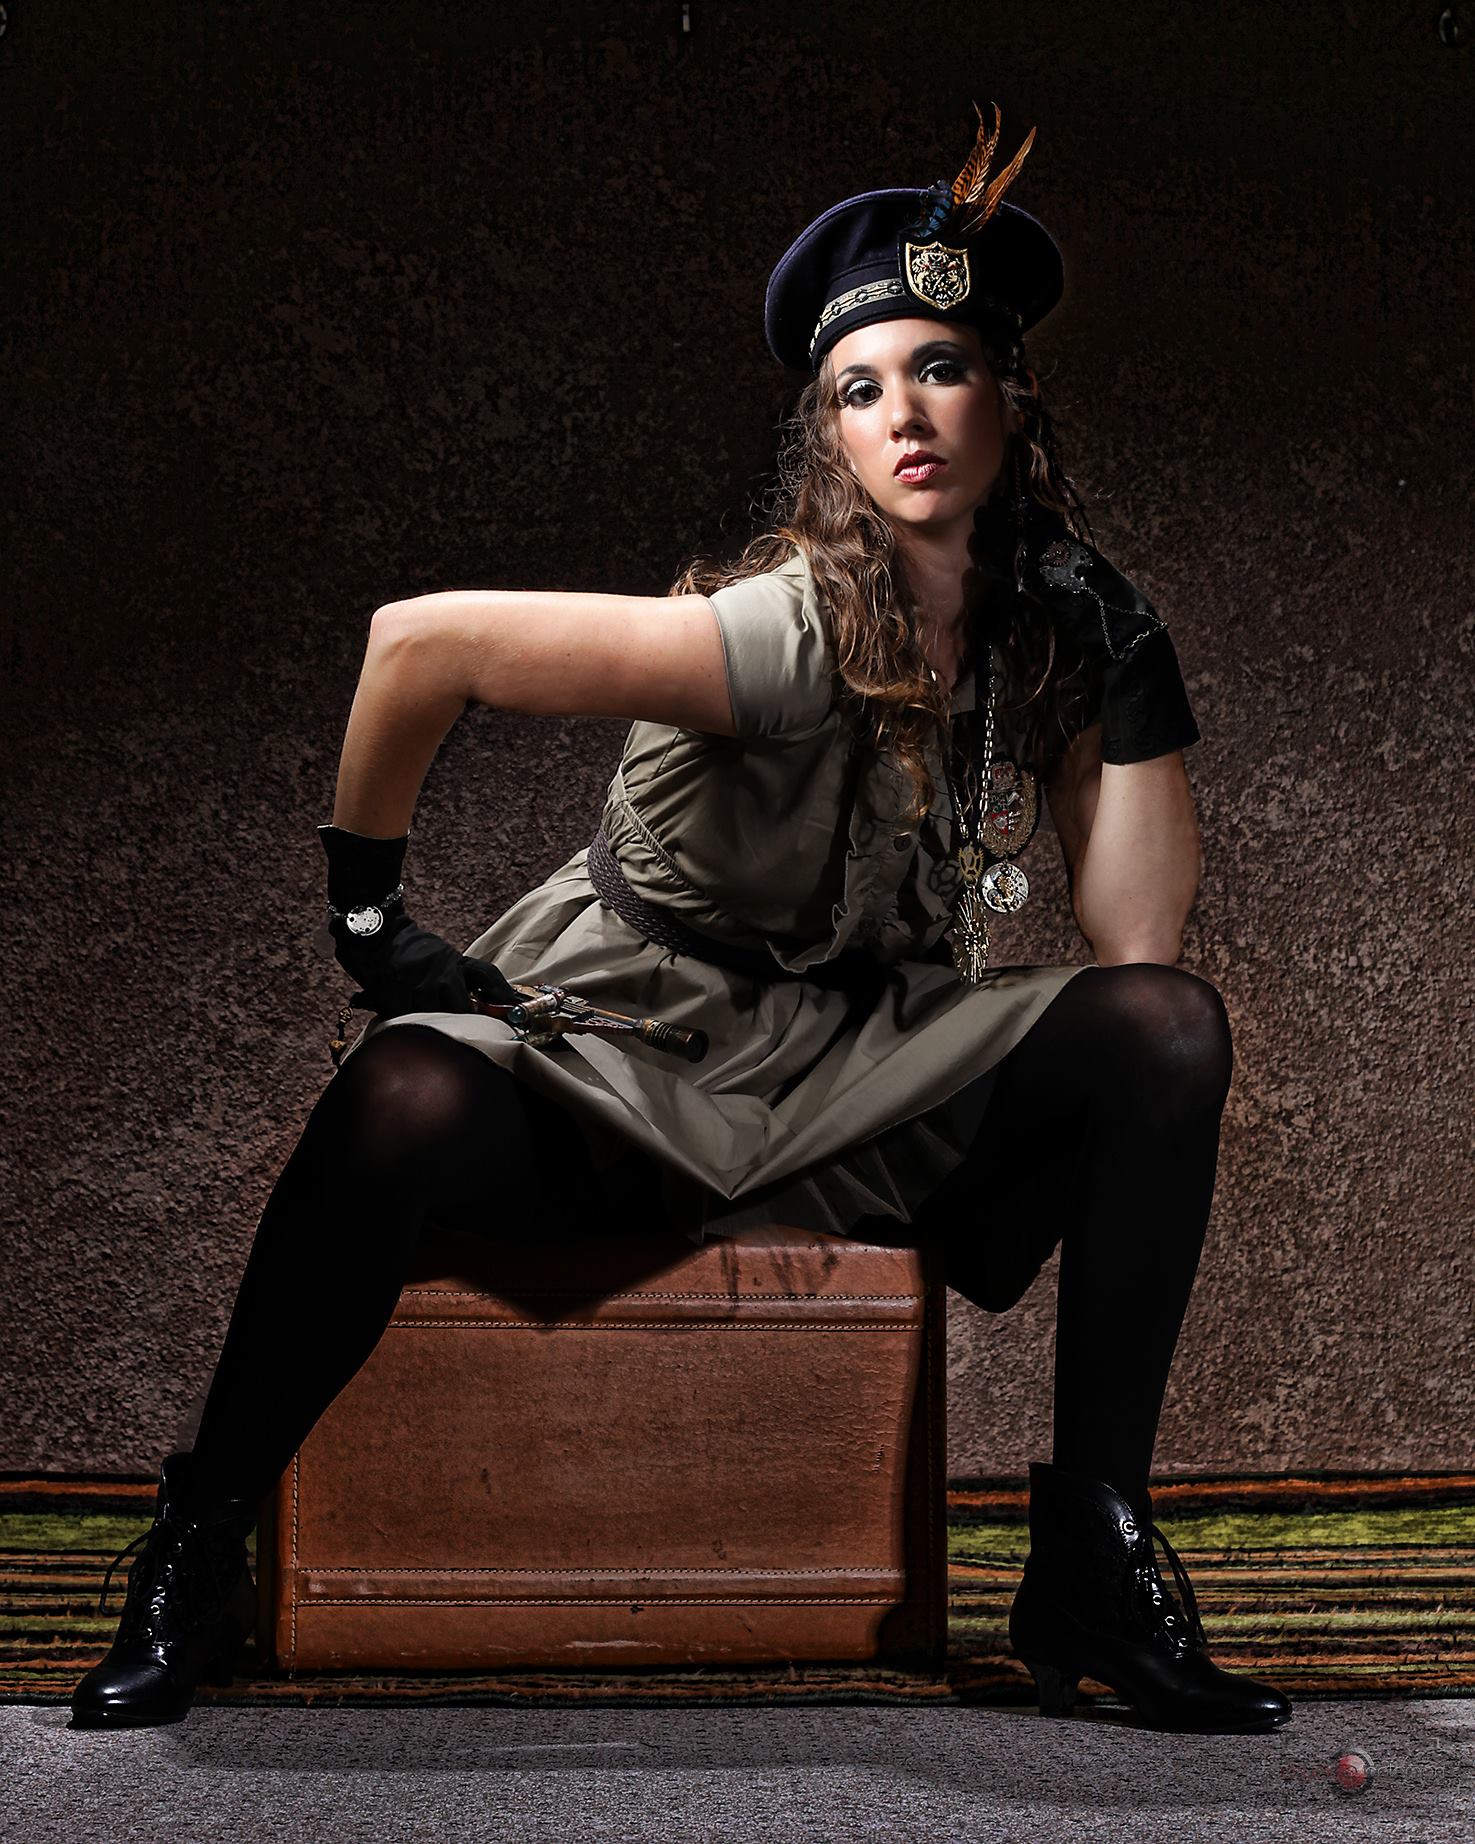
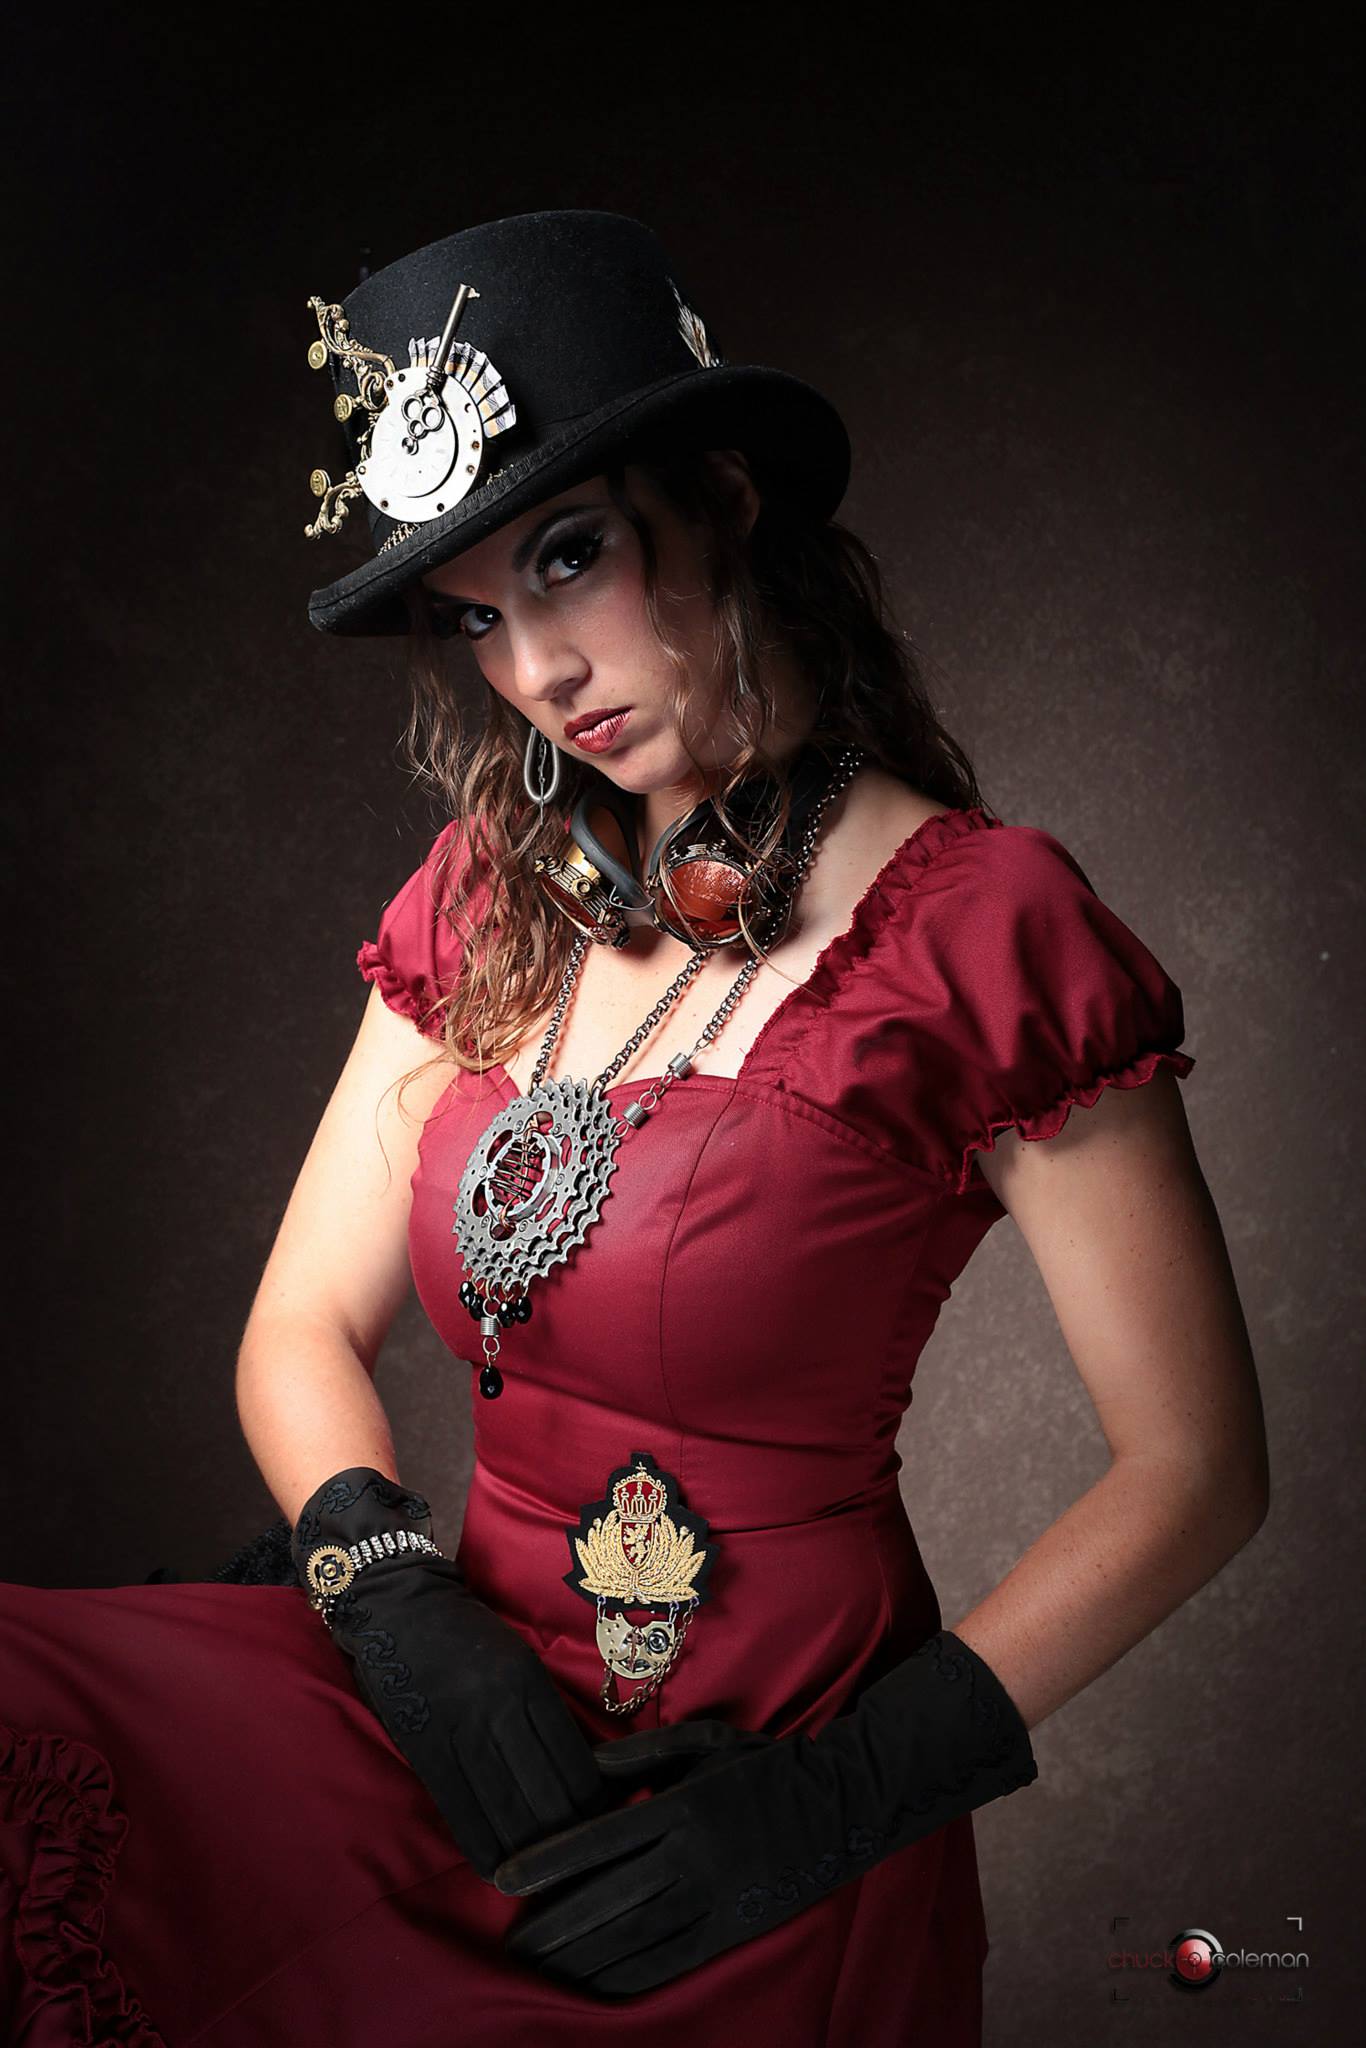 Pictured above is the Time Conductor's Top Hat, Steampunk Princess Braclet, Royal Crest Medal, Spring Earrings, and a Steampunk Bicycle Gear Necklace. Strong, beautiful, and not to be trifled with!
 Pictured above is the Steampunk Highlander Hat, Compass Slave-Bracelet, Royal Steampunk Crest Medal, Simply Steampunk Gear Bracelet, and a Royal Steampunk Medallion.
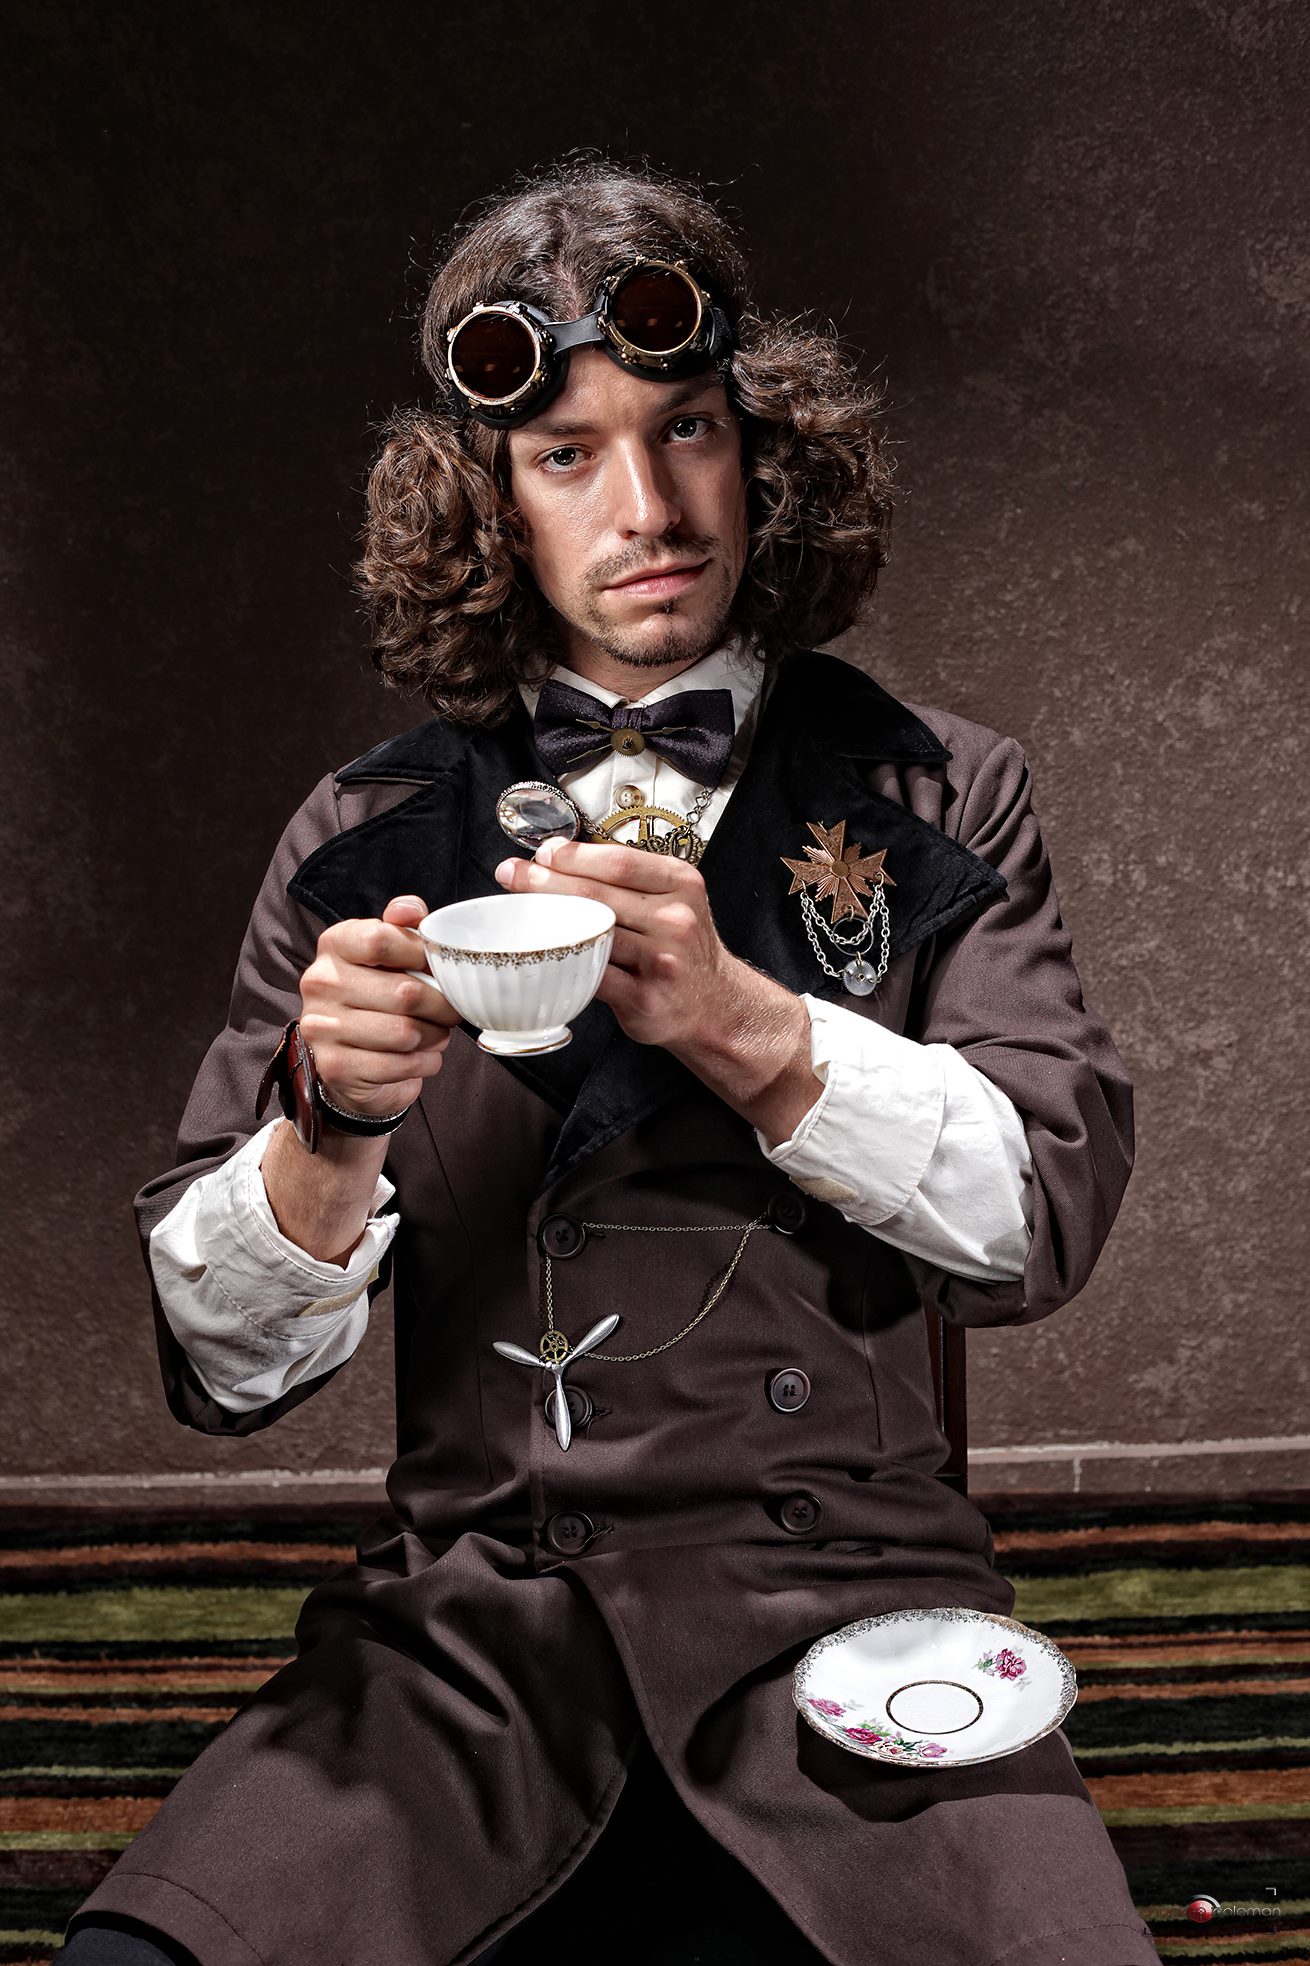 Time for tea? Why I don't mind if I do! Pictured above is the Airship Propeller Necklace, Tim-Traveler's wrist watch, Steampunk Medal, Keyhole Gear Lariat, and the Tick-Tock Bow Tie! Does he look like an Earl Gray to you? (Pardon the pun! It was too delicious to resist!)
 This dapper dame is wearing the Aunte Mame Bowler (my mom's favorite) and a pair of dangly gearrings! Isn't she fabulous?!
 And last, well for now--I will be posting these pictures and more on my gallery page, is this wonderful photo! Pictured on the gentlemen are two Royal Crest Steampunk Medals and a Royal Steampunk Medallion. On the lovely lady, is the Golden Gear Cameo Necklace, Compass Bracelet, Gearrings, Time Conductor's Top Hat, and of coarse, the skeleton umbrella!
Thanks again to Chuck Coleman, to all of the fabulous models, and to all of the other artists who collaborated to make this shoot possible! Now, off to make more steampunk treasures!
Steampunk Flea Market Finds!
Flea Market Finds, InspirationCommentI got a lovely care package from my family in New York today. In typical care packages, most people find their favorite sweets and little trinkets & edibles. Mine, however, are filled with machine parts, cuckoo clock innards, and flea market finds from my whole family. It's really wonderful to get one of these packages and it often results in holing myself up for the next few days and creating lots of new steampunk pieces.
There are so many great finds that I had to share them with you! The first thing I found inside was this dainty little bracelet. Clearly it belonged to a lady named Margaret and was a token of her love of Everett. Margaret & Everett sittin' in a tree...K-I-S-S-I-N-G. Pieces like this always make me wonder--were they ever married, or did their love had some torrid end? 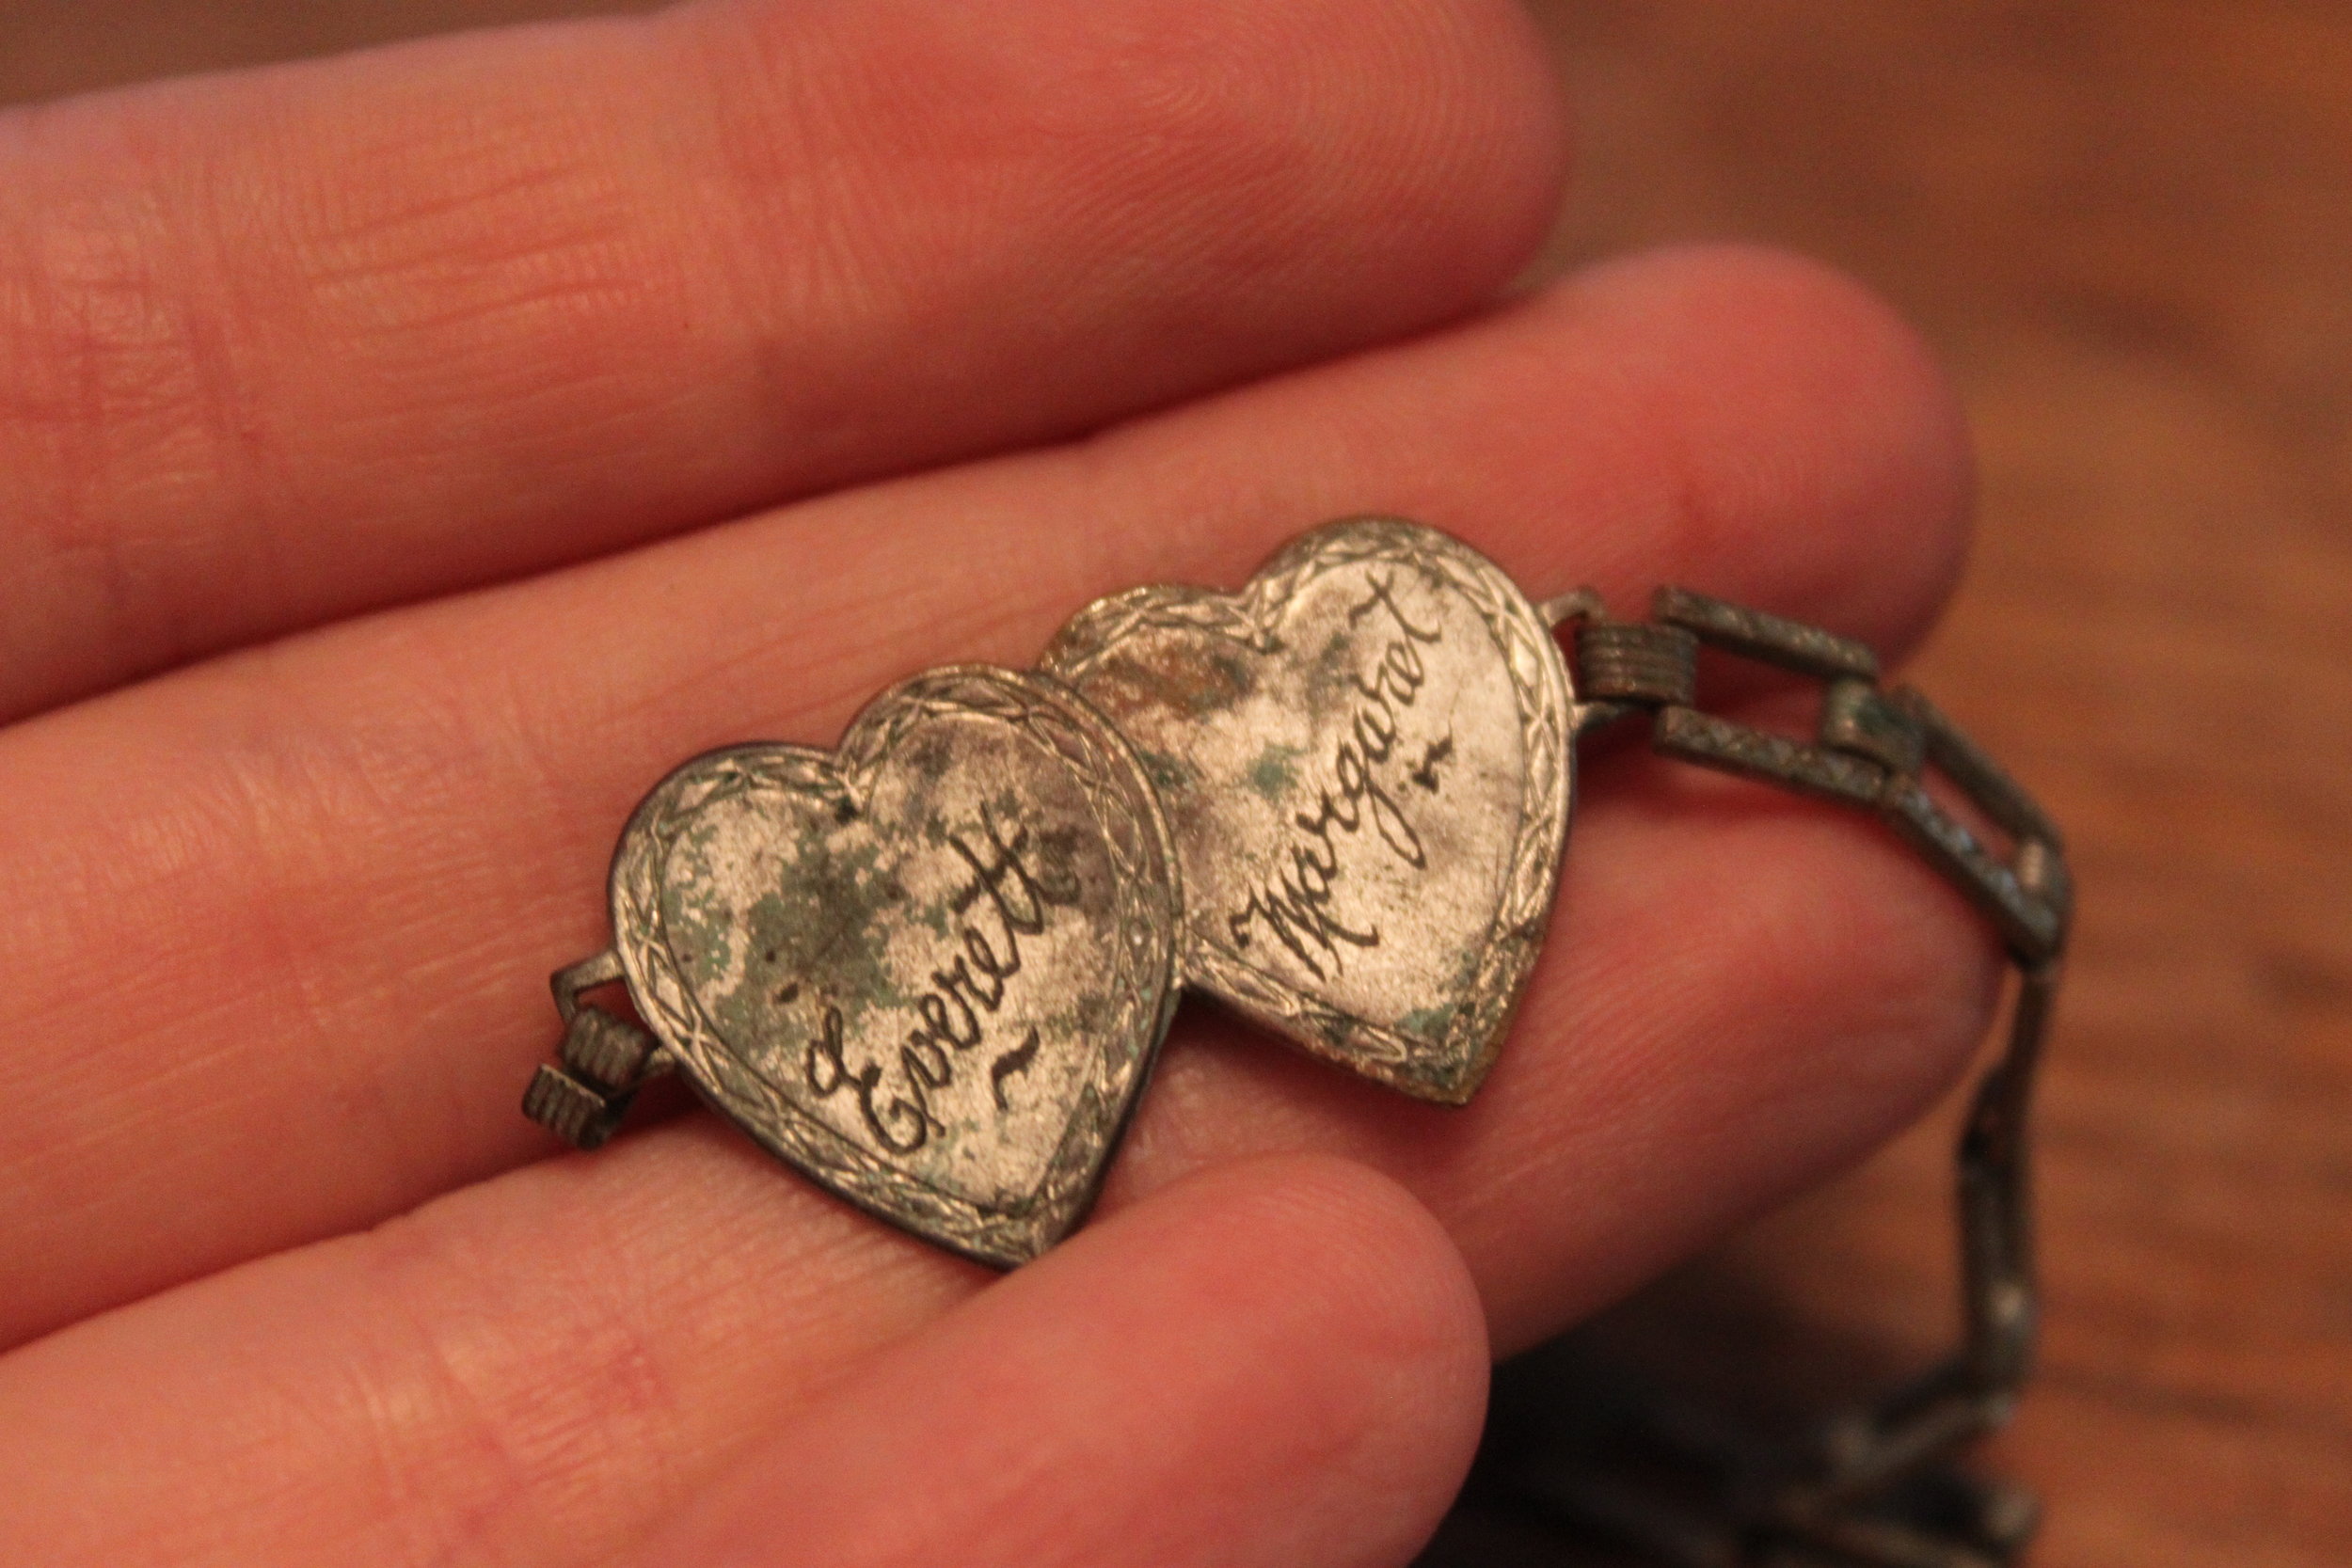 Another treasure I unwrapped was a broken pocketwatch. Some pocketwatches are engraved with a maker's seal or brand. The most fascinating tidbit of history is that this pocketwatch is stamped with the word "Remontoir" which indicates that this watch is powered by a mainspring on its own. Before 1860, even pocketwatches had to be wound with a clock key. Another wonderful detail is that the clock is engraved with the original owner's name--a Mr. Irving Abel.
My godmother found this next piece, a silver & pearl pin with the words--"Ais Urites Es Usaugu" written on the front. The pin features a women standing underneath a tree by a lake at sunset. I had searched for a translation of the words to no avail. I believe they are a Latvian dialect & that the woman under the tree is Zeme māte, or Mother Earth, a figure in Latvian dainas (or folktales). If anyone has come across this before, please let me know--I'd love to pick your brain. 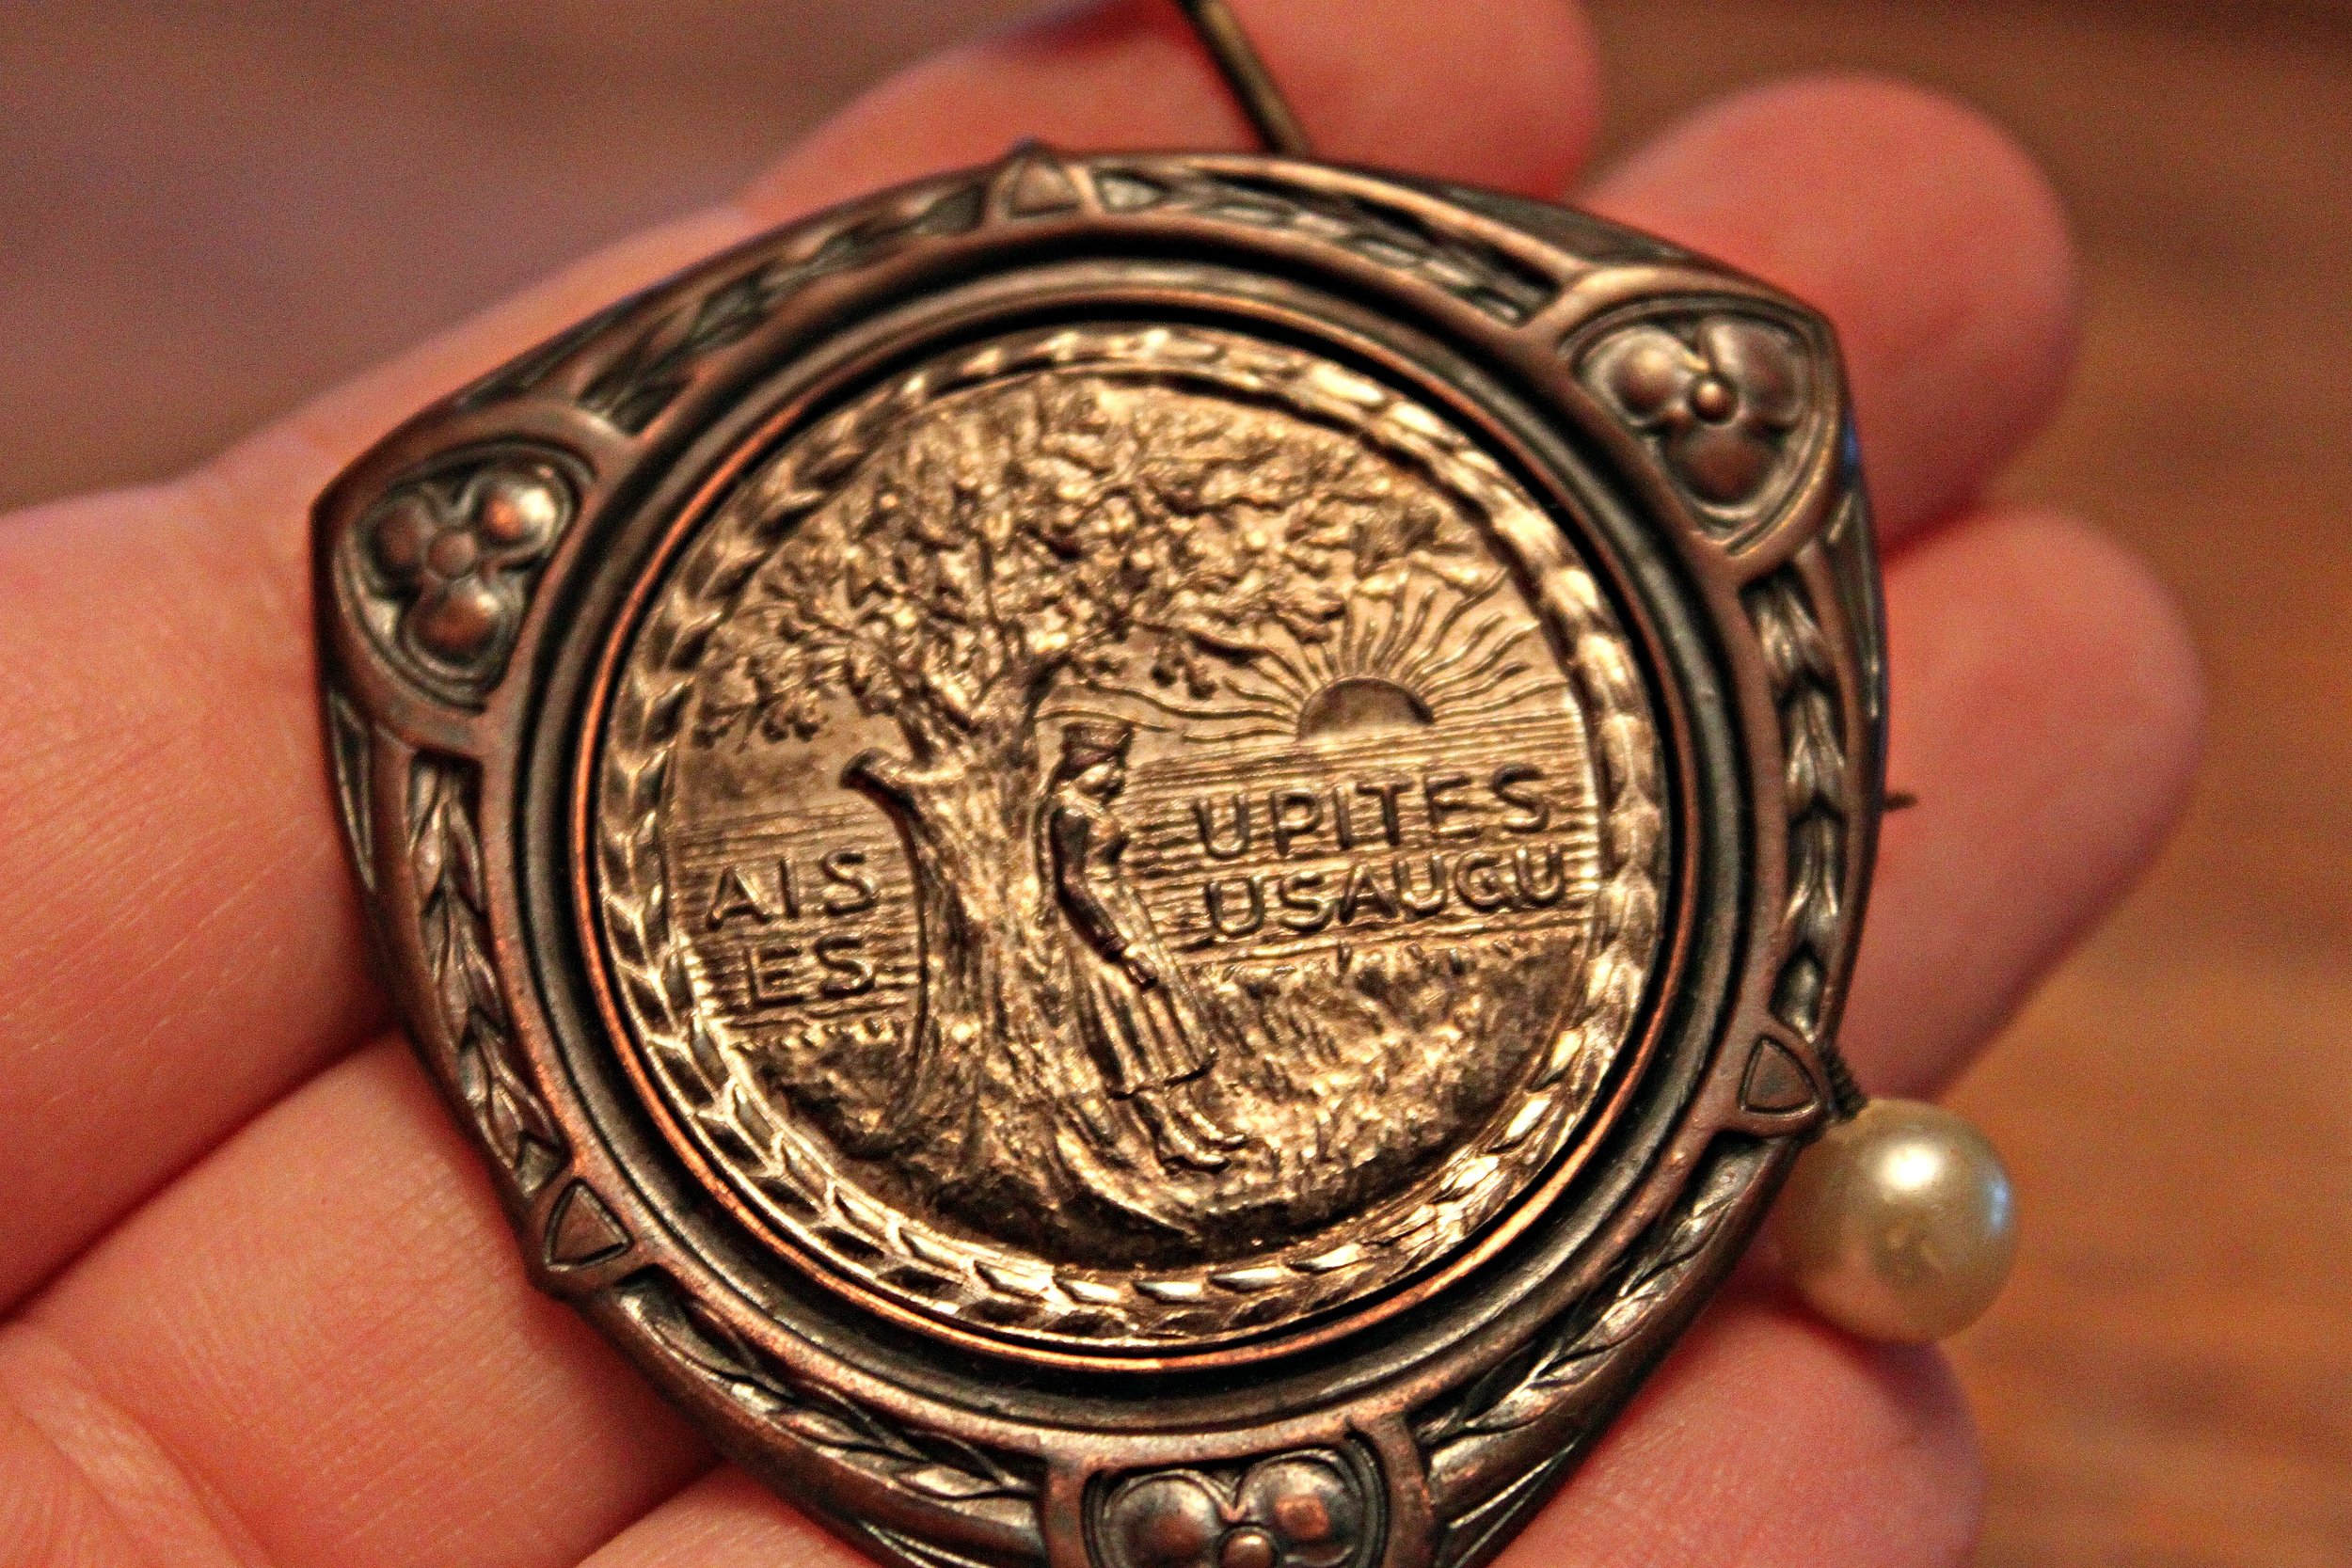
My family, knowing my love of old photos, sent me a tintype photograph of 3 young ladies. I am assuming they are sisters. There is no information about them scrawled on the back. I am left to ponder what their names were and what their lives were like. 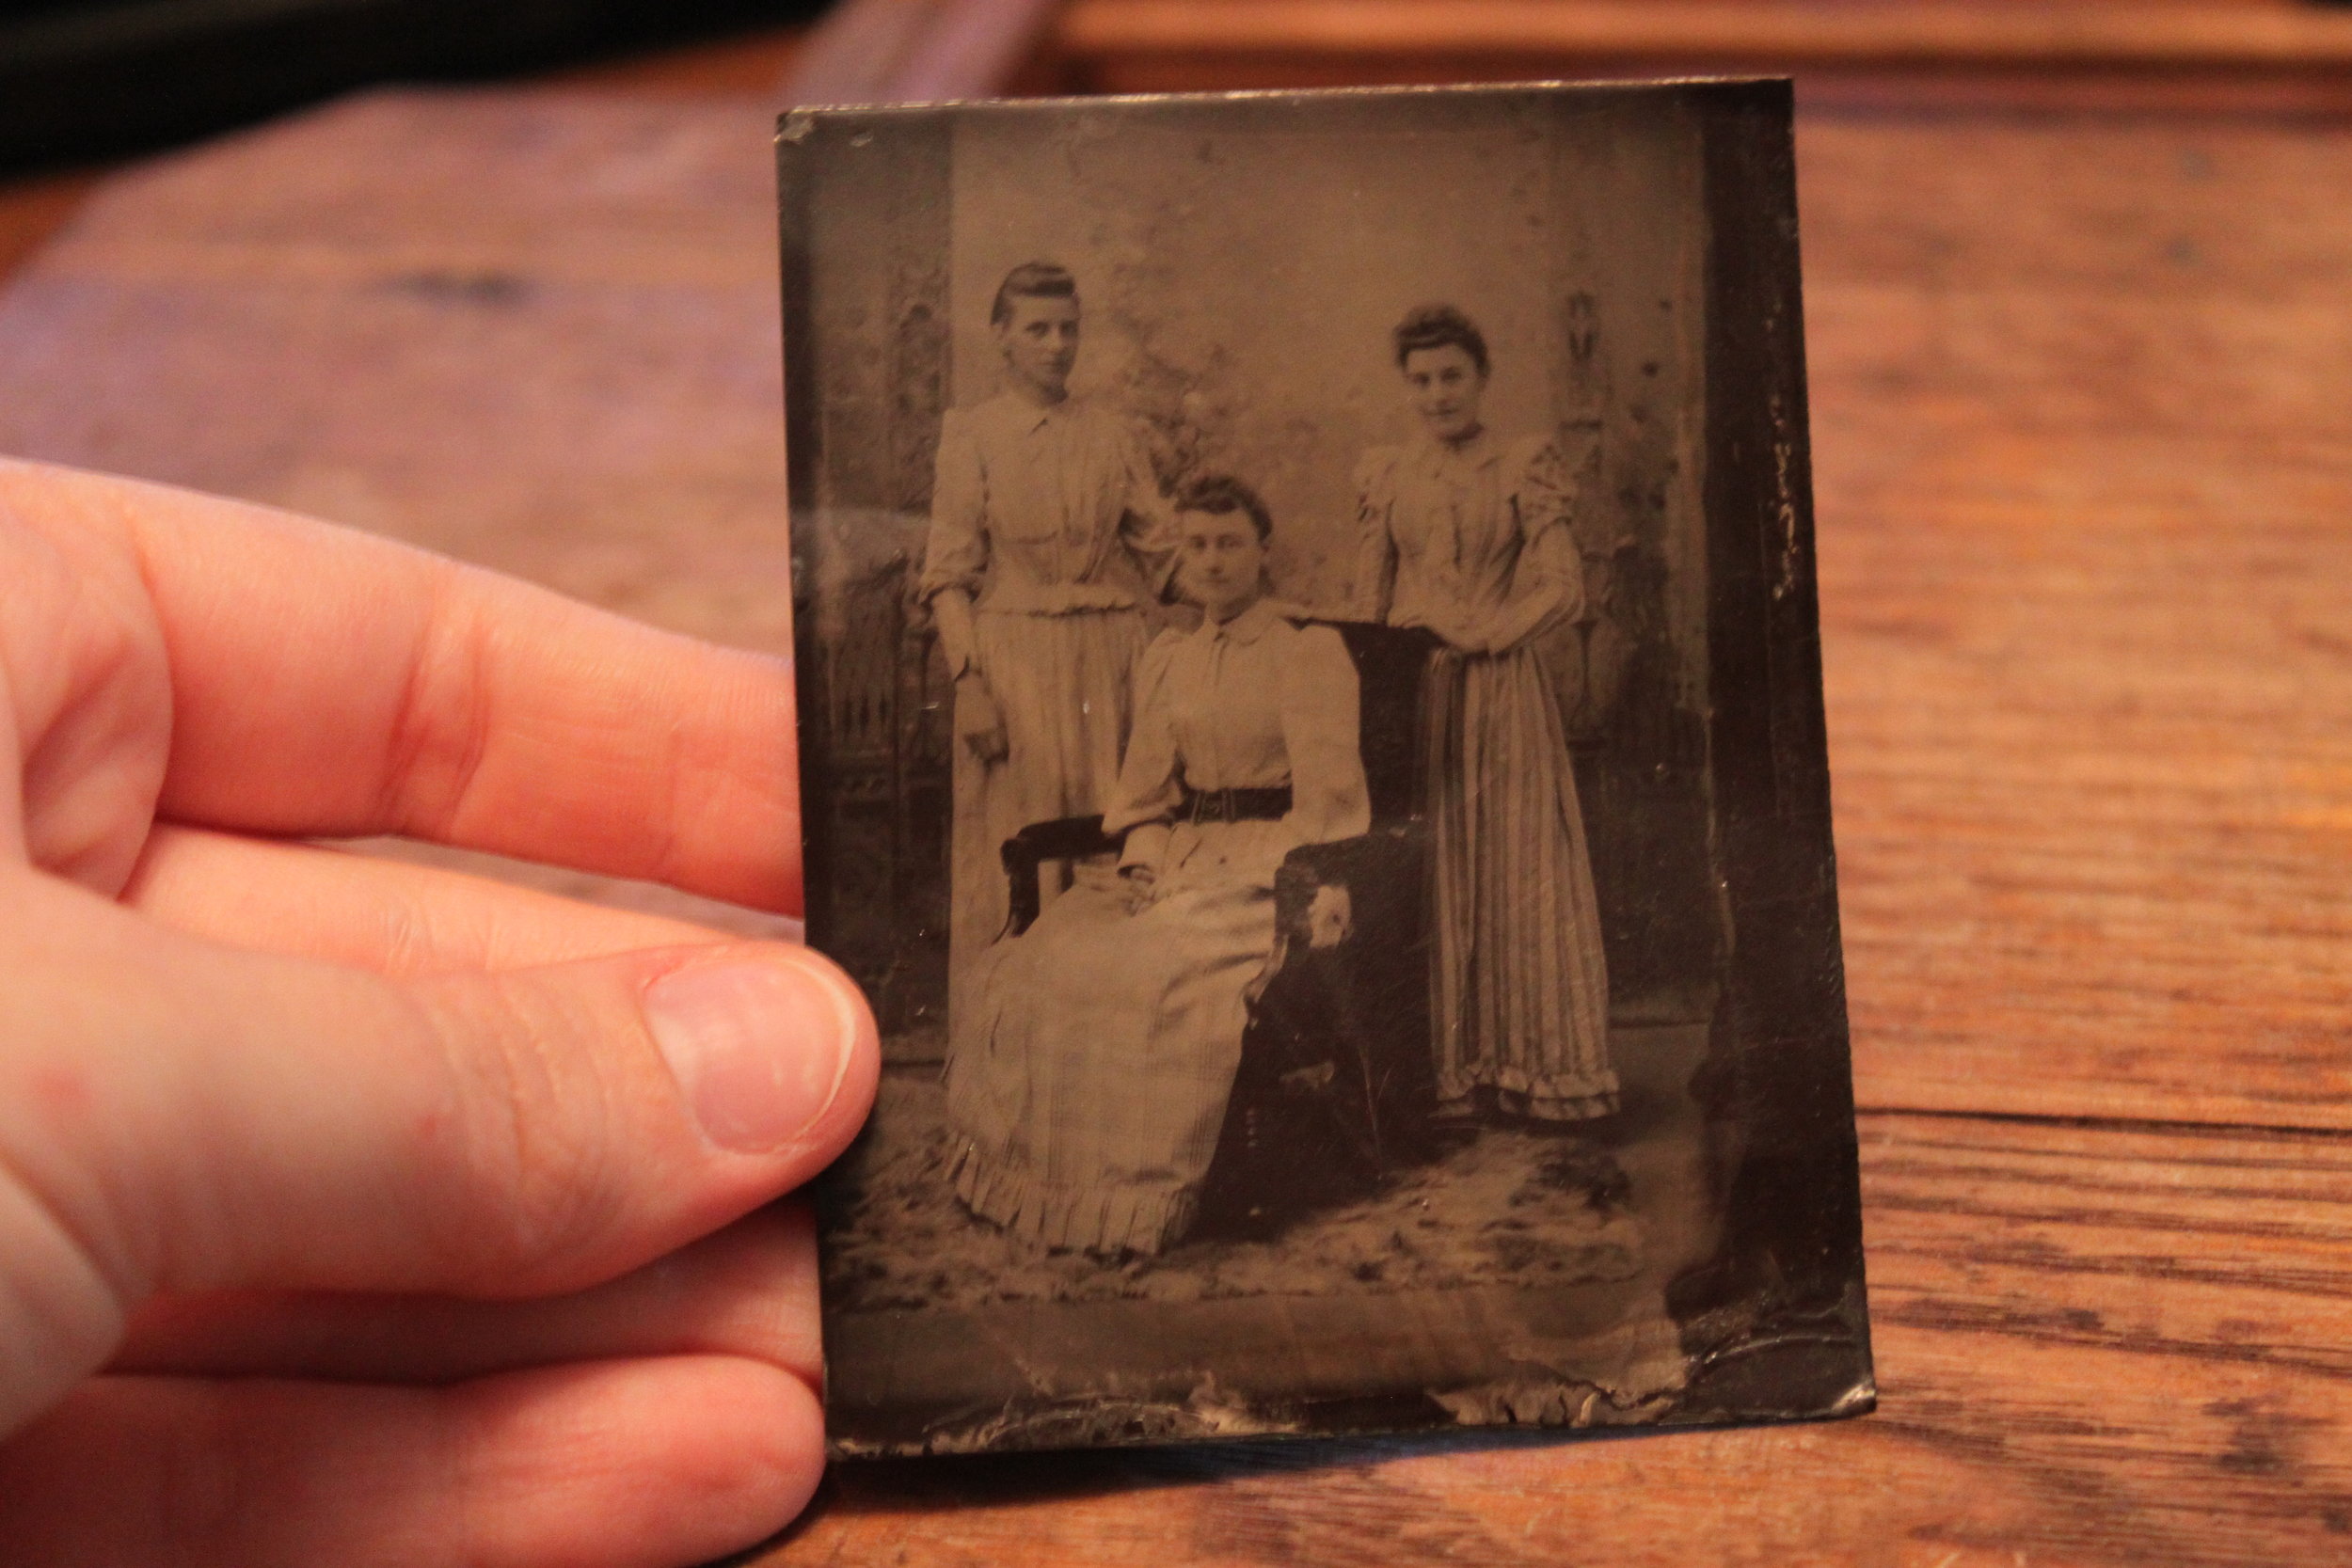 Here's a close up of the sisters.
 Among other flea market treasures, there was a whisk-holder which I am happily converting into a business card holder; a wooden puzzle piece of Oklahoma; and some vintage jewelry to upcycle.
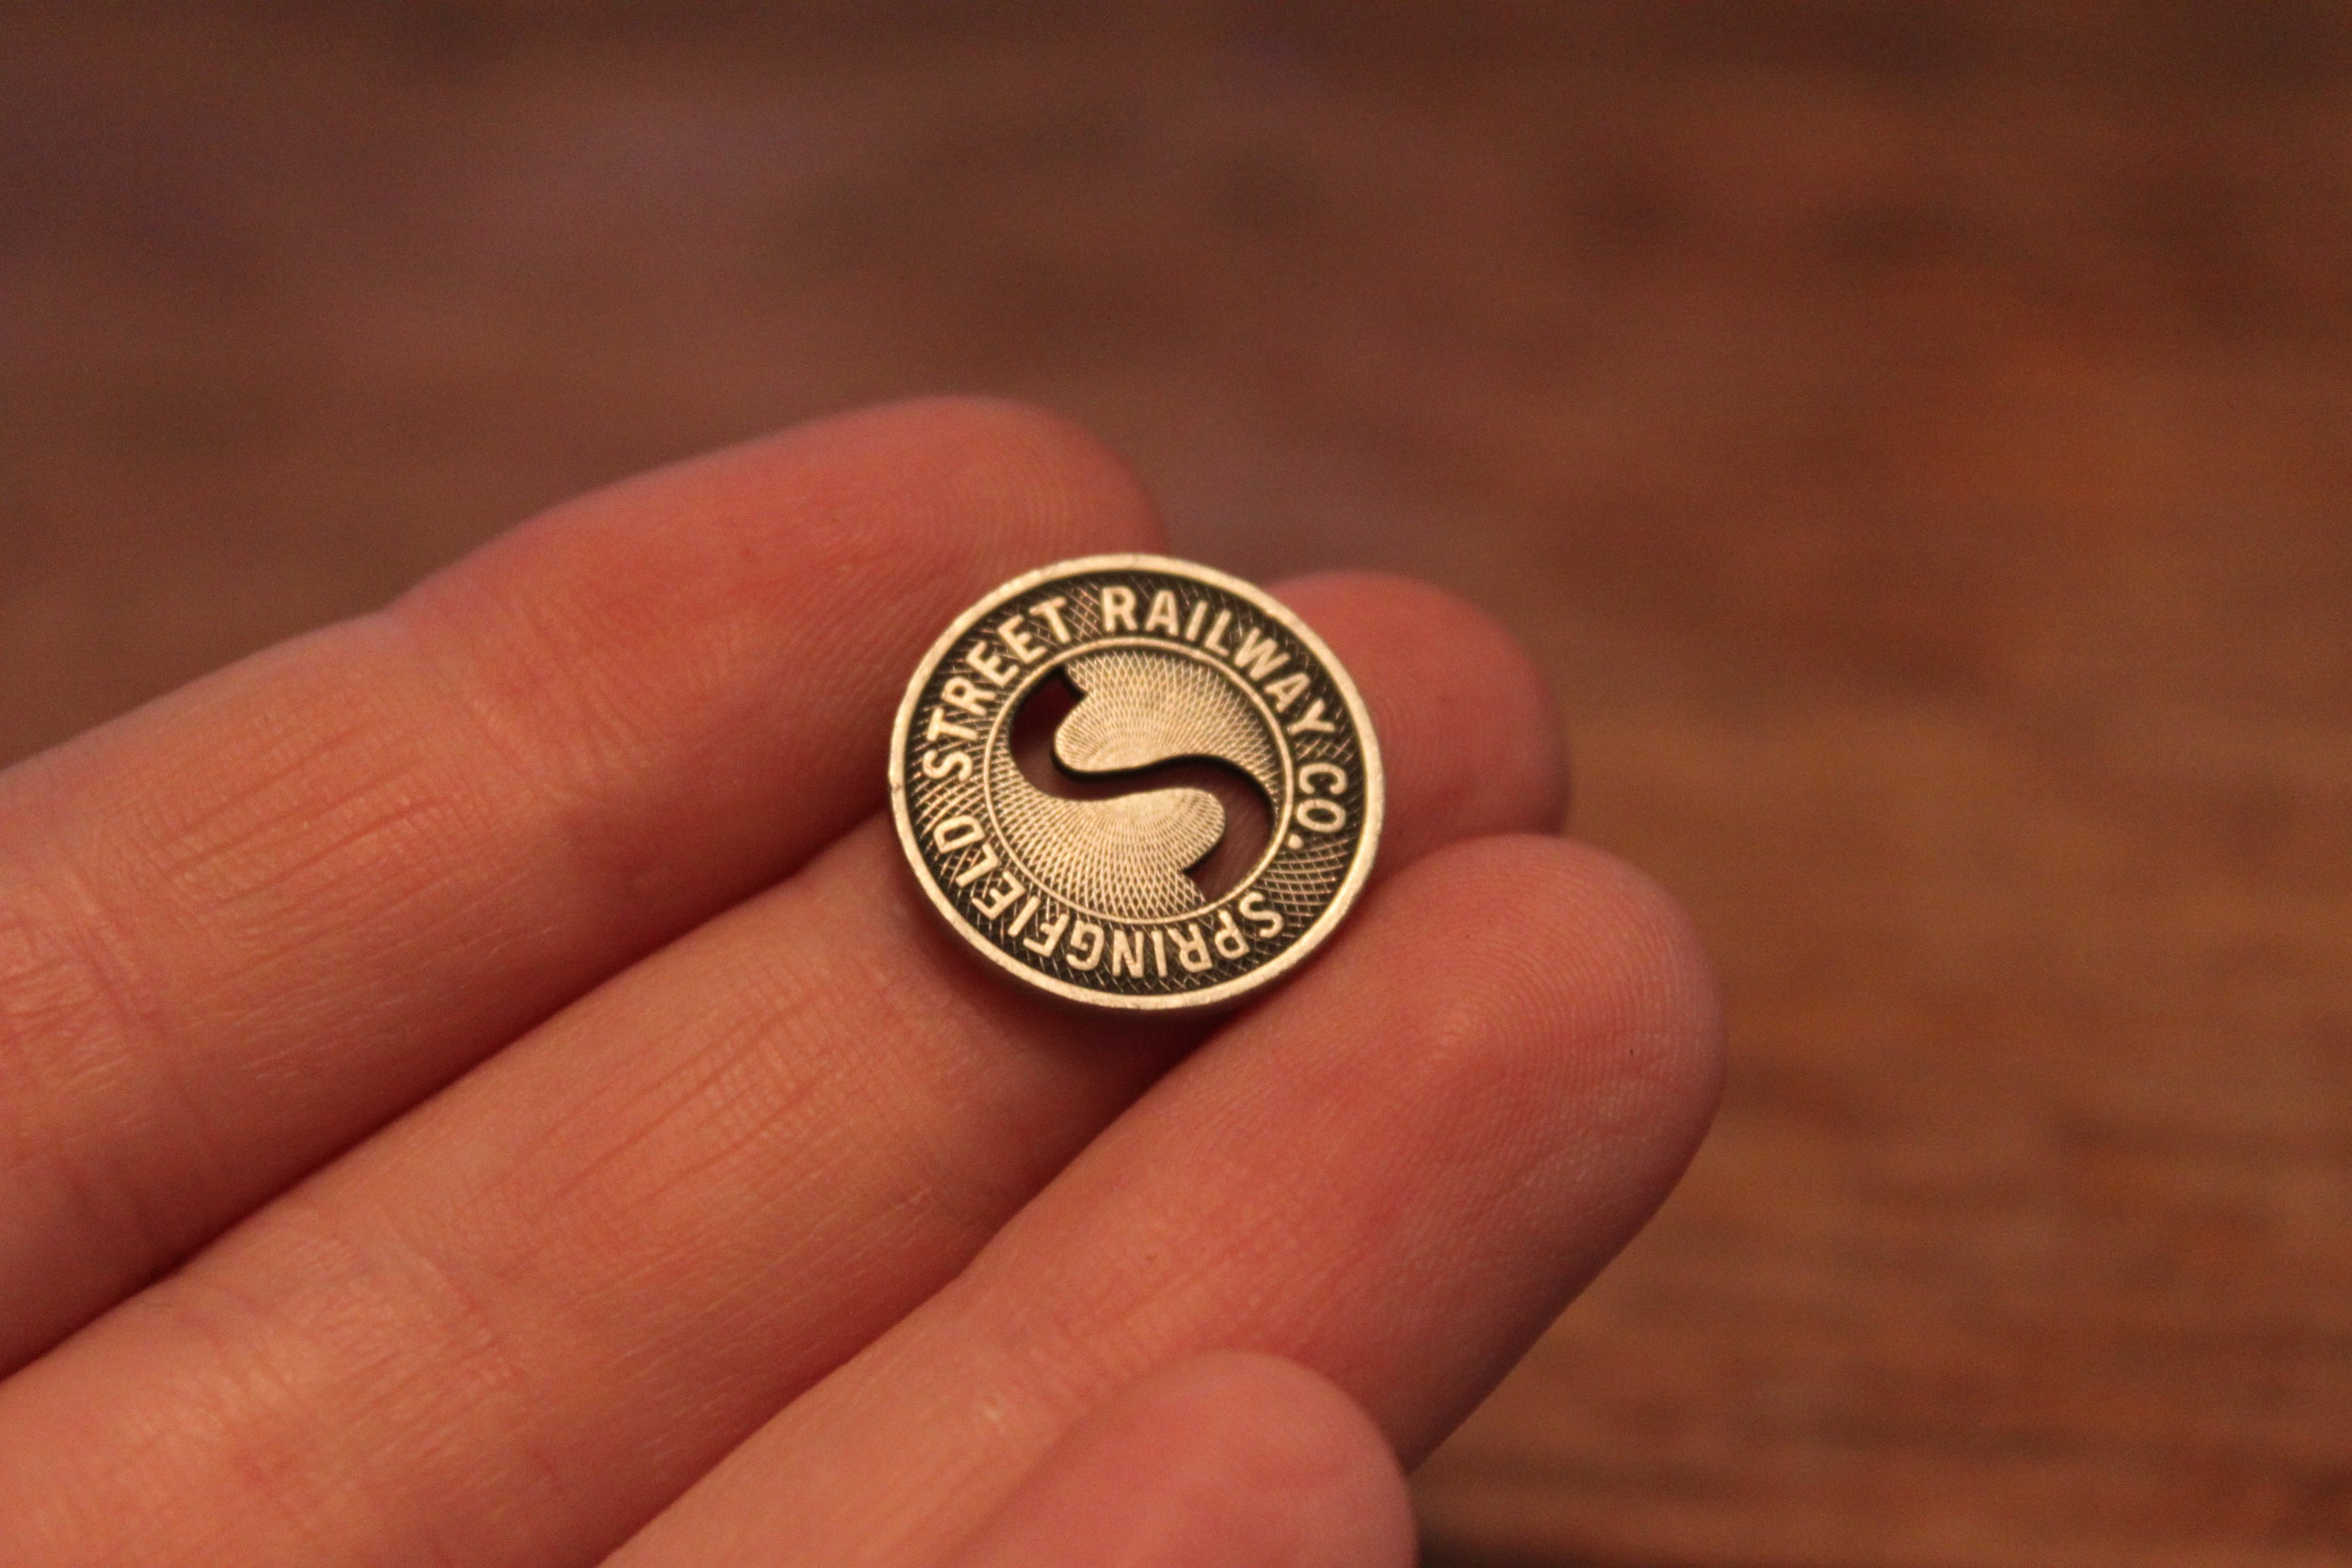
 Another piece that sparked my curiosity were the Springfield Street Railway Co. coins. The company, originally called Palmer and Monson Street Railway, operated out of Springfield, Massachusetts and changed its name in 1901. The coins are from anytime between 1901 and 1927 (when the company stopped its operation and changed to the bus system). A fare was 5 cents. More about the Springfield Street Railway Co. can be found in Albert Sutton Richey's quantitative study, Traffic and Operation: Springfield Street Railway Company published in 1917.
 Well, I am just bursting with ideas & creativity--can't wait to upcycle these incredible pieces of history!
Style Me Steampunk: Shopkeeper's Daughter
Fashion1 CommentI love steampunk fashion & accessories–in fact, I love these 2 things so much that I cannot relegate them solely to cons, shows, or Halloween. “Style me Steampunk” is a series of blog posts on how to infuse your everyday wardrobe with a steampunk flair. From dressy to casual, office appropriate attire to outfits you can wear when you paint the town red–I will offer up ideas for outfits that will hopefully inspire some of you to dip into your closet and get creative!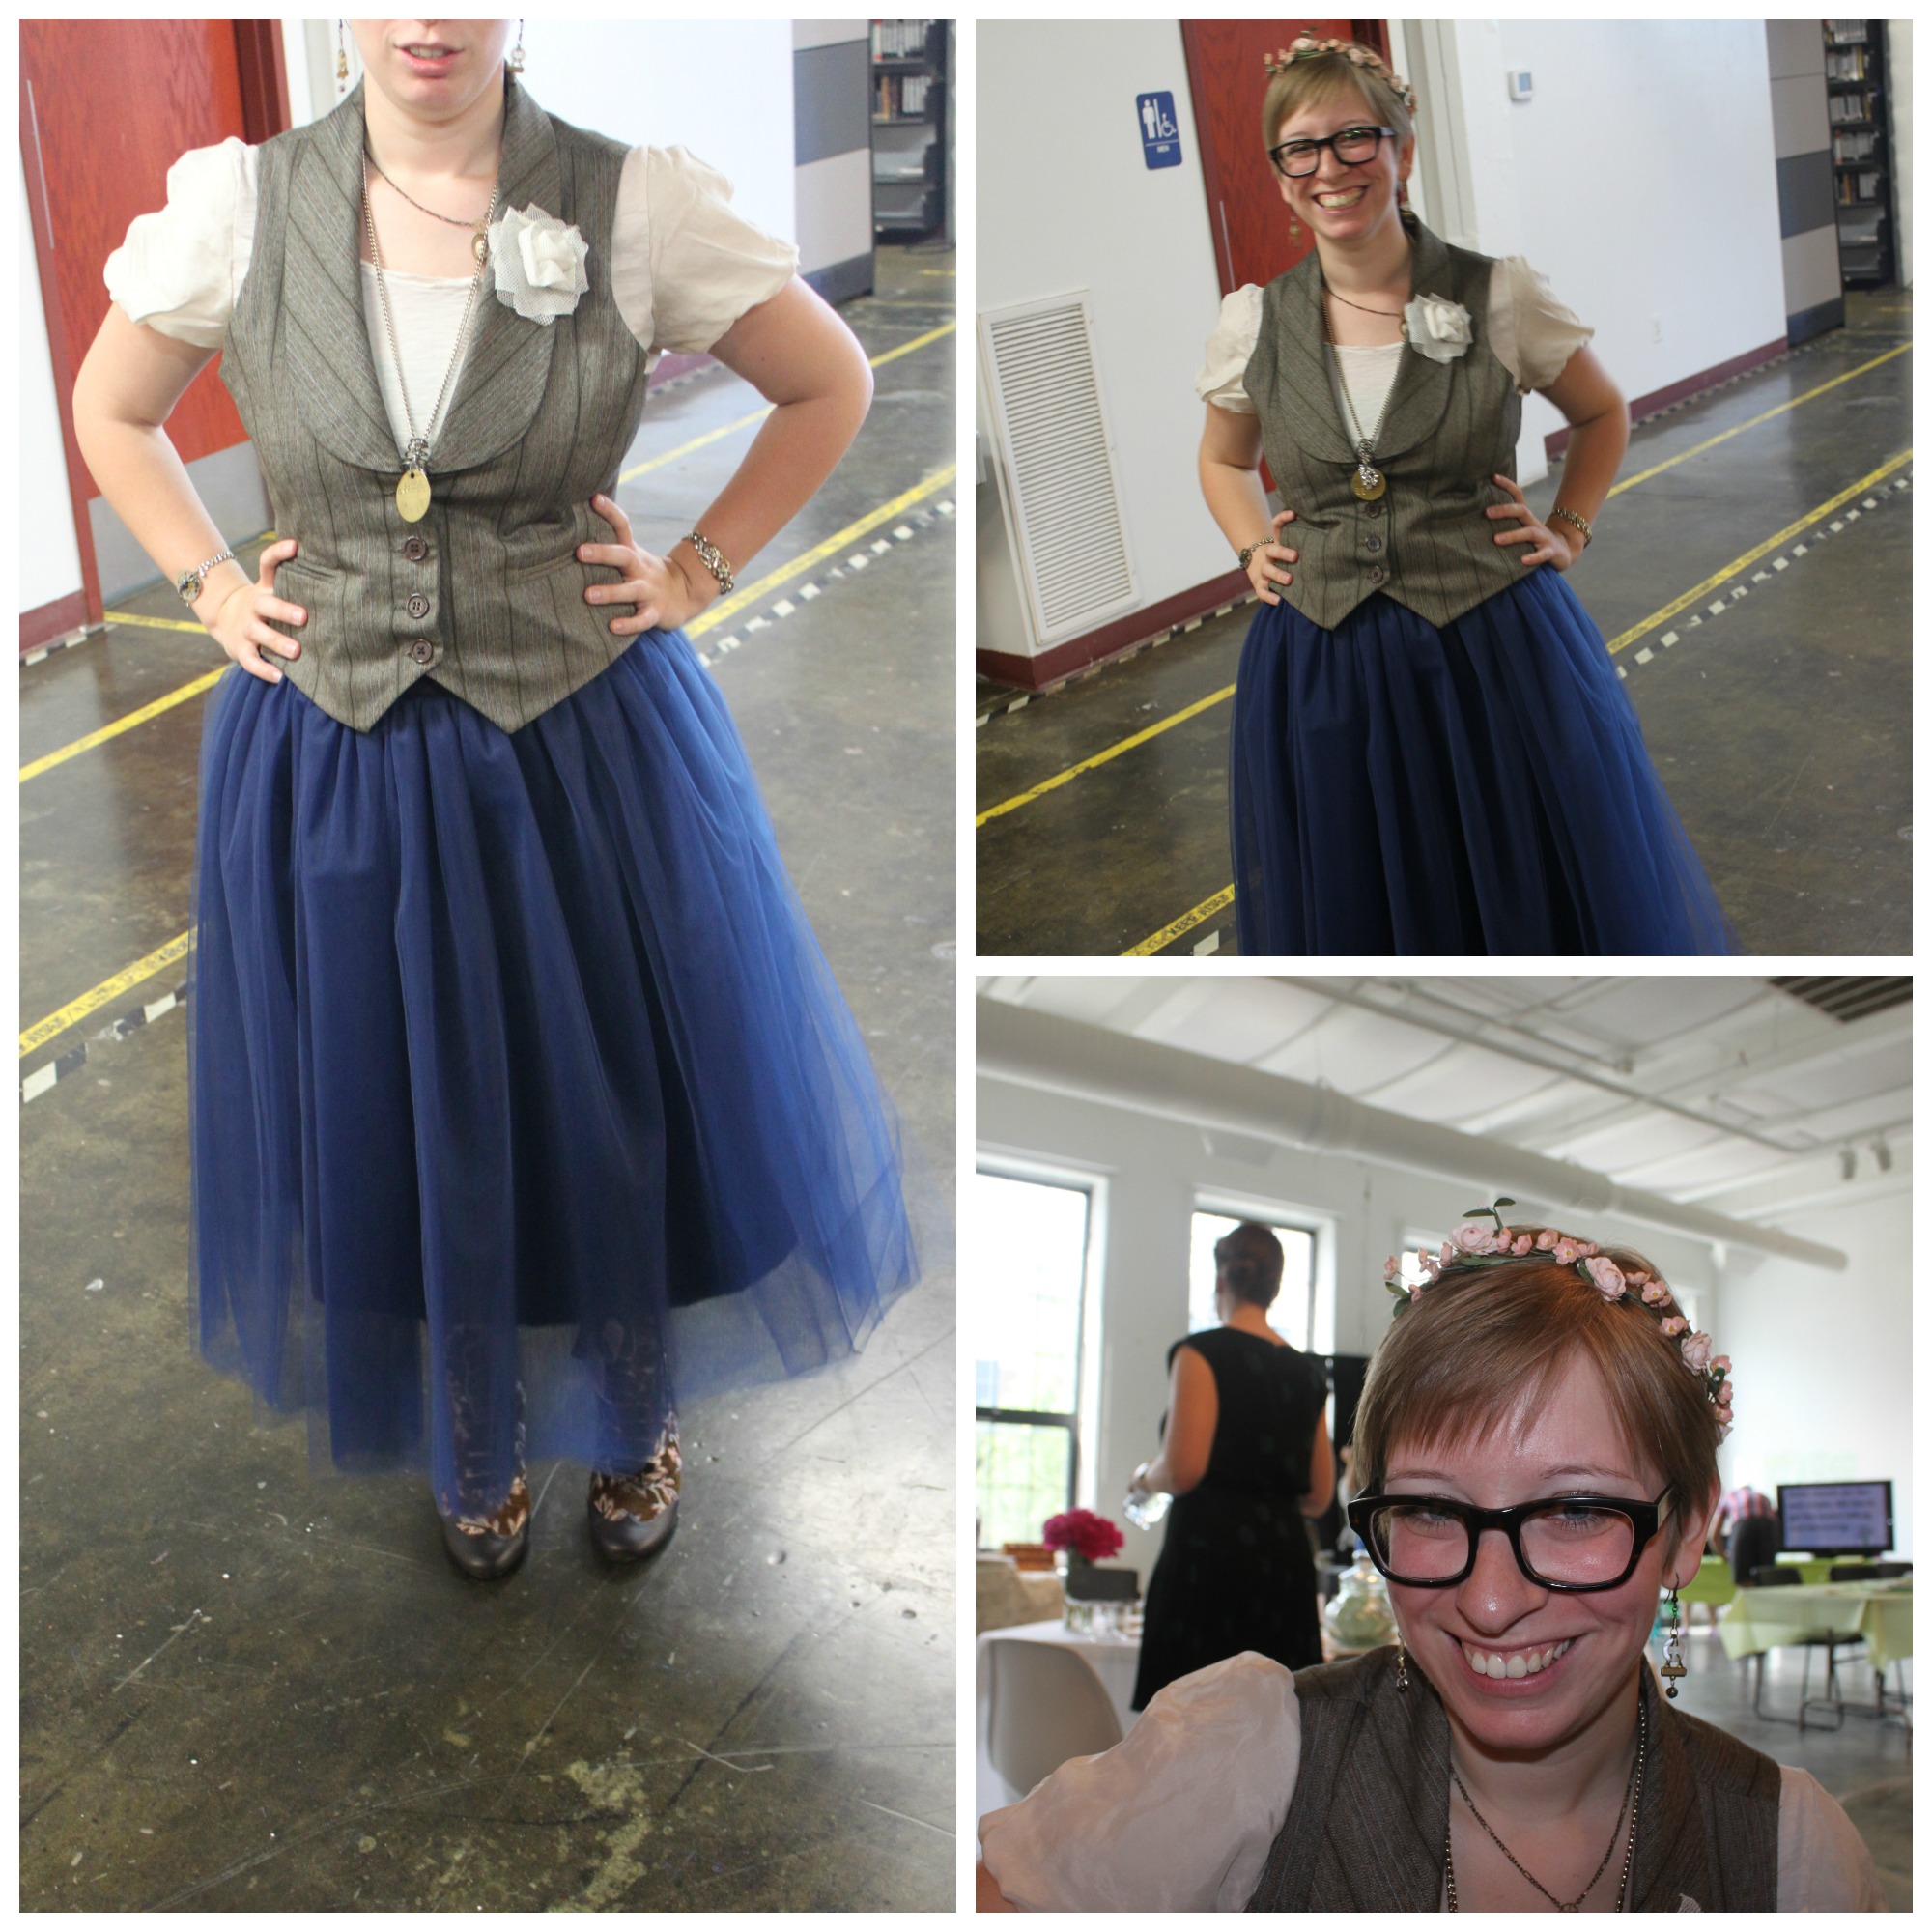 Style me Steampunk: The Shopkeeper's Daughter
A while back I created a look called the Steampunk Ballerina--the Shopkeeper's Daughter is very similar in that it involves wearing a full tulle skirt. This look is a lot fancier and is a great outfit for dress-up occasions. To recreate this look here's what you'll need:
- Tulle Skirt (there are a number of clothing companies that have similar style skirts right now. They are en vogue right now) I purchased mine from Shabby Apple's Fete de Fleurs collection. Right now they have a number of cute colors to choose from--white, pale pink, and blue (as seen above).
- Vest (that complements the color of your skirt) Mine's thrifted--my very favorite kind of clothing!
- Blouse (preferably with decorative or fancy sleeves) Choose a neutral color that will go well with both your vest & shirt
- Fabric Flower (for your lapel) I made mine following a DIY I found on Pinterest
- Poetic License Floral Tapestry Boots (love, love, love these boots) I wrote an earlier post about how to incorporate these boots into your look.
- Steampunk Jewelry (made mine! Check out my Etsy shop for bling of your own)

- Vintage or Antique flowers (to adorn your luscious locks) I fastened mine with bobby pins.
 Have fun rummaging through your closet my fellow steampunk fashionistas!
Broken Eyelash Dream, A Royal Steampunk Wedding Fashion Collection!
Fashion, Shows2 CommentsFew people know how much of a wedding geek I can be but I'm finally ready to admit it--I nerd out over weddings, well handmade weddings mostly. I love the attention to detail and most importantly the attention to the happy couple's story. It's no surprise that I've been asked to be a maid of honor (twice now!), and a bridesmaid (I won't admit how many times but I might give Katherine Heigel's character in 27 Dresses a run for her money). When Marry Me Indie approached me about putting together a collection for their indie, handmade wedding show I was certainly up for the challenge (and I certainly wanted the chance to upcycle all of those bridesmaids' dresses hanging in the back of my closet). I transformed each dress into a simply steampunk creation--both tasteful and elegant. I can't wait to share how I did it in a few DIYs to come later this month (so stay tuned)!
I had so much fun transforming each of the dresses, thrifting for vintage tuxes, and the piece de resistance came from my mom who found (at an estate) the most exquisite wedding dress I have ever seen. It is an off-the-shoulder dress made of gauzy white handmade lace with a long flowing train. It was sold with white ballet shoes (still with a penny for good luck taped into the inner sole)!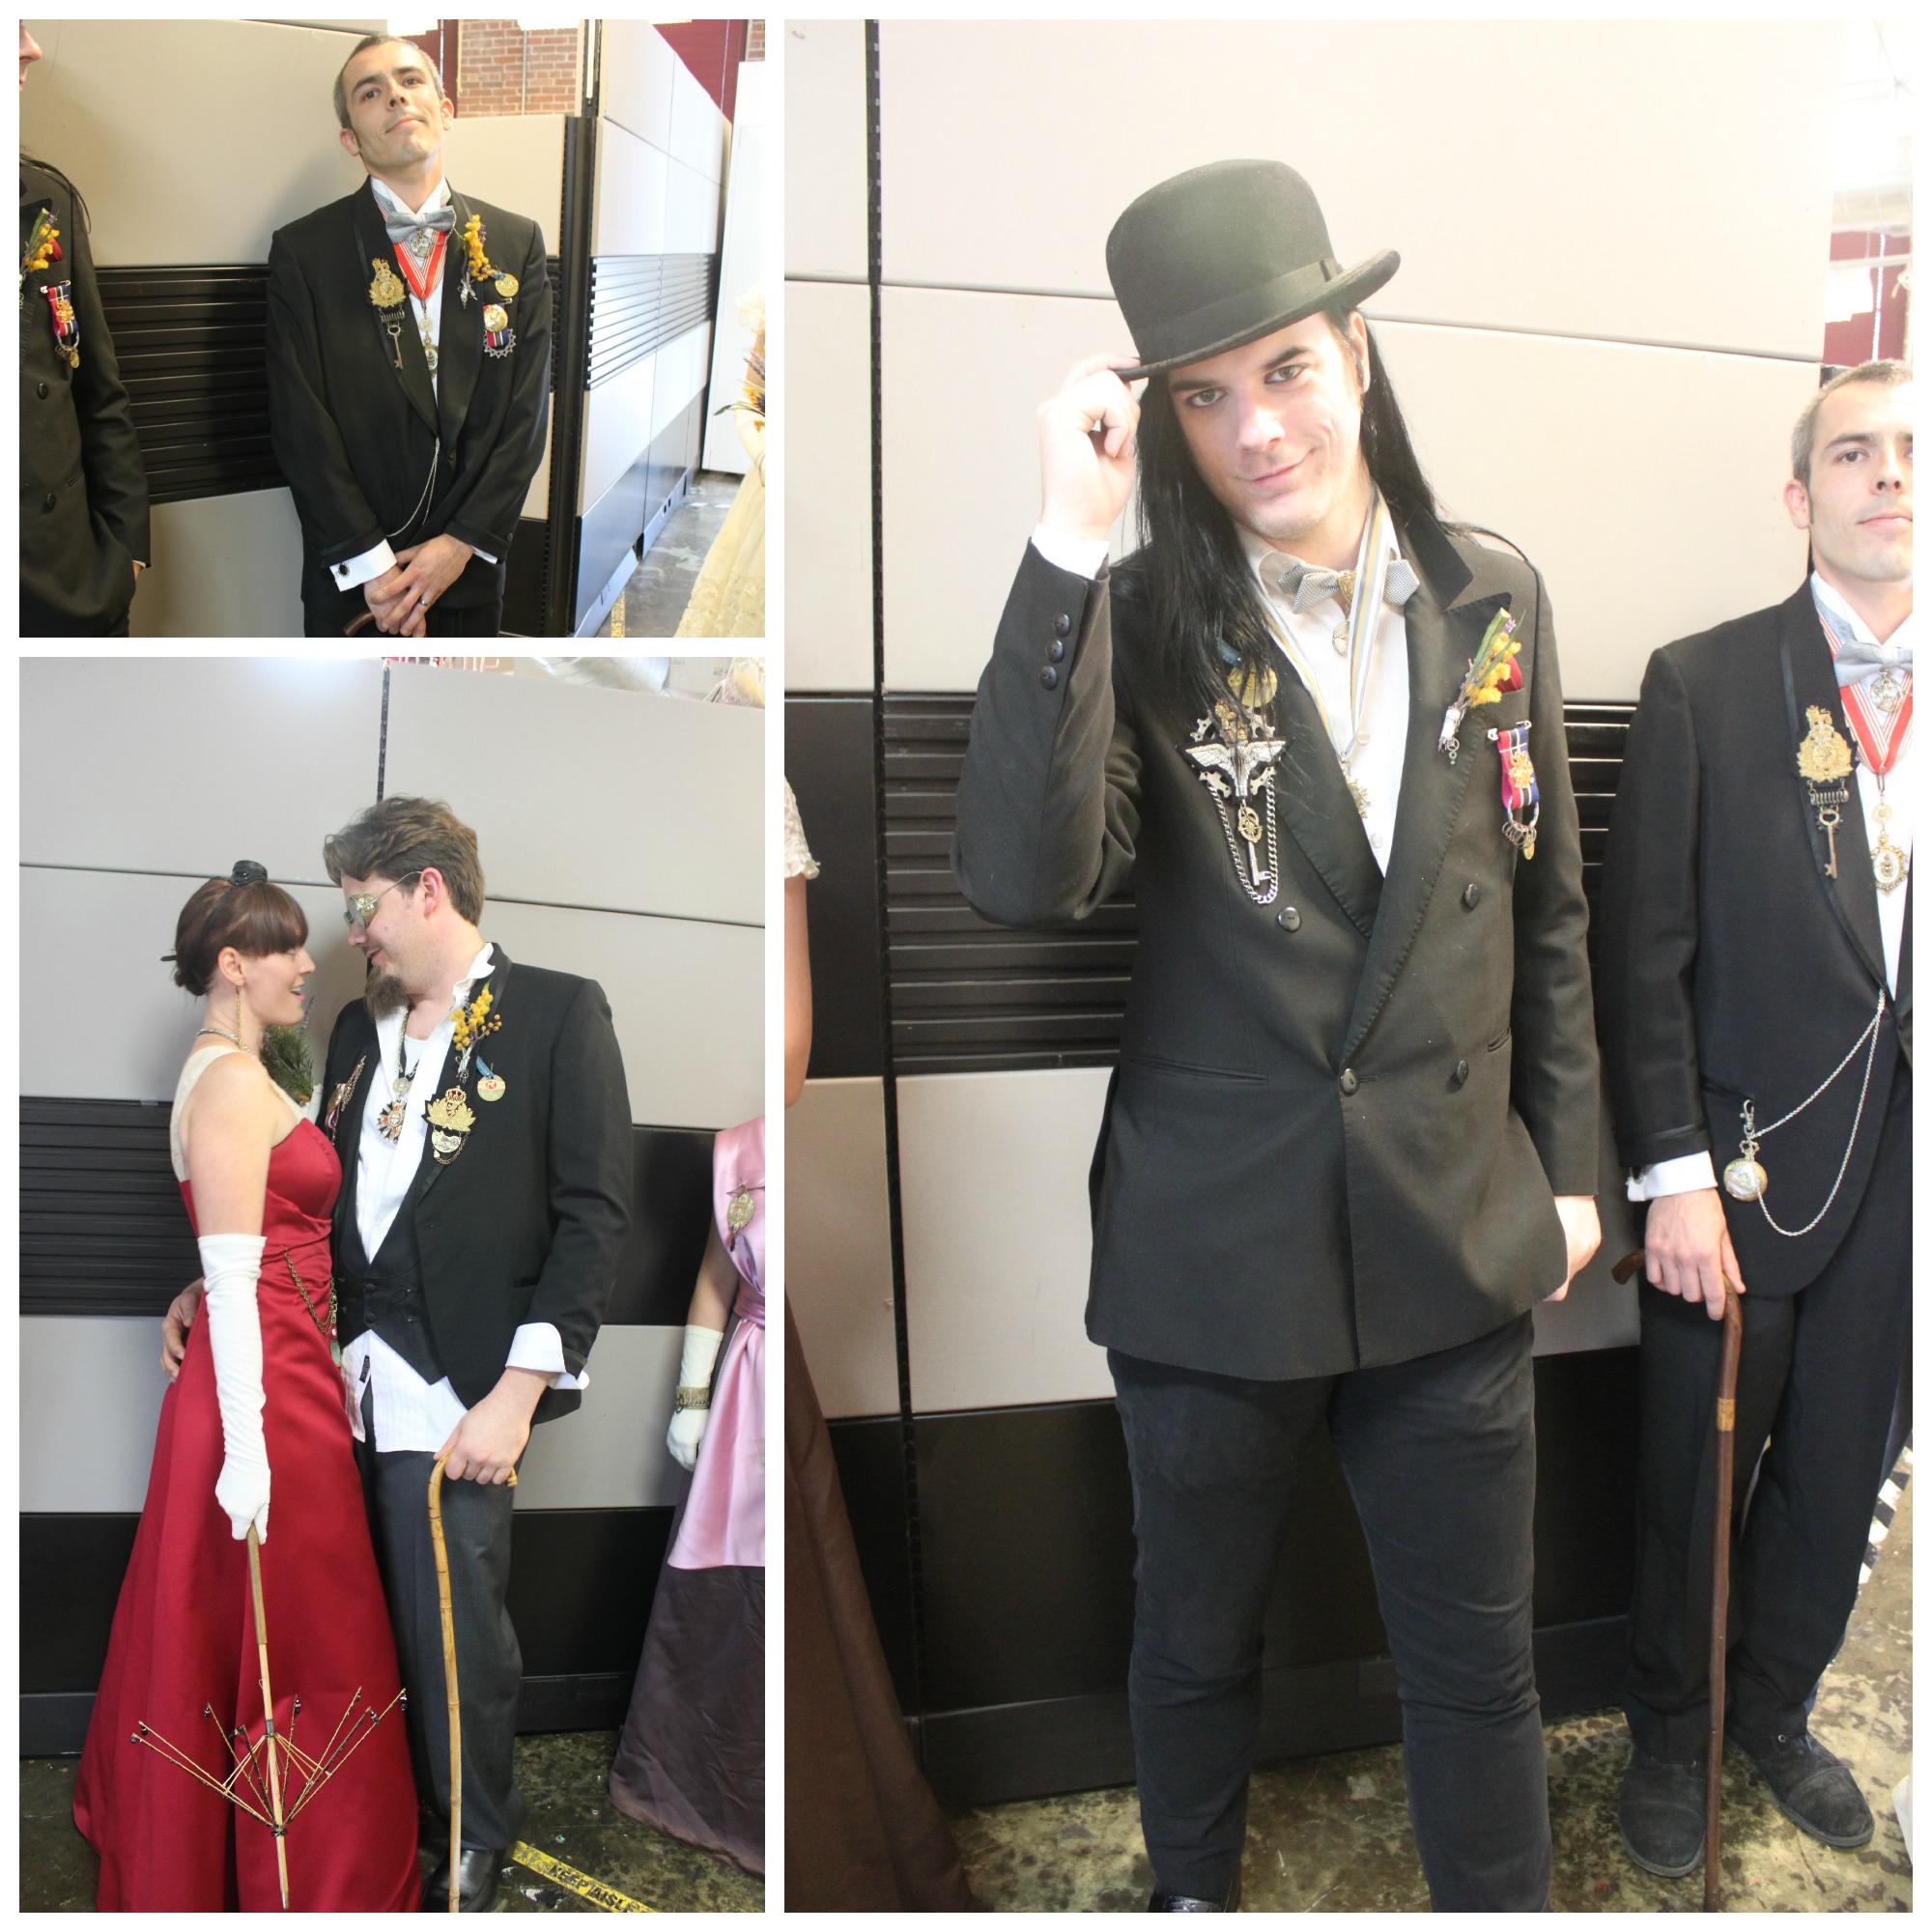
Accessorizing was easy--I was inspired by vintage rhinestone pieces, gleaming brass gears, and these embroidered Royal crests & patches. I had so much fun ruffling through antique photographs of Victorian weddings and ogling all of the dresses, floral arrangements & nosegays.
When June 1st finally arrived I could hardly contain my excitement! Everything had fallen into place and sure there were a couple of hiccups but the show was a complete success (much like a wedding day I expect). I couldn't have done it without the encouragement of Christine & Renee; the help of all of my wonderful models--Melissa, Joe, Michael, Karen, Caroline, Ryan, Mitch, and especially Alicia (who was such a hauntingly beautiful bride--she looked as if she had stepped out of a shroud of ghostly invisibility to corporeal form to remind us of a bygone era); the help of Sherri, who filmed the fashion show for me; and last, but not least, my collaborator and co-designer, my mom (The Salvage Steamstress).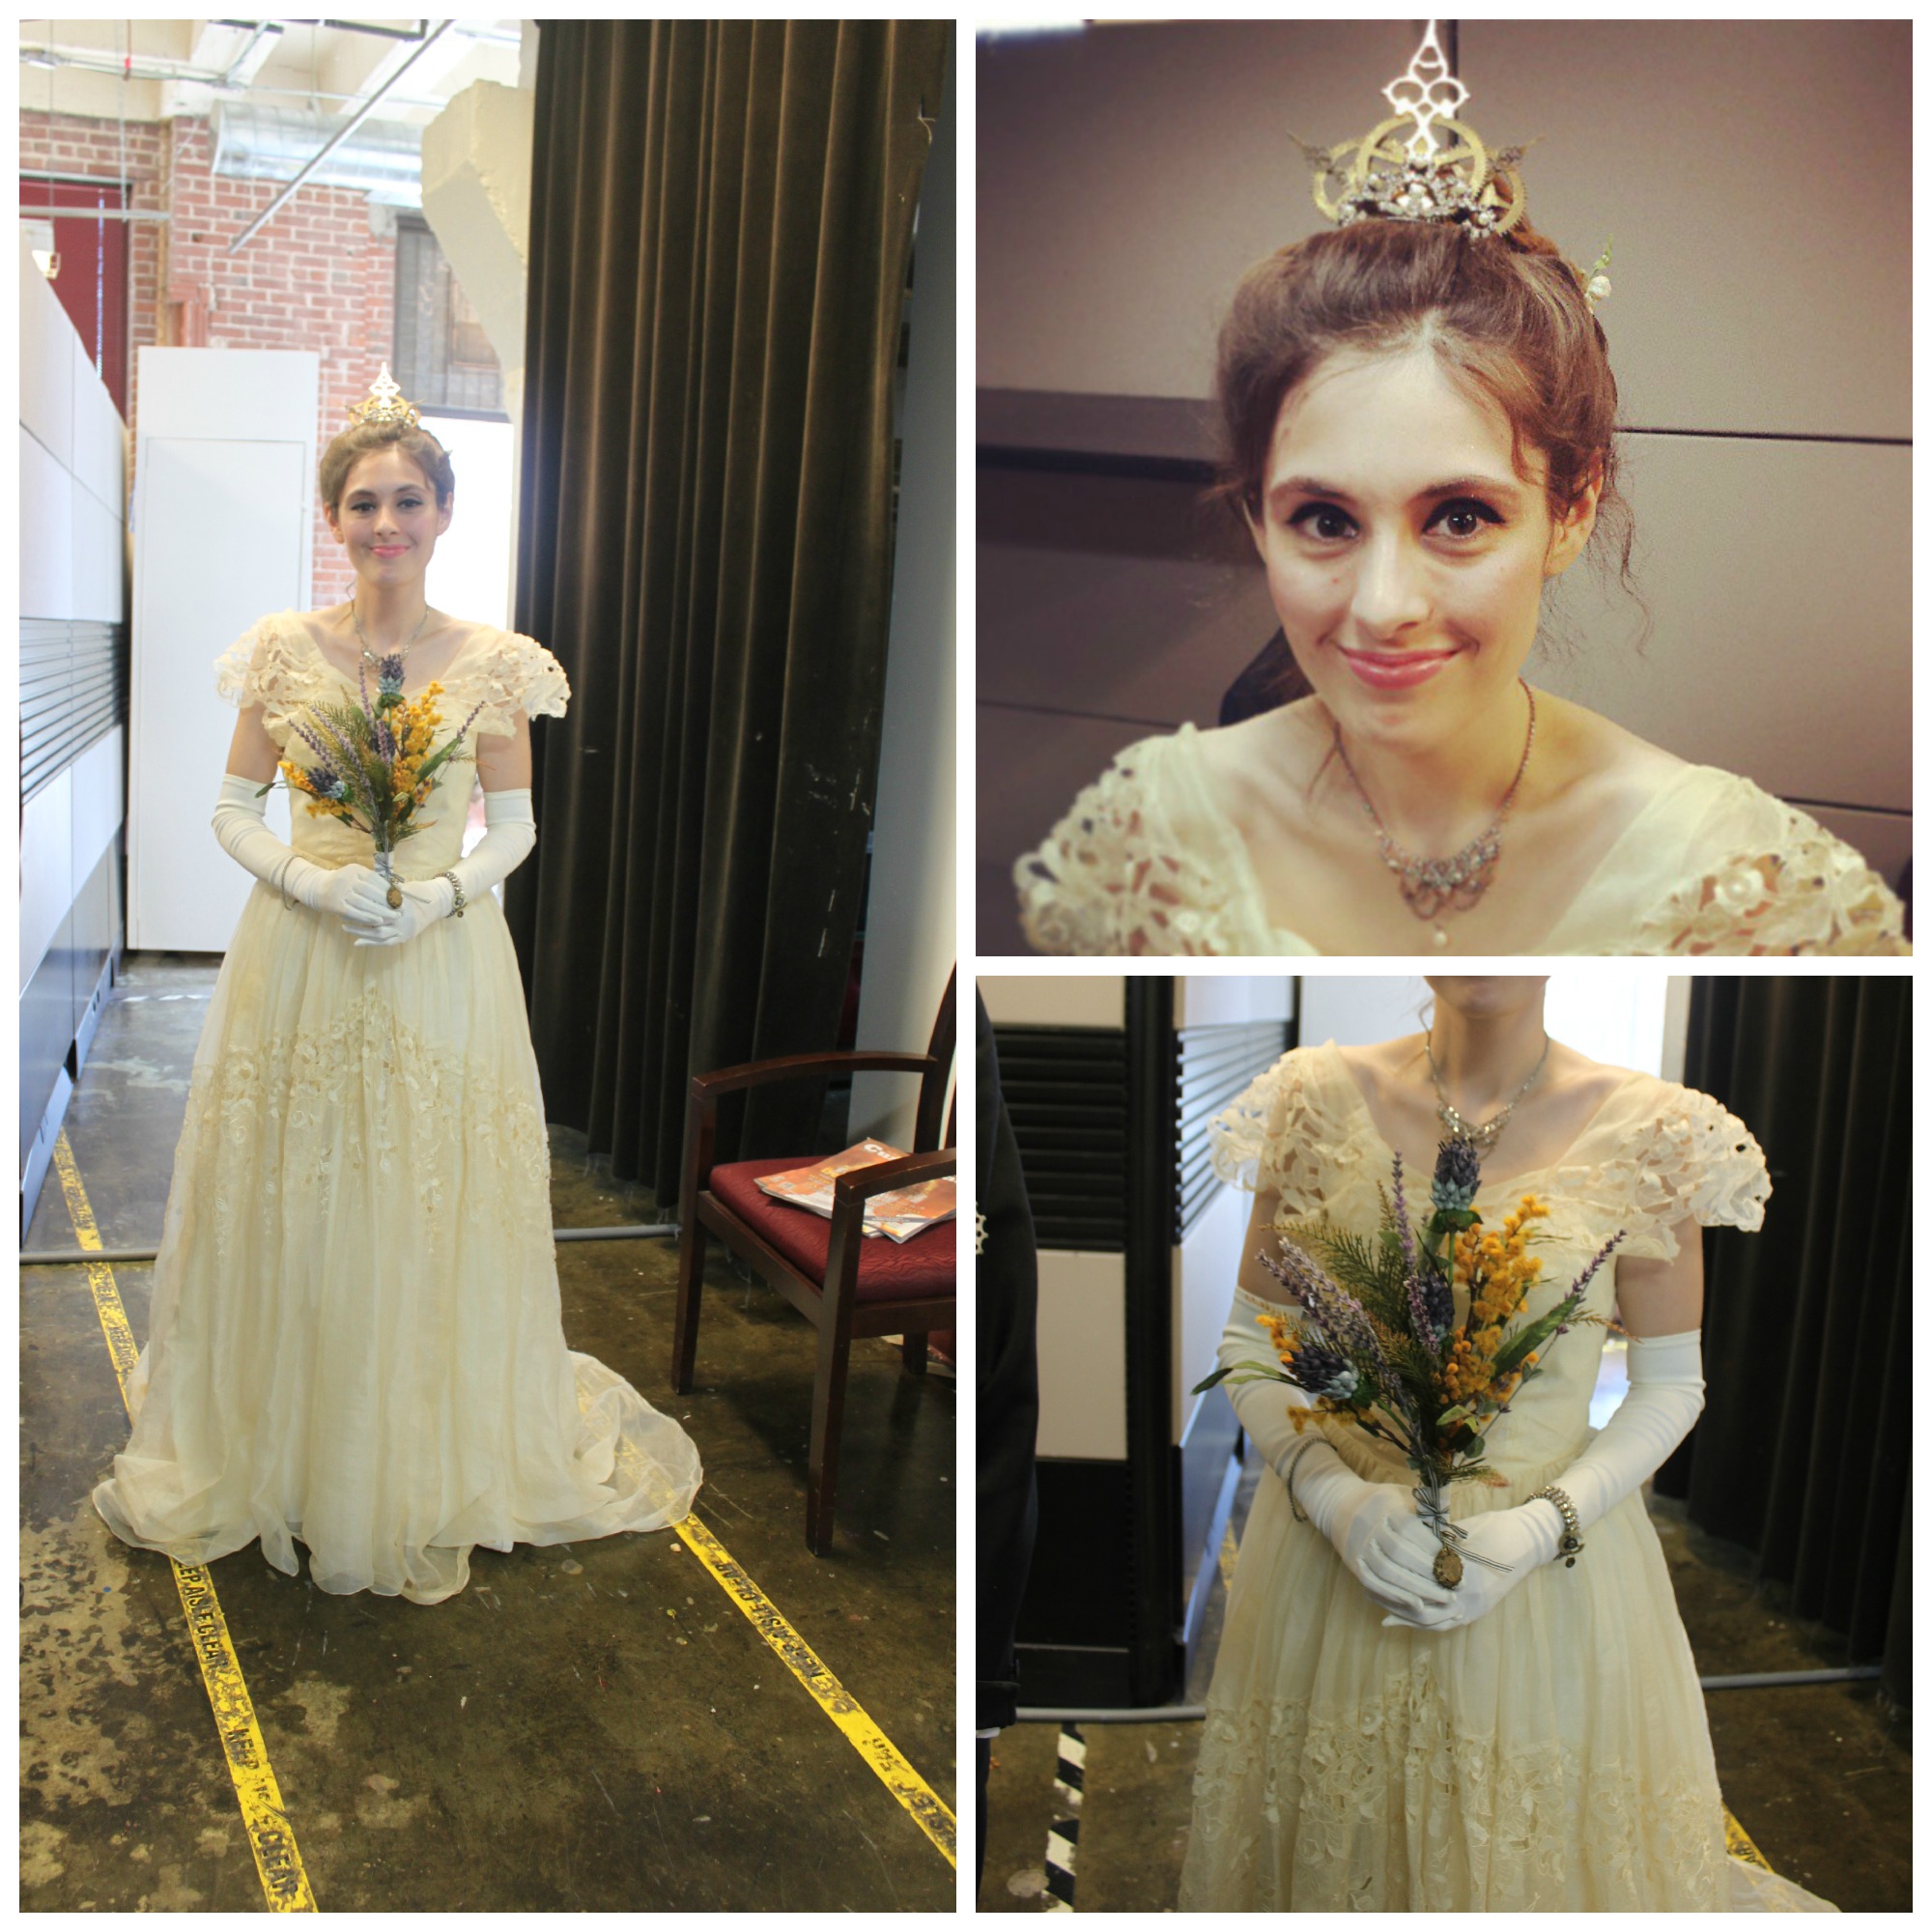
So for those of you who couldn't make it--here's a video of the show. Hope you enjoy it!
[youtube=http://www.youtube.com/watch?v=Nxc_DW1VsJg]
DIY Handkerchief
D-I-Y-4 CommentsAll ladies need a handkerchief, so why not make your own? Here's what you'll need:
- Square of Absorbent fabric (my fabric is a piece of 5x5 muslin)
- 20 inches of lace
- Pins
- Sewing machine
- Scissors; Olfa cutter
- Omnigrid ruler (or any other kind of fabric ruler)
- Embroidery thread & needle (optional)
 Steps:
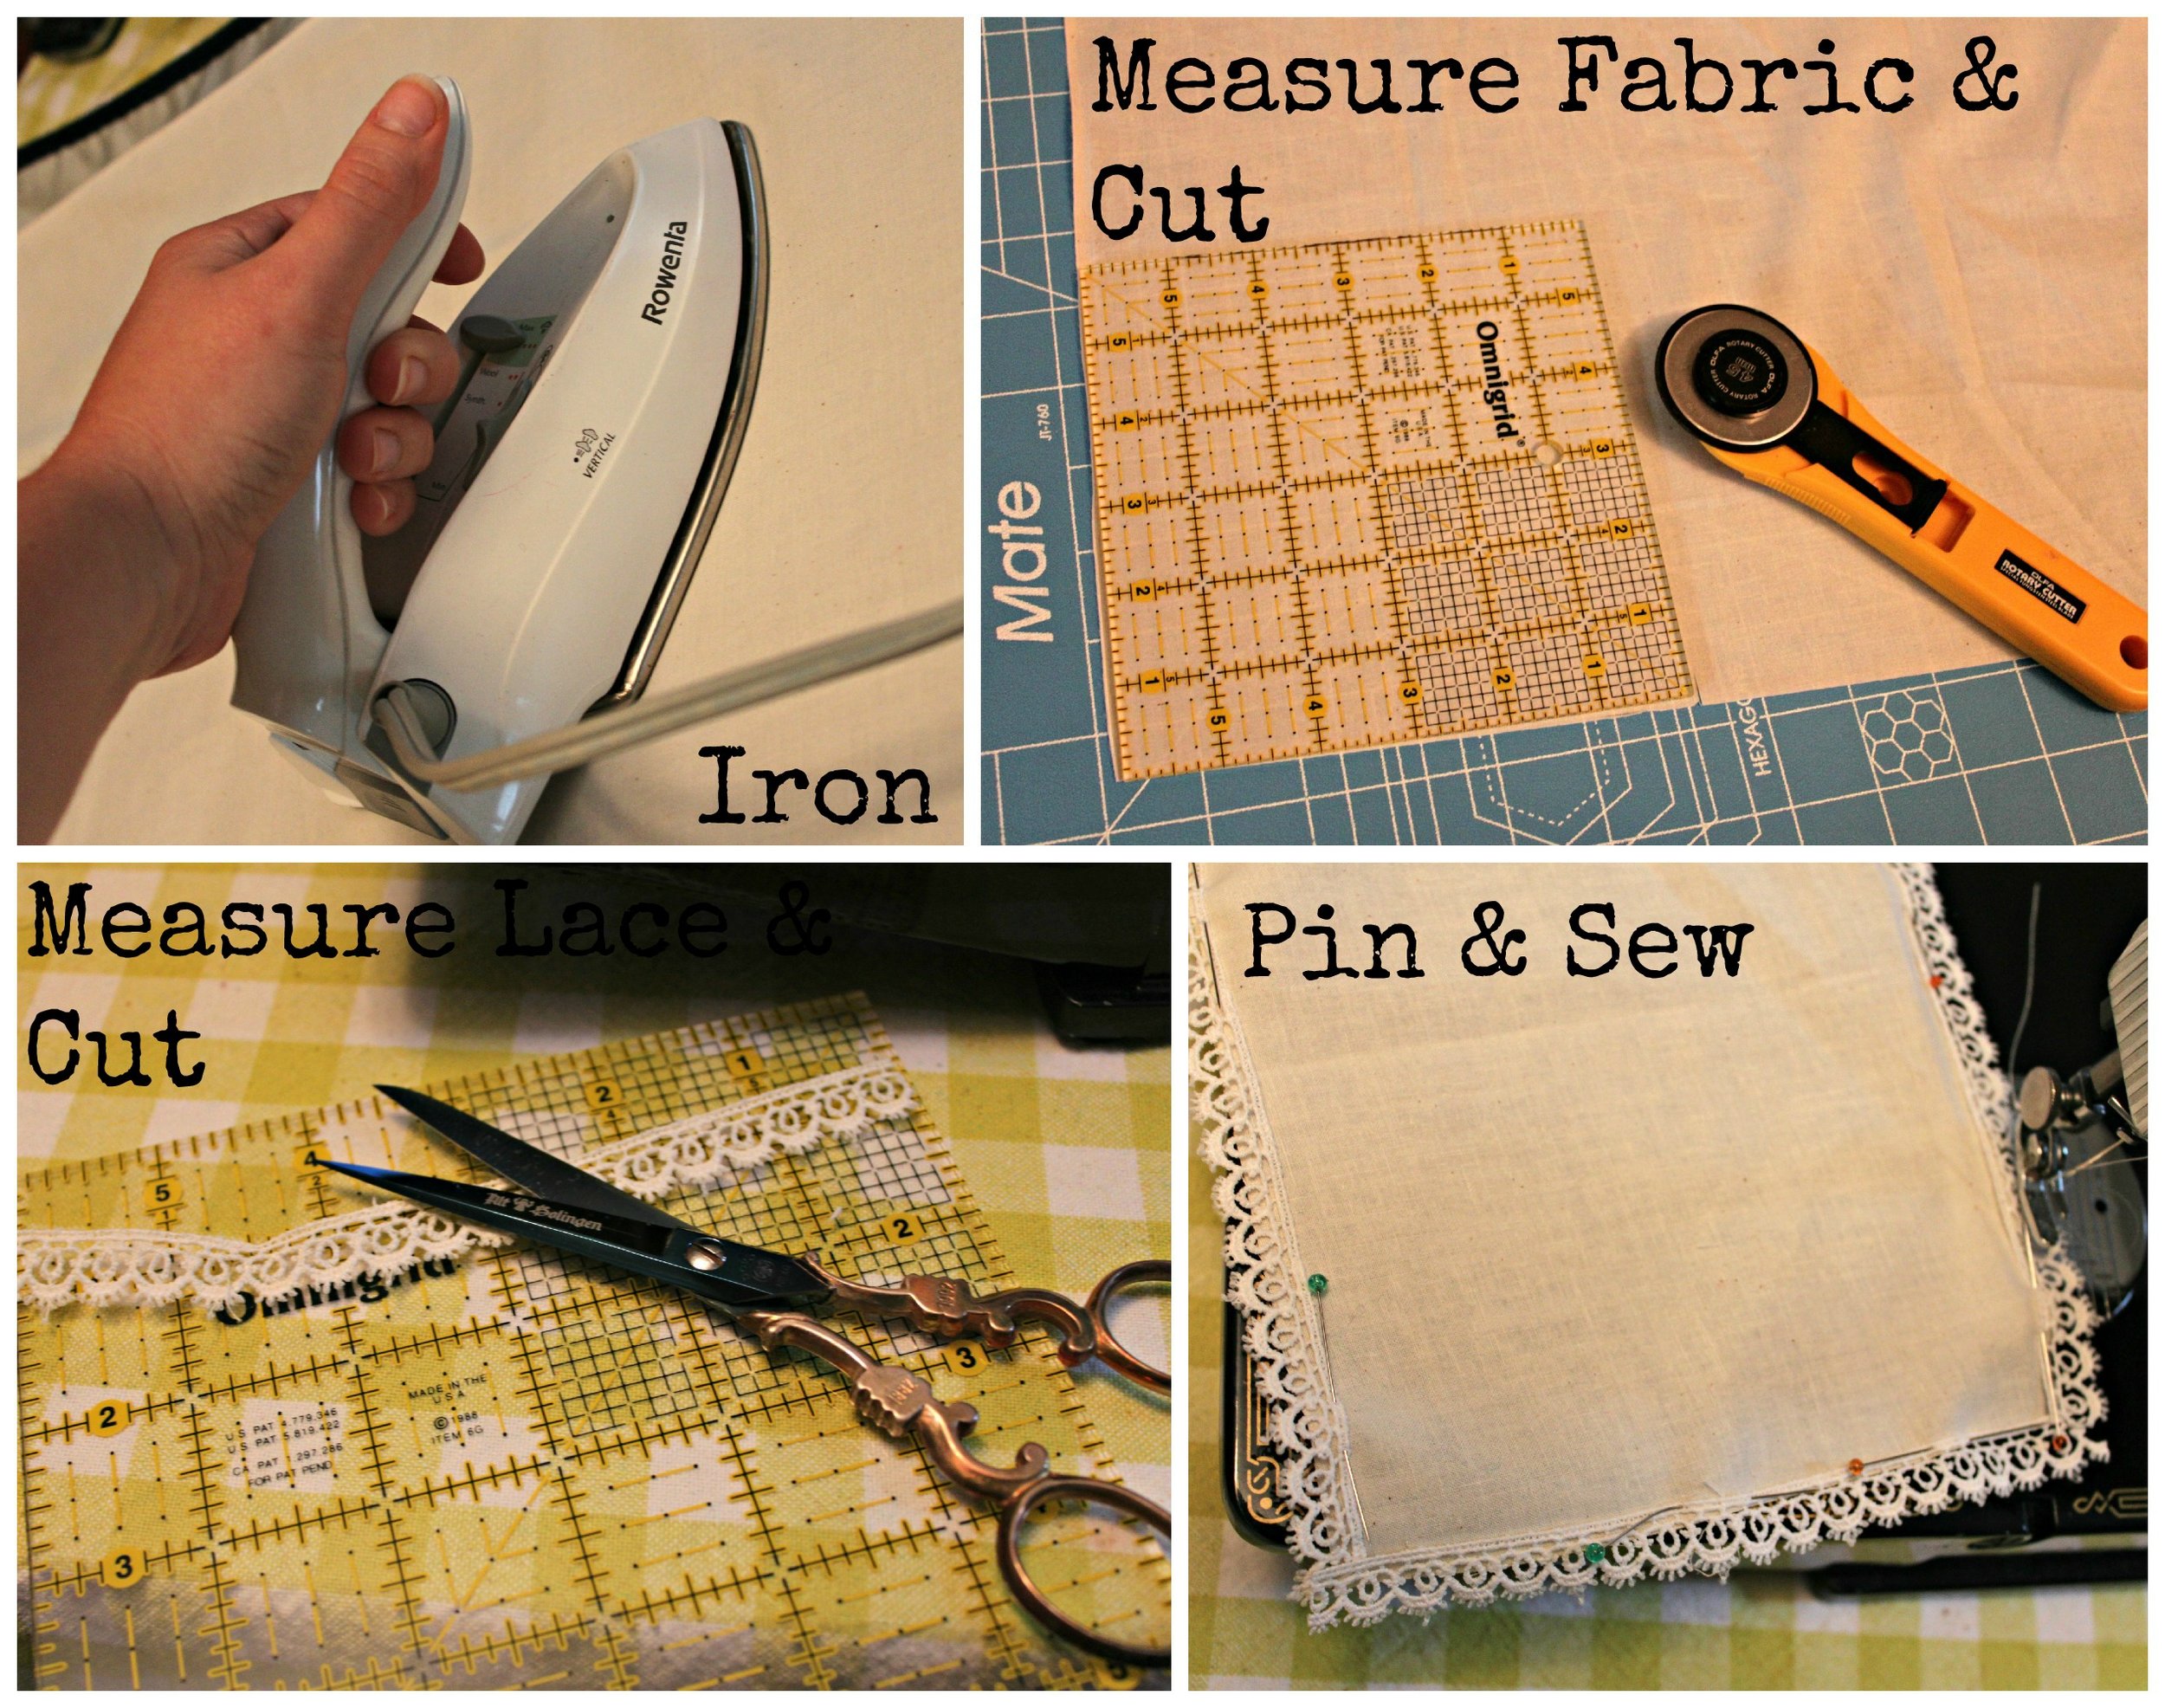
- Iron your fabric.
- Measure your fabric with your omnigrid (or other fabric ruler). I wanted a tiny handkerchief so that I could pin it inside my dress or tuck it inside my bodice. I measured it to be a 5x5 square. Equal sides work best (so 6x6, 8x8, 10x10, 12x12 for example) is best. Once you've measured your fabric, cut it out using your olfa cutter or scissors.
- Next measure your lace. You want 4 pieces all equal to the length of your handkerchief sides. I measured and cut 4 pieces of 5 inch lace since I have a 5x5 handkerchief.

- Pin your lace in place. Make sure that your lace overlaps at the edges. Then sew. You can sew continuously by lifting up your machine's foot and pivoting your handkerchief. Cut off any excess threads.
- (Optional) Embroider your initials or an elegant design on your handkerchief. You can also both embroider & draw on your handkerchief (as I've done above. I embroidered the initial "C" and drew a pretty floral design using a micropoint fabric pen).
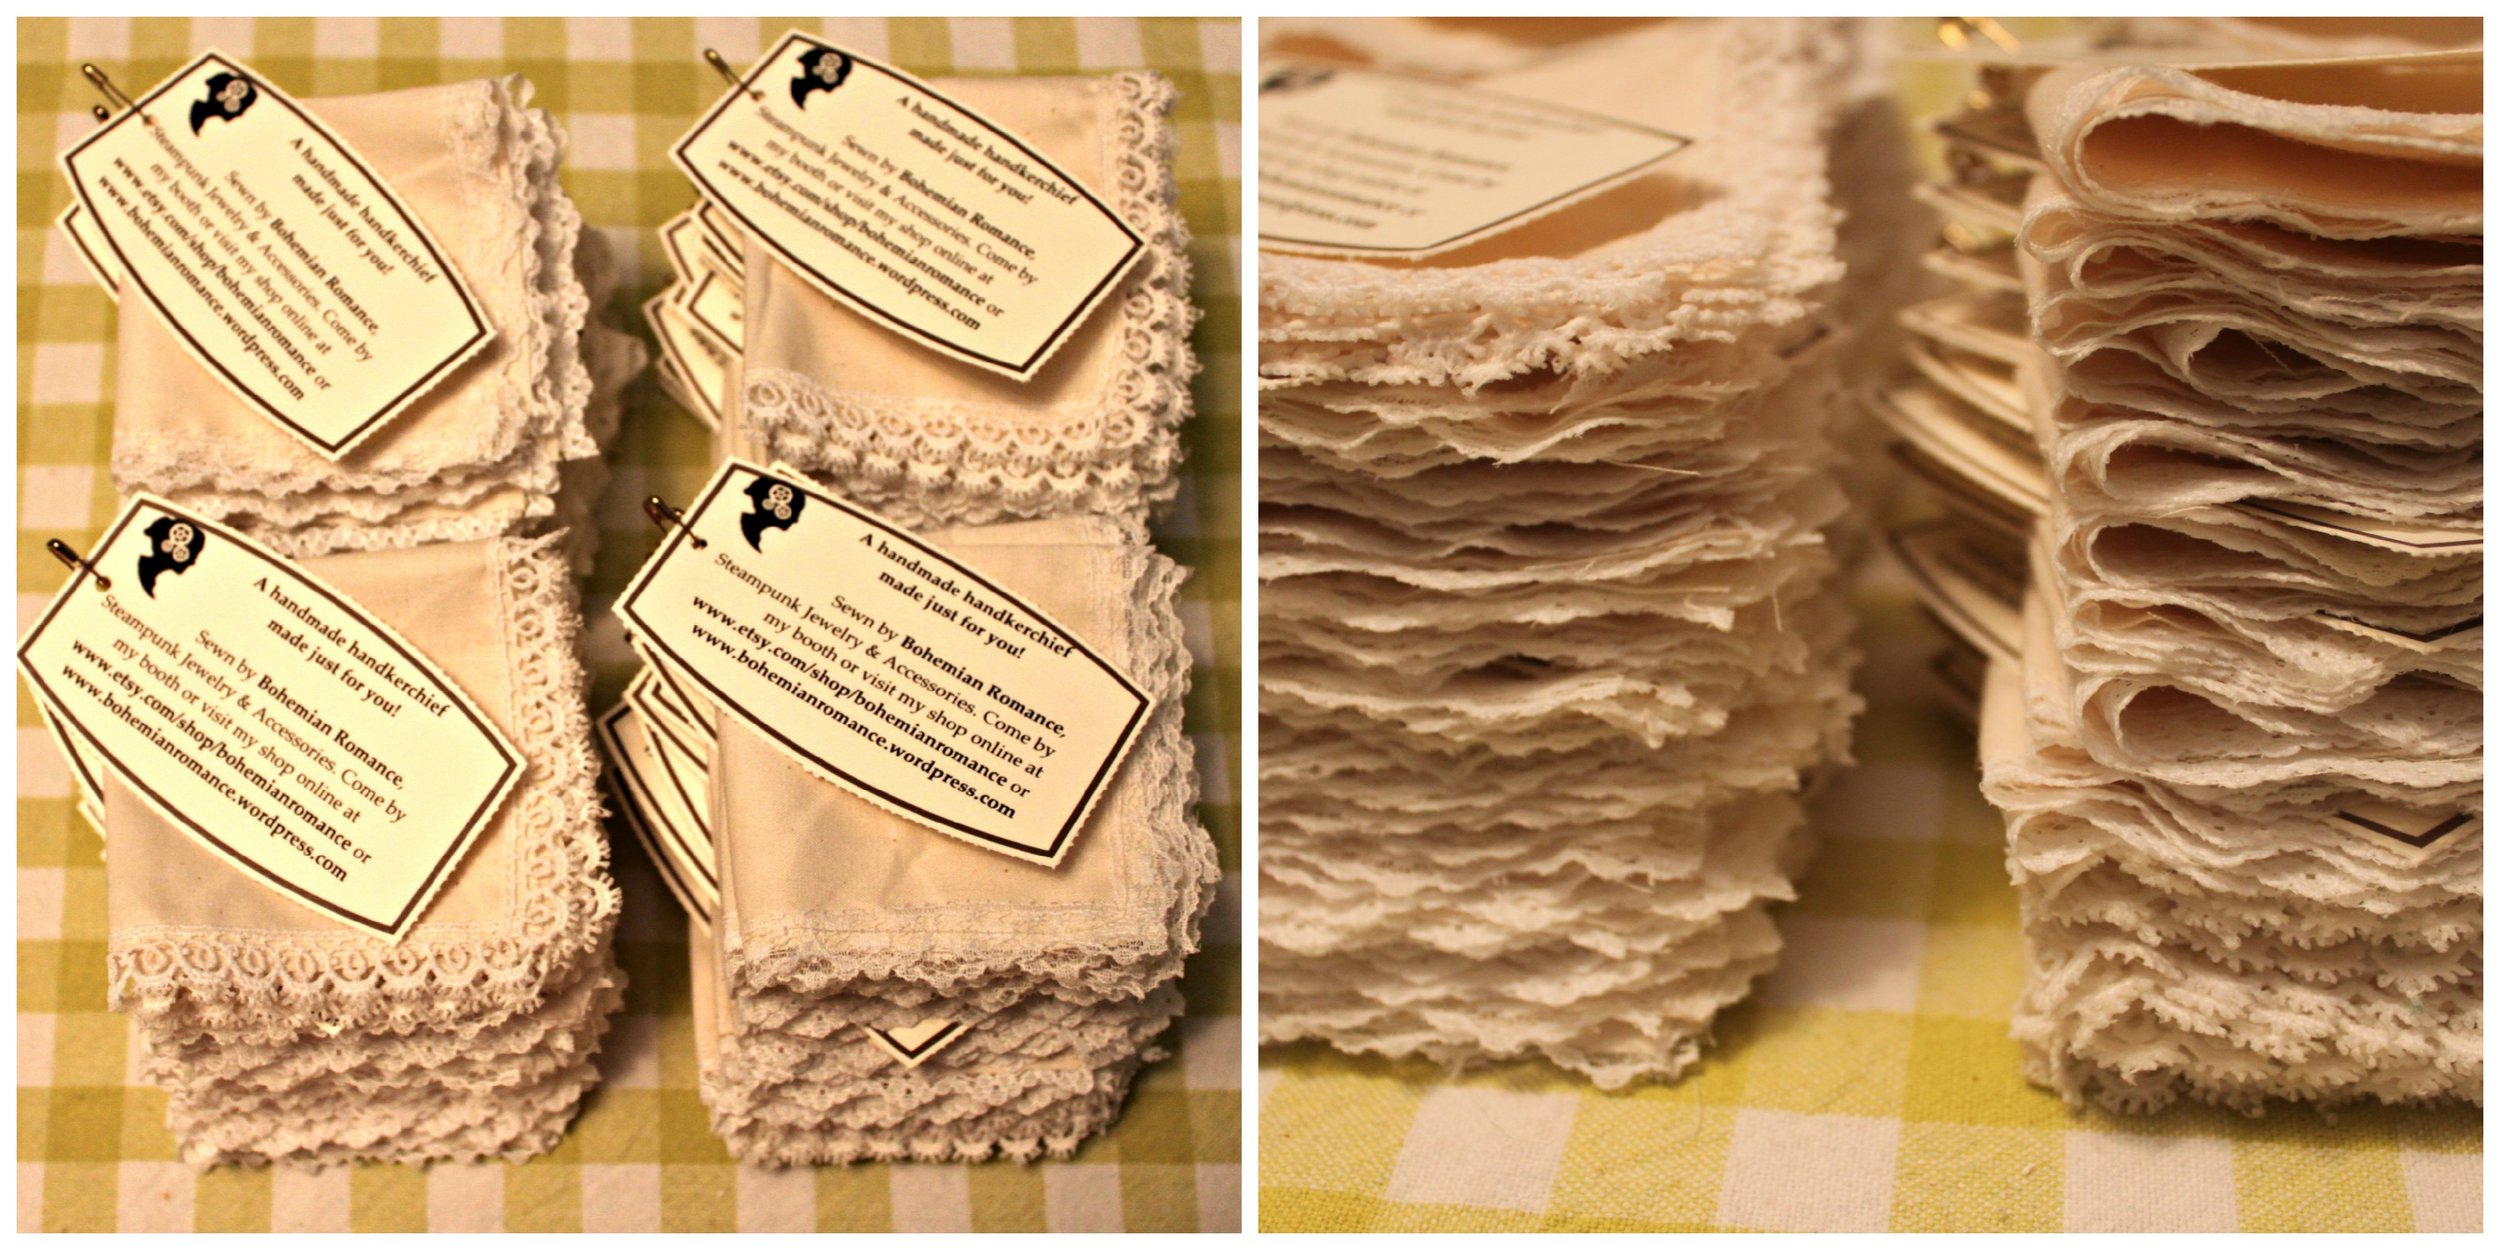
These handkerchiefs are elegant & easy to make. They are a perfect bridesmaid gift! I am making handkerchiefs as a giveaway for Marry Me Indie! The first 50 brides to attend will receive a bag full of free goodies from each of the vendors. So if you want a handmade muslin & lace handkerchief of your very own--come by the show early!
My Booth at Springfest
Shows3 CommentsI set up at Springfest this year--thank you to everyone who came out--and got the chance to show off my new displays. (The DIYs of which you can find here, and here, and also here). I am incredibly proud of my booth display as I put a lot of thought behind it. So whenever someone gets excited about it too or oohs and ahs over it I feel a sense of accomplishment at having successfully transported them (even if only for a moment). 
The light from the window created a soft Spring glow and it shone brilliantly on the metals of my table.
 This inkwell, which I purchased from one of my favorite antique & junk shops in Tulsa--Delman's on 15th street--is always a conversation starter.
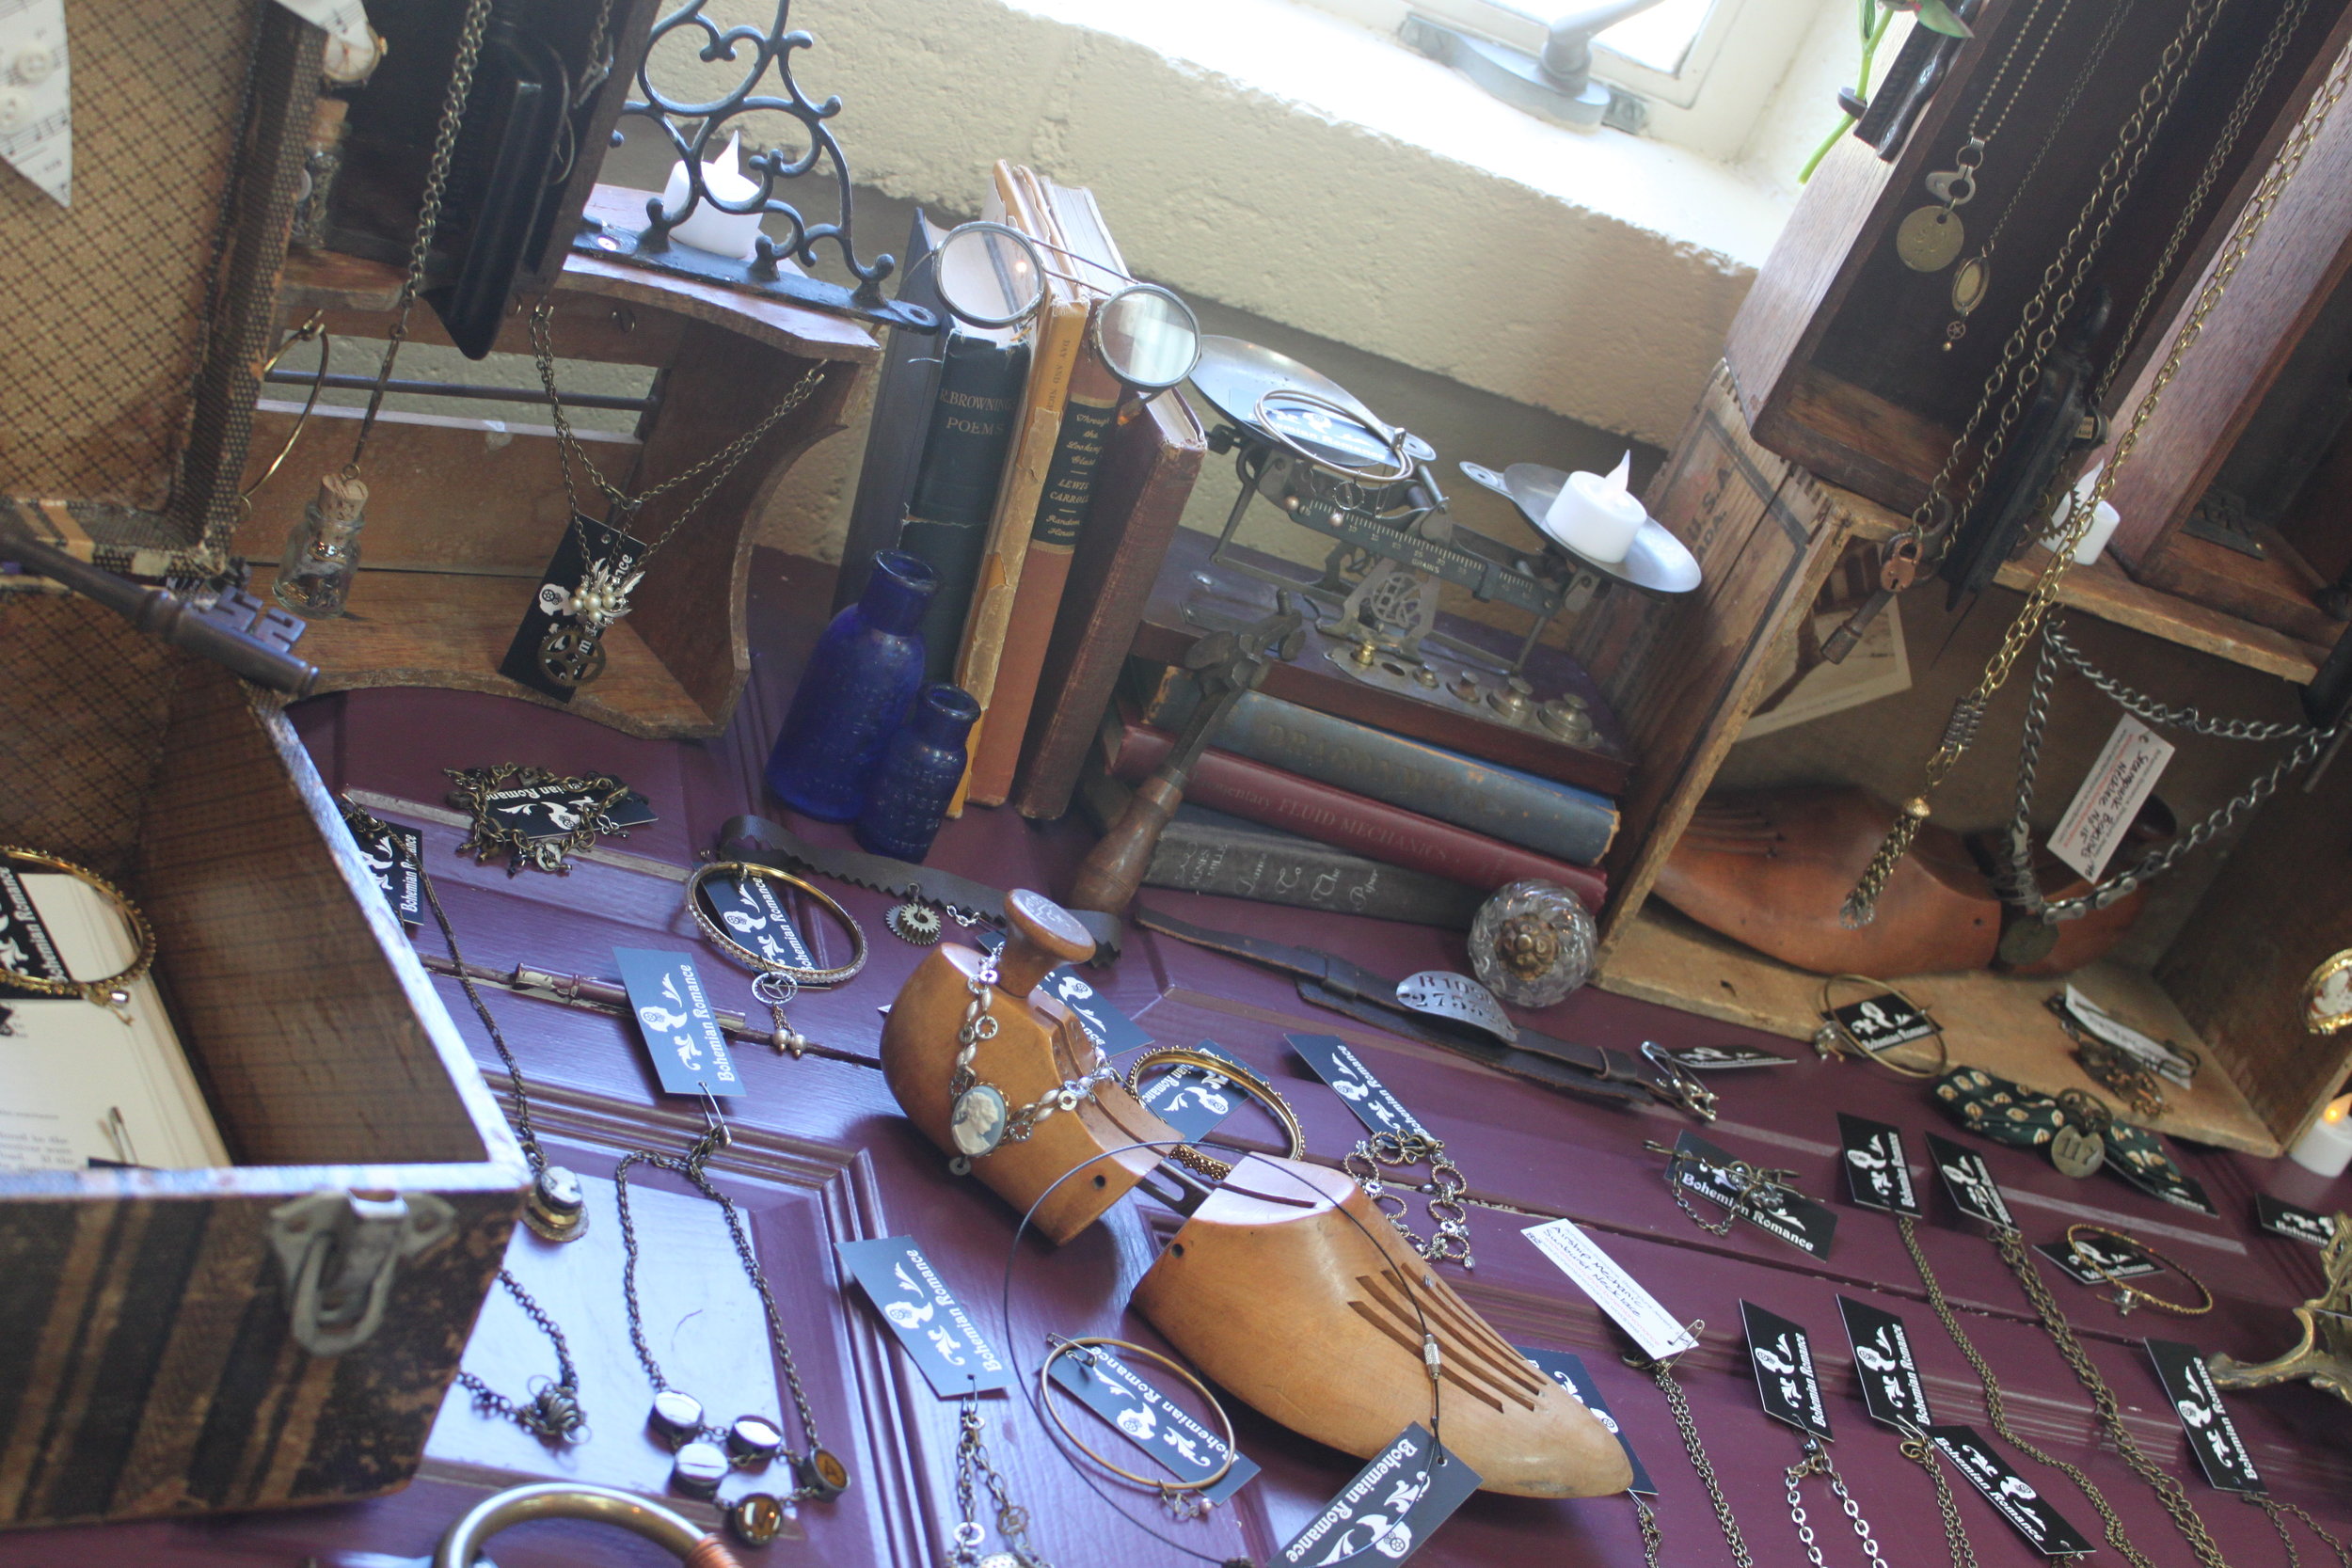
 Shoe horns are among my favorite display objects because they are great for draping & showing off tiny, dainty, and intricate pieces.
 Among my display pieces are a number of tools--like my old drill, jeweler's anvil, wrench, and blade sharpener. Many men (and tough tomboys & tinker-type ladies too) who might normally pass by a jewelry booth without giving it a second glance--stop by.
I have a lot of fun setting up my booth because I know that throughout the whole show I will meet tons of new people (as well as see familiar, friendly faces) and stories will be exchanged sparked by the various objects in my booth.
For those of you who have your own crafty business and are looking for more information & inspiration on how to create booth displays & how to set up for a show--check out my friend Jill's (of Favoring Brave) new website: CraftFairology! I'll be guest posting one of these days I hope!
DIY Steampunk Jewelry Display, Style No. 2
D-I-Y-CommentIf you have a steampunk crafty business, or perhaps an old-timey aesthetic, your booth should convey the feeling of your products. This is something I feel that I do quite well and I am quite proud of. Many people stop by my booth just to look at the curiosities inside. This is the second in a series of 3 blog posts on how to recreate 3 of my newest displays for yourselves! Too see Style No. 1, click here. For Style No. 2, read on!
Style No. 2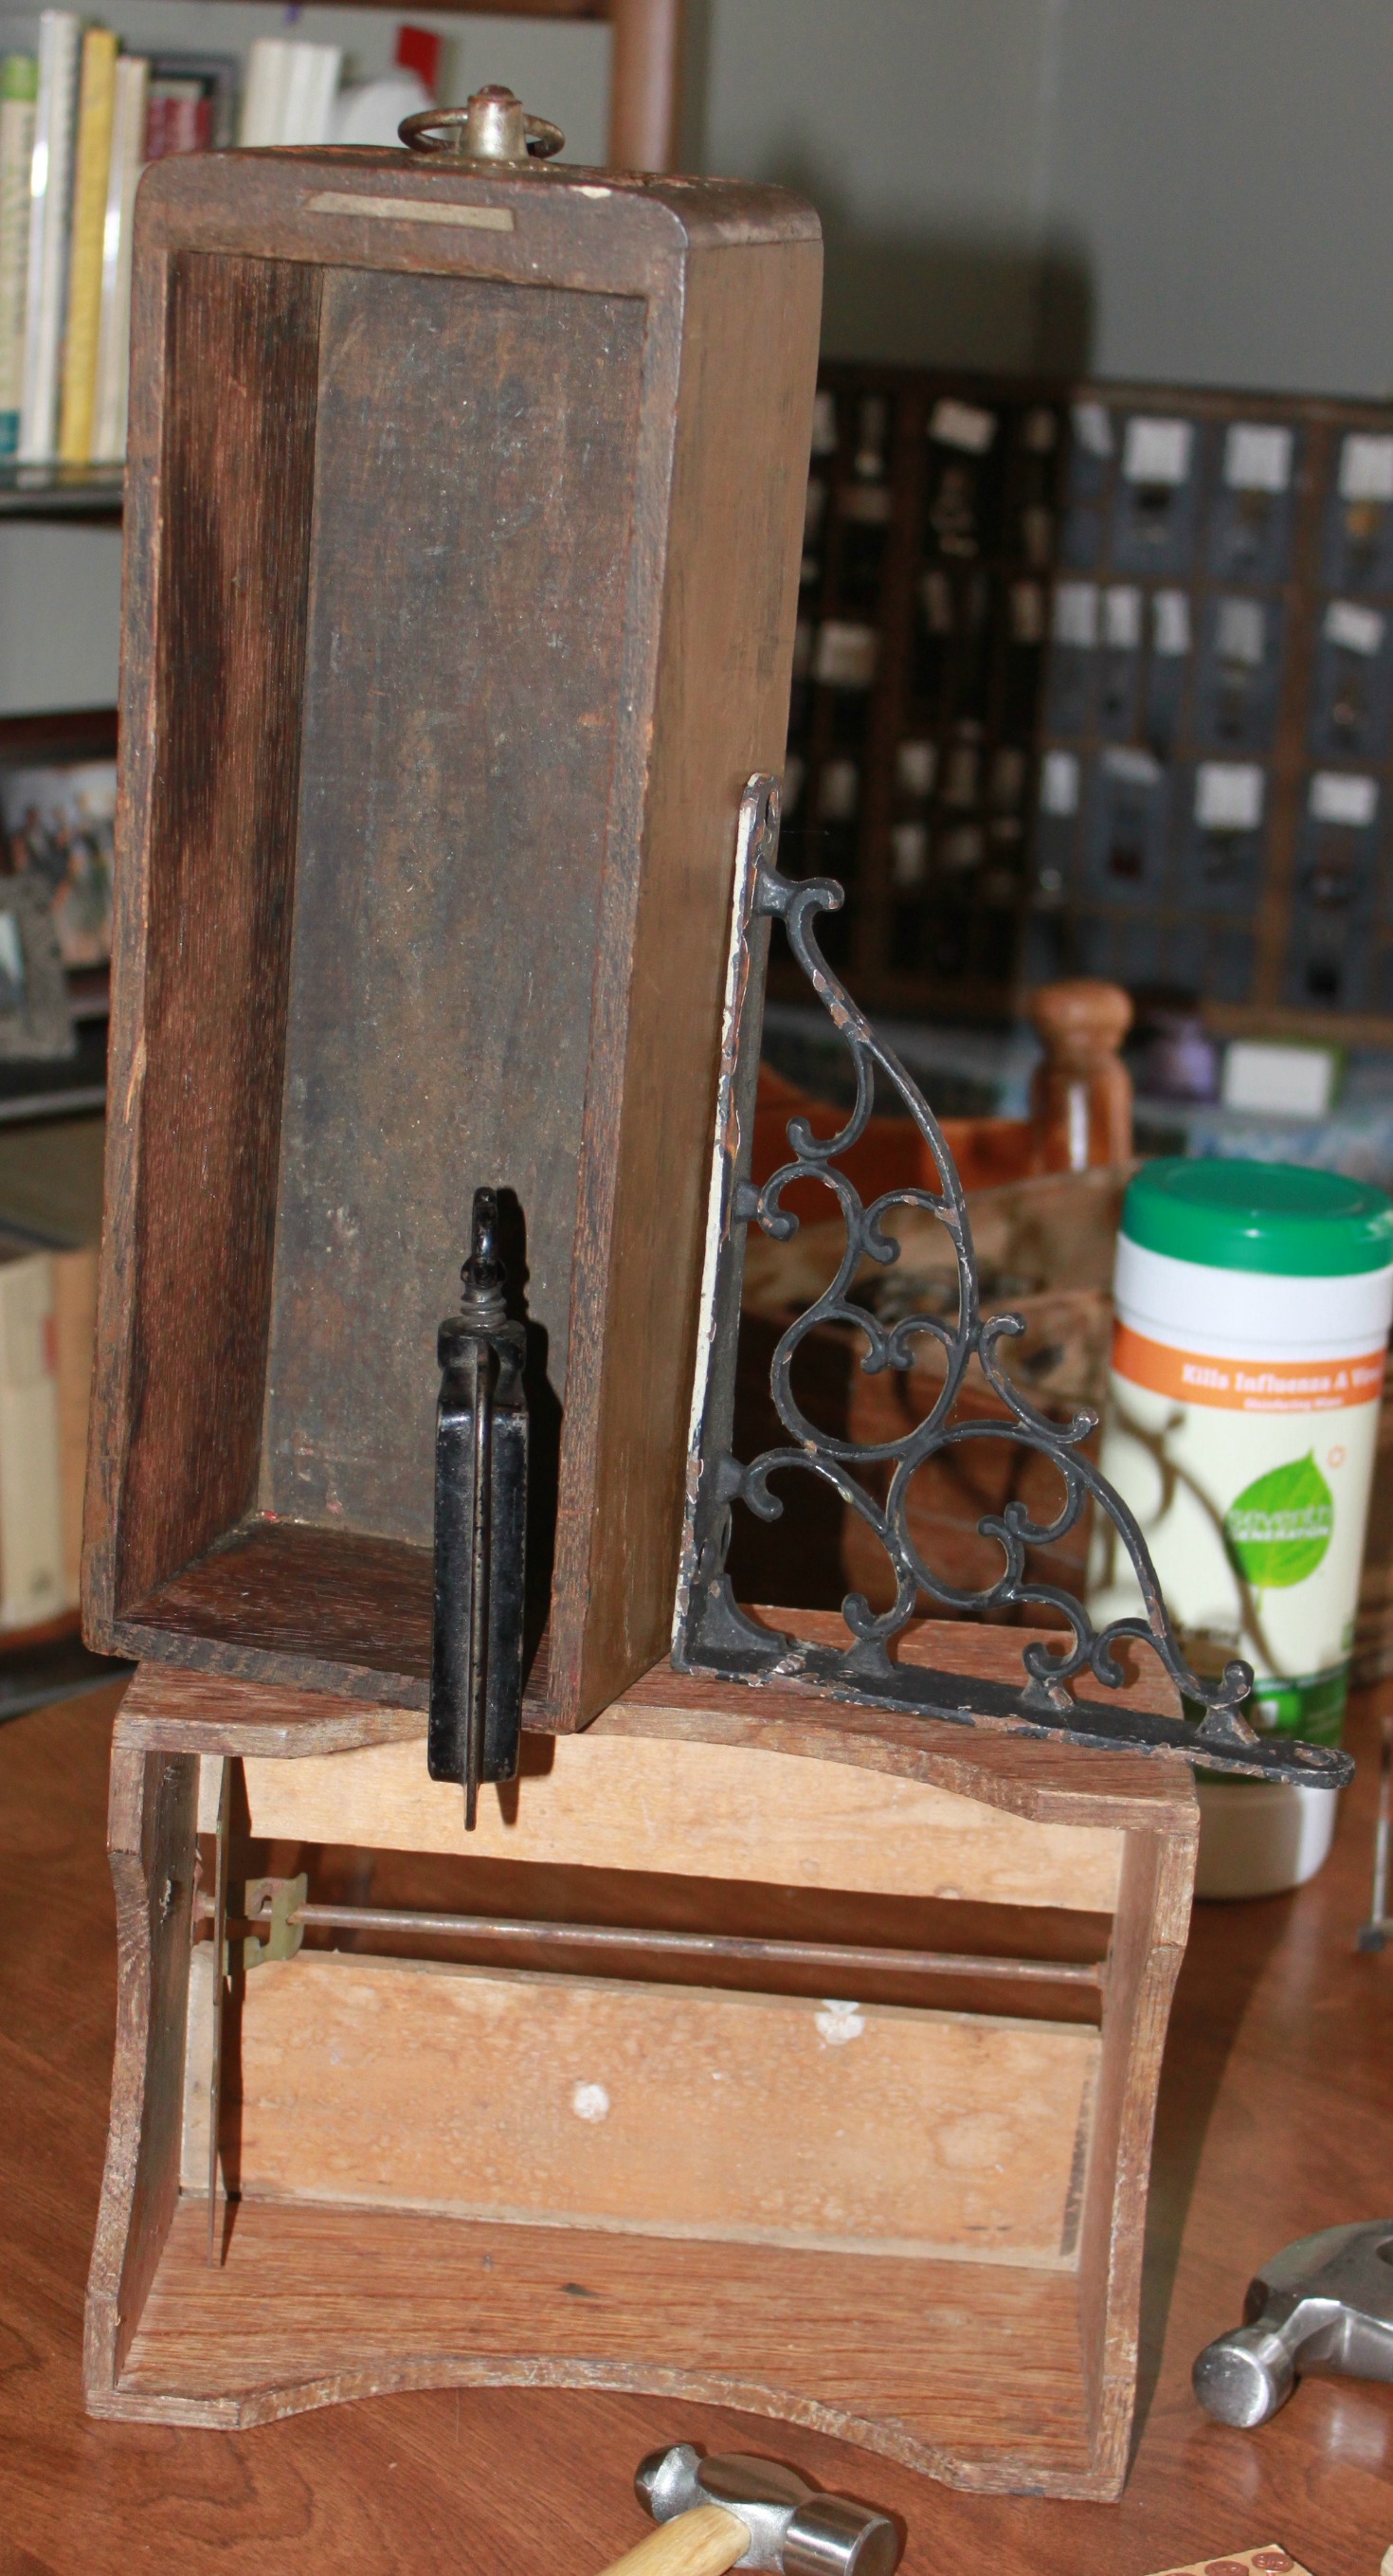
What You'll Need: 2 boxes (1 large and 1 small); 2 screws; drill & screwdriver; Murphy's Oil; medium-large cup hooks, as many as preferred; awl; c-clamp; and decorative metal bracket
A Note on Where to Find Boxes: Flea Markets; Garage Sales; Antique Malls; and ReStores (which benefit Habitat for Humanity)--Look for sewing machine drawers & old produce crates especially. Avoid any boxes with mold, badly split sections of wood, or water damage. They will not be as structurally sound and may break with minor hammering.
Instructions:
- Clean your boxes with soap and water (be careful not to soak your boxes). Shine them with a little bit of Murphy's Oil. Let dry completely.
- Place your sewing drawer (or small box) and metal bracket where you'd like them. Mark with pencil where you need to screw your metal bracket in place. Also, mark the corner of your sewing drawer so if you choose for it to be removable you can place it back in the same spot. (I would suggest making your drawer removable because when you transport these kinds of displays, they can shift and it is much easier to adjust a c-clamp than having to re-screw the box on location).
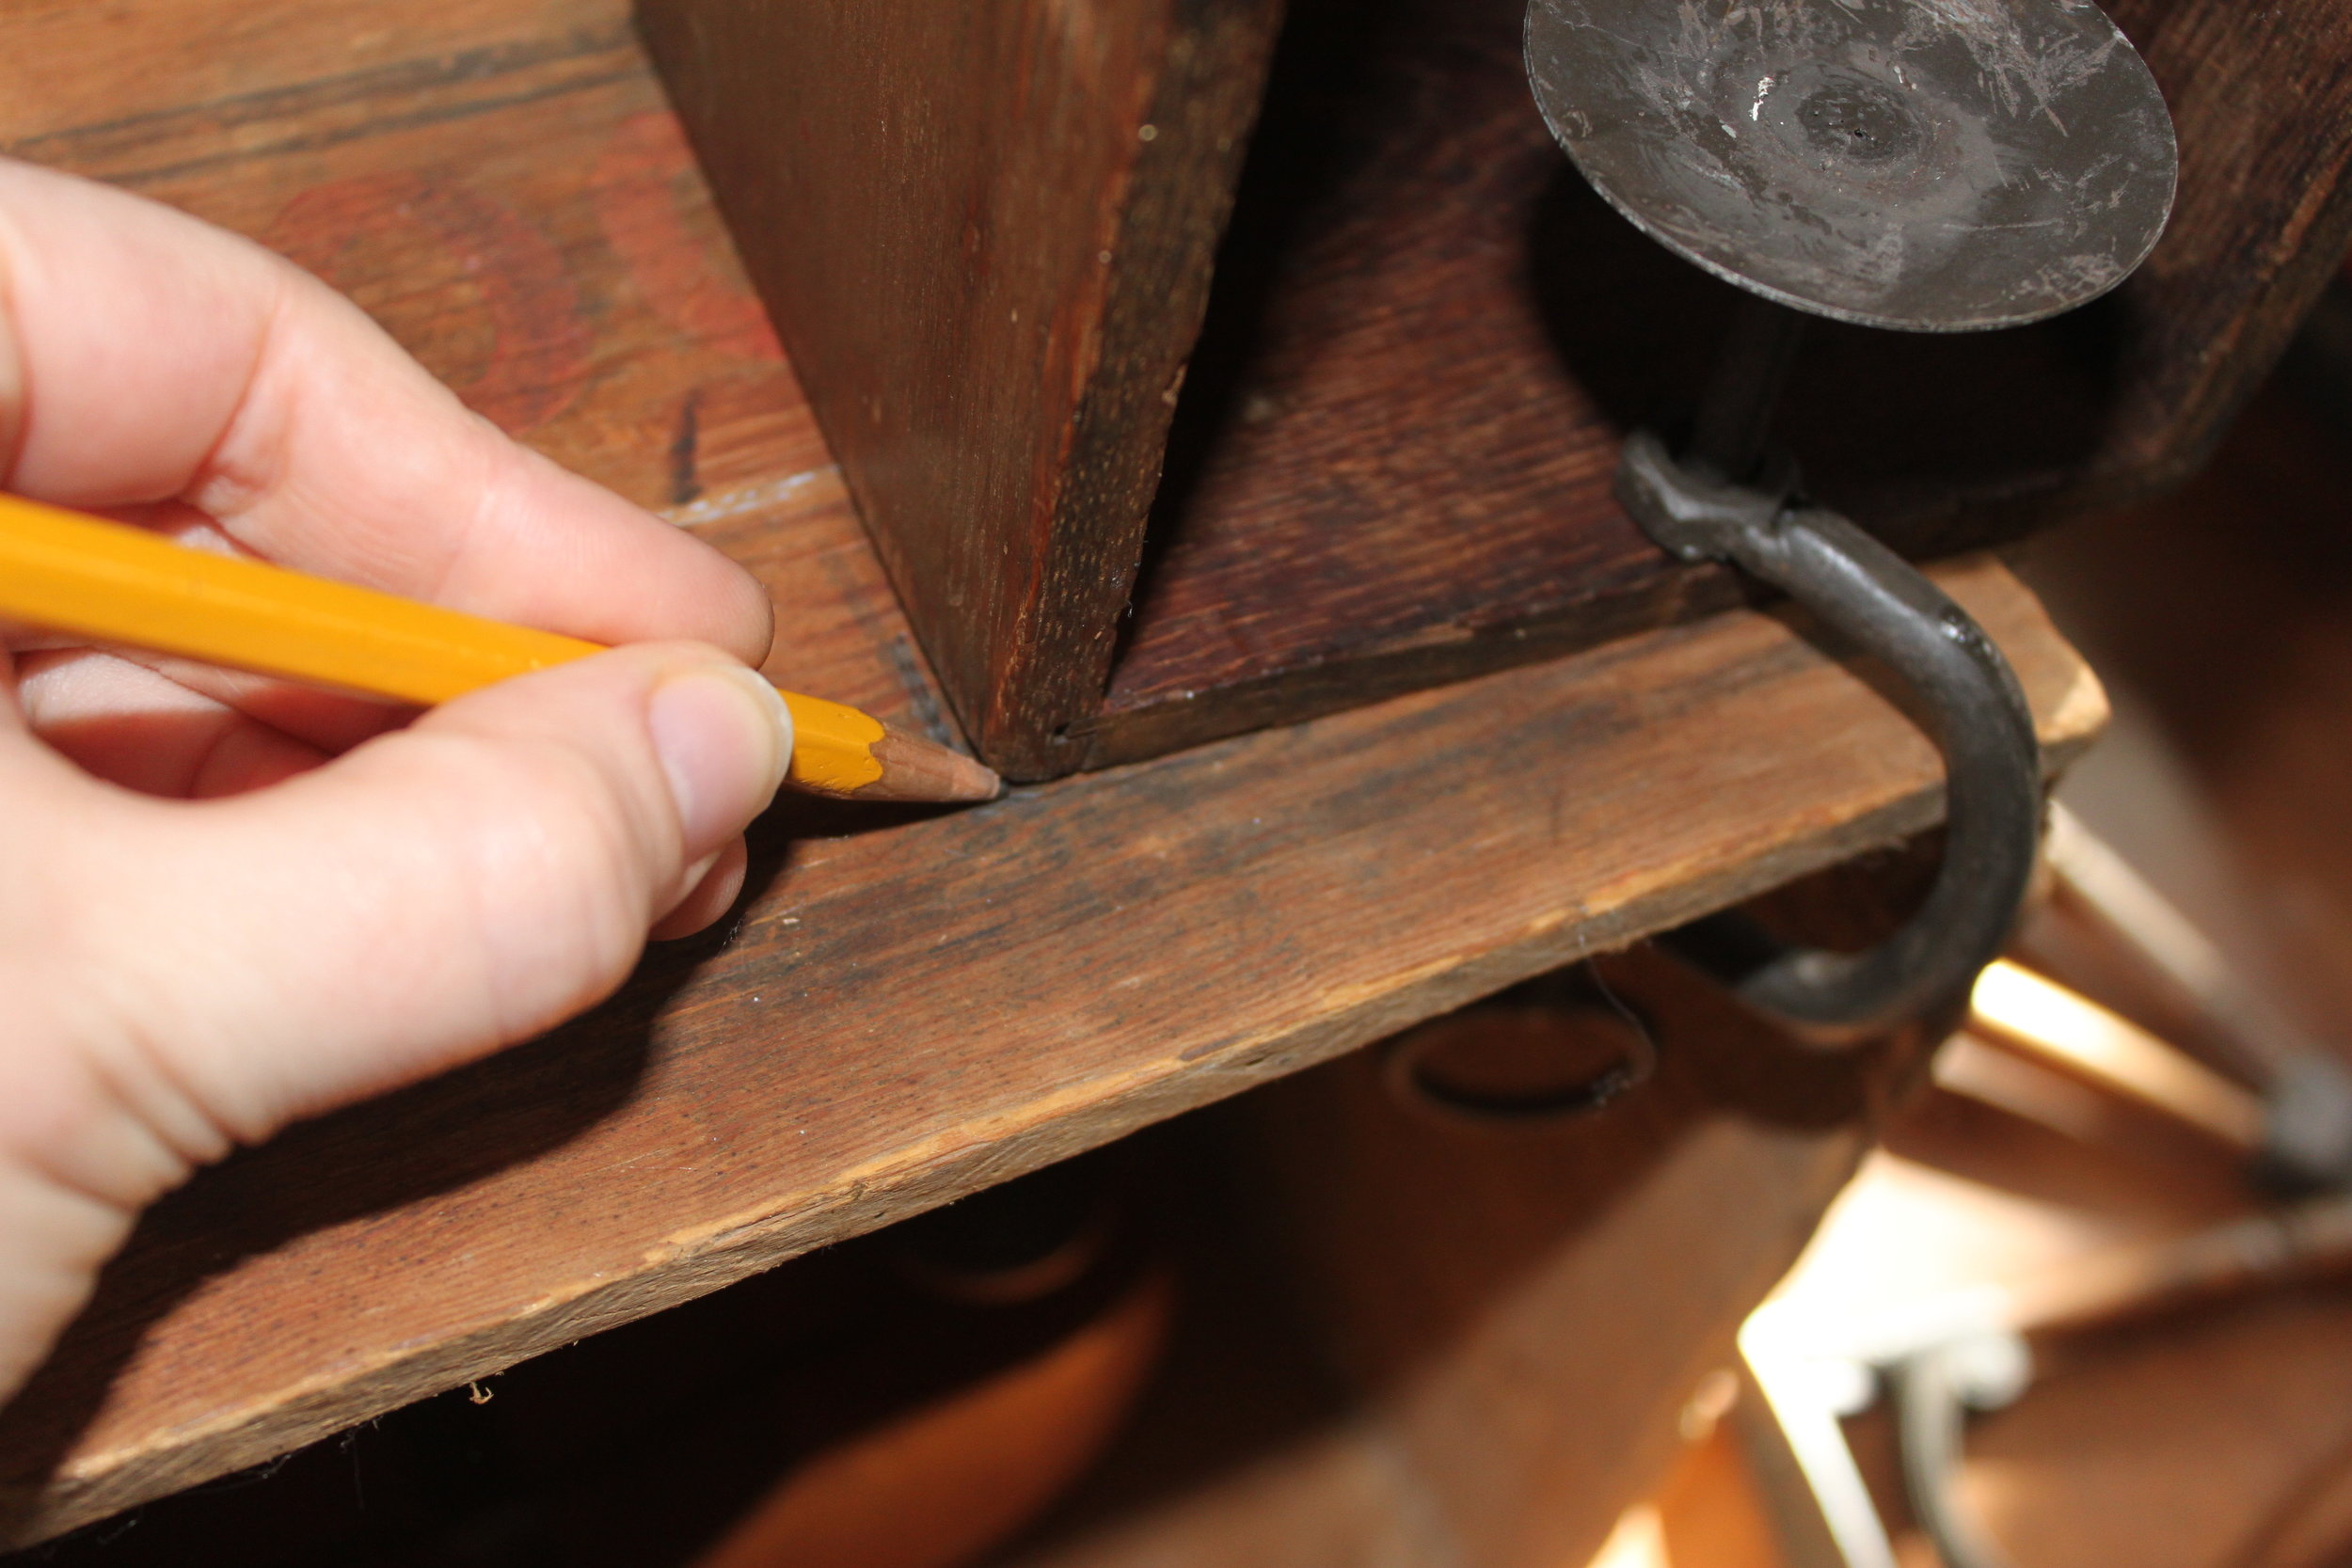
- Clamp your sewing drawer to your large box with your c-clamp.
- Next, make starter holes in your large box for your screws. If your box is oak or another hard wood use a drill rather than your awl. And vice versa for a more pliant or less sturdy wood.
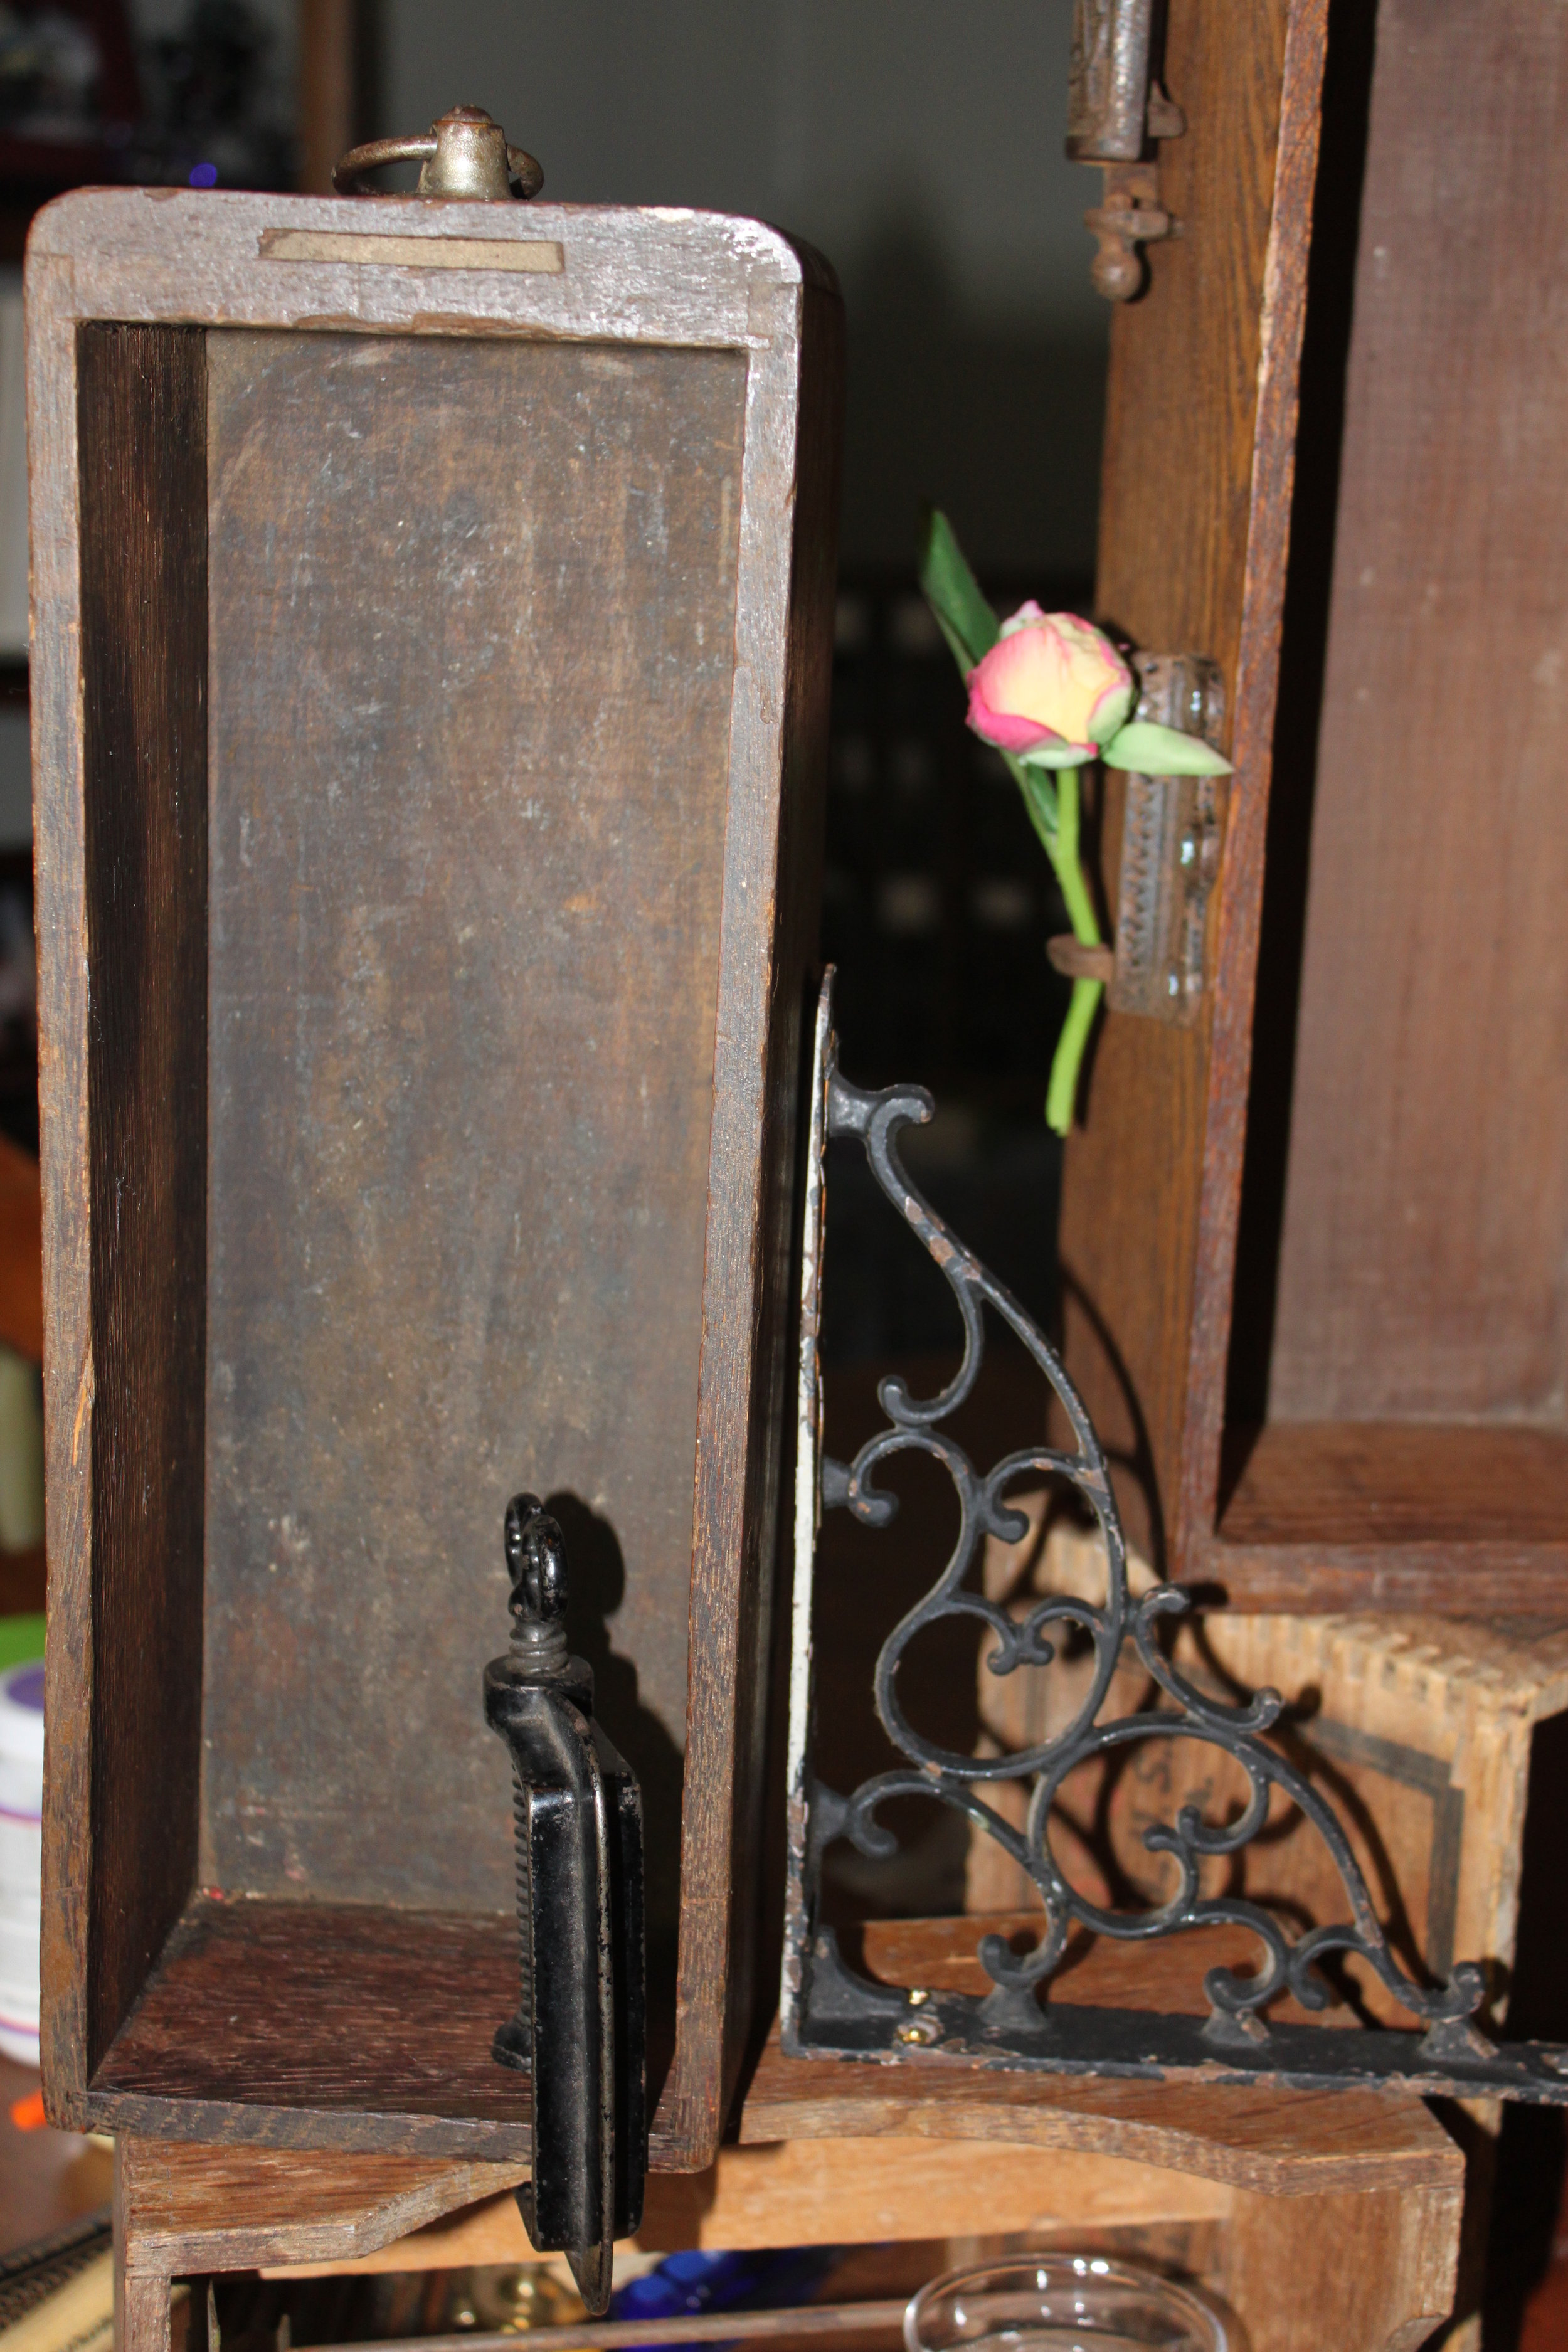
- Affix your metal bracket to your large box with your screws.
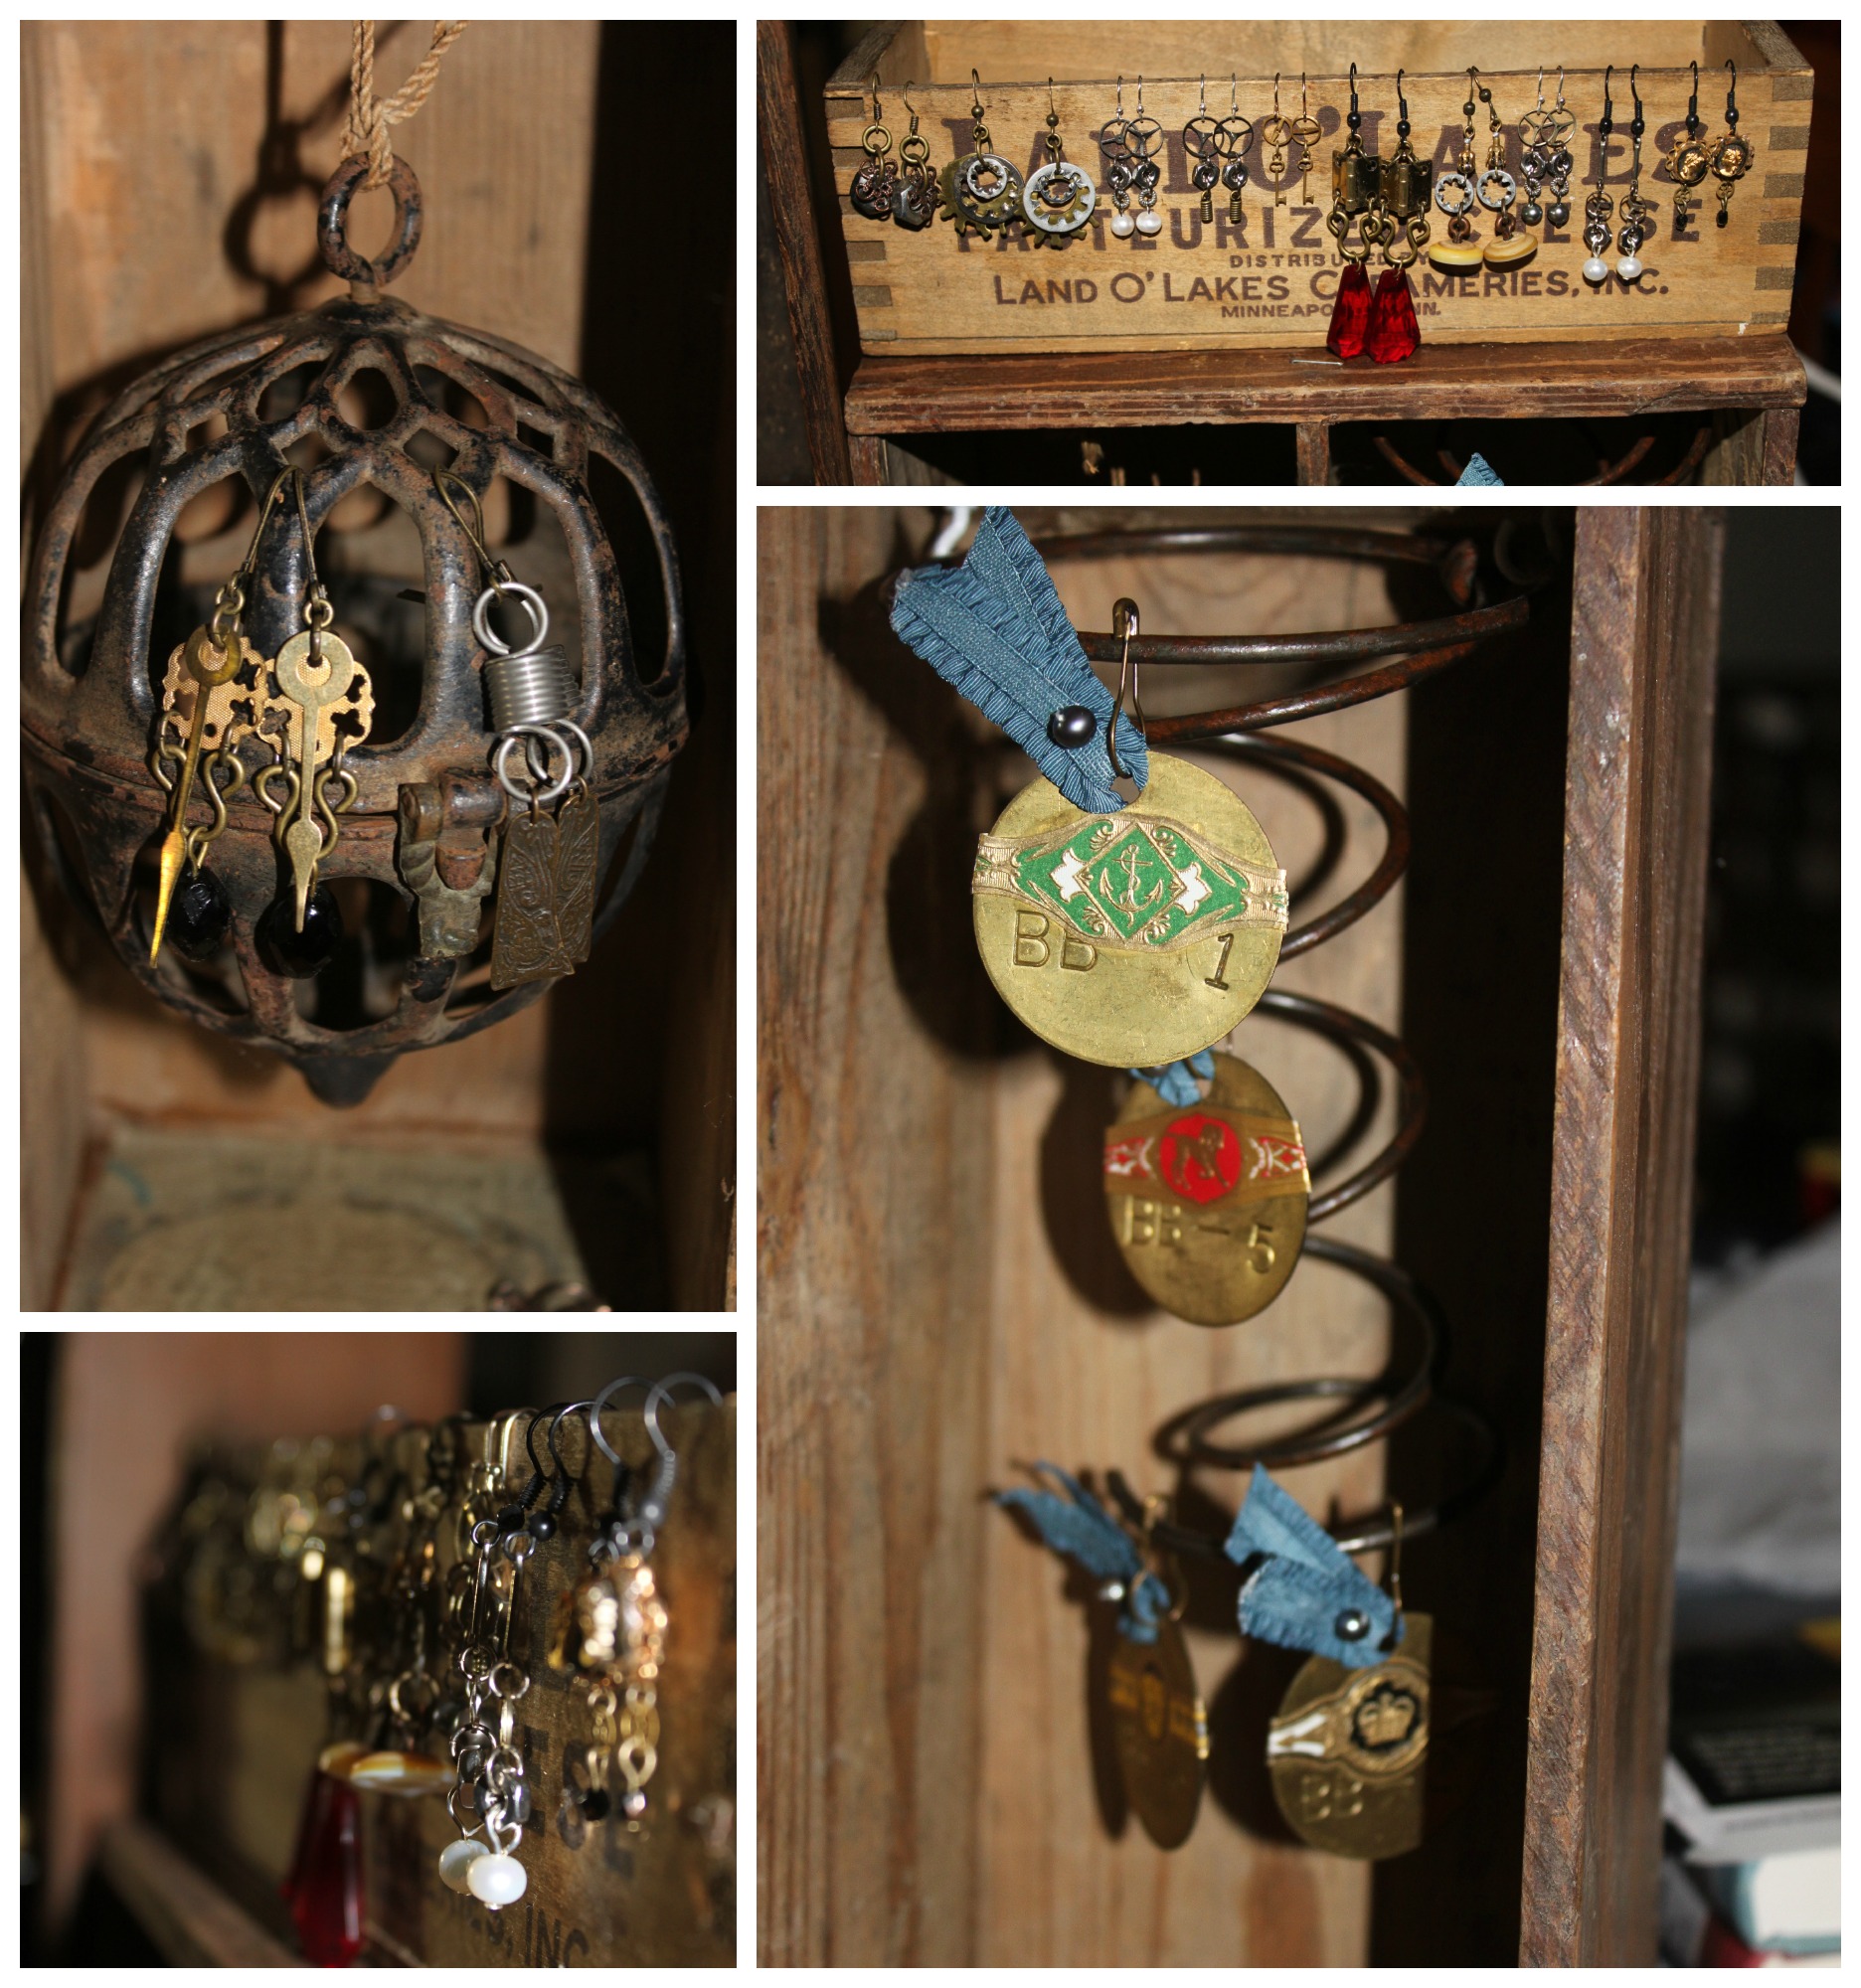
- Last, make starter holes on your display where you'd like to place your cup hooks. Screw your cup hooks in.

- Hang your jewelry with pride!

DIY Steampunk Drawer Displays, Style No. 1
D-I-Y-1 CommentIf you have a steampunk crafty business, or perhaps an old-timey aesthetic, your booth should help convey the feeling of your products. This is something I feel that I do quite well and I am quite proud of. Many people stop by my booth just to look at the curiosities inside. In my next 3 blog posts, I will be sharing 3 of my newest displays with instructions & tips on how to recreate them for yourselves! Here's no. 1.
Display No. 1:

What You'll Need: 2 boxes (1 large and 1 small); 2 nails; hammer; Murphy's Oil; 3 medium-large cup hooks, or more if preferred; 1 large spring; modge podge; paintbrush; scissors; awl; map tissue paper (or regular paper) cut to fit the bottom of your box; twine; and a metal filigree globe (this can be substituted for anything else you'd like or can find that fits your box that you can hang jewelry from)
A Note on Where to Find Boxes: Flea Markets; Garage Sales; Antique Malls; and ReStores (which benefit Habitat for Humanity)--Look for sewing machine drawers & old produce crates especially. Avoid any boxes with mold, badly split sections of wood, or water damage. They will not be as structurally sound and may break with minor hammering.
Instructions:
- Clean your boxes thoroughly with soap & water (though do not soak the box) and shine up with a little Murphy's Oil. Let dry completely.
- Affix your small box on the top of your large box with your 2 nails. Hammer the nails in the bottom of the small box. Next, cut a piece of your map tissue paper to fit the bottom of your box. Apply a generous layer of modge podge to the bottom of the small box and then place the map tissue paper over it. Apply another layer of modge podge and let dry, approx. 15-20 mins. (Side note, map tissue paper, which you can find at Barnes & Noble BookStores in their gift wrap section, looks more antique when modge podged into your box than regular map paper).
- Next, cut a piece (or pieces if your large box is divided like mine) of map tissue papers to fit the bottom of your large box. Apply a generous layer of modge podge to the bottom of the box. Place the map tissue paper to the bottom of the box and then modge podge on top of it. Let dry, approx. 15-20 mins.
- Next, place your spring where you want it to hang in your box. Mark 2 spots with your pencil (where your cup hooks will go). Using your awl, create 2 starter holes over your pencil marks.
- Screw your cup hooks in place. Hang your spring from the cup hooks.

- Place your metal filigree globe in the box. Figure out where you would like it to hang. Mark it with pencil and create a starter hole with your awl. Next, cut the length of twine you need. Attach the twine to your filigree globe.
- Screw your cup hook in place. Hang your filigree globe.

- (Optional) Screw in more cup hooks for additional places to hang your jewelry. Remember to first create starter holes before screwing in the cup hooks so that you do not split the wood.
- Display your amazing product!
Rainy Saturday in the Studio
Inspiration3 CommentsRainy days are wonderful--perfect for naps, reading, and working in my studio creating all kinds of steampunk jewelry while watching a frightening amount of sci-fi movies & television. Suffice it to say--rainy days are something I look forward to.  I just finished reading the last book in Cassandra Clare's Mortal Instruments trilogy--Clockwork Princess. I rarely review the books that I read for fun on my blog (I save that for my academic life) but I will make an exception for this last book because I want to encourage you all to read it. I won't spoil Clare's carefully thought out and brilliantly executed plot--so do not fear reading this modest review any further. As an ardent bibliophile, the epigraphs to chapters & the poetry & fiction quoted fervently by the characters creates a story informed by a kind of meta-narrative. Though anyone can enjoy Clare's exciting trilogy--it is the well-read person of Victorian literature that is rewarded (for it helps clue in the reader as to characters' true feelings and establishes another layer of Clare's already vivid world--a literary one in which she situates two of her main characters, Will and Tessa). Not only are Will and Tessa voracious readers--but literature becomes for them a language, or shorthand in communicating with one another. Literature is also a coping mechanism for both characters--when faced with moral ambiguity or great challenges both imagine themselves as other characters and then pose the same obstacles & questions to the characters they imagine so that Will and Tessa may arrive at answer/action.
Literature also offers comedic relief. Here is one of my favorite passages from a Clockwork Princess (which pokes fun at a very strange, and often overlooked, instance in Charlotte Bronte's Jane Eyre):
"Mr. Rochester never courted Jane Eyre," Tessa pointed out.
"No, he dressed up as a woman and terrified the poor girl out of her wits. Is that what you want?"
"You would make a very ugly woman."
I laughed out loud when I read that. Not only did I enjoy the book's humor and literary play but also its subtle feminism. Tessa is a sturdy, complex character who is not defined by the love triangle in which she finds herself (and also might I add--there is no obvious choice--as a reader I was rooting both for Jem & Will). Tessa does not stand idly by while others fight and indeed she rescues herself throughout the series. More importantly, on a more miniscule level Clare's writing does not undermine the strength of her character--despite at times when Tessa falls into the role of damsel or love-interest because, in the words of her suitors, "She did not belong to Will--she was too much herself to belong to anyone, even Jem--but she belonged with them" instead. The novel vilifies the objectification of women (represented by the villain & his thoughts and actions toward Tessa) and champions gender equality & love based first and foremost on friendship and respect. Besides all that--it is one of those trilogies that will keep you up until the wee hours of the morning reading.
As a result of this fantastic story--and vivid steampunk world--I have been so inspired and been creating all kinds of new pieces. Here's a little of what Clare's book inspired & what I've been making this rainy Saturday.
 Rhinestone, Washer & Gear Necklaces--I have had steampunk weddings on the brain now for a while.
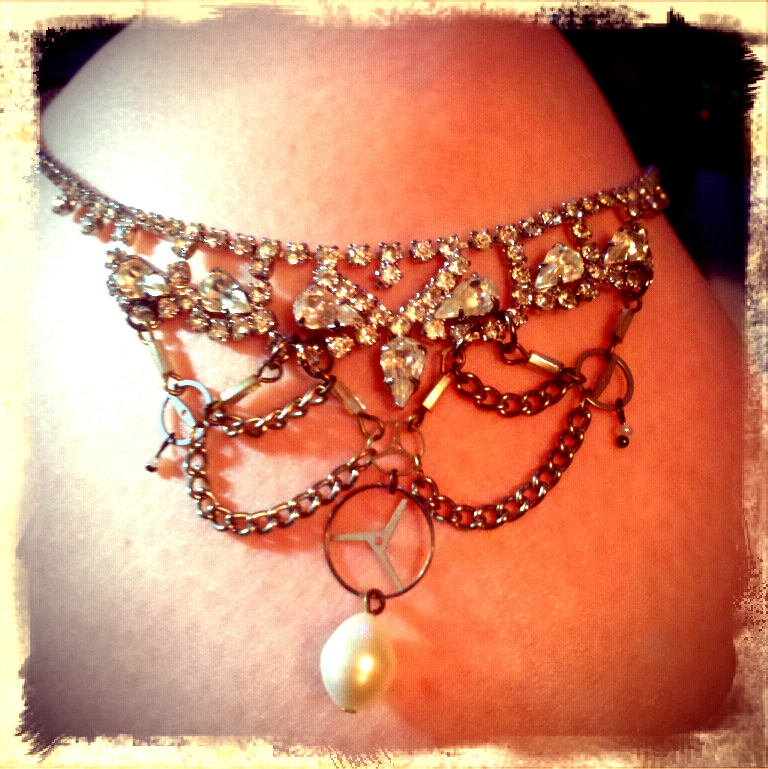
 And here's a pair of gearrings--for that sweet bookish someone in your life! I've also been working on some new displays (will reveal more in my next blog post so stay tuned--until then here's a sneak preview)!

What have you been reading? What do you do on your rainy days?
DIY Steampunk Home Decor: Clock Face Catch All
D-I-Y-Comment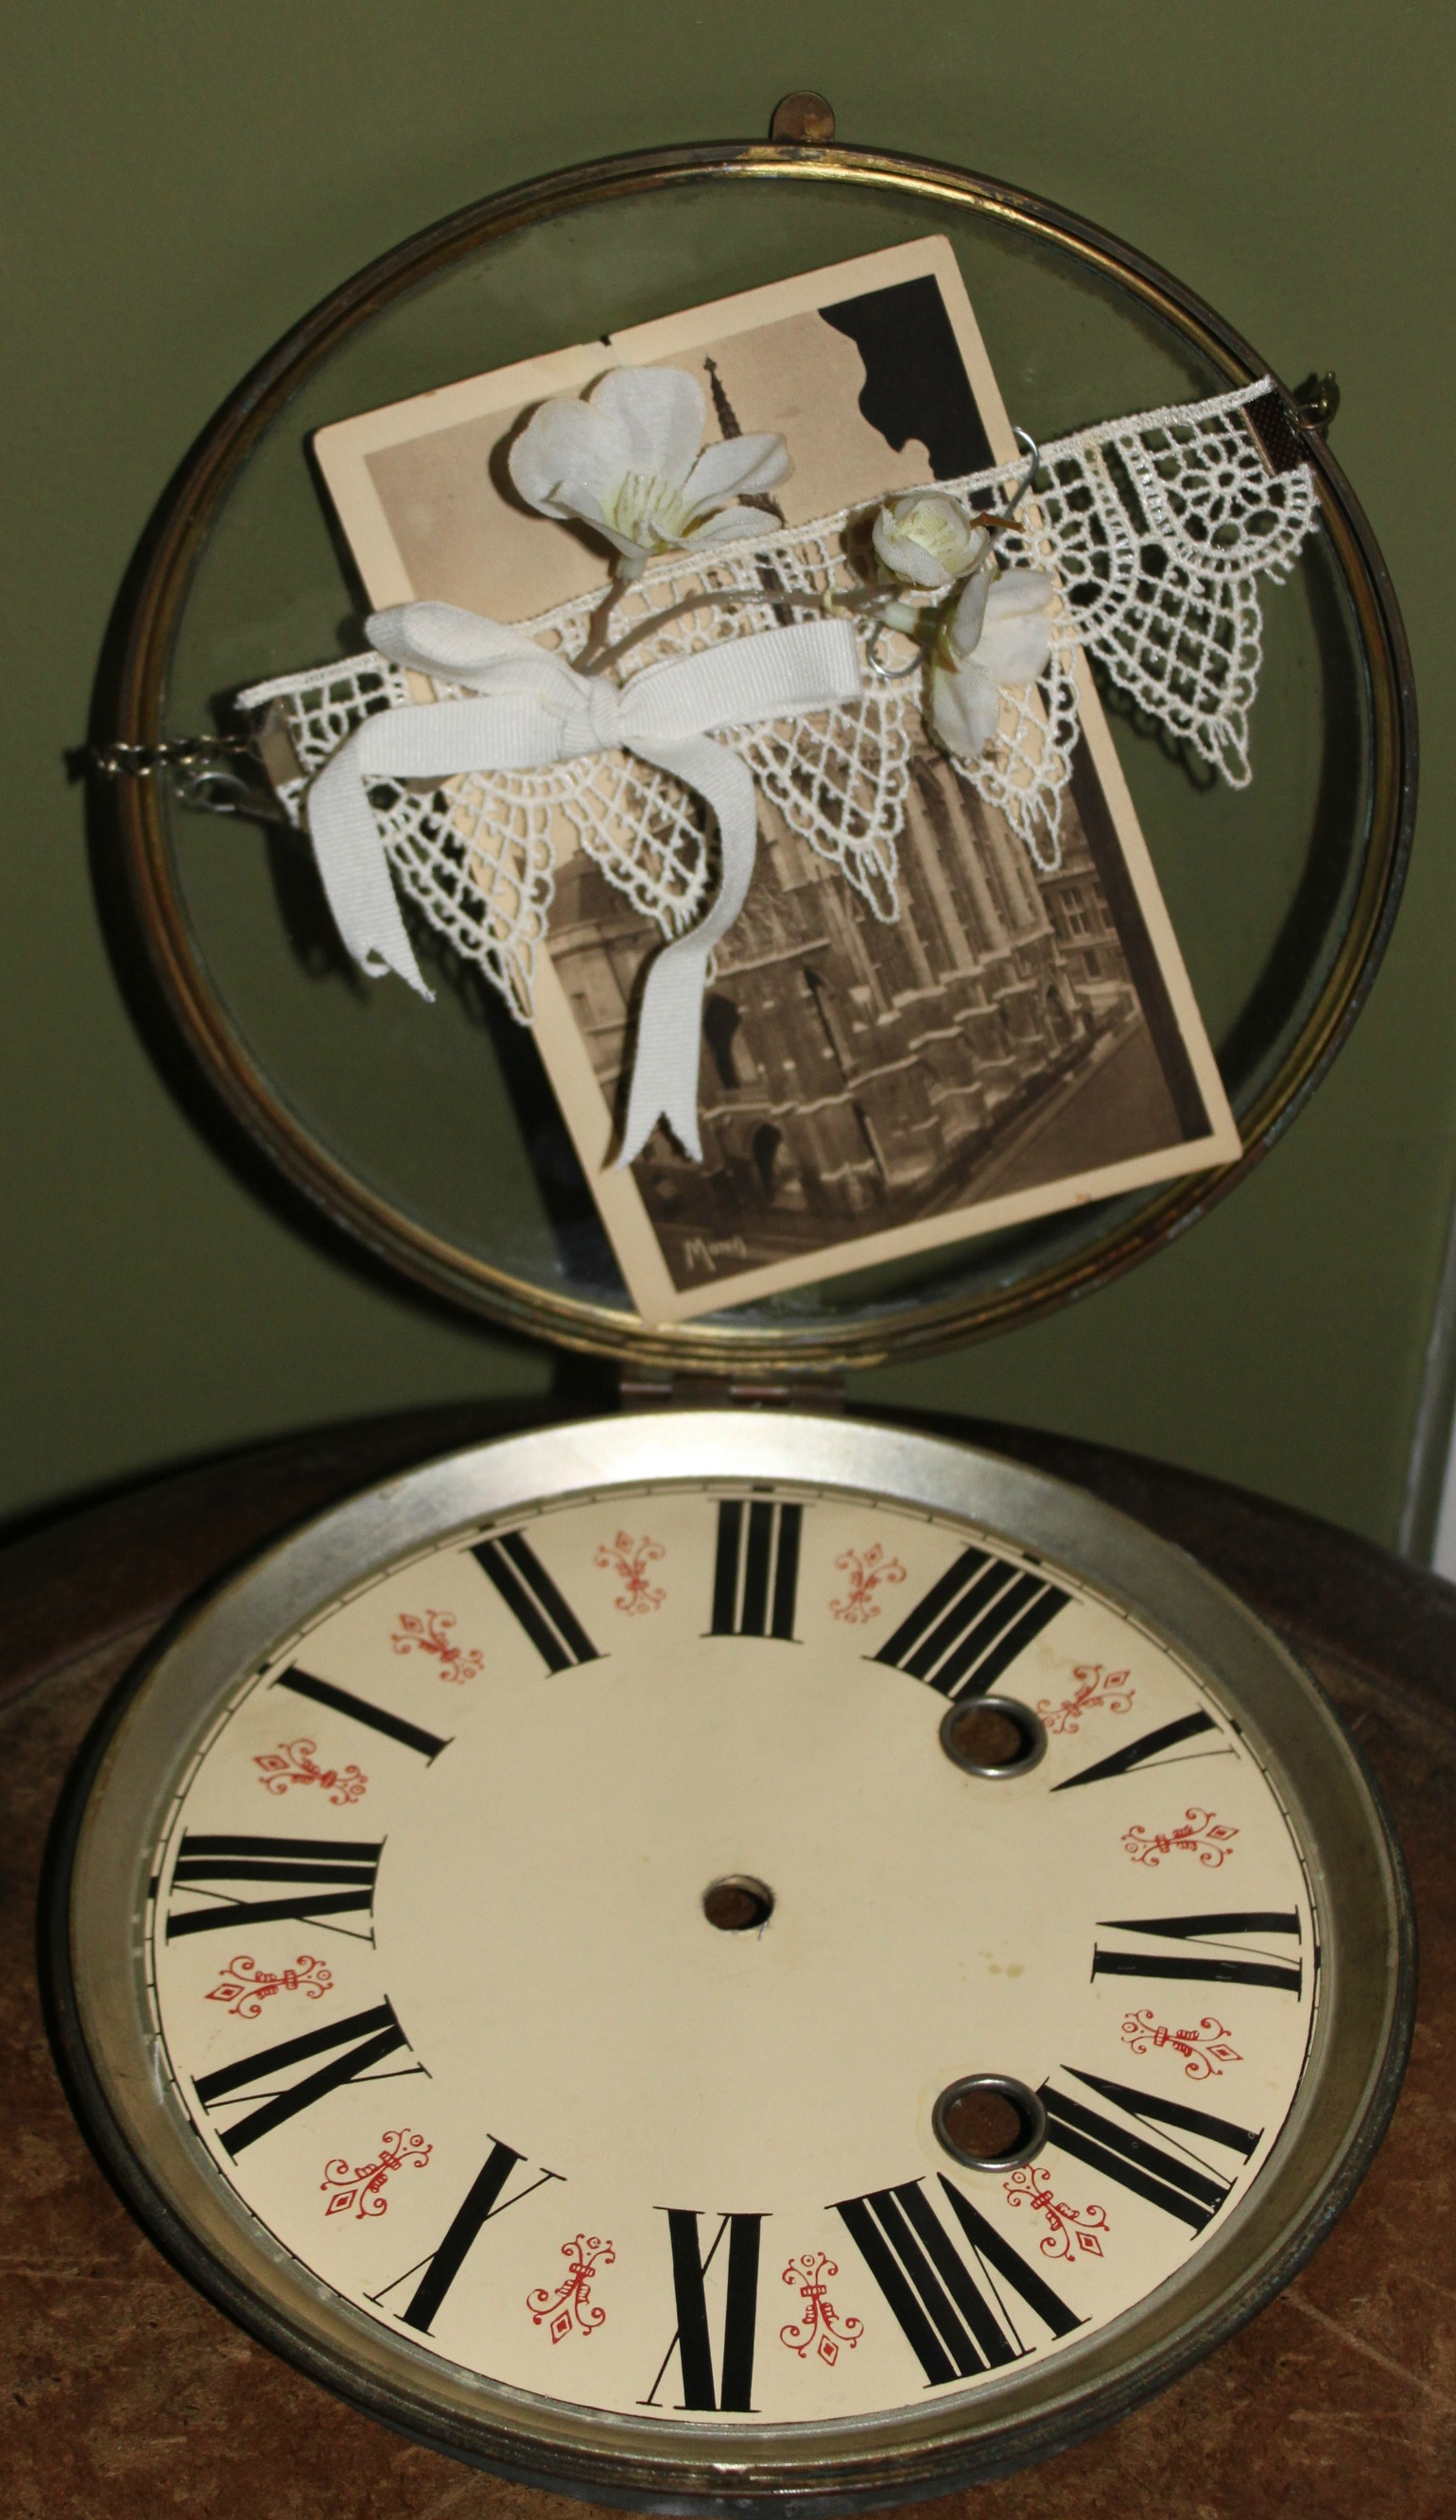 Steampunk your home with this simple & elegant clock face catch all. Perfect for holding your loose change, keys, sunglasses, stamps, or jewelry--your catch all will not only be beautiful, but also be another conversation piece to add to your home! Here's what you'll need:
 Materials & Tools:
- Clock Face (oversize or large) that has a protective covering. If you cannot find a clock face then try looking for a sundial instead.
- Vintage Photograph or Postcard (that fits inside your covering)
- Ribbon (any color of your choice)
- Fake Flower (any kind of your choice)
- Lace (the amount will depend on the size of your covering. Your lace should equal the length [circumference] of your covering)
- Paperclip
- Scissors
- Needle & Thread (or glue gun)
- Chain (also measured to equal the circumference of your covering)
- Jewelry pliers & wire cutter
- 2 Ribbon Crimps
- 2 jump rings
Steps:
- Open up the covering of your clock face & leave open. Place your vintage photograph inside. Set aside.
- Measure your lace (it should be the same length as your covering) and then cut. Next, place 1 ribbon crimp at the end of your lace and crimp in place with your jewelry pliers. Repeat for the other end.
- Now measure the amount of chain you need. (It should be the same length as your covering too.) Cut your chain with wire cutters, or toenail clippers if you do not own a pair of wire cutters. Next, using your jewelry pliers (2 flat nosed pliers are best) connect your chain to your lace by hooking the jump ring through the ribbon crimp. Repeat for the other side.
- Place your lace & chain over the covering--the lace should be placed in front over the photograph/postcard. You may have to adjust your chain if you don't like where it sits on your covering (by making it smaller or larger--respectively, removing chain links with wire cutters or adding jump rings or more chain with your pliers).

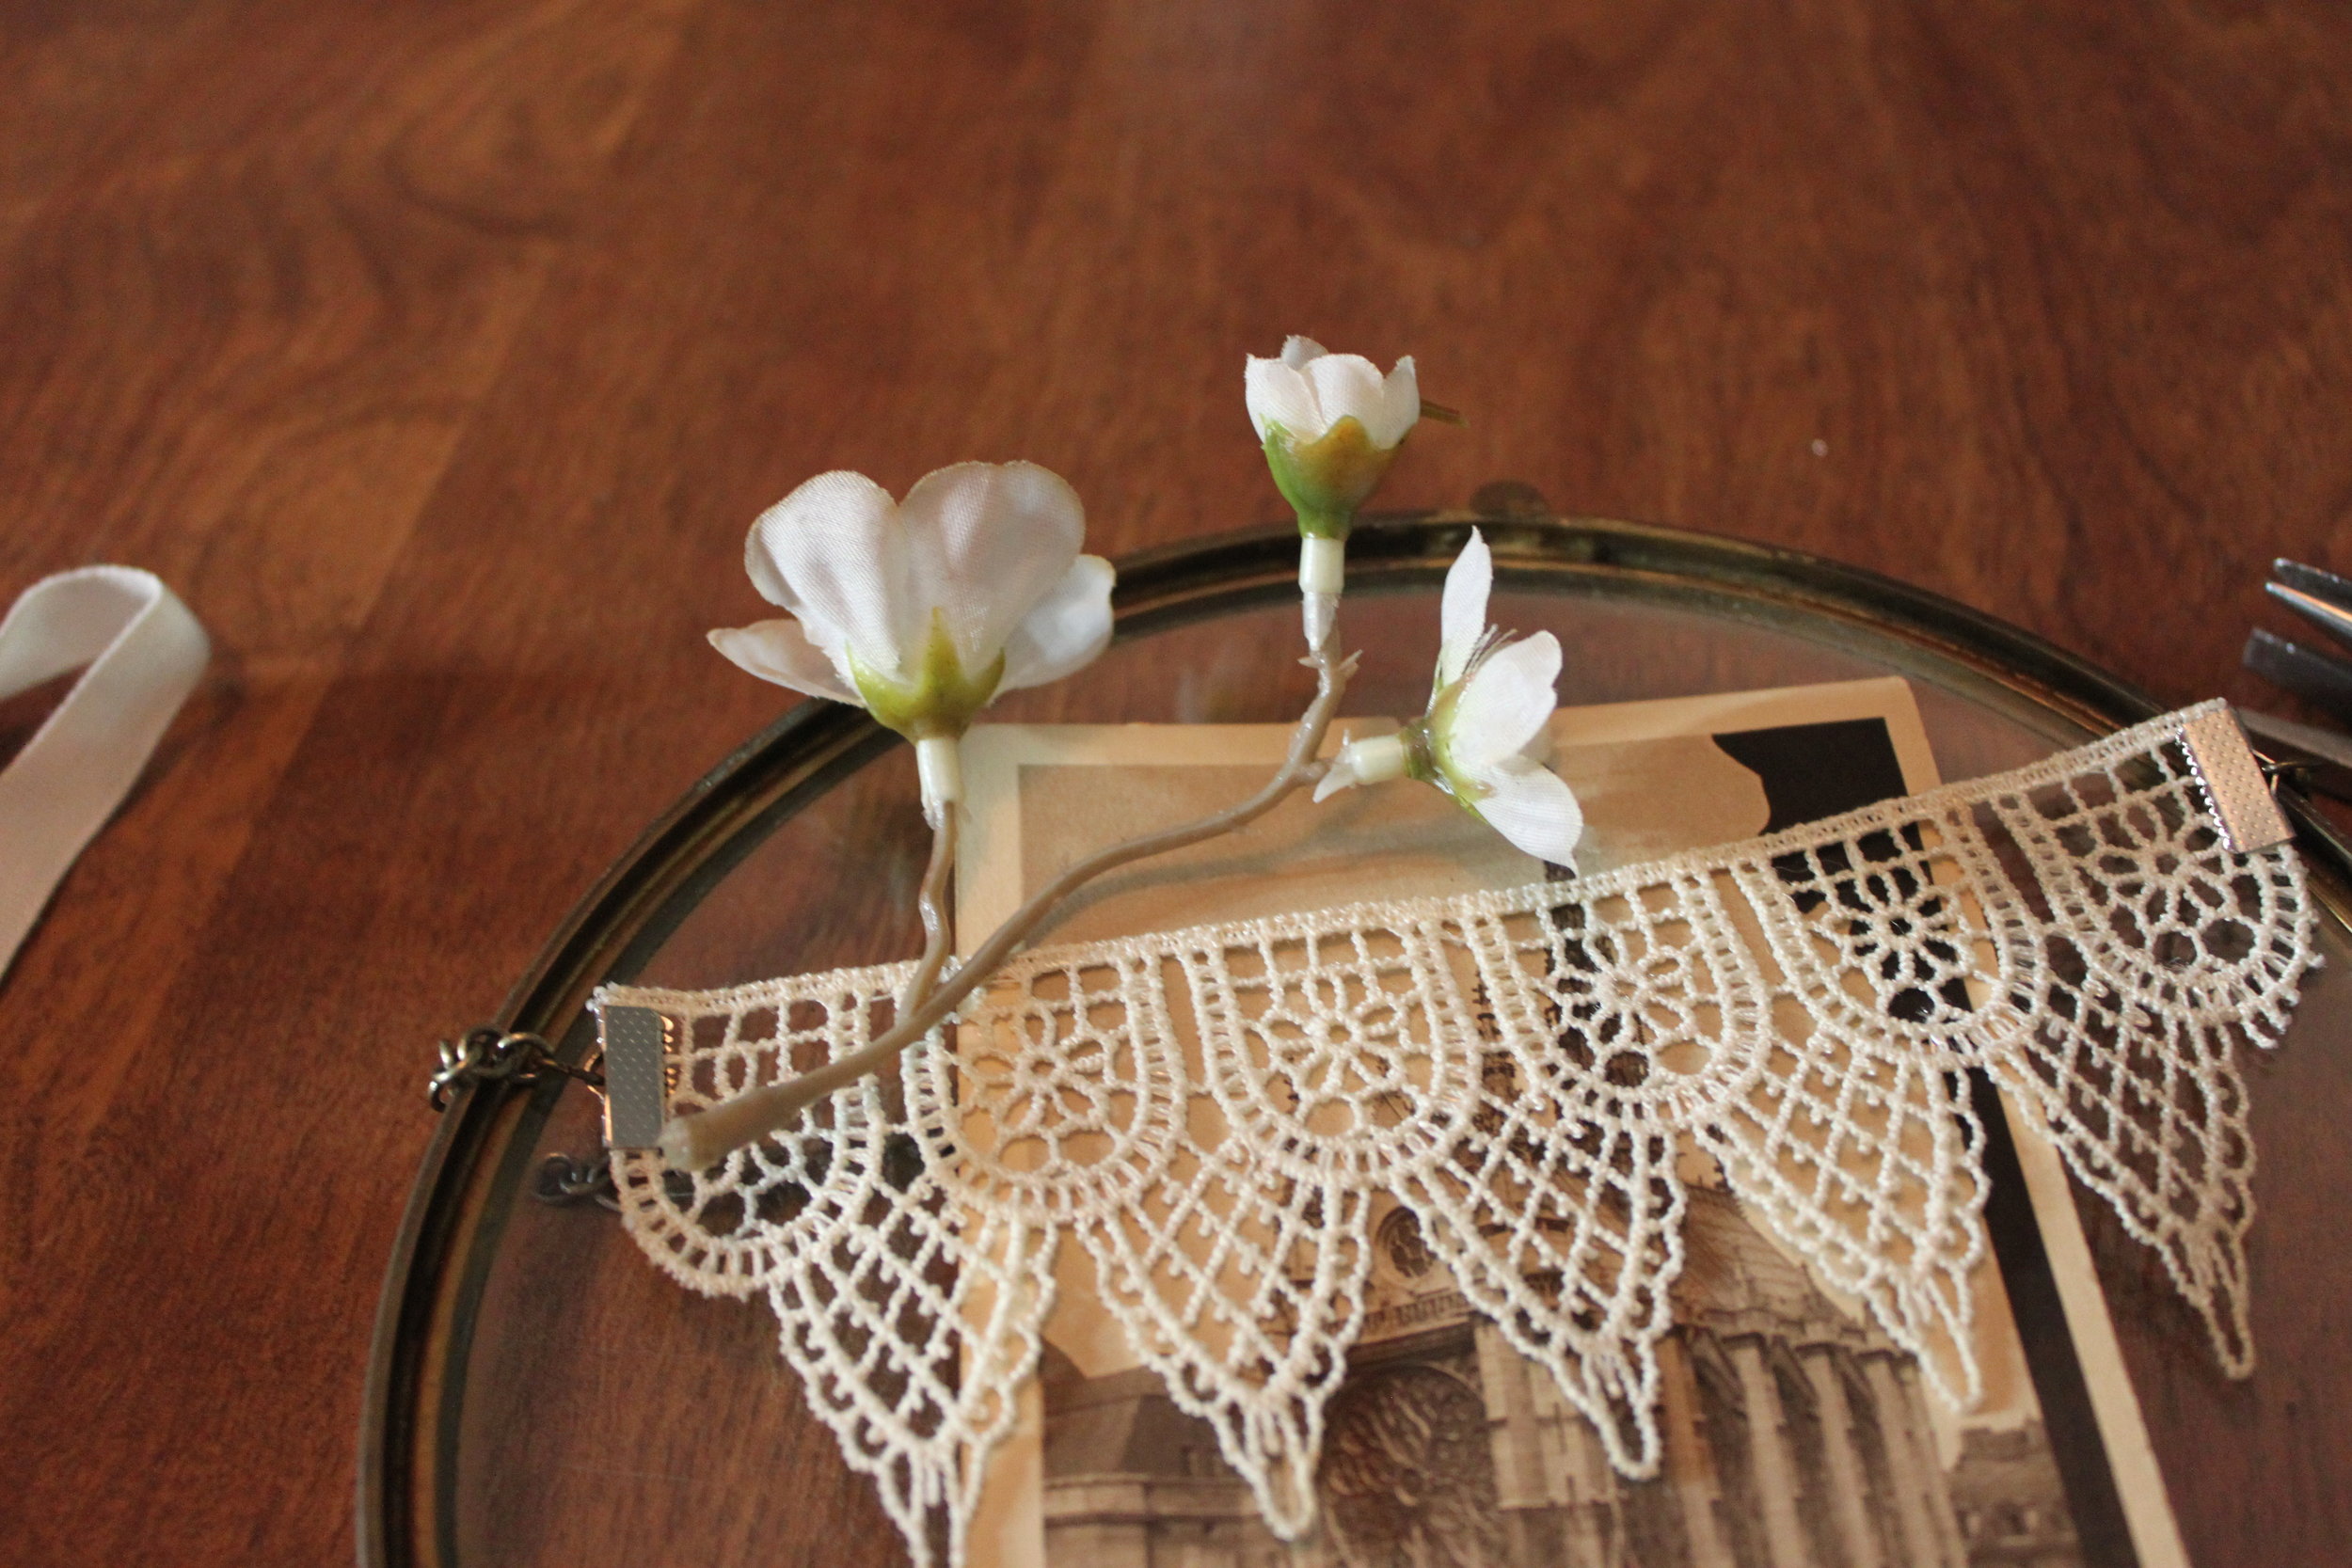
- Next, make a decorative bow out of your ribbon.

- Using your needle & thread, sew your bow and fake flower in place onto the lace. Be sure to tie a sturdy knot. (Another option for this step if you don't like sewing--glue the bow and fake flower in place with your glue gun.)
- Last, clip together your photograph and lace with your paperclip. This helps the lace remain taut across the photograph/postcard rather than sag across it.
- Proudly display in your lovely home!
 As always, happy making!