There is nothing more wonderful than the sound of crinkling wrapping paper, the sharp tweet from the metal hinge of your scissors, and last the slide and crack of tape being measured & broken. I love gift wrapping (if you couldn't tell from my somewhat silly/poetic description above)! To me the wrapping is just as much of a gift as the present itself. One of my favorite holiday pastimes--up there with baking cookies with all the lovely ladies in my family--I just pop in some holiday tunes, pile up all the treasures I have for my loved ones, (imbibe a little jolliness) and wrap away.
Here are a few DIYS and ideas that are perfect (for more than just your holiday gift wrapping) for that steampunker in your life! Happy Wrapping!
 Jolly Spring Wrapping:(Materials: Wrapping paper, lace, ribbon, a spring, and a twig of berries; Tools: Scissors & tape) Wrap your present in your paper, taping it up. Next measure the amount of lace you'll need to fix around your box and cut. Then tape in place. Next thread your twig of berries through your spring and arrange your berries decoratively. And last, attach your spring to the top of your box with ribbon. (I made a knot in the back to hide it).
 Frilly Girl Wrapping: (Materials: lace, thick ribbon, and mini doll's purse or coin purse; Tools: Scissors & tape) First, measure your lace and cut the length you need. Then tape it in place. Next measure your ribbon (remember to leave yourself room for a bow) and cut. Tie your ribbon over the lace. Before making your knot thread your purse through one of the ribbon ends. Then make your knot & bow!
 Sweetheart Locket Wrapping: (Materials: Lace, ribbon, a small safety pin and a locket on its chain; Tools: Scissors & tape) First, measure your lace and cut the length you need. Then tape it in place. Next measure your ribbon (remember to leave yourself room for a knot) and cut. Tie your ribbon over the lace and hide the knot in the back. Next affix your locket in place on the top. Flip over to the back (making sure not to lose the locket's place) and safety pin the locket in place. To do so thread through both side of your chain and then through both your lace and ribbon. Tuck any excess chain behind the lace (tape in place if desired).
My favorite aspect of this wrapping is that it's both a tag (if you have it engraved with your loved one's name or initials) and a present itself!
 Sweetheart Bracelet Wrapping: (Materials: Lace, ribbon, a small safety pin--maybe 2, and a bracelet; Tools: Scissors & tape) First, measure your lace and cut the length you need. Then tape it in place. Next measure your ribbon (remember to leave yourself room for a knot) and cut. Tie your ribbon over the lace and hide the knot in the back. Next affix your bracelet in place on the top. Flip over to the back (making sure not to lose the bracelet's place) and safety pin in place. To do so thread one safety pin through one end of your bracelet and then through both your lace and ribbon. Repeat for the other side. (If your bracelet fits around your present, simply close shut as you would around your wrist but I'd advise still safety pinning in the back for extra security).
My favorite aspect of this wrapping is that it's also a present itself!
 Flower & Spring Wrapping: (Materials: Ribbon or lace ribbon like I used, a fake flower, and a spring ; Tools: Scissors & tape) First, thread your flower through your spring. Next measure your lace ribbon and cut the length you need. Remember to leave yourself room to tie a bow and also tie onto your spring. After you've finished cutting, tie your lace ribbon onto the spring and then around your box. Make a big bow on the front!
 Cameo Comic Bubble Wrapping: (Materials: Lace, wrapping paper, tacky glue, plastic or cheap reproduction cameo, and a pen ; Tools: Scissors & tape) Wrap your present. Next measure the amount of lace you'll need to fix around your box and cut. Then tape in place. Using tacky glue (or any kind of all-purpose glue), affix your cameo onto the top of your present. Last, write your holiday message and/or tag onto the paper and draw a comic book/graphic novel style word bubble on your paper.
I love this gift wrap because you can really personalize it.
 Clock Part Wrapping: (Materials: Ribbon and clock part/ or gear ; Tools: Scissors) Measure the amount of ribbon you'll need to fix around both your box and clock part. Remember to leave room for a bow and an extra knot. Cut. (Also, make your ribbon prettier by cutting an upside down V into each of the ends). Tie around ribbon around your box. Next, place your clock part on top and tie your ribbon around it. Knot. Then make a bow.
This wrapping is really great for guys, gear enthusiasts, tinker-types, or those friends who prefer a more gender neutral wrapped gift. I used a clock part that was big and bulky but you can simplify this wrapping idea by using a clock gear or other machine part.
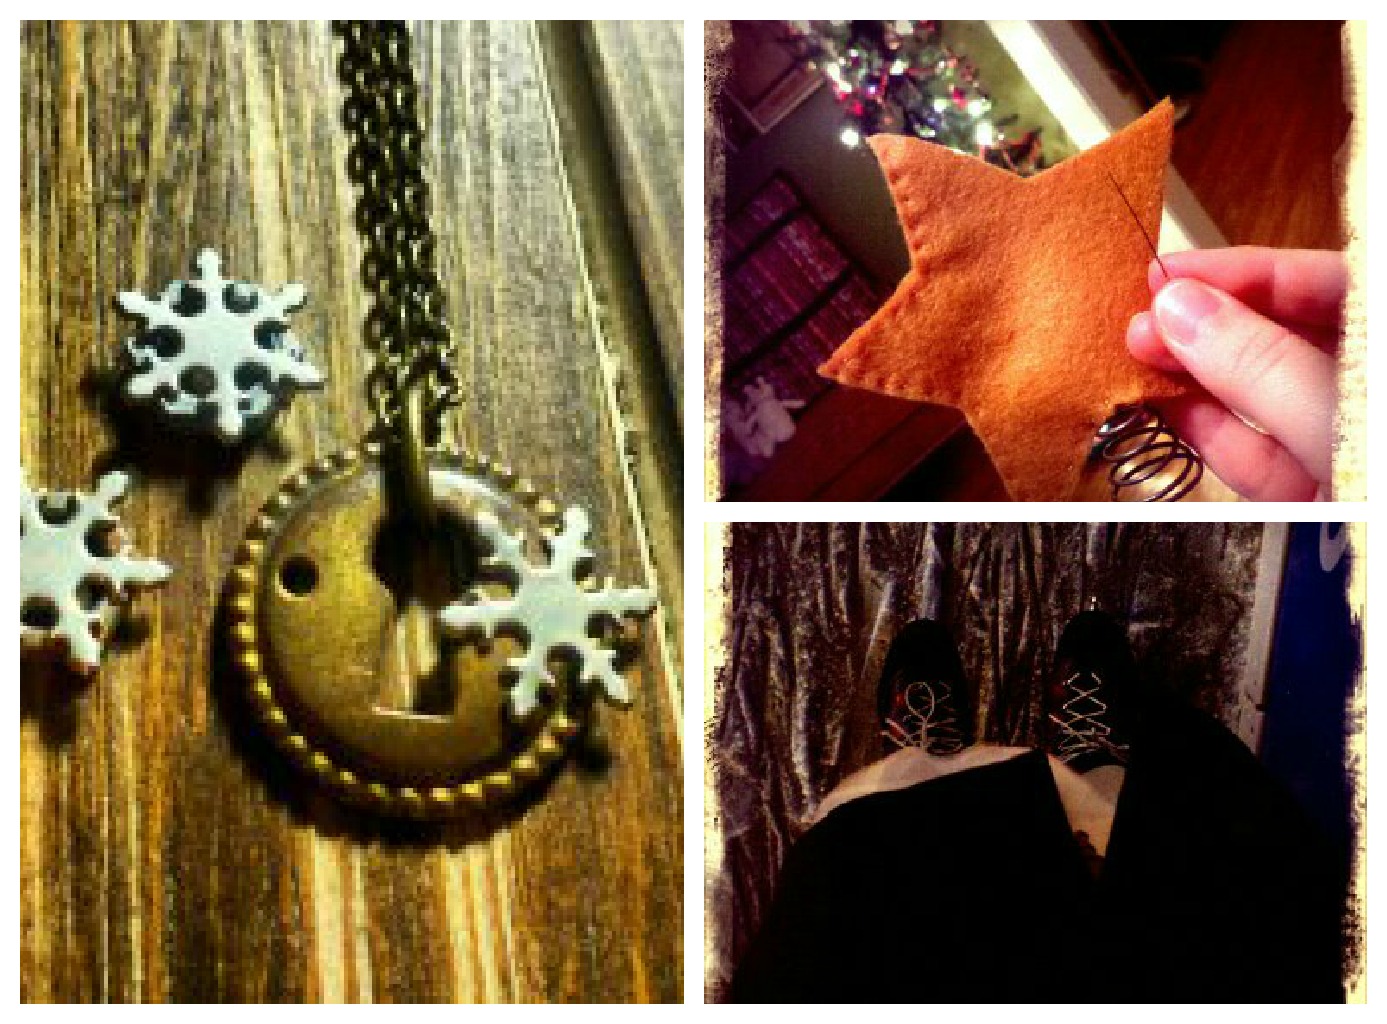
 Key to Wonderland Wrapping: (Materials: Lace, wrapping paper, and snowflake skeleton key ornament; Tools: Scissors & tape) Wrap your present. Next measure the amount of lace you'll need to fix around your box and cut. Then tape in place. Last, hook your snowflake skeleton key ornament through the lace (or if you prefer or are traveling with your wrapped gifts, safety pin it in place). I will be posting a DIY on how to make your own snowflake skeleton key tree ornament within the next week so stay tuned!
What I love about this wrapping is that it's also a present itself--you can take the key off your package and hang it on the tree!
 Pocket Watch Wrapping: (Materials: Wrapping paper, ribbon, and a pocket watch frame; Tools: Scissors, needle & thread--thread should match the color of your ribbon, a pen & tape) Wrap your present. Measure the amount of ribbon you'll need to fix around both your box and pocket watch frame (on both sides). Remember to leave room for a a length of ribbon to hang off (pictured on the far right) and to loop around to the back (on the opposite side of the pocket watch frame which has ribbon hanging off the side). Cut. (Make your ribbon prettier by cutting an upside down V into each of the ends). Now loop your ribbon around one side of the pocket watch frame and stitch in place. Leave a little ribbon hanging off to the side decoratively (pictured right). The decorative ribbon should be on top.
The ribbon looped around toward the bottom will be tied around the box and looped through the opposite side of pocket watch frame. Pull tight and then bring the rest of the ribbon to the back. Flip over your present, and stitch the remaining length of ribbon in place. Cut off any excess. (You can also choose to tie the ribbon in the back but it often makes the frame look funny in the front which is why I suggest stitching it instead).
Last, write your holiday message inside the pocket watch frame on your wrapping paper.
 Gears & Lace Wrapping: (Materials: Lace, reproduction or real gears, and brads; Tools: Scissors & tape) Wrap your present. Next, measure your lace and cut the length you need. Then place your gears decoratively on your lace. Once you're happy with their positioning, attach them using a brad. Thread both the gear and the lace onto the brad and pull the brad closed. Repeat with your other gears. Once you've finished, tape your lace in place.
This is by far the easiest and cheapest gift wrap (if you purchase reproduction gears at your local craft store or Michaels).
 Steampunk Stamp Wrapping Paper: (Materials: Plain wrapping paper or even recycled paper grocery bags which is what I use, stamp ink in holiday colors, and steampunk stamp; Tools: Scissors and tape) Lay out your paper. Load your stamp with ink and pound away! Create patterns (using a variety of stamps) or just repeat one stamp over & over. If you feel really ambitious you can even highlight the stamp after it's dried by coloring in the image with colored pencil or sketching in the negative space.
Also, you can create steampunk holiday gift tags with stamps--you'll need manilla shipping labels, steampunk stamps, and stamp ink. I purchased my stamps from 123stitch.com!  Merry Wrapping to You all! Hope this post gave you lots of ideas! Stay tuned for more Christmas & Holiday Steampunk DIYs over the next month!

 Of course, my favorite part of Christmas is spending time with my niece who is already quite a crafter. We made pine cone ornaments, painted birdhouses, and she beaded me the most beautiful necklace I will ever own! She also gave me a fine maincure & painted my nails Belle-o-yellow!
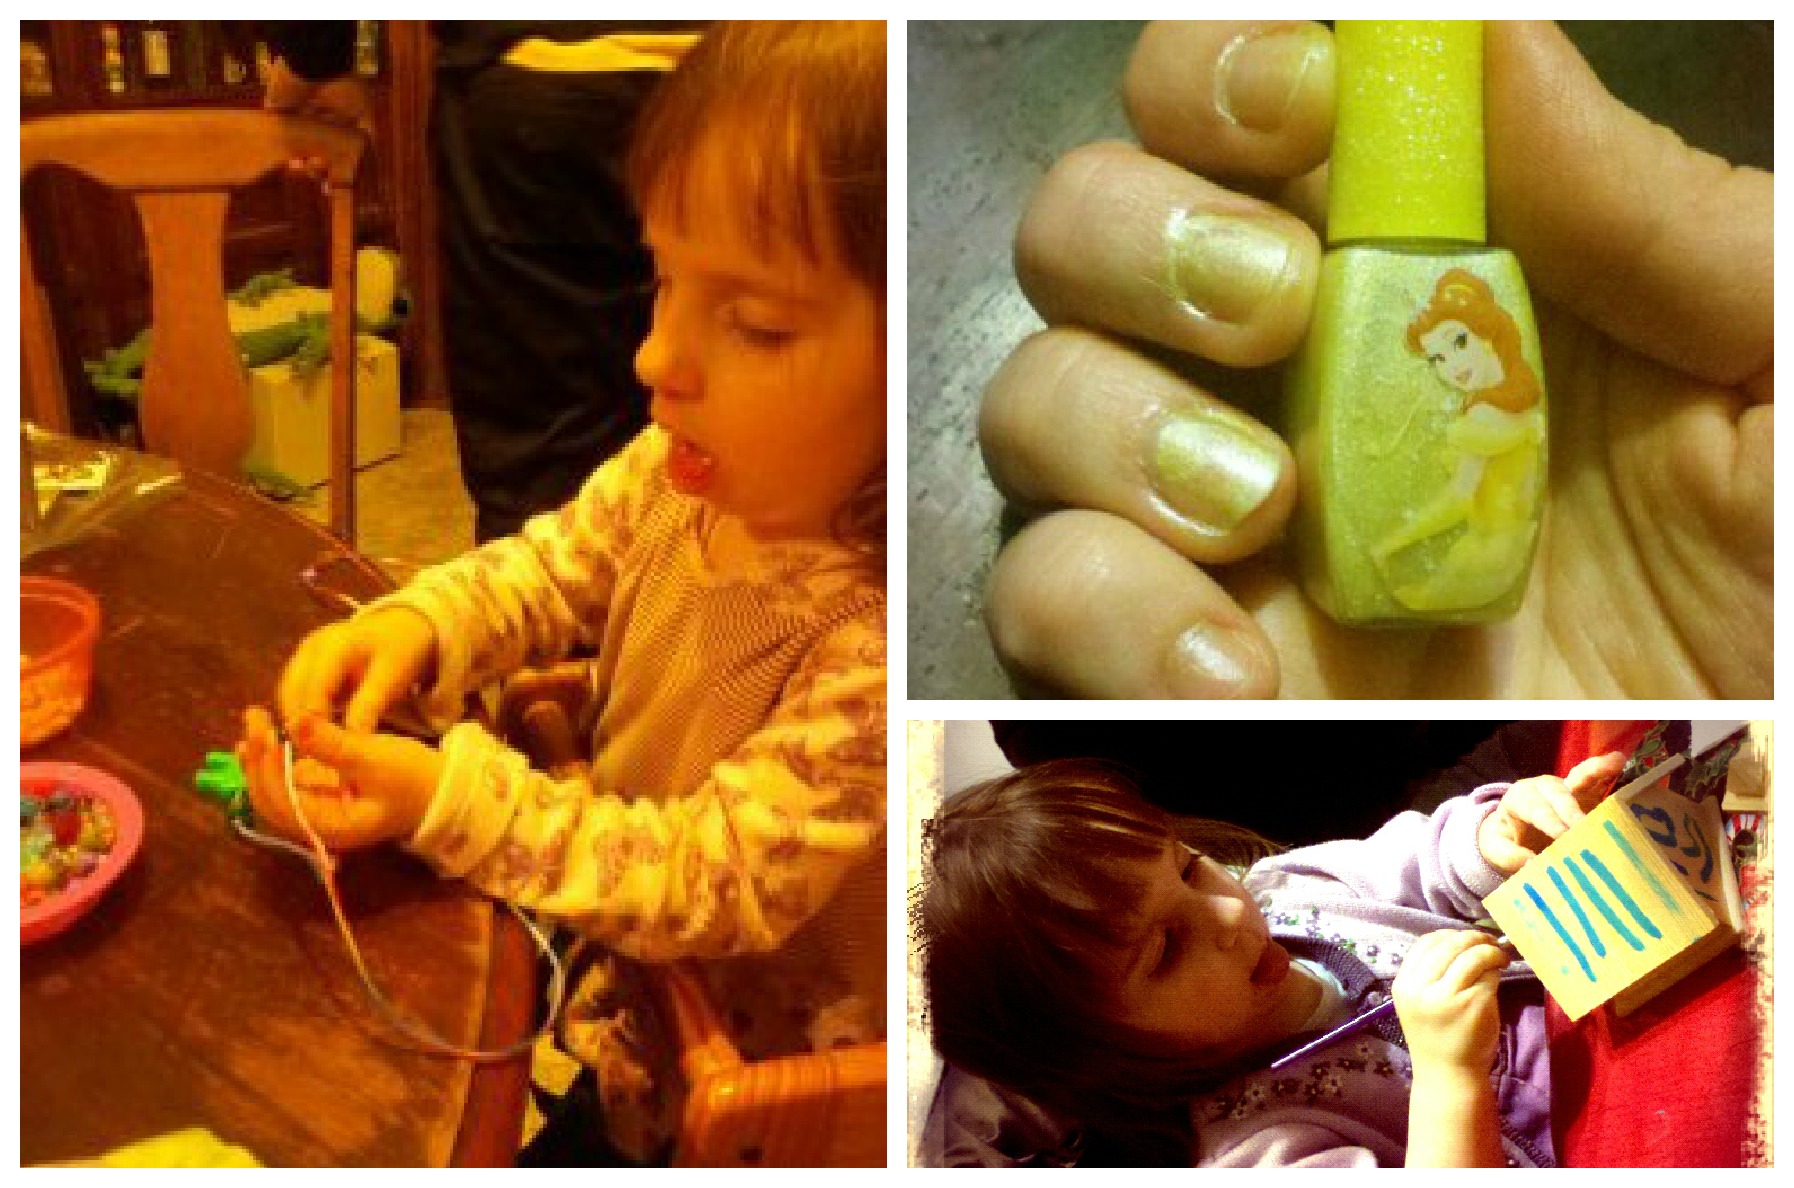
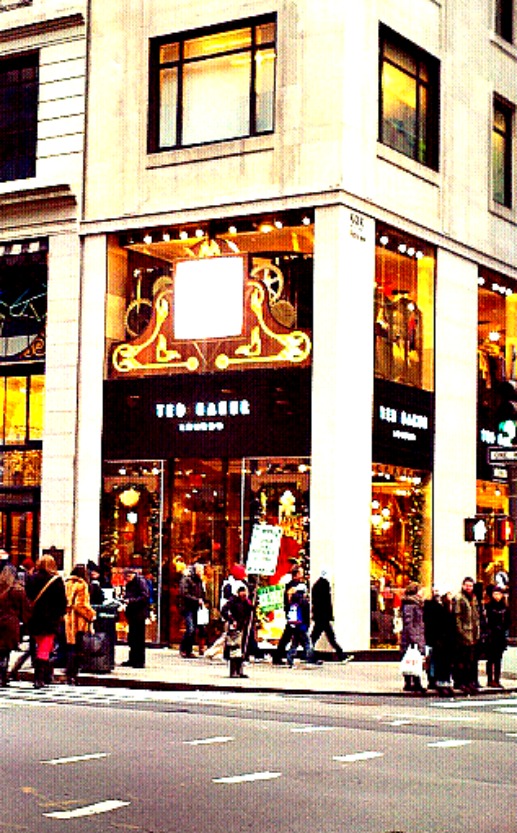 The outside of Ted Baker London. You can see the second story scroll work and gears are both illuminated! It gave you the impression that you were looking at the inside of a clock tower gleaming with sunshine.
  A close-up of one of the windows. The moving gears and chain pulleys were elegantly bordered with garlands wrapped in twinkle lights and small metal ornaments.
 A close-up of the pulley system. It looked like it was constructed from a large metal erector set's parts.
  One of the chain pulleys dropped a small wooden box filled with deconstructed clock parts and featuring this handsome leather shoe. In the other window, another chain pulley dropped a serving tray filled with flowers and bone china.
 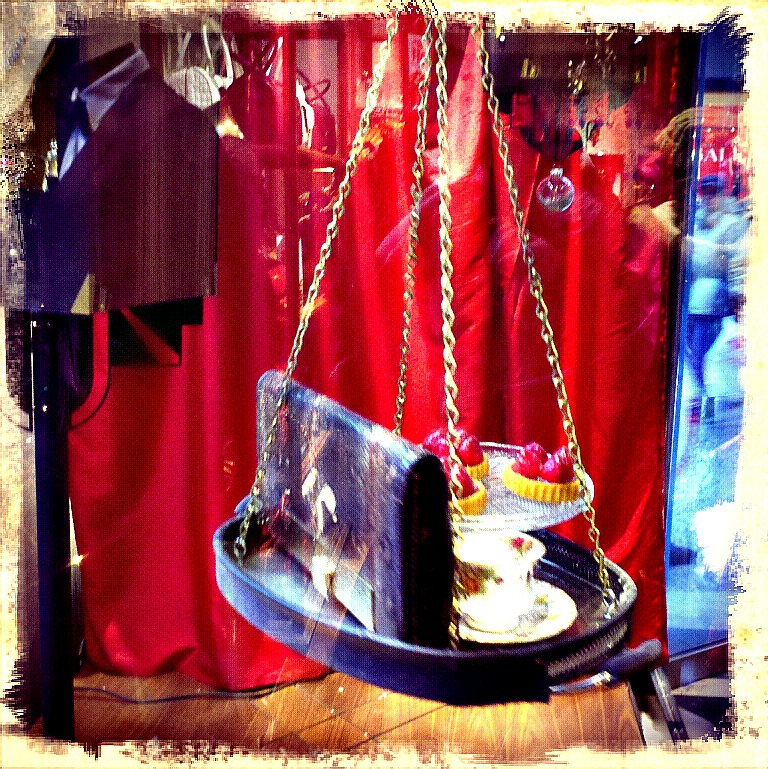 I was thoroughly inspired by Ted Baker London's windows. I can't wait to steampunk some windows myself at Made;the Indie Emporium Shop sometime in the coming months.


