
Crossed off my crafty bucket list: make a book fort!
DIY
Steampunk Hallow's Eve Party~Decorations (Re-blogged)
D-I-Y-3 CommentsHaving a Halloween party? Want to Steampunk it up? Here are a few ideas that won't break your wallet (gotta have money for all that candy right?)! Jars of candy are a given for any Halloween party--to add just a touch of mystery & oddness you can attach labels like the one below from VectoriaDesigns. They are much classier than your average Halloween labels, indicating the jar's contents are brains, zombie boogers, blood, etc. VectoriaDesign's labels, for instance, help set a Steampunk/Sci-Fi mood with labels like: Anti-Time Tablets, Steam Engine Oil, Octopus Ink, and my favorite Time Traveler Pills to name a few.

The labels are a digital download. Total cost: $3.50 label images (15 total), $11.99 label printer paper...$15.49
Another great digital downloadable decoration for your party are Victorian style paper dolls with a Halloween & Steampunk twist. My favorite paper doll artist is RhondasOrignials. Her dolls are by far the most unique and strikingly odd. She has over 50 paper dolls for Halloween alone. These dolls make excellent centerpieces for your table or to fill up empty space on your mantle or shelves.

What makes Rhonda's paper dolls so special is the accessories that come with each doll and the characters that she creates. You can download her dolls on her Etsy shop, click here to follow the link. Rhonda also has specials where she bundles a number of her dolls together for Halloween. The bundle costs $23.25 or you can purchase individual doll patterns for $6.00 each. The instructions on how to assemble your dolls is very easy to follow and the colors are true to how they print on your home printer. Total Cost: (for a bundle) $23.25, brads (found in your local arts & crafts store in the scrapbooking aisle) $1.39, Aleene's Tacky Glue $2.50...$27.14
Aside from digital downloads, hit your local flea markets, garage sales, and estate sales for old jars & bottles. You can fill these bottles & jars with an assortment of items to fit the mood of your party. Inkling for a bit of twisted romance, dry some red roses beforehand and place them in your jars for a pretty bit of decay to display or paint them black (how very Alice in Wonderland of you to do so!). Want your party to look like a Mad Scientists Laboratory, fill those jars up with an assortment of colored liquids & place glow sticks inside so that they give off an eerie luminescence. There's also my DIY on steampunk candles--they're perfect for a Hallow's Eve Bash!

There are other items you can make to give your party a steampunk feel. Craft recently posted a DIY on how to make your own miniature hot air balloon.

You can suspend them from the ceiling to give your party-goers the feeling that they are on an airship deck among the clouds--you can even make clouds! Click here to find out how!

If you do not have a specific steampunk theme in mind, you can be more general and decorate using broken machines, machine parts, clocks, and other mechanicals you may already have or ones that you can thrift. Great items to pick up: tea cups & saucers, china, clocks of any kind (you can line them all up on your mantle, table, or along your stairs), jars of light bulbs, globes or old maps, or springs (to make a garland to hang in your doorway or off your fire place).
These are just a few ideas to get you started! Stay tuned for the rest of October for my Steampunk Halloween DIY series and get ideas on steampunkins and how to make your own steampunk halloween costumes for adults & kids.
Carve Your Own Steampunkins! (Re-blogged)
D-I-Y-1 CommentAs promised, here are a few ideas & DIYs (3 different DIYS) on how to Steampunk your Pumpkin this Halloween! Happy Carving! 1) Kid Friendly Steampunkins, or the "Mr. Potato Head" Approach
What You'll Need:
- Pumpkin Carving Tools (You can purchase a kit or gather up the following: A large knife, paring knife, toothpicks, a corn-on-the-cob utensil (optional but it makes poking holes so much easier), small & large metal spoons, newspaper or trash bags to protect your table from all the pumpkin guts, and a bucket or big pot lined with a trash bag for pumpkin guts & seeds)
- 2 gears, or as many as you prefer your pumpkin can have many cog & gear eyeballs (salvaged is preferable but if you cannot find any you can purchase reproduction gears from Michaels. Just look for the "Industrial Chic" or "Found Objects" items).
- 3 springs (use 5-6 springs if you have a large pumpkin)
- Accessories, goggles, a top hat, a monocle, pocketwatch, eyepatch--get creative! Create your very own Steampunk Pumpkin Character!
Steps:
- (For adults only) Carve a lid, scoop out the pumpkin guts, and poke starter holes where the gear eyes & spring mouth will be inserted. The holes for the spring-mouth should be relatively small because your springs will be held in place by 2 toothpicks (as shown below). The toothpicks should stick out approximately 1/2-1 inch.

- (For kids) Stick the eyeball gears into their pumpkin sockets and give that steampunkin the ghoulish grin it's been waiting for! Link the springs and place them on the toothpicks.
- (For kids) Last but not least, dress up your pumpkin with a pair of googles & a hat, an eyepatch, or a monocle on chain! Whatever your heart desires!


2) Painting on the Punk! Another kid friendly approach to pumpkin decorating!
What You'll Need:
- Various Acrylic Paints (any colors you choose. I like black, white, red, & metallics)
- Paintbrushes (or various sizes, at least 1 small paintbrush for details & 1 large brush)
- Water & Jar & Paper plate (or cardboard) for mixing your paints
Steps:
- Paint some Steampunk scenes, objects, or faces onto your pumpkins!
- (Option 2 for tiny tinker-tykes ) Cut out some gear shapes or pocketwatch shapes from some sponges & give them to your tyke to dip in paint and place on their pumpkin! Download a template for gears below!
3) Classic Carving & Pumpkin Poking
What You'll Need:
- Pumpkin Carving Tools (You can purchase a kit or gather up the following: A large knife, paring knife, toothpicks, a corn-on-the-cob utensil (optional but it makes poking holes so much easier), small & large metal spoons, newspaper or trash bags to protect your table from all the pumpkin guts, and a bucket or big pot lined with a trash bag for pumpkin guts & seeds)
- Template or Design, to trace or draw freehand on your pumpkin (you can download Steampunk ones here)
- Tea candle (I prefer electric, but that's up to you!)
Steps (for tracing your design):
- Carve a lid & scoop out the pumpkin guts.
- Next, place your design over your pumpkin and trace using your special pumpkin poking tool (in your kit). I used a corn-on-the-cob utensil instead. It worked really well and had the added benefit of creating 2 holes instead of just one per punch so I was finished poking holes a lot sooner.
- Once you're done tracing your design, place your tea candle inside and affix your lid! Enjoy your steampunkin's ghoulish glow!

Steps (for carving your design):
- Carve a lid & scoop out the pumpkin guts.
- Next, free hand sketch the design or template of your choice onto your pumpkin. I recommend using a pencil as pen can smudge and show on the skin.
- Carve out your design!
- Once you're done carving, place your tea candle inside and affix your lid. Enjoy your steampunkin's eerie luminescence!

Templates: (Free to download, my gift to you! Happy Halloween!)
- To download Gears, click Steampunkins Template--Gears
- To download Bohemian Romance's Silhouette, click Steampunkin Template--BohemianRomanceSilhouette
- To download a Lady Promenading with a Parasol, click Steampunkin Template--LadywithParasol
- To download "Happy Halloween" (in Gear Letters), click Steampumpkin Template--Happy Halloween in Gear Letters
Don't forget to post pictures of your steampunkins! I'd love to see 'em! Happy Carving!
DIY Jewelry Display, Style No. 3
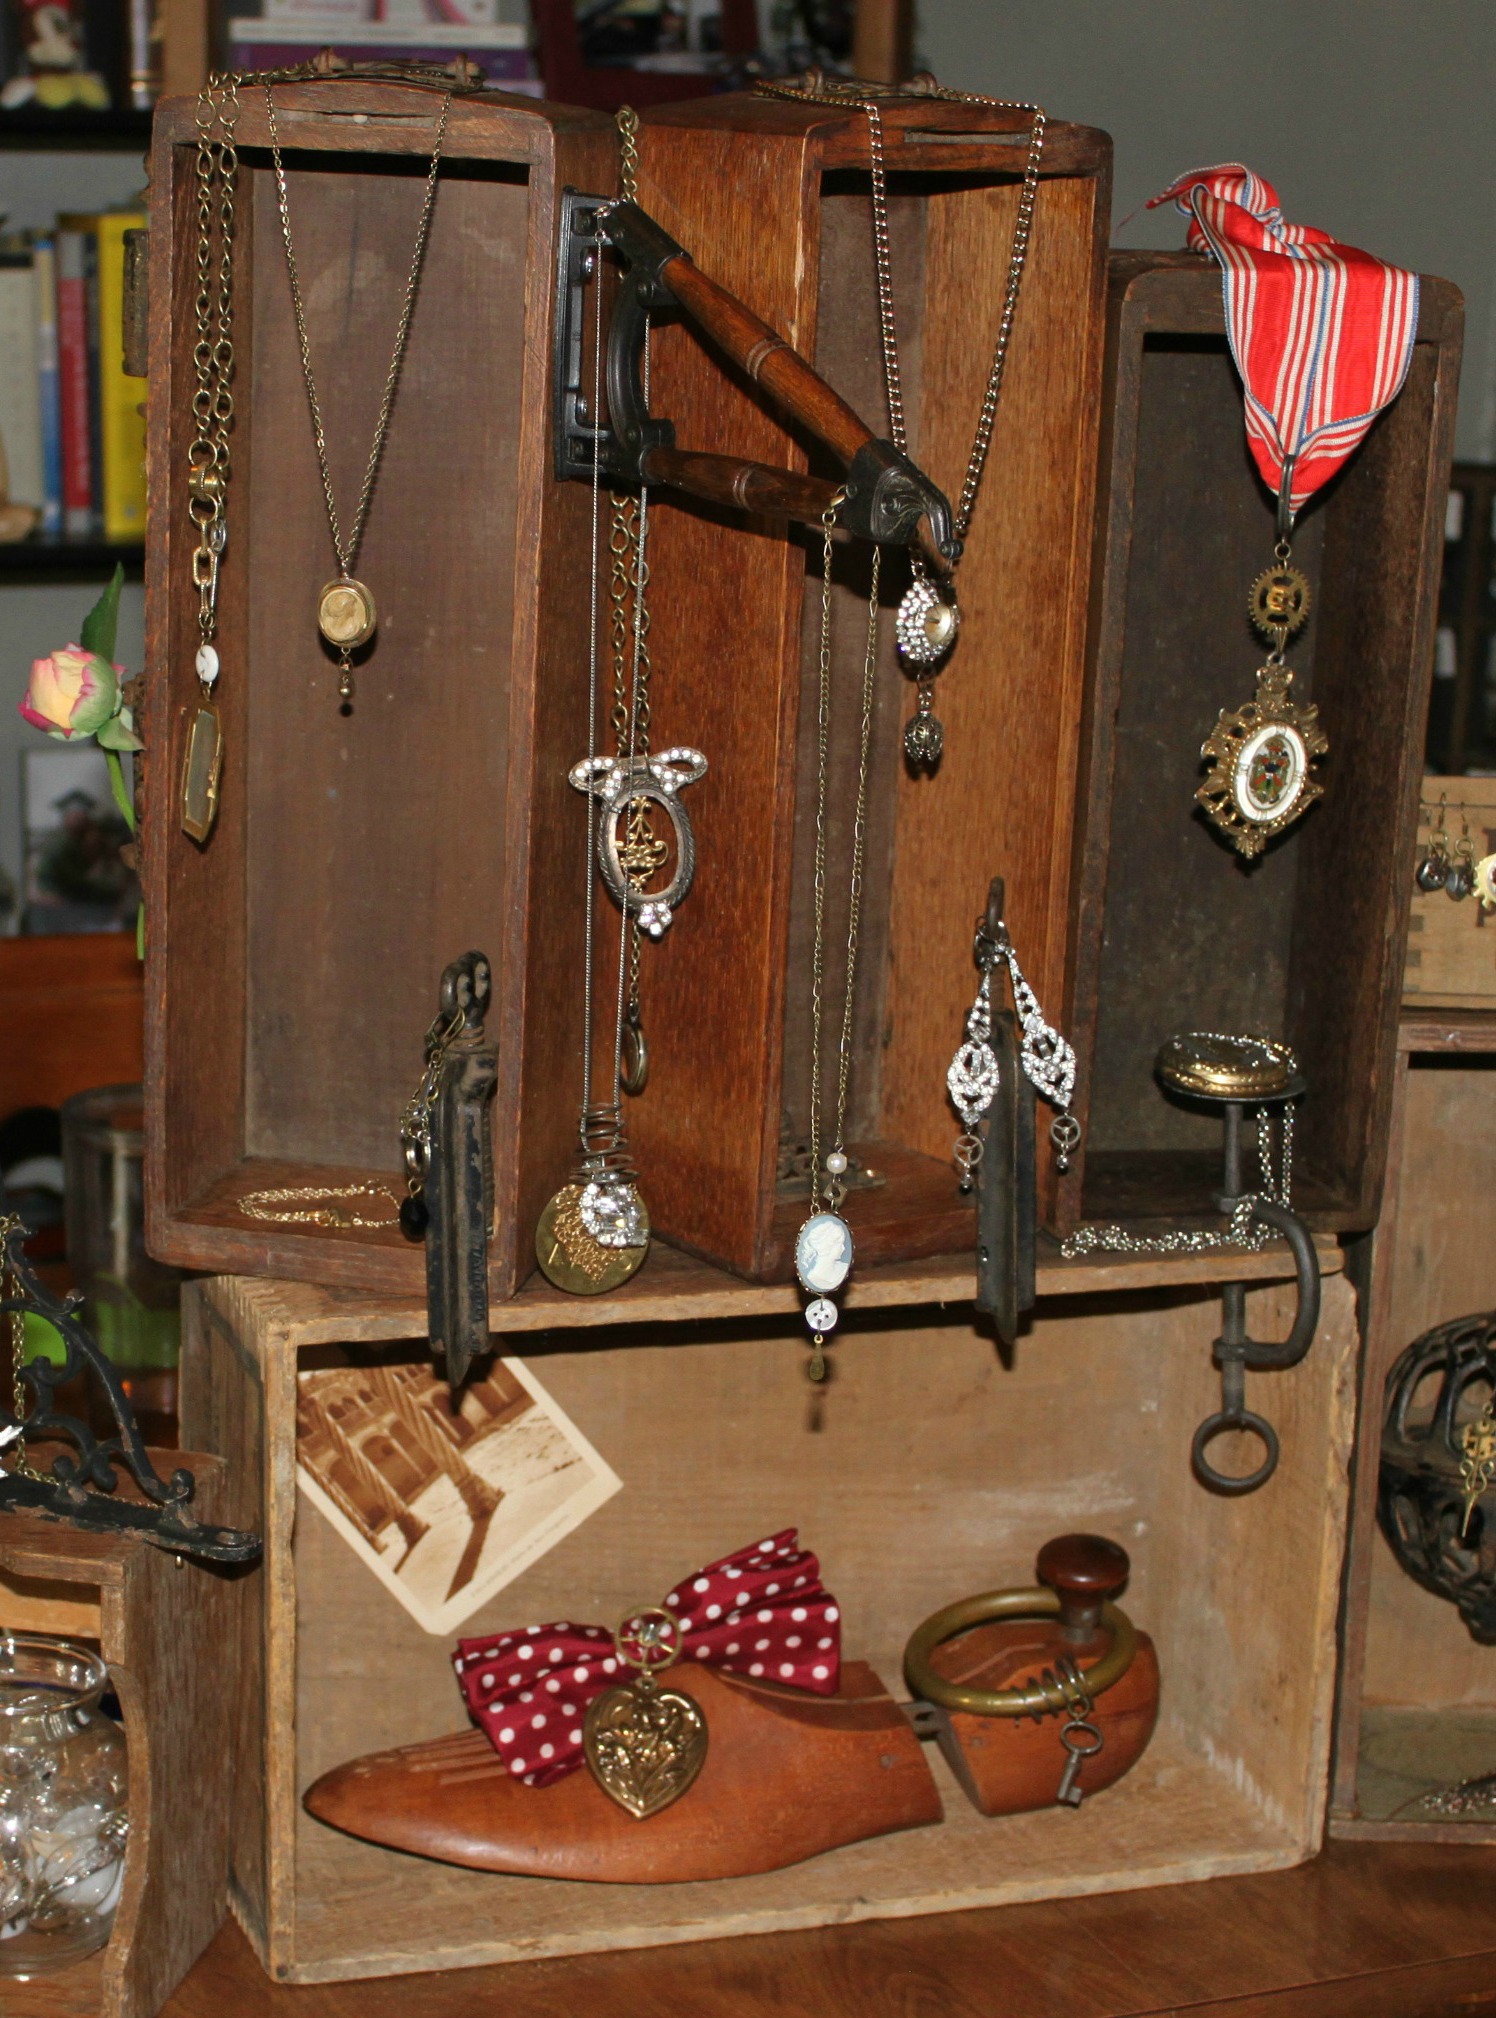
D-I-Y-CommentIf you have a steampunk crafty business, or perhaps an old-timey aesthetic, your booth should convey the feeling of your products. This is something I feel that I do quite well and I am quite proud of. Many people stop by my booth just to look at the curiosities inside. This is the last in a series of 3 blog posts on how to recreate 3 of my newest displays for yourselves! Too see Style No. 1, click here & Style No. 2, click here. For Style No. 3, read on!
Style No. 3
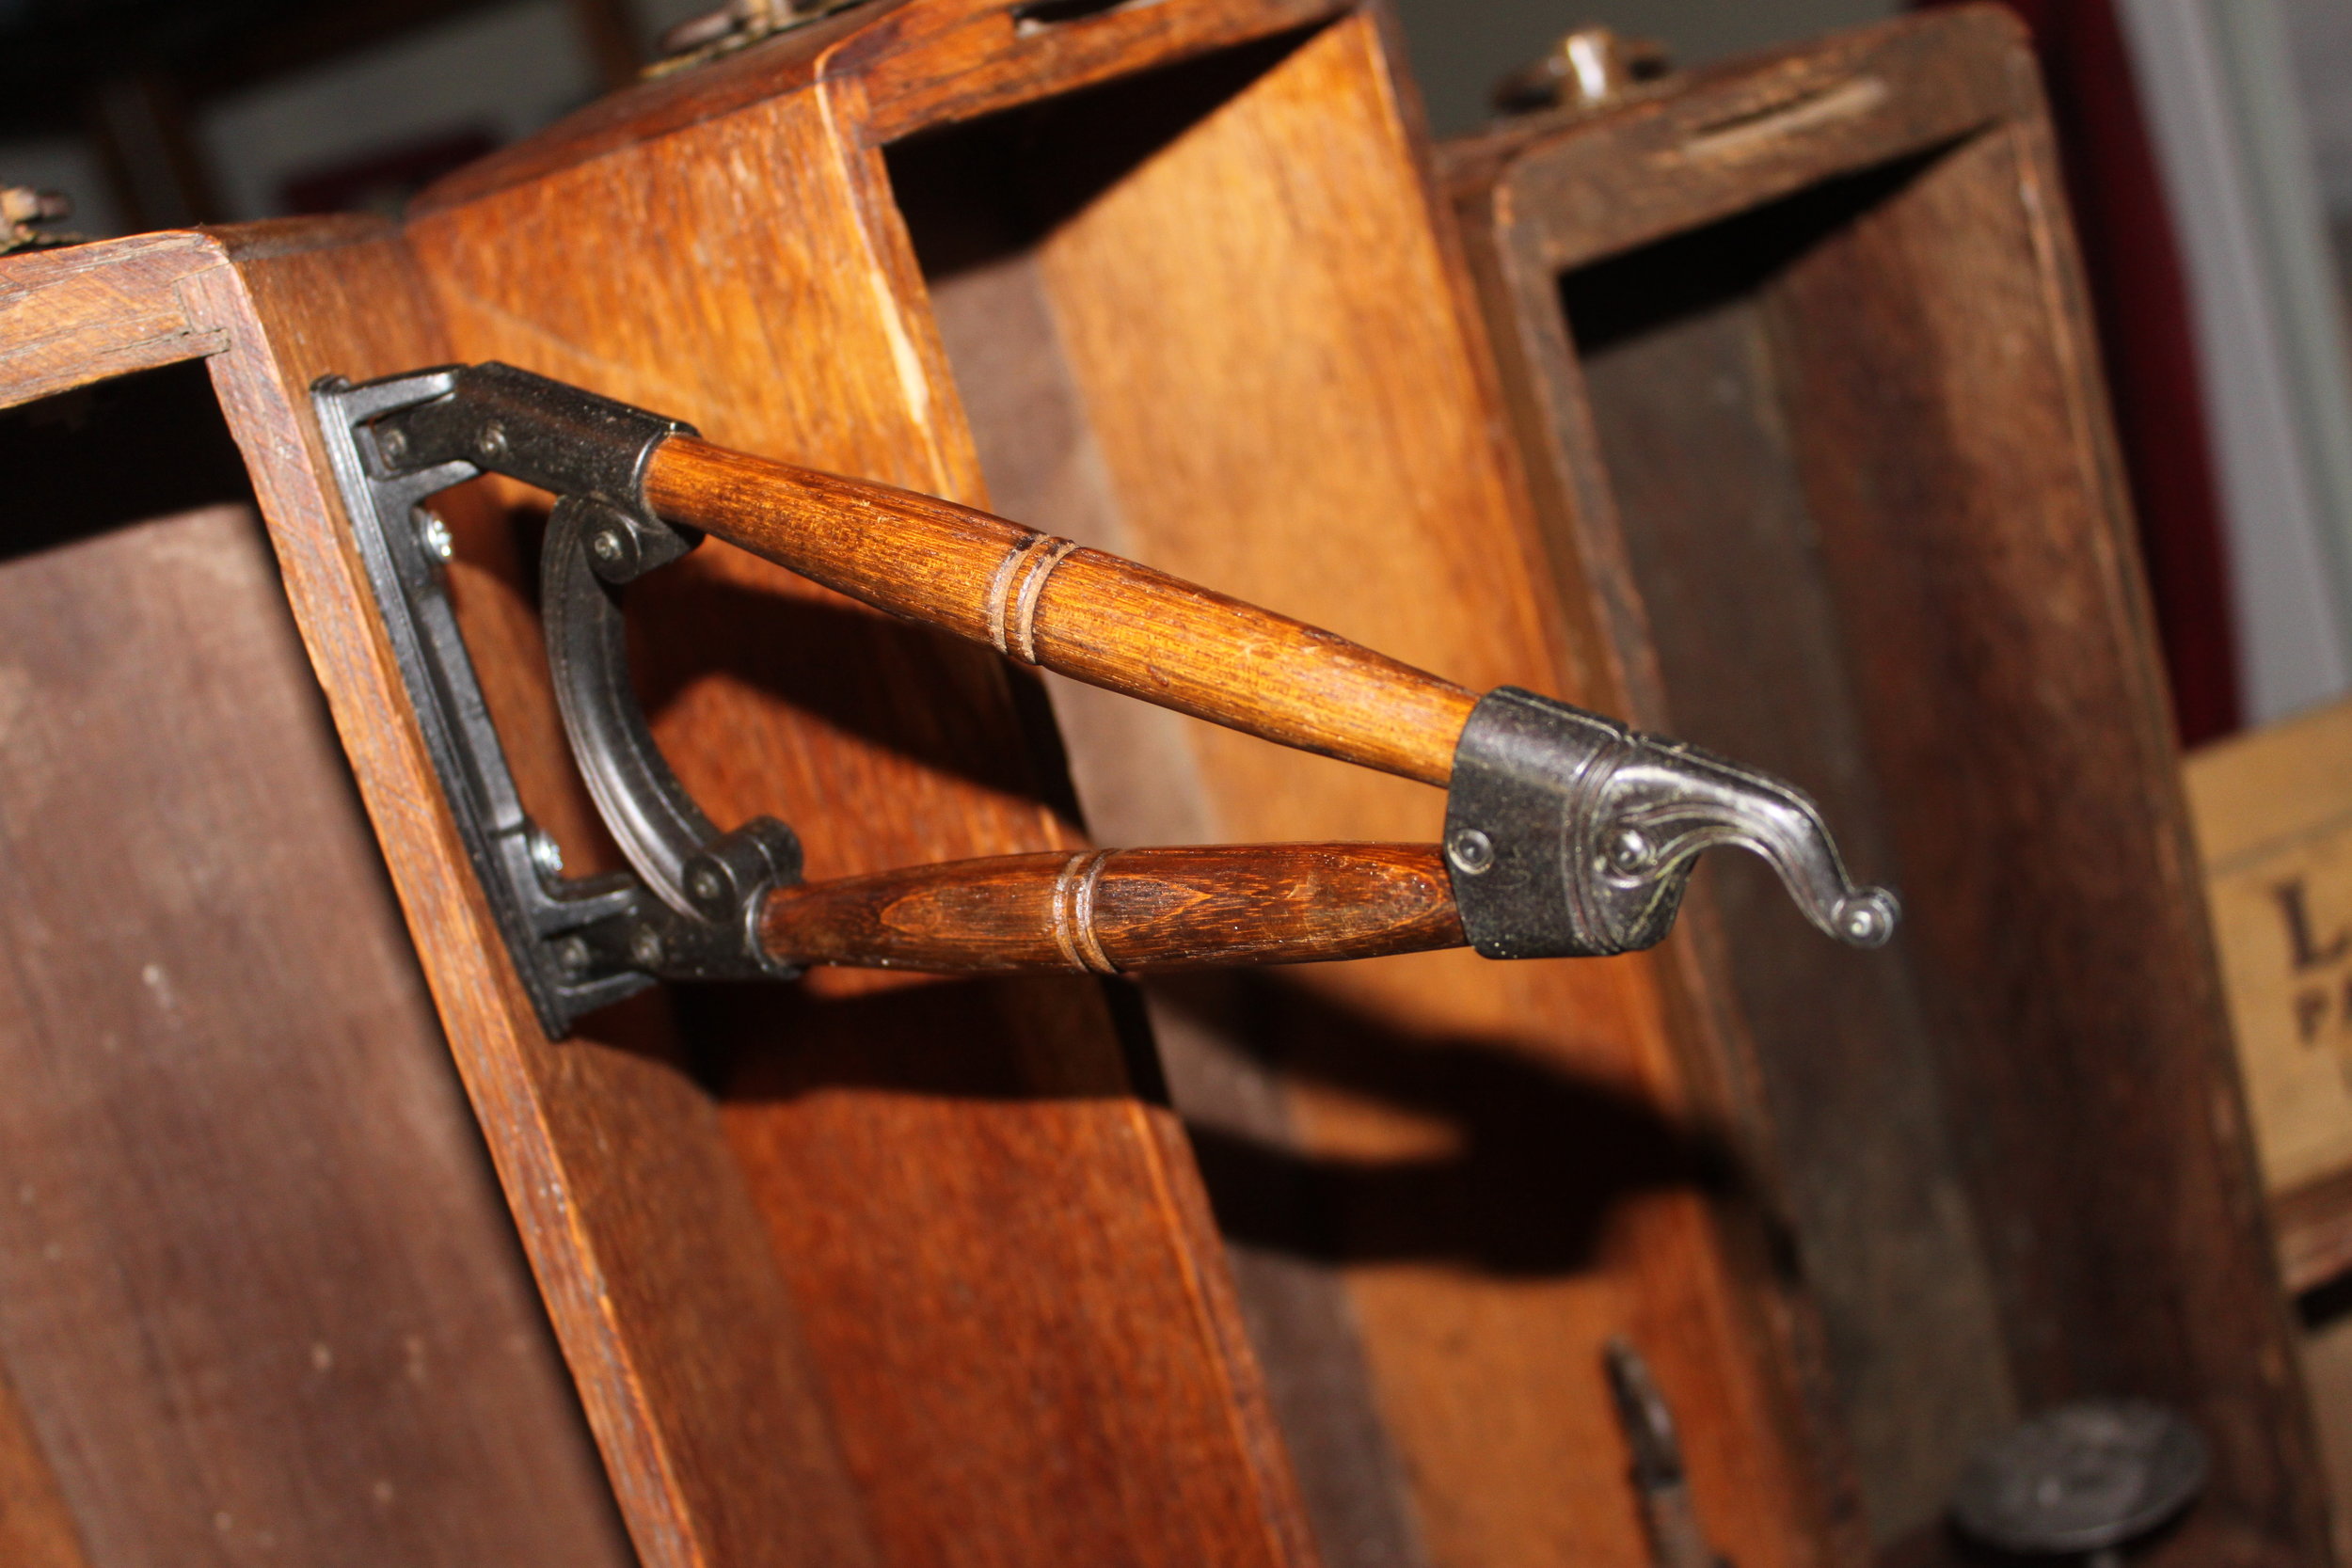
What You'll Need: 4 boxes (1 large and 3 small); 4 screws; drill & screwdriver; Murphy's Oil; medium-large cup hooks, as many as preferred; awl; 3 c-clamps; photo; shoe horn; decorative hook (mine's actually part of an old naval navigation piece); and decorative metal bracket
A Note on Where to Find Boxes: Flea Markets; Garage Sales; Antique Malls; and ReStores (which benefit Habitat for Humanity)--Look for sewing machine drawers & old produce crates especially. Avoid any boxes with mold, badly split sections of wood, or water damage. They will not be as structurally sound and may break with minor hammering.
Instructions:
- Clean your boxes with soap and water (be careful not to soak your boxes). Shine them with a little bit of Murphy's Oil. Let dry completely.
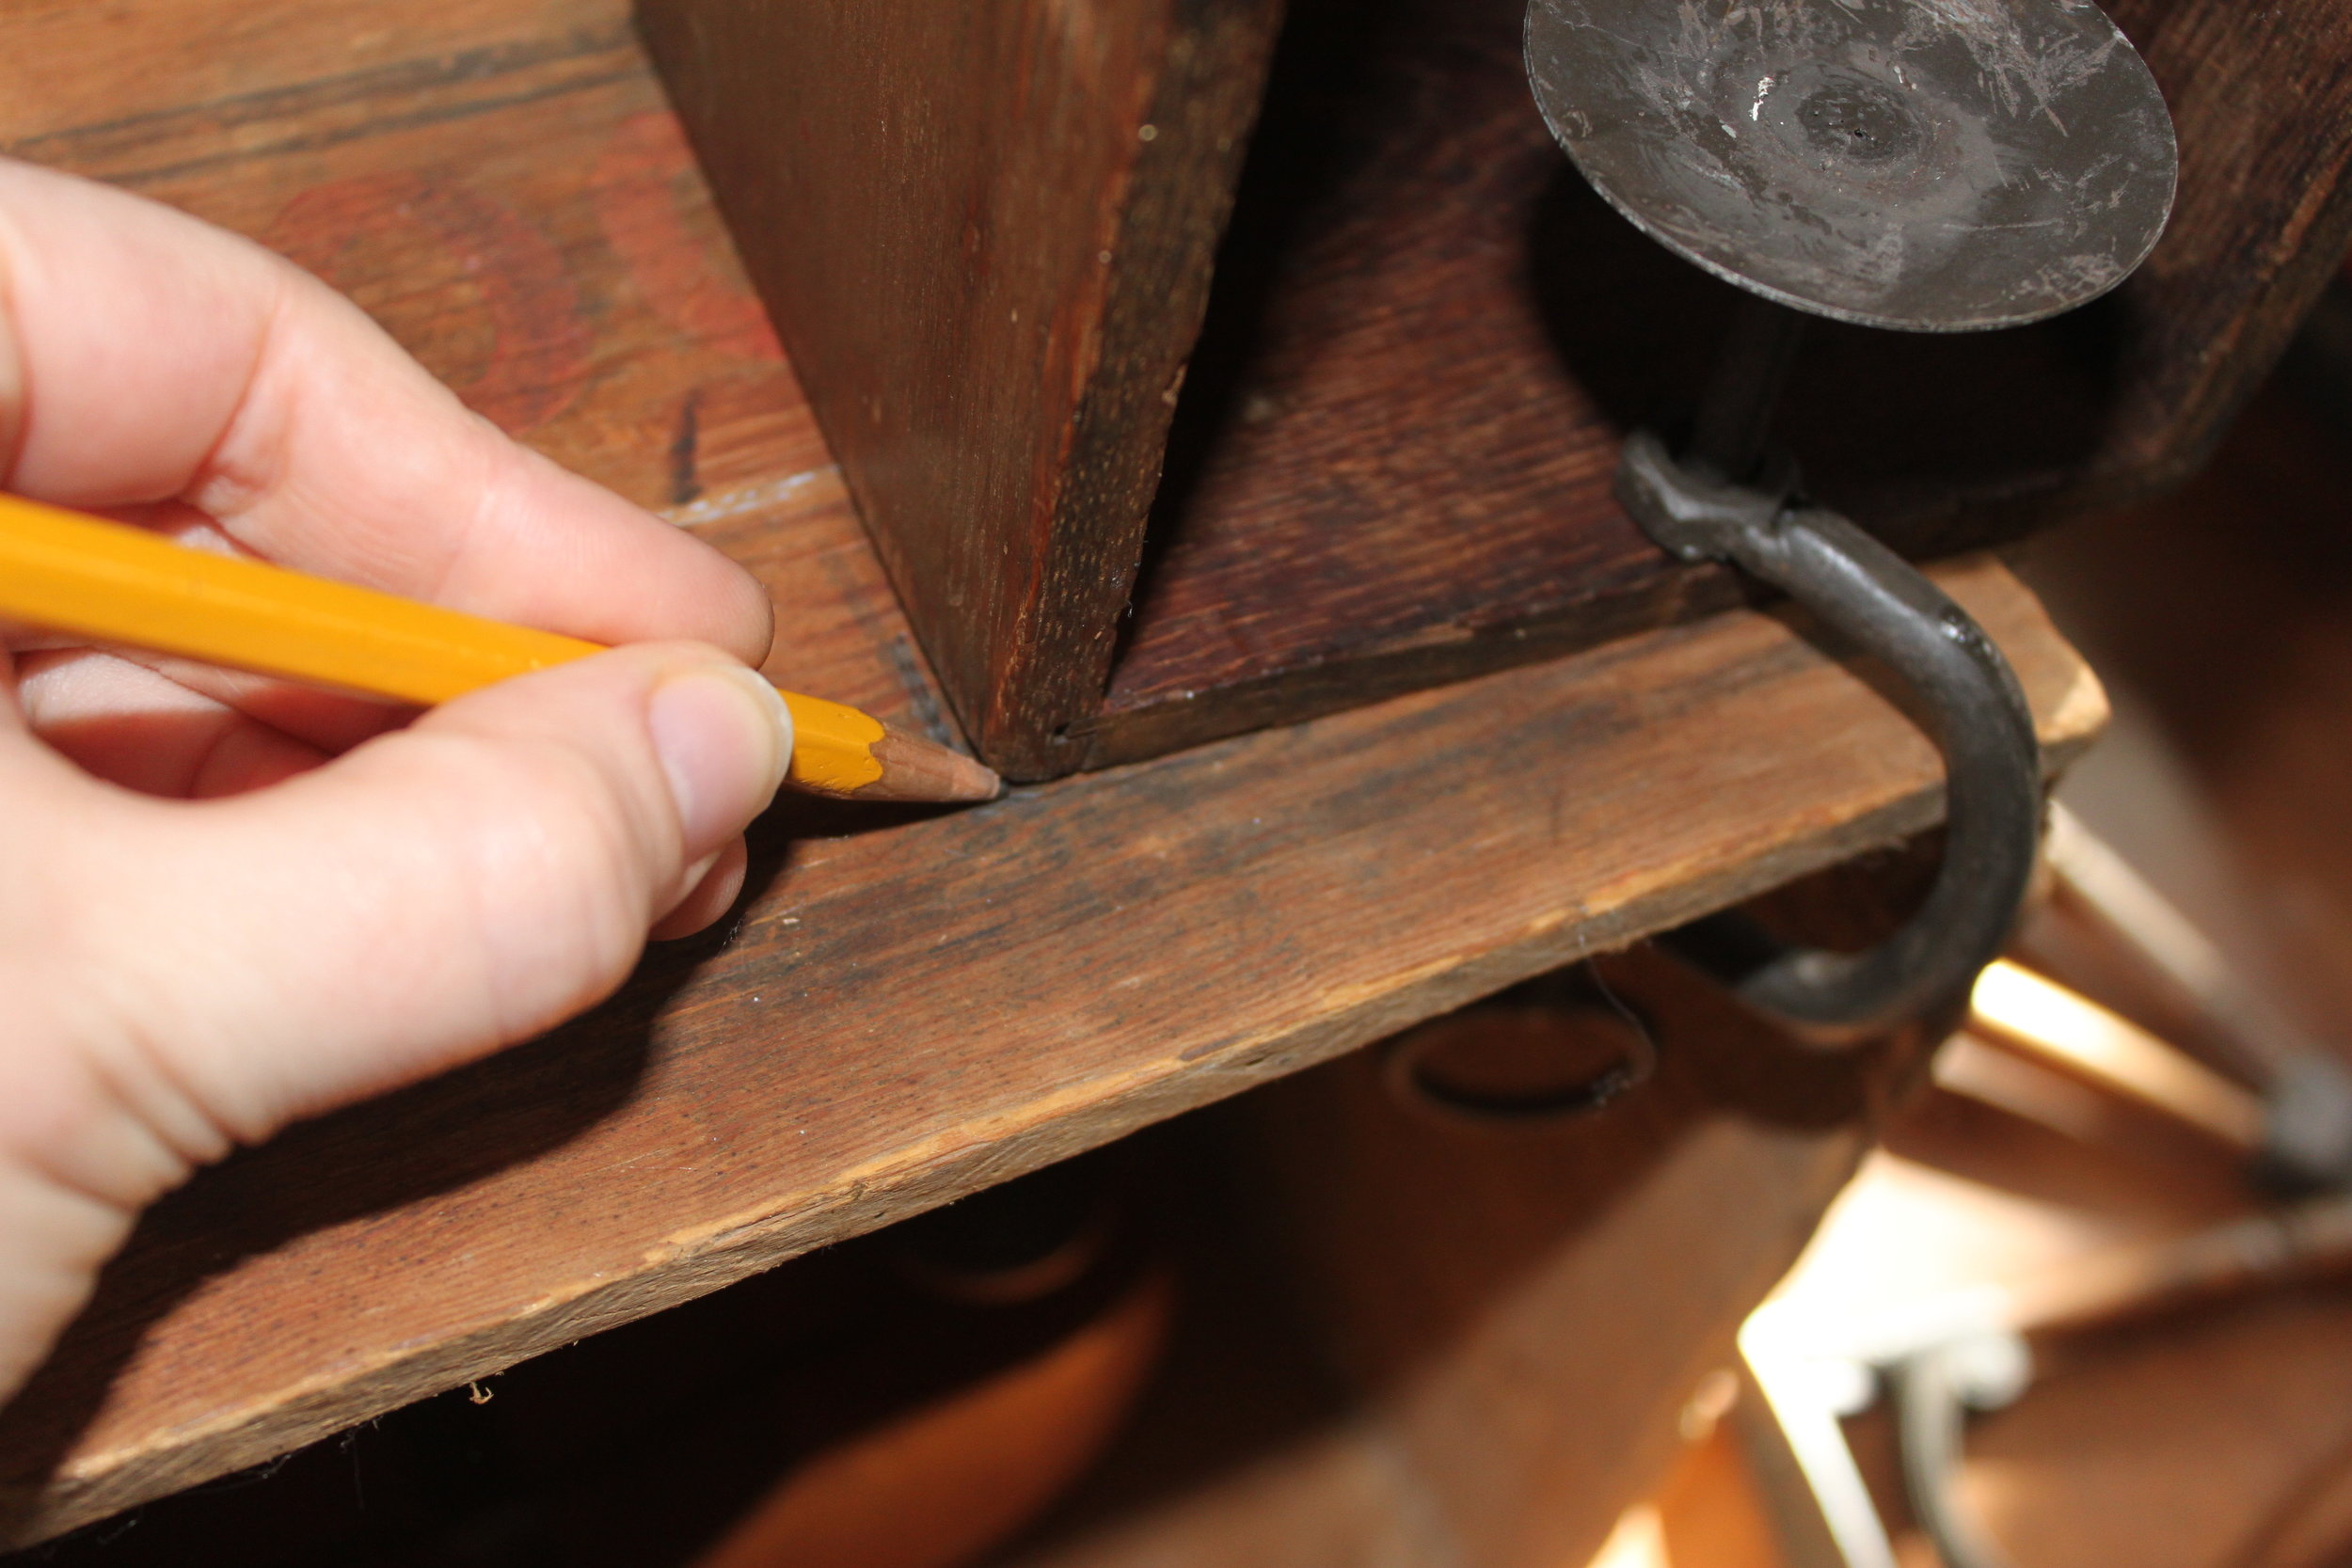
- Place your sewing drawers (or small boxes), hook/navigation piece and metal bracket where you'd like them. Mark with pencil where you need to screw your metal bracket in place. Also, mark the corners of your sewing drawers so if you choose for it to be removable you can place it back in the same spot. (I would suggest making your drawer removable because when you transport these kinds of displays, they can shift and it is much easier to adjust a c-clamp than having to re-screw the box on location).
- The Box that you want the hook/navigation piece on: Make starter holes where you've marked using your awl (for softer woods) or your drill (for harder/thicker woods). Then screw your hook/navigation piece in place. Set aside.
- The Box that you want the decorative metal bracket in: Repeat step 3.

- Clamp your sewing drawers in place using your c-clamps.

- Make starter holes for your cup hooks and then screw your cup hooks in place to hang your jewelry off of.

- Place your shoe horn in the bottom box (optional).
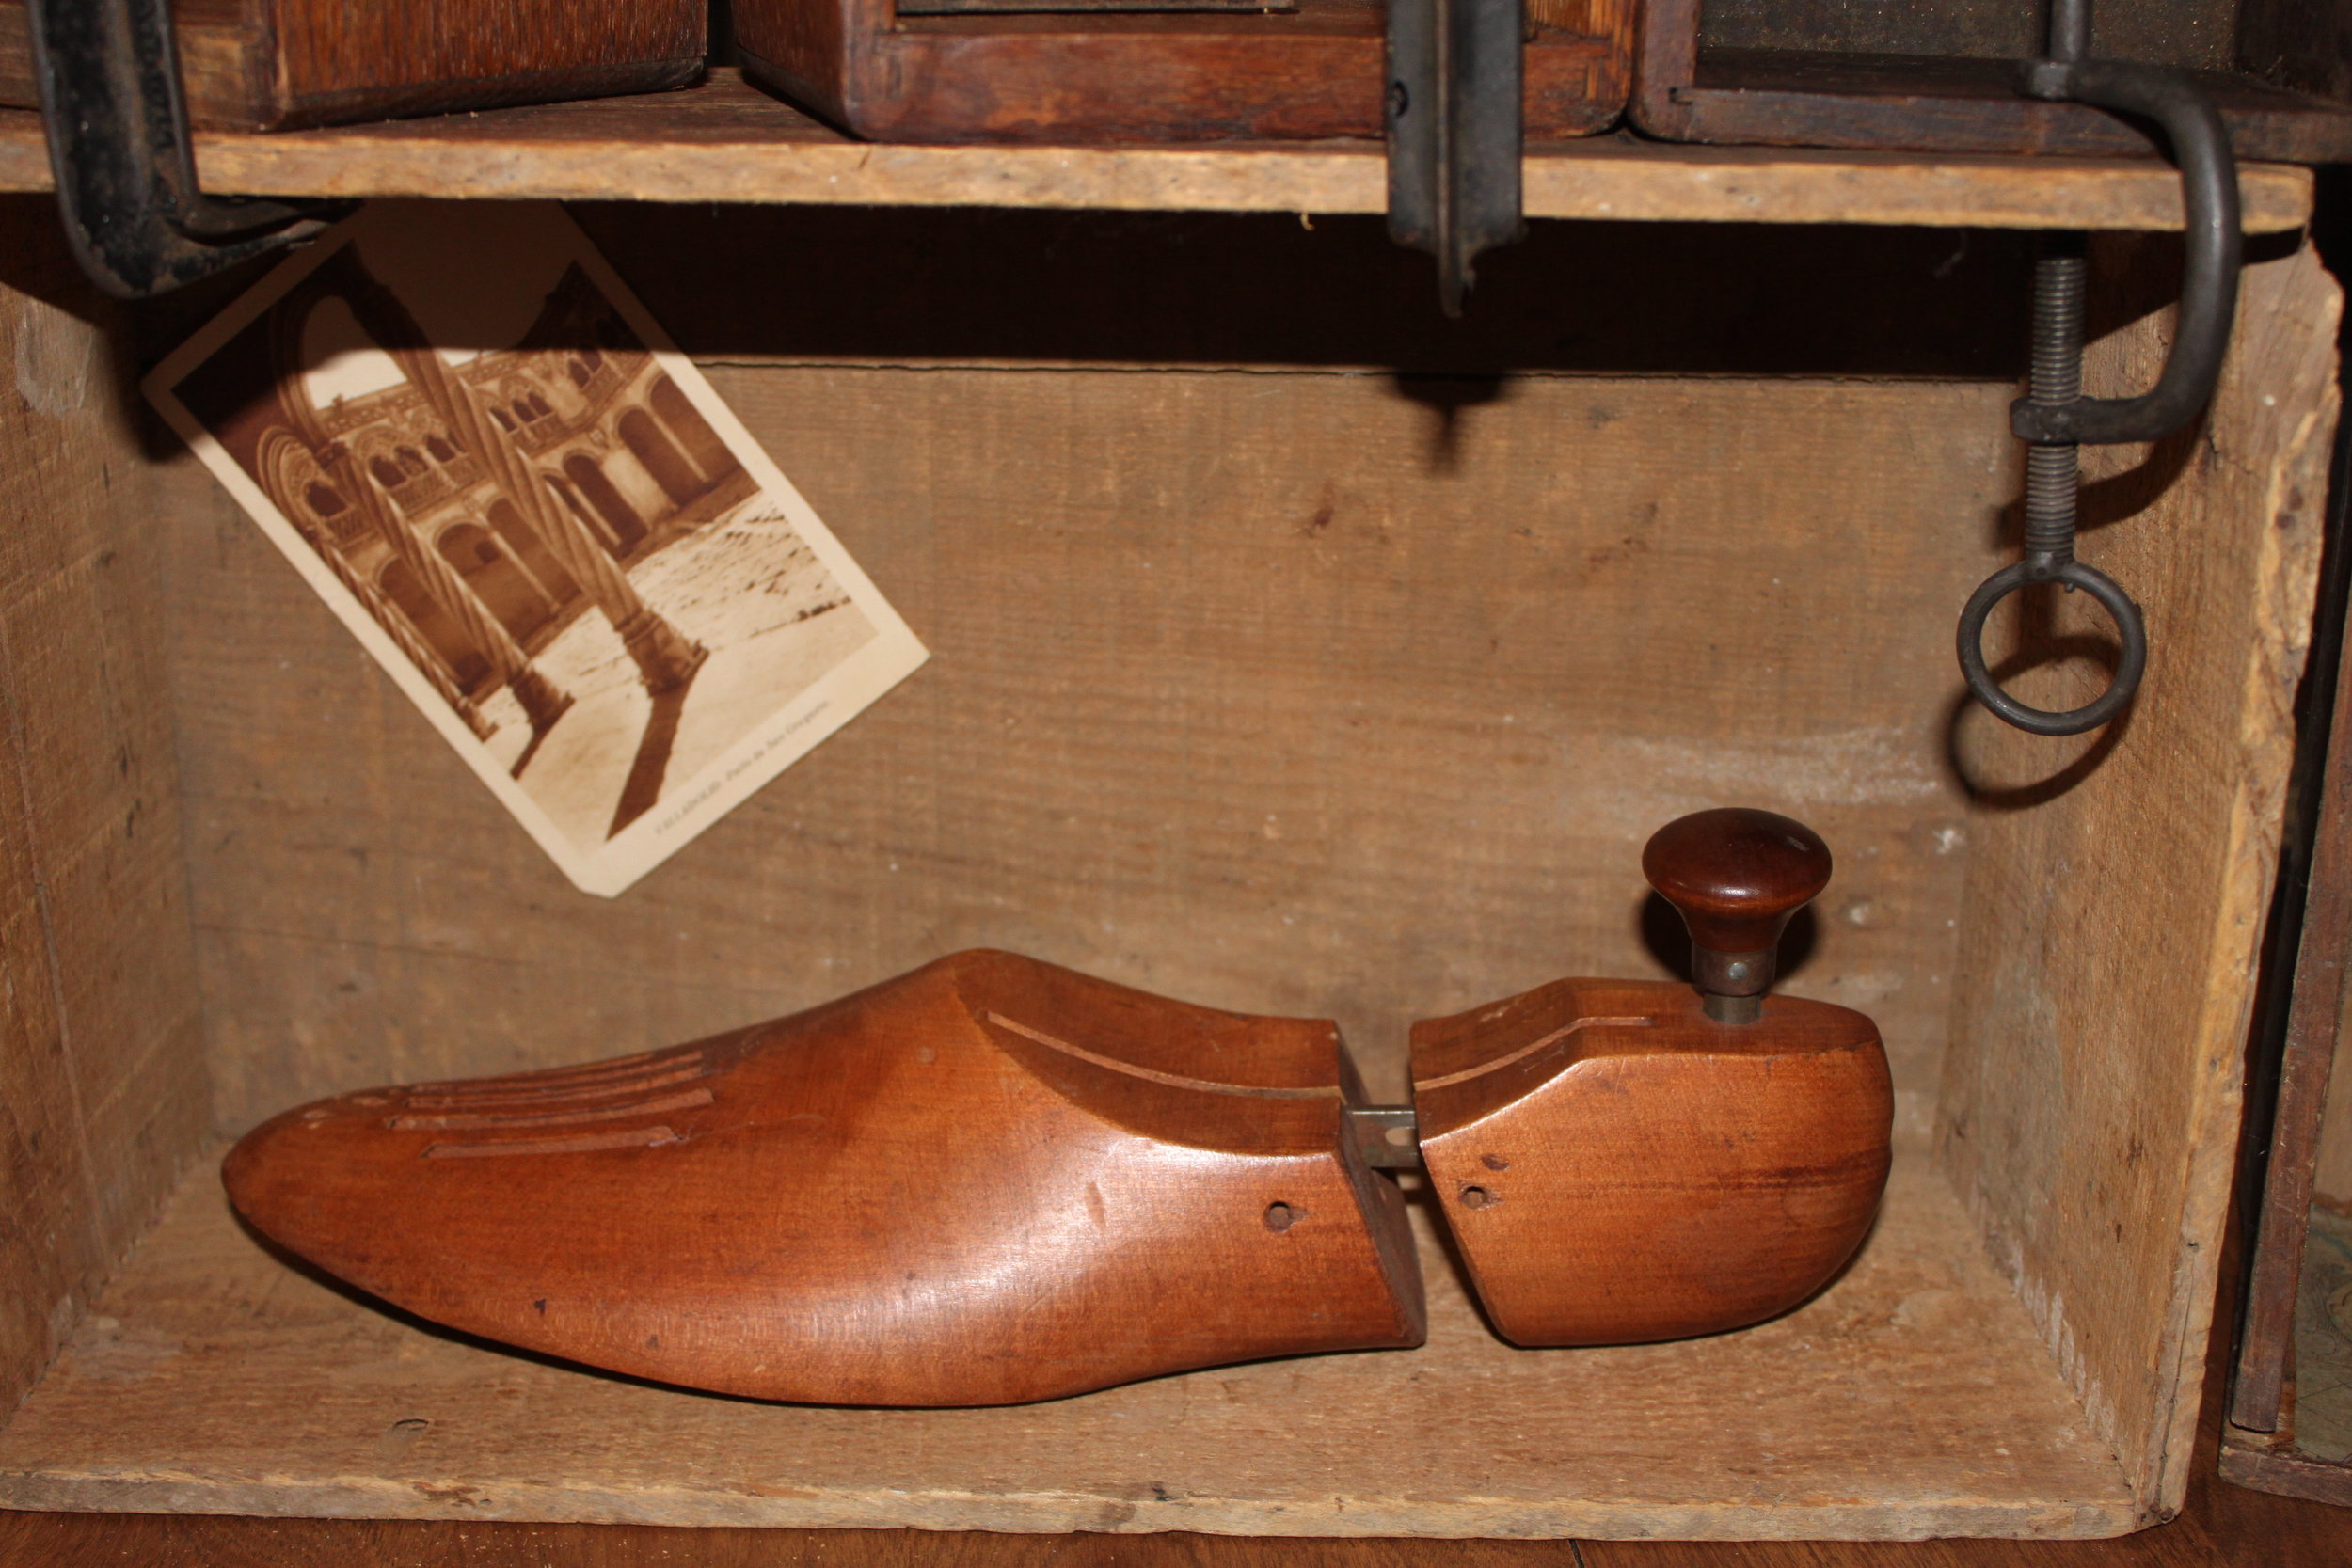
- Place the photo in your bottom box (optional).
- Hang your product proudly inside!
DIY Steampunk Illumination, Live Demo
D-I-Y-CommentI had so much fun Thursday morning on Great Day Green Country filming a live DIY! I made 2 versions of Steampunk Candle Holders (one for tea candles & one for candlesticks). They are easy, elegant, and cheap to reproduce (bet. $5-10 to make). In case you missed it, here it is! Enjoy! And as always, Happy Making! http://eplayer.clipsyndicate.com/embed/iframe?aspect_ratio=3x2&auto_next=1&auto_start=0&page_count=4&pf_id=9204&pl_id=26017&rel=3&show_title=0&tags=GDGC&va_id=3969819&volume=8&windows=1
Make your own Steampunk Valentine's Day Cards
D-I-Y-6 CommentsI love Valentine's Day, mostly because it's one of the few times I see handmade cards exchanged. Here a a couple of DIY Stemapunk Valentine's Day cards that are easy & cheap to reproduce. As always, merry making!
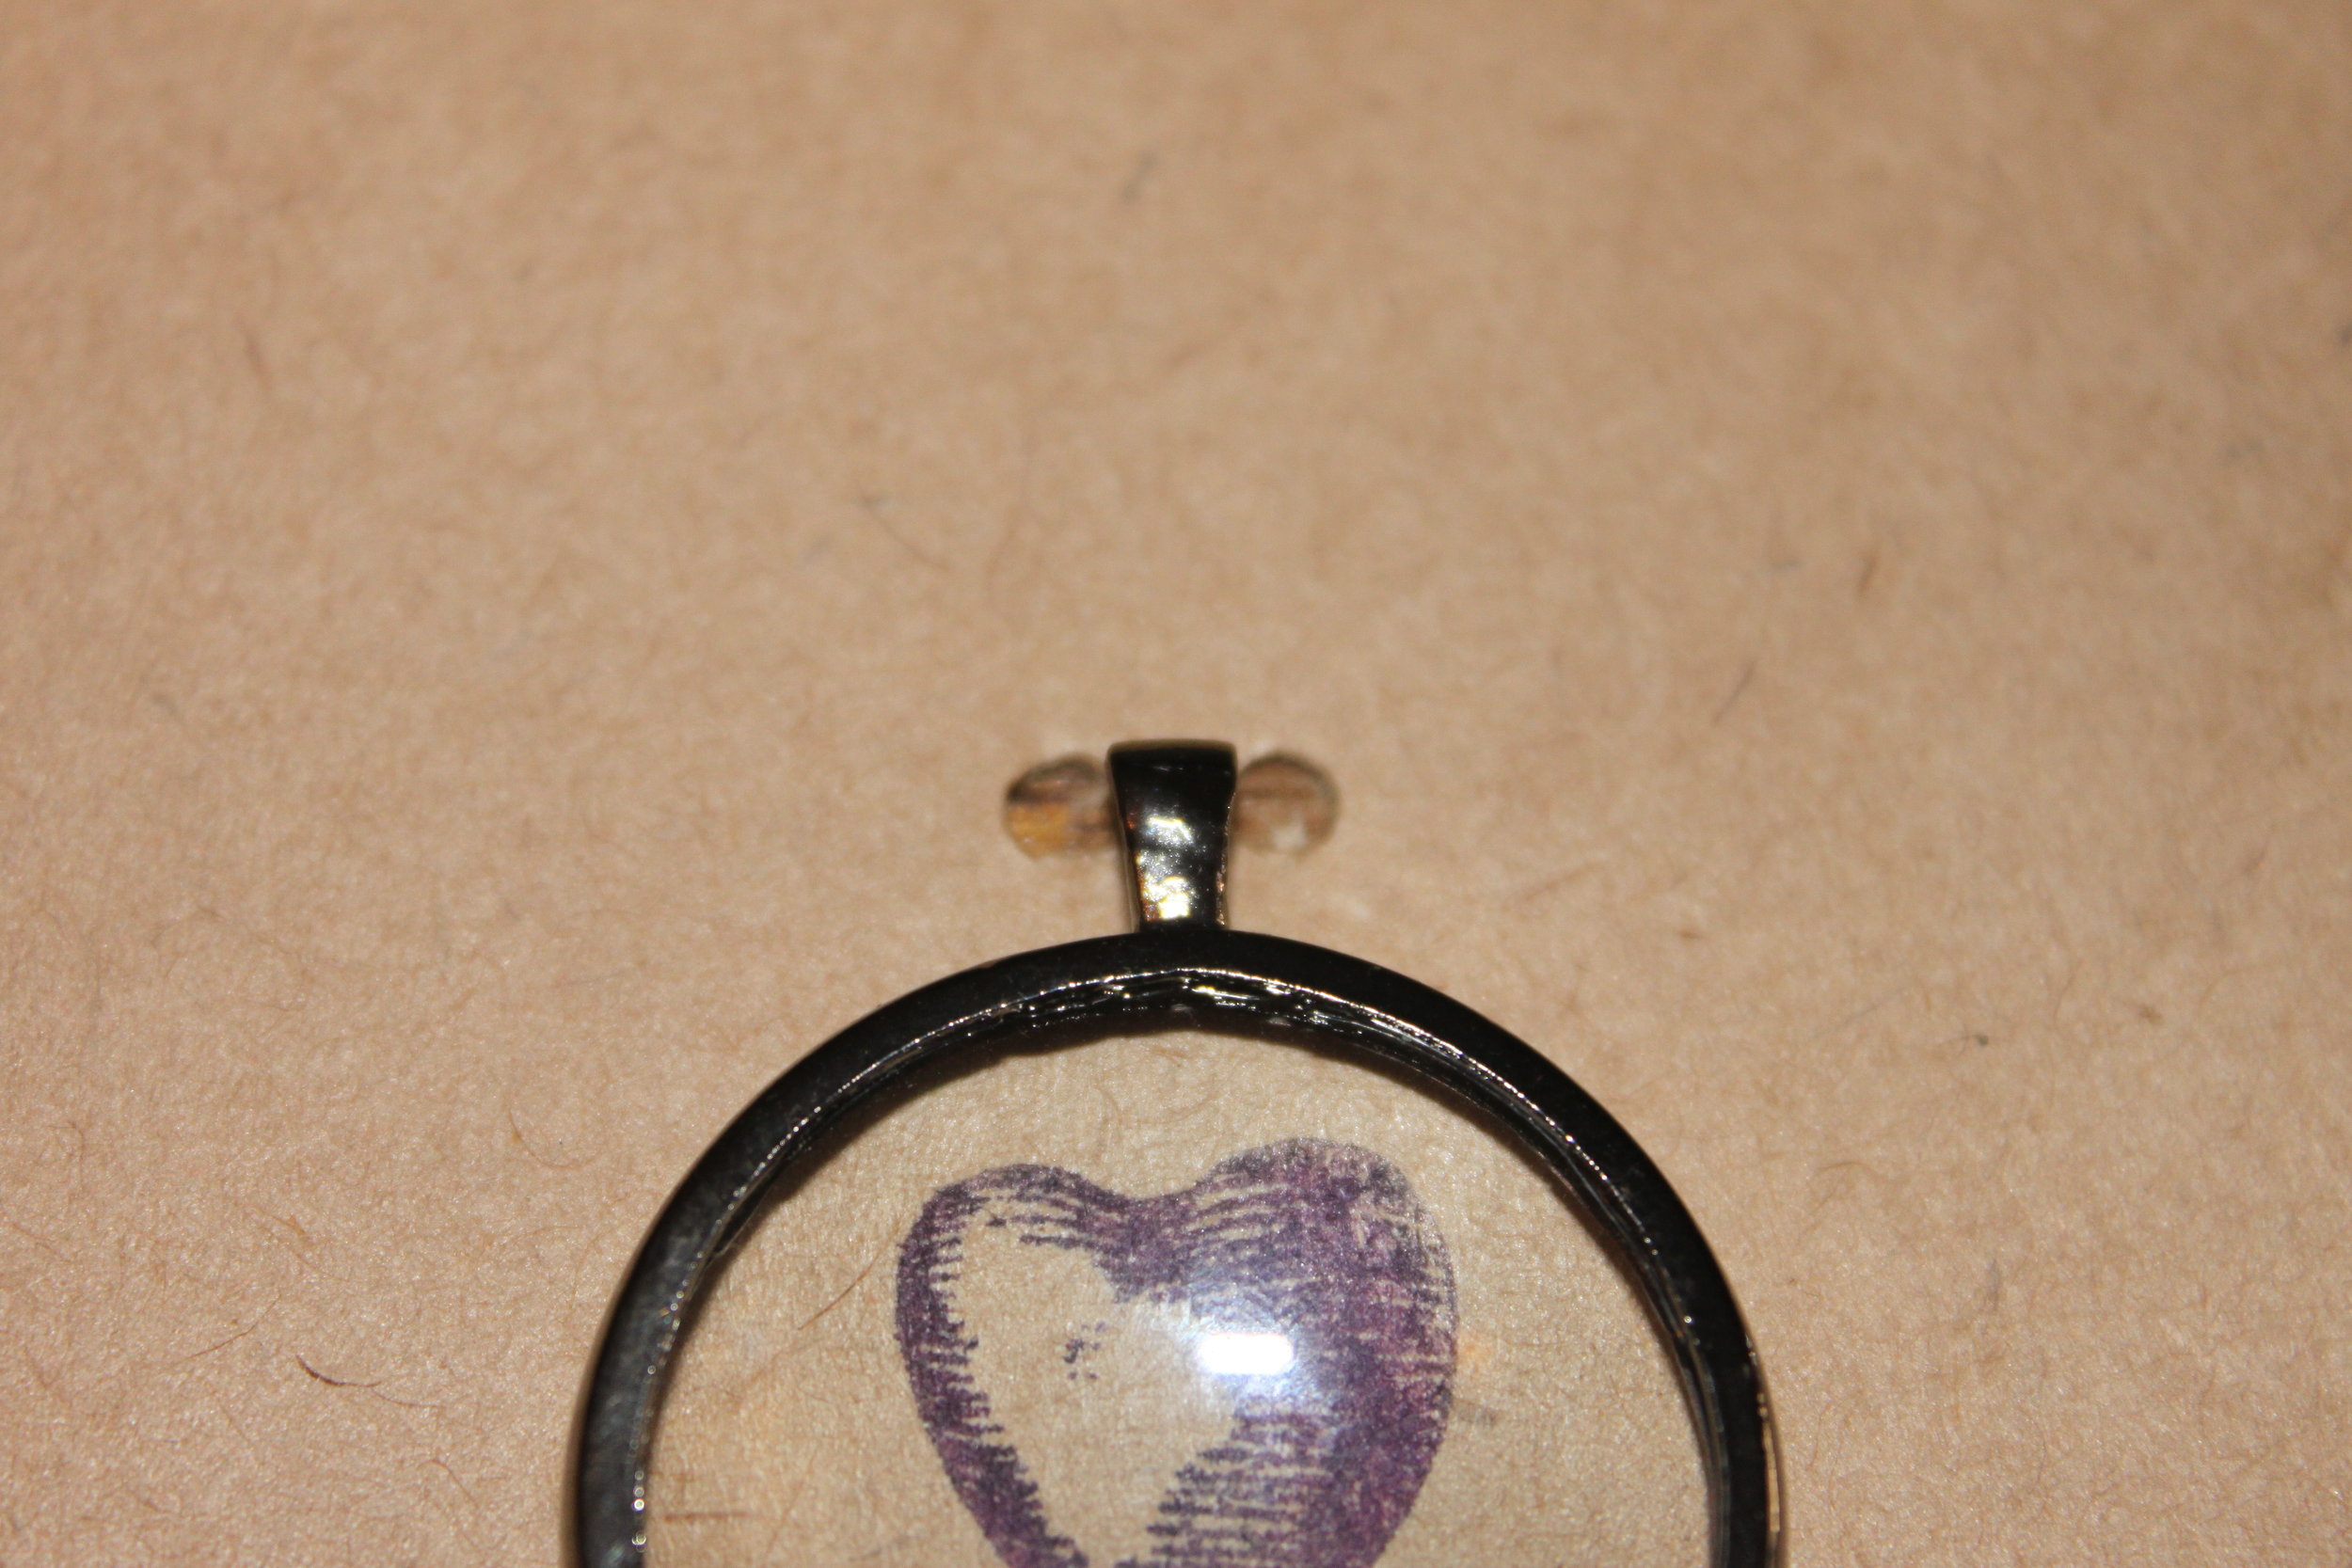
 The Valentine's Day Magnifies My Love for You Card
- Plain card & envelope (your choice of color)
- Bakers Twine (your choice of color)
- Small Magnifying Glass
- Small Heart Stamp (or you can draw your heart)
- Scissors, pink or red marker & Pen
Total Cost: approximately: $3.50
- Using your pink or red marker color in your heart stamp and then place the stamp firmly onto the middle of your card. If you are drawing your heart, draw it in the center of your card. Be careful not to draw your heart larger than your magnifying glass.

- Place your magnifying glass on the card over your stamped/ drawn heart. Make two tiny dots with pen on both sides of the magnifying glass. This tells you where to poke holes in the card. You want your holes to be close to your magnifying glass's hook or ring.
- Poke out your holes where you've already marked.
- Cut a length of bakers twine (approximately 1 inch) and thread it through your paper so that both ends meet at the front of your card.

- Next thread the twine through your magnifying glass's hook. The twine on the left should thread to the right and vice versa.
- Tie a knot securely on the front of the magnifying glass's hook. And then tie a decorative bow. Cut off any excess twine.
- Last, write your message & the card's quirky phrase: "Valentine's Day magnifies my love for you."
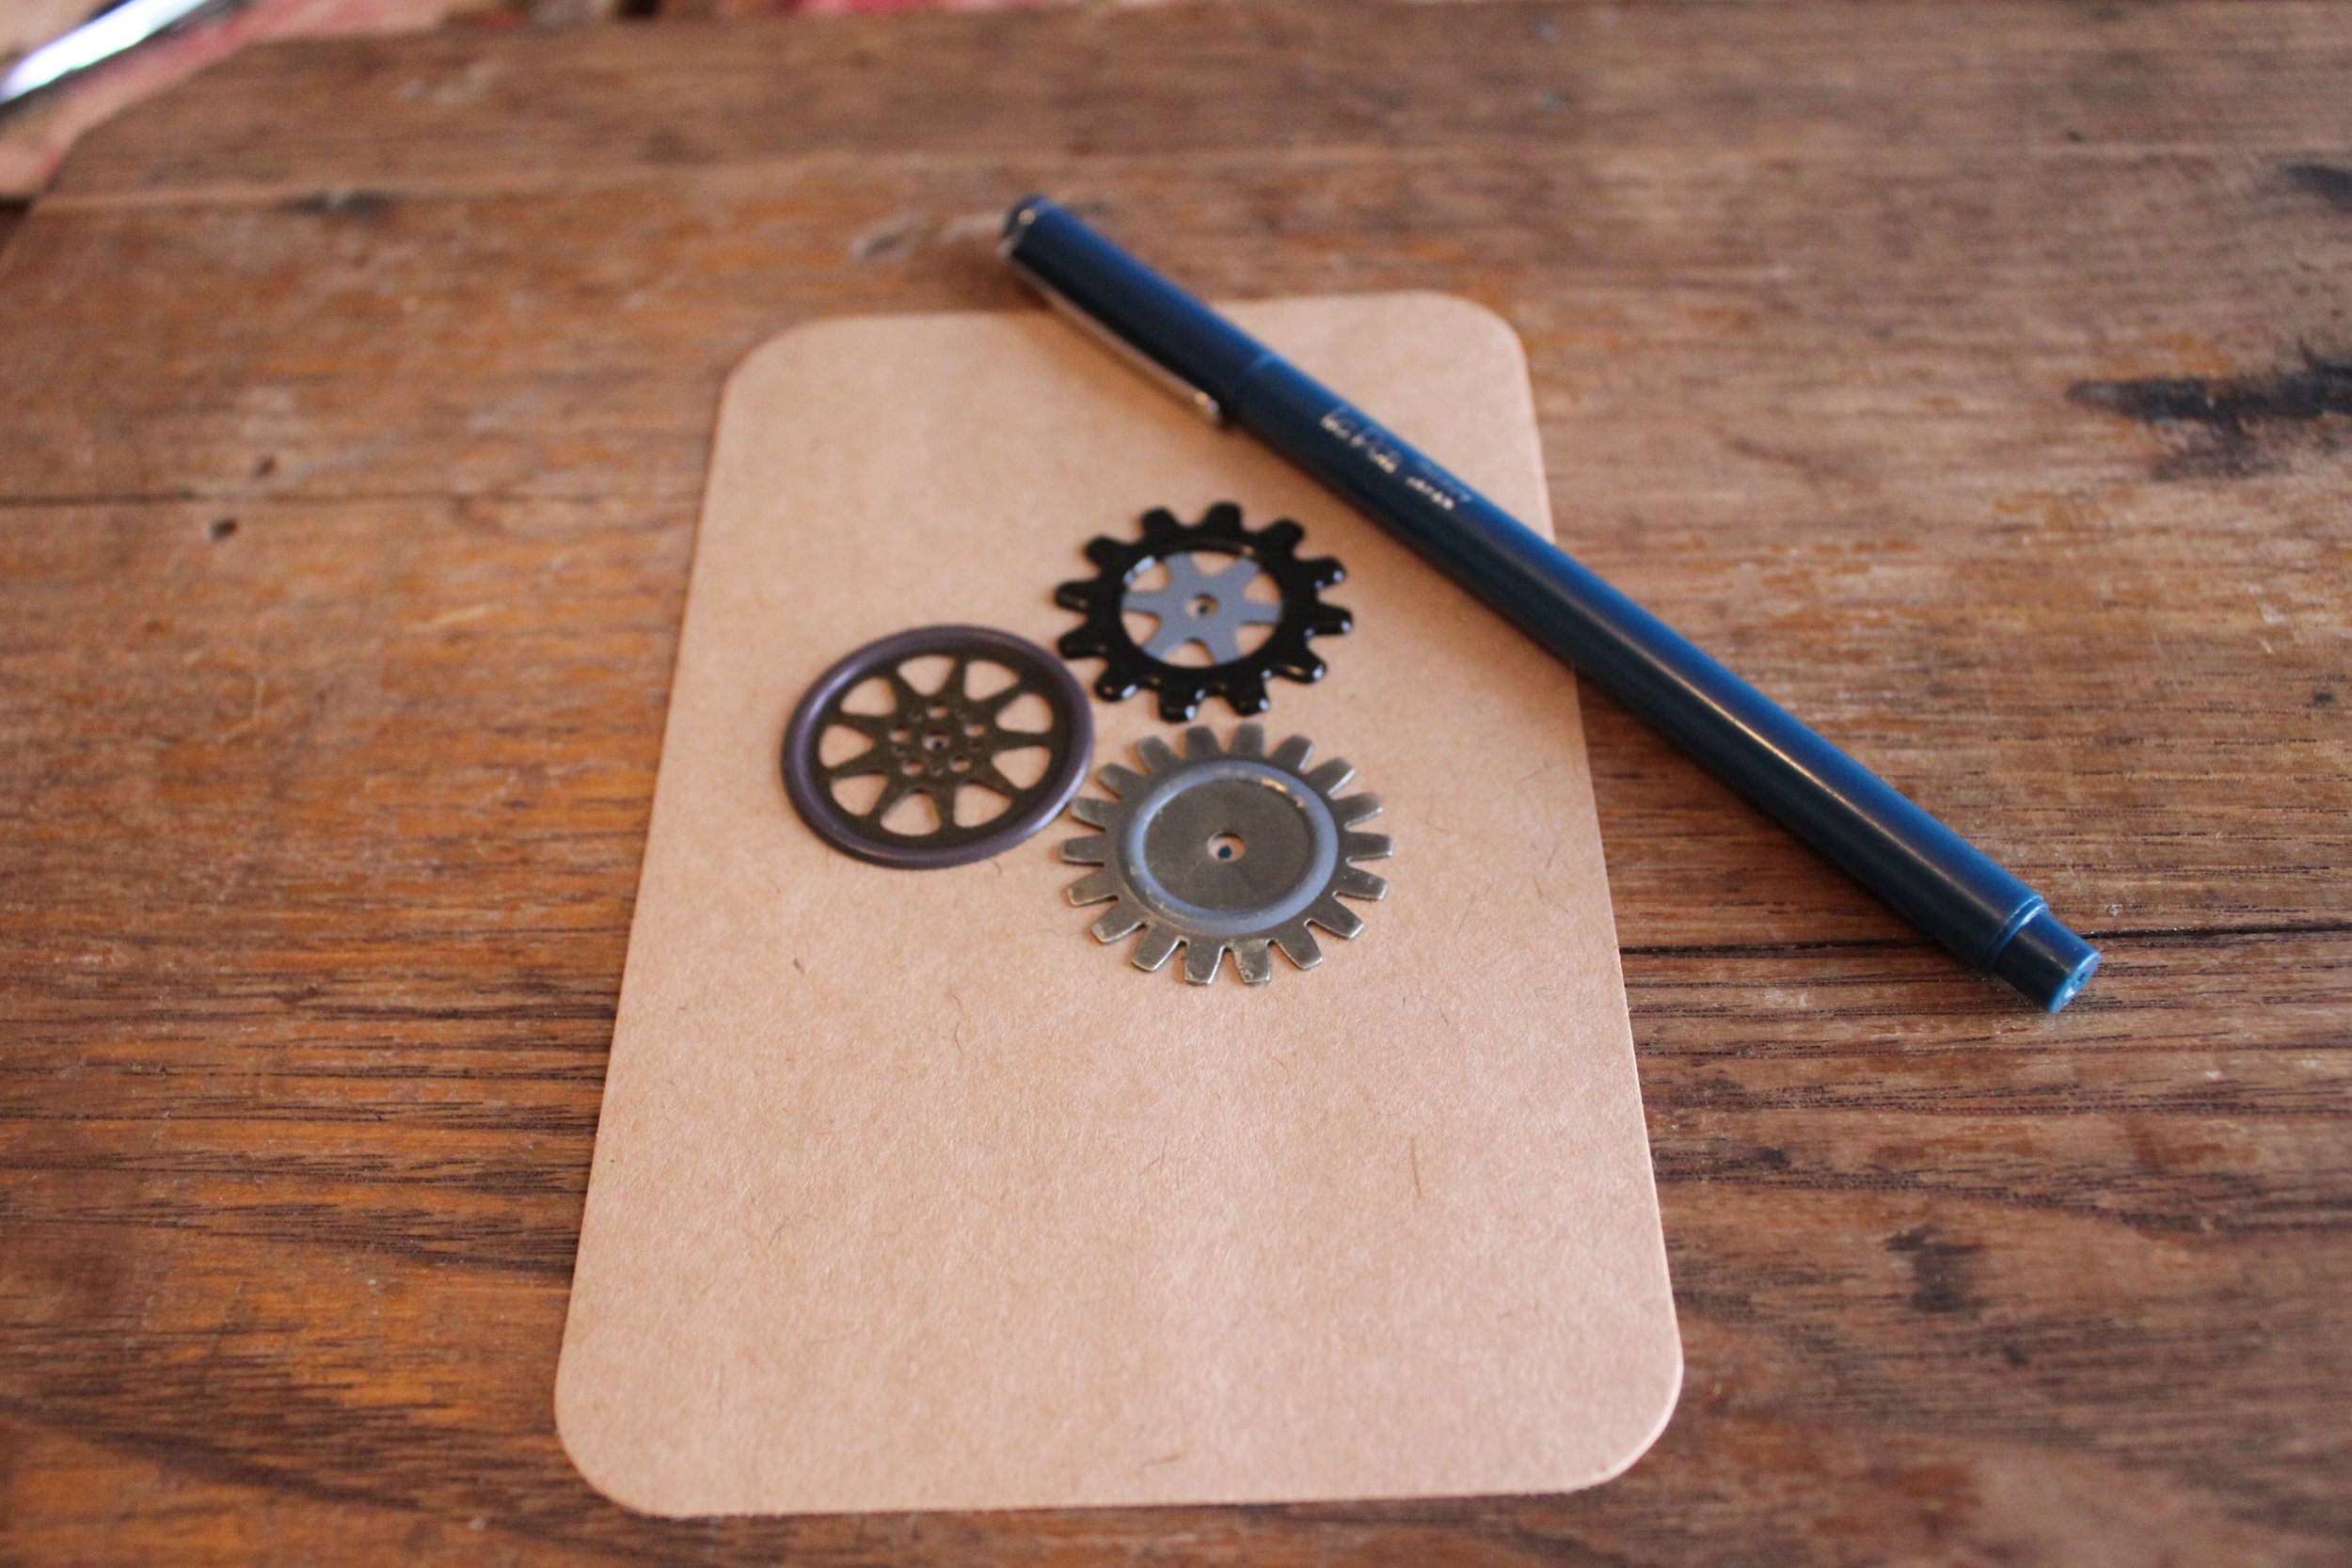
The You Really Get My Gears Going Card
- Plain card & envelope (your choice of color)
- 3 gears (I used reproduction gears which you can purchase at Michaels in their jewelry section)
- 3 brads (also available at your local craft store in the scrapbooking section)
- Scissors & Pen
Total Cost: approximately $1.75 
- Place your gears on your card. Figure out which placement you like best.
- Once you've got your gears where you want them, mark the center of each gear with your pen. A small dot will do.
- Next, poke holes in your card with your scissors. Be sure not to make a large hole, a small one is sufficient.

- After you've finished making all of your holes, affix each gear to the card with a brad. To do so, place your gear (face up) onto your bard and then through your card. Place your thumb over the brad to hold it firmly in place and pry the brad's 2 metal prongs out. Repeat for each gear.

- Last, write your message of love and the card's fun little phrase: "You really get my gears going."
The You are the Gear that Keeps my Heart a Pumping Card
- Plain card & envelope (your choice of color)
- 1 gear (I used a reproduction gear which you can purchase at Michaels in their jewelry section)
- 1 brad (also available at your local craft store in the scrapbooking section)
- A Heart Stamp (or you can draw your own heart)
- Scrap piece of paper (to stamp the heart on)
- Scissors, pink or red marker & Pen
Total Cost: approximately 80 cents
- Stamp (or draw) the heart onto your scrap piece of paper. Once you are done, cut it out. Poke a hole in the center of your heart using your scissors. Set aside.
- Poke a small hole in the center of your card.
- Next load your brad with the following (in this order): heart cut out, gear, and card.

- Close the brad by placing your thumb over it to keep it firmly in place and pry the brad's 2 metal prongs out.
- Last write your message of affection and the card's fun phrase: "Happy Valentine's Day" and "You are the gear that keeps my heart a pumping."
The I Only Have Eyes for You Card
- Plain card & envelope (your choice of color)
- Glasses (just the front piece of the frame, or a monocle would work too)--local thrift stores have tons of old frames so check them out first if you don't have a broken pair lying around the house
- Embroidery thread & needle
- An "XOXO" Stamp (or you can write "XOXO" yourself)
- Scissors, pink or red marker & Pen
Total Cost: (depends entirely on the glasses you chose and their cost) for mine, $8.00 
- Place your glasses on your card.
- Once you're happy with the placement of your glasses color one half of your "XOXO" stamp with your pink or red marker (so only one "XO"). Flip up your frame and stamp the "XO" where the lens is on your card. Repeat for the other lens.

- Next, thread your needle and secure your eyeglasses frame to the card by threading it through available holes. Be careful to keep your stitches neat, small, and close. Knot on the back side of your card. Repeat for another hole on your eyeglasses frame. You should stitch your frame securely in at least 2 places.
- Last write your message of adoration and the fun little phrase: "I only have eyes for you."
Have fun telling those you love just how much you love 'em. If you want more ideas for DIY Valentine's Day Cards check out my post from last year where I use upcycled items readily available around your home.
DIY Steampunk Wedding Bouquet
D-I-Y-CommentMaterials & Tools:
- Flowers, real or synthetic (your choice)
- Floral wire (or any green colored wire) & wire cutters (or toenail clippers)
- Needle & thread & scissors
- Lace & ribbon (or you can choose any kind of fabric you'd like instead of lace)
- clock gear
- Pin
Steps:
- Arrange your flowers.
- Cut your floral wire using your wire cutters/toenail clippers.
 Wrap your flowers tightly with the wire to secure them.
- Measure your lace by wrapping it around your flowers' stems for your desired width/look. I wrapped the lace 2-3 times around the stems.

 Once you are done wrapping your lace tuck the end into the top of your lace.
- Next, measure the amount of ribbon you'll need to fit tightly around your bouquet. Be sure to leave yourself at least a 1/2 inch on one side for sewing the ribbon to your gear.

- Loop your ribbon through the gear. Sew your ribbon to your gear. Keep your stitches small and close. (You can also secure the ribbon to your gear with a hot glue gun.)

- Next, wrap the ribbon around your bouquet. Be sure to hold the gear in place in the front of your bouquet when you pull the loose end of the ribbon through the gear.
 Pin it in place with your pin (or hatpin). Cut off excess ribbon and tuck it under.
- Promenade proudly down the aisle!
 Variations:
 Instead of a gear, maybe pin a cameo to your bridal bouquet. It's a romantic & nostalgic twist and yet is elegant & simple.
Or look for any other kinds of pins that you could attach to your fabric or lace that ties into your wedding's theme, your heritage, or your story as a couple.  Here is another variation that combines both the cameo pin & clock gear, ribbon, and simple pastel pink fabric. It's more textured & intricate--offering a much more Stemapunk vibe.
This last variation is more simple than the above pictured cameo & gear bouquet & offers a hint of sparkle. Clip-on earrings are easy enough to find at vintage stores, flea markets, & estate sales which makes them even more appealing as materials for your bridal bouquet.
Happy Wedding Planning (or day-dreaming)!
DIY Steampunk Stamps
D-I-Y-1 CommentWriting letters in this digital age makes it all that more important for letter writing to be more artistic & personal. Give your letters & stationary a steampunk flair with these 2 simple DIY stamps!
Geared Up! Stamp
 Materials & Tools:
- Square block of wood
- 3 gears (mine here are reproduction gears that you can purchase at Michaels--these work best because they are flat)
- Hammer & 3 nails (the nail heads should be large enough so that they hold the gears in place)
- 3 rubber washers (should be roughly the same width. See second picture below)


Steps:
1) Arrange your gears on your wooden block. Once you have them arranged as you desire, (using your nail) mark where you will hammer each gear into the wood.

2) Take a gear and place the rubber washer underneath it.  Then hammer the gear in place with a nail. Be sure to hammer the nail straight so that the head is not crooked (because it makes stamping a little more difficult). Repeat for the other 2 gears.
3) Begin stamping!
Steampunk Spring Stamp
 Materials & Tools:
- Square wood block
- Wire cutters
- 20 gauge wire
- Spring
Steps:
1) Cut a length of wire using your wire cutters (if you do not own a pair of wire cutters, use a pair of toenail clippers). I cut mine about arm's length.
2) Thread the wire through the spring and around your wood block.  Pinch the wire tight around the edges of the wood and pull the wire taut through the spring each time.
3) Once you've wrapped all of the wire around your wood block & through your spring--wrap the loose end of wire to another piece of wire to secure it.
4) Being stamping!
 As always, Happy making!
D.I.Y. Antique Printer Drawer Jewelry Display
D-I-Y-1 CommentI am obsessed with antique printer drawers! They are perfect for displaying jewelry as well as other small bits and bobs you might collect and wish to show off. On Etsy there are several sellers who have upcycled printer drawers for the purpose of jewelry display. Most sellers' prices are steep but of course this depends entirely on the condition of the drawers and the amount of work that converting them requires. I bought all 4 of my drawers for $100 at a local antique shop (each drawer came with a complete set of letterpress letters, numerical signs, punctuation & symbols). If you're local to Tulsa, you should drop by Sidedoor Antiques (located on Harvard Avenue between 15th and 21st street). Be sure to tell William I said hello!
Once you have found your drawer, then comes the hard part--cleaning, decorating, and fitting your drawer with cup hooks. This D.I.Y. is broken down into 3 parts. (Believe me, you won't get it all done in 1 day!).
Part One: Cleaning Your Drawer
This part is the most time consuming. The older your drawer, the chances are the dirtier it is (after all--they do contain letterpress parts that were frequently used and slathered with ink).
Cleaning Supplies:
- Method All-Purpose Disposable Wipes (Normally I would not suggest disposable anything, if you're like me you use rags for cleaning made from old socks and worn out clothing; however, cleaning each of the drawer's cubbies takes up a ton of rags (more than I had) and I did not want to just spread around dirt and ink--so just this once, use some wipes. Also with wipes, you do not run the risk of over-saturating your drawer with water.)
- Vacuum cleaner
- Razor blade
- Wood polish & rag
Steps:
1) Using your vacuum cleaner, suck any loose dirt, dust, or lint from each cubby. 
2) Once you are done, use a razor blade to scrape out the paper lining underneath each individual cubby. If your drawer does not have paper lining, then you can skip this step. If yours does, you should remove it. Each of my drawers had moldy paper lining because it had been wet at some time and not thoroughly dried out. If your drawer does have mold, please take care to cover your mouth and nose with a mask and wear gloves to protect yourself.
3) Once you've scraped away the paper lining, vacuum out the paper. Tweezers can be useful if you have paper that is stuck underneath the wood dividing the cubbies.
4) Wipe each individual cubby with a disposable wipe. Make sure to clean all four sides and the bottom of the drawer's cubby. Also wipe down the sides, bottom, and back of the drawer.
5) After your drawer has dried a bit, wipe down each cubby and the drawer's back and sides with wood polish.
Part Two: Decorating Your Drawer
These are just a couple of suggestions on how to decorate your drawer! Have fun with it!
1) Paint the cubbies with chalkboard paint (or any other kind of paint you like). Two of mine are chalkboard painted (another obsession)--I have fun writing little messages in each of the cubbies.
2) Line each cubby with cut-outs from old magazines, books, postcards, or vintage fabric scraps using modge podge.
3) Keep it natural and seal your cubbies with modge podge wood sealant for a natural sheen that protects your wood!

Part Three: Fitting Your Drawer
What is wonderful about converting your own drawer is customization. You can add cup hooks anywhere you wish. The drawer can be mounted on the wall or stand on your vanity table. Decide where you'd like to place your drawer and then begin to measure your drawer's dimensions so that you can fit it with the appropriate hardware.
Supplies You'll Need to Mount Your Drawer on the Wall:
- flat brackets
- screws (that fit into your bracket and do no exceed the depth of your drawer's wood)
- screwdriver or drill
- awl
- measuring tape
Supplies You'll Need for a Freestanding Drawer (on the Vanity):
- L-shaped brackets
- screws (that fit into your bracket and do not exceed the depth of your drawer's wood)
- screwdriver or drill
- awl
- measuring tape
For both kinds of drawer displays you will need cup hooks (or any other kind of hook you desire). Cup hooks are the easiest. The size depends entirely on your drawers dimensions.
Steps:
1) Measure your drawer's dimensions. Start first with its width (A) and height (B). Next measure its depth (C) and the width and height of each cubby (D). Not all of your cubbies are the same width and height so be sure to make note of that. Record each of your measurements.

2) Count how many cubbies your drawer has and record the number along with your other measurements. For the printer drawer I use as display for my business I only put one cup hook per cubby so that each pair of earrings or bracelet could be more easily seen. For my personal printer drawer (the one I use to hold and display all of my jewelry that I wear) I put 2 cup hooks per cubby where I could so that the drawer could increase its holding capacity. This is a choice that's up to you.
3) Using your screws and screwdriver, attach your brackets to the back of your printer drawer. I recommend attaching the bracket to a thicker part of your drawer for more stability. Obviously, if you are mounting your drawer on the wall--keep in mind how it will hang and likewise, if you are standing it up on your vanity, how it will stand when your brackets are in place. It's best to mark the spots where you'll want to screw in your brackets with pencil first before drilling. (You can also lean your drawer up against the wall if your prefer, as is pictured in BlueBirdHeaven's photo above).
4) Once your brackets are in place, use your awl and start a hole in each individual cubby and then screw in your cup hook.  Repeat (many, many times). You may also want to use a pair of flat nosed pliers to help you screw in the cup hook.
Part Four: Enjoy!
 Have fun putting all of your jewelry & tiny bric-a-brac in your new display! As always, Happy Making!
Learn How to Make Your Very Own Pair of Washer Earrings!
UncategorizedCommentLooking for something fun to do next Wednesday night (3/21)? Well, why not come down to Made; the Indie Emporium Shop (located at 5th & Boston) anytime between 5:00-7:00 pm and make a pair of washer earrings! Supplies included ($5.00, Girl Scouts $2.00). Hope I see you there!

D.I.Y. Book Display
D-I-Y-1 CommentI like to use antiques and things I can upcycle and re-purpose to display my jewelry. As many of you probably already know if you have seen my booth at local craft shows--I have antique printer drawers, an old door that I use for a table, a shutter, and a wood kitchen drawer that I refurbished for display purposes. This display came about when I was thinking up creative ways to display my jewelry in a new shop that is opening up here in Tulsa. I am happy to be a part of Made; The Indie Emporium shop, located on the corner of 5th & Boston (the grand opening is February 1st & I hope to see you there!). I loved making these displays and I hope you will too!
 Materials & Tools:
screwdriver; scissors; needle & thread; 2 books (1 to use as the display and the other to use as an anchor); cup hooks (white); Sharpie marker; awl; brads; lace; buttons; all-purpose glue; 1 pkg. of corner braces with screws (mine are 2 1/2" x 5/8") but really this just depends on the size of your book
 What is great about this DIY is that it is simple and elegant while also being incredibly cheap to reproduce. I purchased the books for 50 cents each at a used bookstore, the lace was 50 cents in a bargain bin, the buttons were free! (I collect lost buttons, they are everywhere you look!), cup hooks 89 cents per pkg. of 5, and the corner braces came in a pkg. of 4 with the screws and only cost $3.95 at Lowes, and lastly a large pkg. of 20 brads were on sale for 76 cents--which brings me to a grand total of $7.10.
Steps:
1) Before doing anything, first figure out which pages you would like to have your book display opened on. I read mine to make sure that there wasn't anything a potential customer might find offensive (like expletives, racy scenes, or racial/ethnic slurs). Also, measure (eyeball it) to make sure that the screw (that you will fix in the middle of the top page of your book display to keep it securely open) can go through all of the pages that you have opened your book to. See figure below for clarification.
You want the screw to go into the book cover otherwise the book pages will fall down once you place jewelry on it.
2) Once you have done this, measure and cut your lace to fit the top page of your book display. Your lace should wrap around to the other side of the book page to hide unsightly unraveling and seams. I suggest sewing 2-4 pages together (depending on your paper quality and its thickness) so that there is less of a chance of tearing the pages while you are sewing your lace in place. Too few pages and it's too flimsy to sew easily and too many pages leads to more paper tears because you are tugging at your stitches more. It helps to pin your lace in place on the book page.
3) Once you have your lace pinned in place, sew it. Try to keep your stitches small, even, and neat.
 4) Next, place your buttons on the bottom book page of your display. I pinned mine in place (which is optional). You could sew as you go if you choose. Sew your buttons in place. Again, sew 2-4 pages together for maximum ease.
  5) (Optional) Use your marker to write your business name or a cute phrase on the bottom page of your book display. You could also stamp a design on your page or doodle in the margins. Anything goes, have fun with it!
6) Once you are finished with decorating your display, it's time to fasten the display book to your anchor book. Place your anchor book underneath your display book. Grab one of your corner braces and place it up against the back cover of your display book situating the screw holes tightly against both the back cover of your display book and the top cover of your anchor book. See the image below for clarification.  Once you have the corner brace places, take your Sharpie marker and mark each screw hole. Repeat for the other corner brace.
 7) Next, take your awl and poke a hole directly through the marks you made for your screw holes on both covers. When poking a hole in the display book cover, be sure not to go through your book pages--just the cover.
  8) Once you have made all of your holes, take 2 brads and use them to fasten your corner braces to the display book. (You are putting the brad through the screw hole, book cover, and then opening the ends to hold the corner brace in place). The picture here is upside down, but you get the idea.
 9) Next, take 2 screws and screw them in place (through the hole you poked through the anchor book cover). You know when you're done because the display book will feel more secure (essentially, it will no longer slide or fall closed but remain upright).
  10) Turn your display book around so that it is facing you. Using your awl, poke tiny holes (starter holes) in your top book page for your cup hooks. And then, screw your cup hooks in place. I recommend alternating which cup hooks you screw in so that the page does not ripple or become uneven.
  For instance, I had 5 total cup hooks so I screwed in the 1st hook and then the 3rd and 5th, and afterwards, the 2nd and 4th hooks.
11) With the display book still facing me, I lifted up my lace, and using my awl made a starter hole in the very middle of the top page for my screw. Then I took a screw and secured it in place using my trusty screwdriver. 12) Once I was done, I cut a circle out of a scrap book page to cover the screw and glued it in place.
 13) Now comes the fun part--splaying your jewelry across the page and hanging it from the tiny cup hooks!
  For a layered look, stack books underneath your display to create height and use different angles.
As always, Happy Crafting! And please, do come visit Made; The Indie Emporium shop's grand opening on Feb. 1st!
Handmade Illumination: D.I.Y. Steampunk Candlestick Holder (3 ways)
D-I-Y-2 CommentsThese candlesticks are perfect for hosting an intimate dinner party for fantastical inventors, airship tinkerers, clockmakers' sons & daughters, and bicycle enthusiasts everywhere!
 D.I.Y.s and Materials needed for each candlestick are written below under their respective name. Before you begin, I would like to note that in each of these photos a tea candle is pictured. I did not have a candlestick on hand and so I substituted a tea candle for a candlestick in order to show each step completely. As always, happy making!
 Atomventor's Candlestick Holder
 Materials Needed:
Mason jar, medium sized bicycle gear (from a cassette), glass candlestick holder, a candlestick, and various odds & ends of your choosing to place inside your jar.
I used washers, springs, bicycle brakes, clock parts & gears.
A note on your mason jar & glass candlestick holder: These items must be able to stack inside one another. When purchasing your jar and candlestick holder, you should bring your bicycle gear with you to the store to ensure that you purchase the correct sizes.
Steps:
 1) Fill your jar with your assorted odds & ends (also known bric-a-brac, couch treasure, & dumpster delights). Fill your jar about halfway.
2) Place your bicycle gear atop your jar. See also figures 2a & 2b below.
 3) Place your glass candlestick holder on top of your bicycle gear. The candlestick I purchased (from Michaels) has a tiny "lip" on the bottom--this keeps the candlestick from falling off of the gear & sliding out.
 4) Next, place your candlestick into the glass candlestick holder.
5) Enjoy your handmade illumination!

Simply Steampunk Candlestick Holder
 Materials Needed:
Medium-sized bicycle gear, glass candlestick holder, and a candlestick.
A note on your glass candlestick holder: This item must be able to stack inside your gear. When purchasing your candlestick holder, you should bring your bicycle gear with you to the store to ensure that you purchase the correct size.
Steps:
 1) Place your bicycle gear over your glass candlestick holder. You can see in figure 1a that the candlestick's "lip" keeps the gear in place.
2) Next, place your candlestick into the glass candlestick holder.
 3) Enjoy your handmade illumination!
Simply Steampunk Easy Candlestick Holder
Materials Needed:
Medium-sized bicycle gear, glass candlestick holder, and a candlestick.
A note on your glass candlestick holder: This item must be able to stack inside your gear. When purchasing your candlestick holder, you should bring your bicycle gear with you to the store to ensure that you purchase the correct size.
Steps:
 1) Place your bicycle gear on your table and then stack your glass candlestick holder on top of it. Again, the "lip" of teh candlestick holder keeps the gear in place & from sliding. See figure 1a.
2) Next, place your candlestick into the glass candlestick holder.
 3) Enjoy your handmade illumination!
This D.I.Y. is versatile--once you have the materials you will be able to make each of these candlesticks. Since the candlesticks are made by stacking pieces into one another, you will also be able to change them to fit the mood or theme of your table setting.