Bohemian Romance Jewelry

steampunk home

DIY Steampunk Home Decor: Clock Face Catch All

D-I-Y-Samantha ExtanceComment

IMG_7284Steampunk your home with this simple & elegant clock face catch all. Perfect for holding your loose change, keys, sunglasses, stamps, or jewelry--your catch all will not only be beautiful, but also be another conversation piece to add to your home! Here's what you'll need: IMG_7279Materials & Tools:

  • Clock Face (oversize or large) that has a  protective covering. If you cannot find a clock face then try looking for a sundial instead.
  • Vintage Photograph or Postcard (that fits inside your covering)
  • Ribbon (any color of your choice)
  • Fake Flower (any kind of your choice)
  • Lace (the amount will depend on the size of your covering. Your lace should equal the length [circumference] of your covering)
  • Paperclip
  • Scissors
  • Needle & Thread (or glue gun)
  • Chain (also measured to equal the circumference of your covering)
  • Jewelry pliers & wire cutter
  • 2 Ribbon Crimps
  • 2 jump rings

Steps:

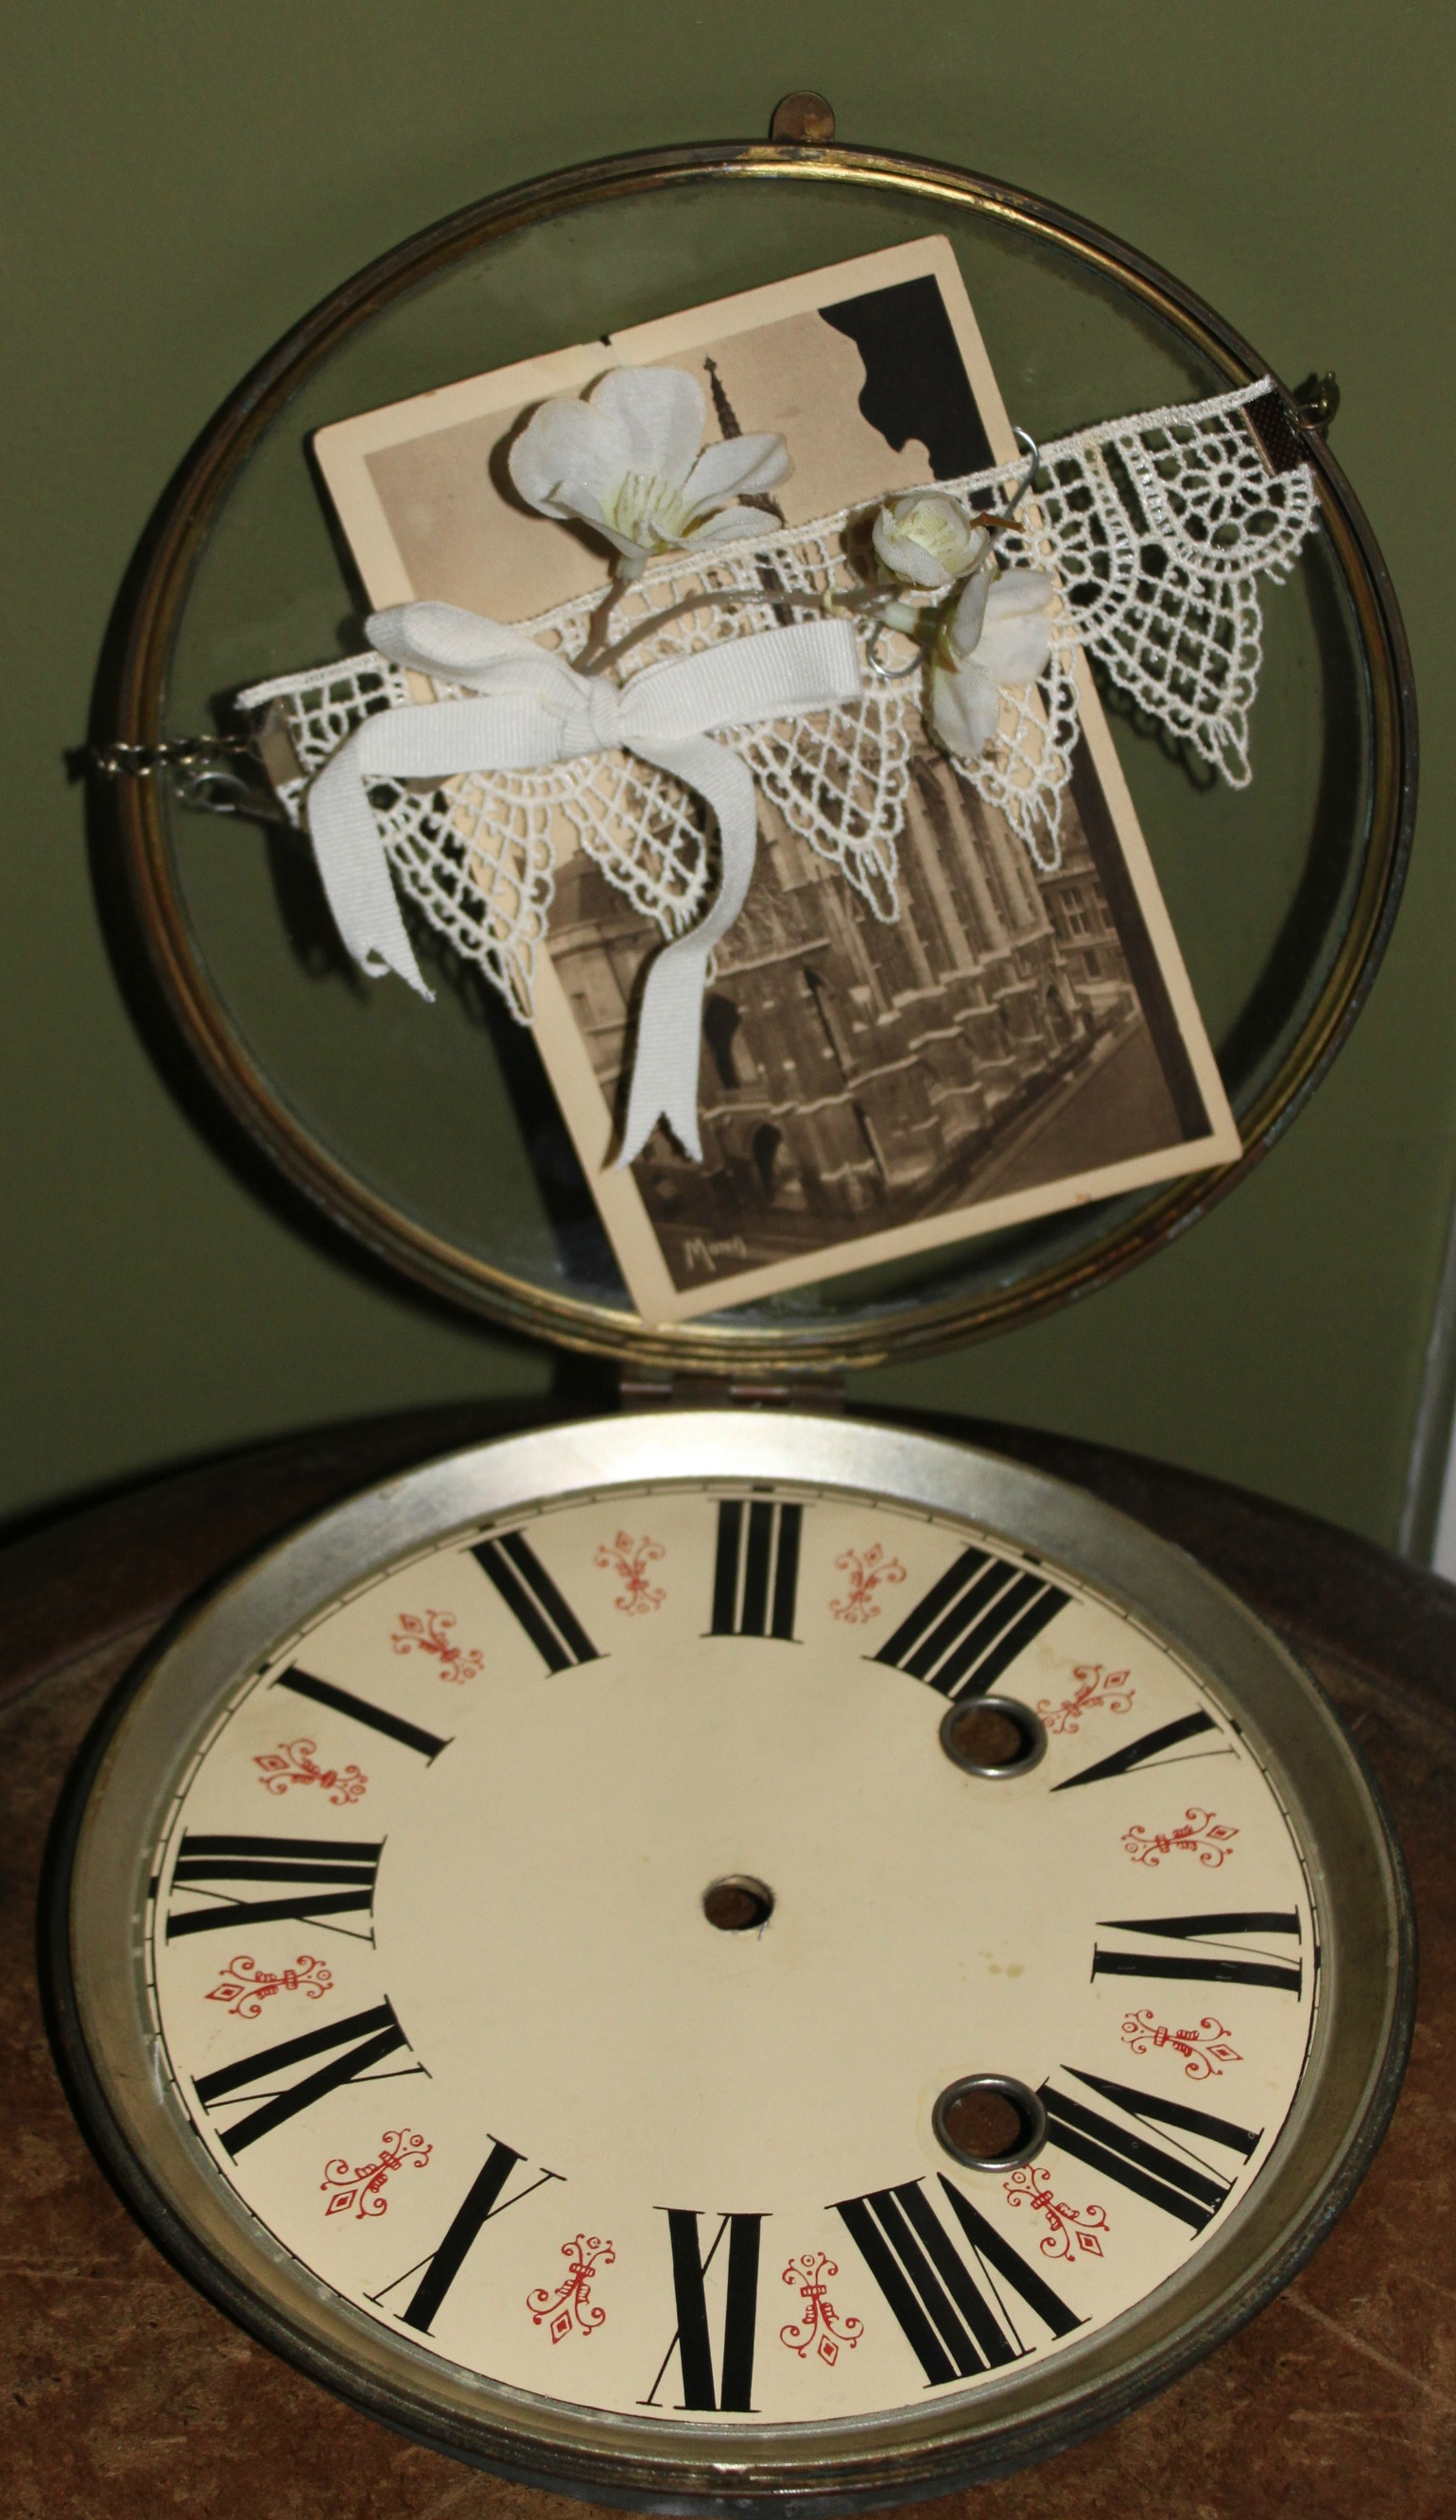
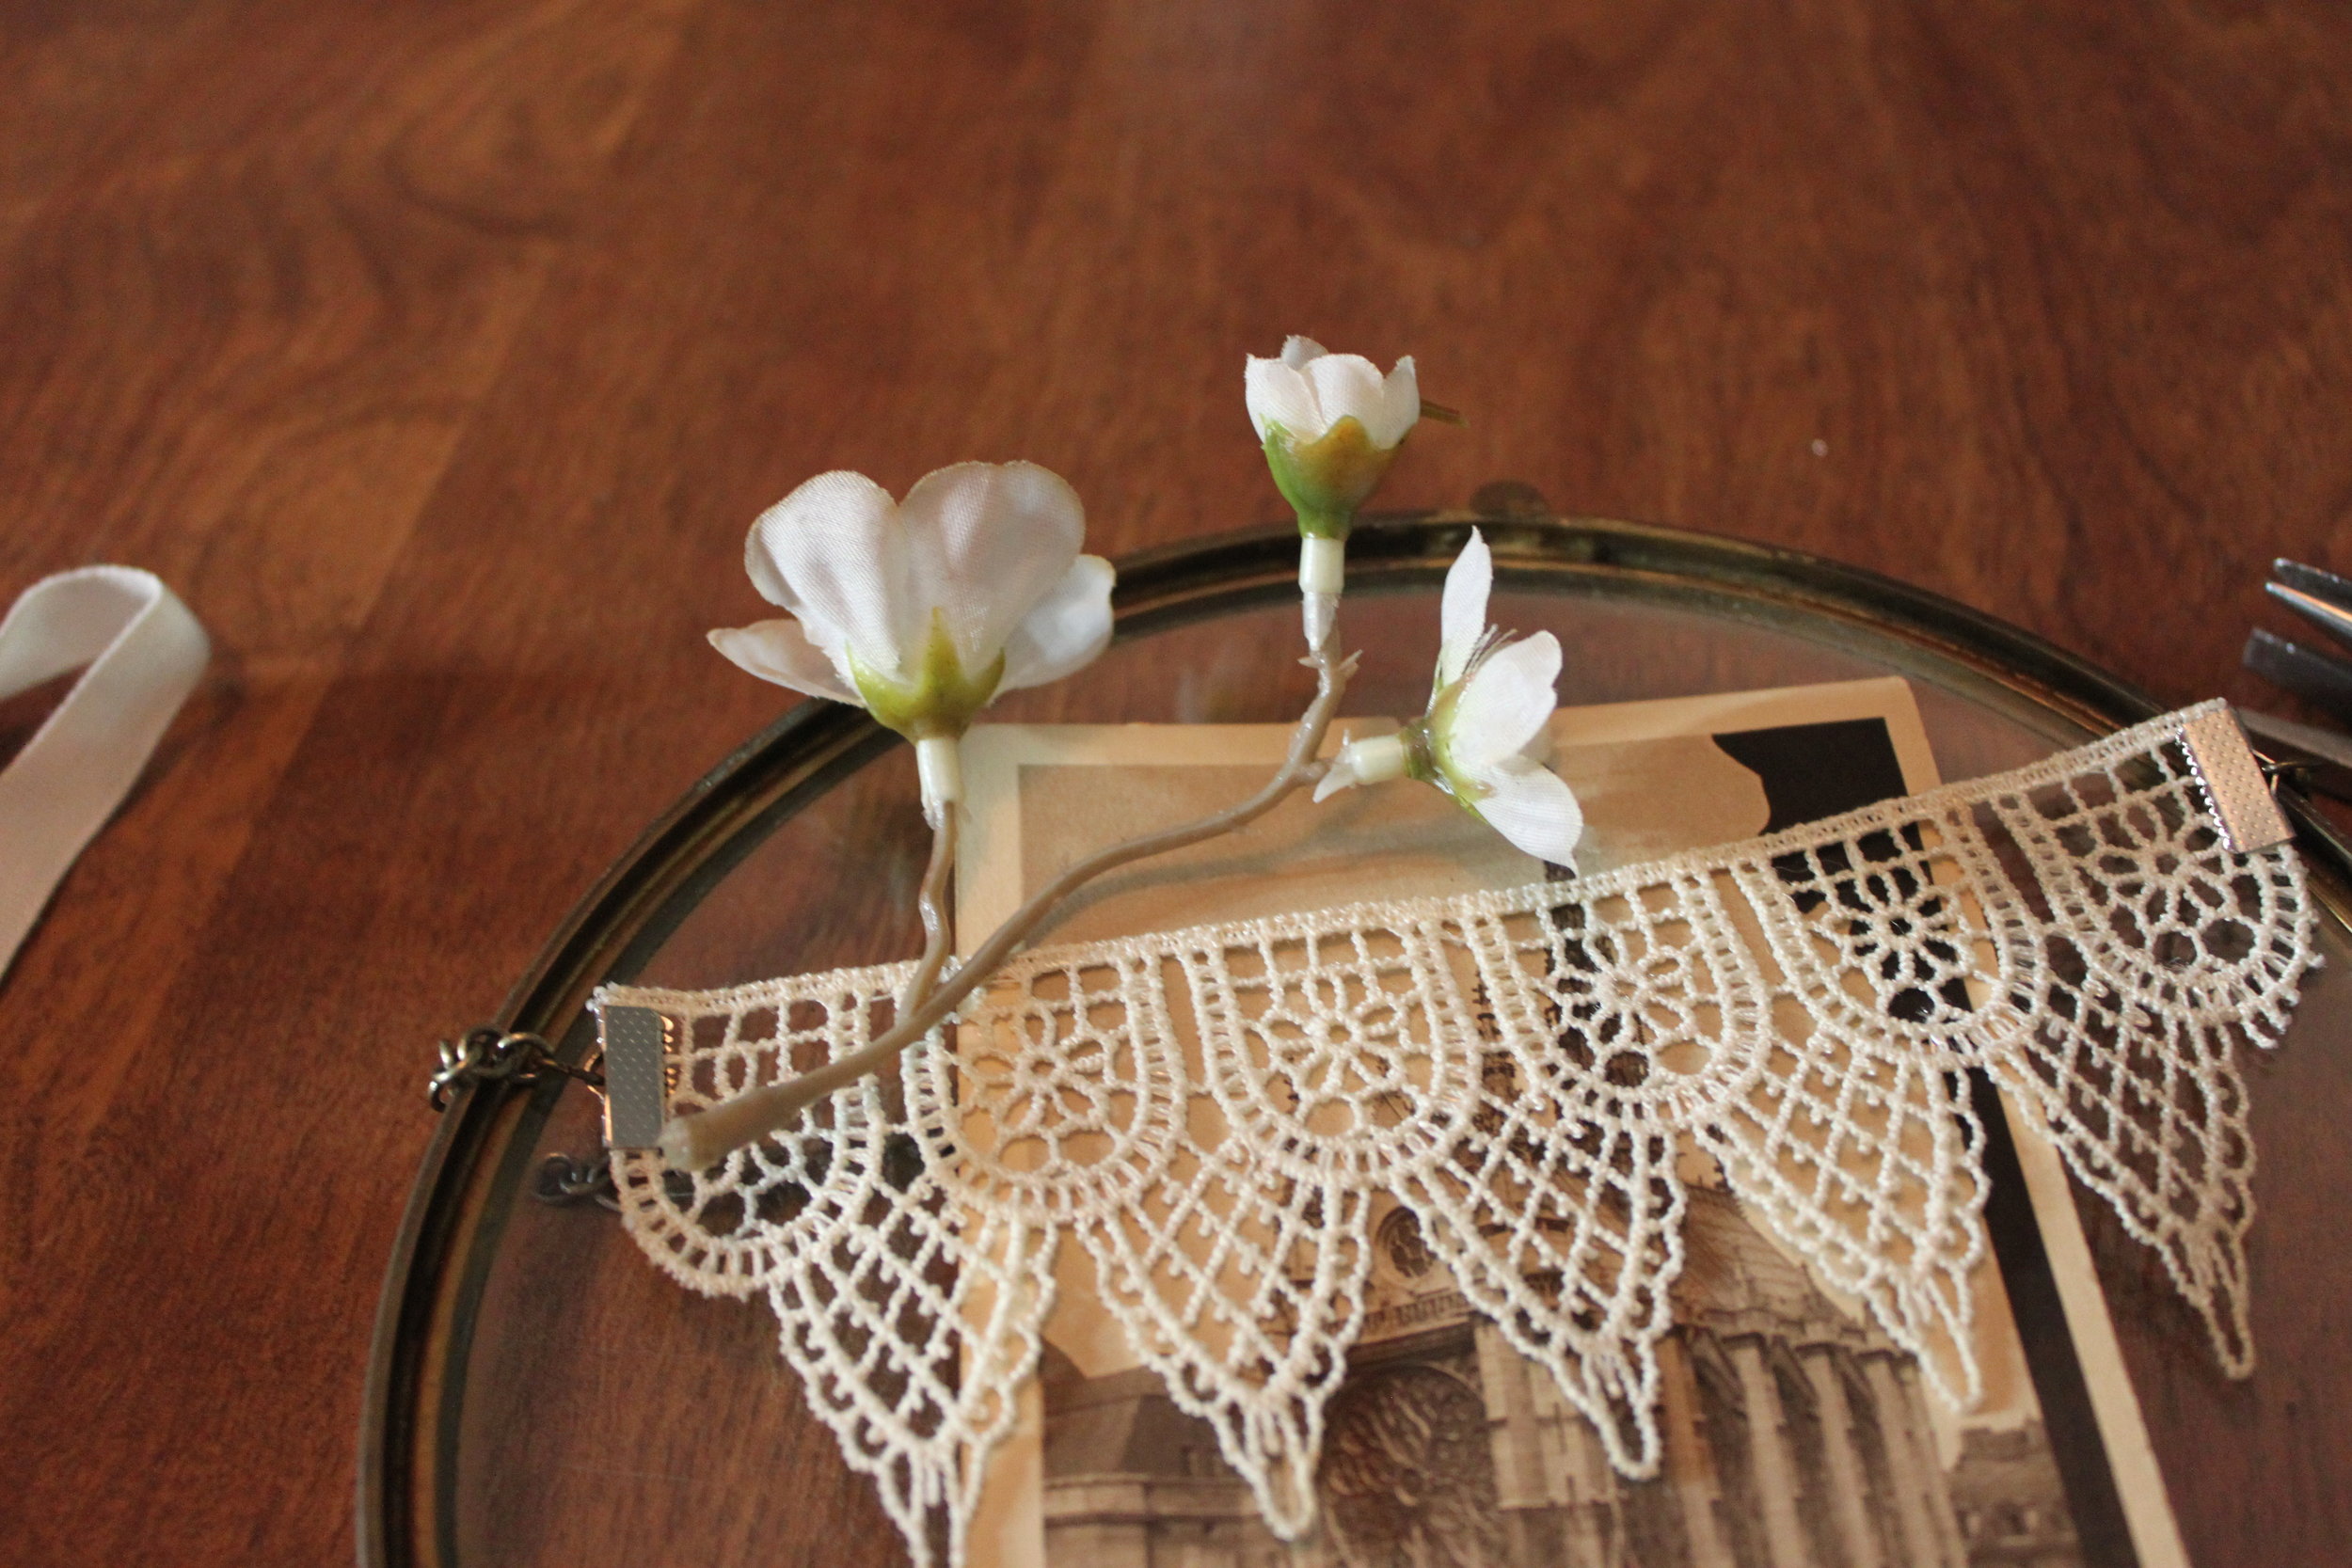
  1. Open up the covering of your clock face & leave open. Place your vintage photograph inside. Set aside.
  2. Measure your lace (it should be the same length as your covering) and then cut. Next, place 1 ribbon crimp at the end of your lace and crimp in place with your jewelry pliers. Repeat for the other end. IMG_7283
  3. Now measure the amount of chain you need. (It should be the same length as your covering too.) Cut your chain with wire cutters, or toenail clippers if you do not own a pair of wire cutters. Next, using your jewelry pliers (2 flat nosed pliers are best) connect your chain to your lace by hooking the jump ring through the ribbon crimp. Repeat for the other side.
  4. Place your lace & chain over the covering--the lace should be placed in front over the photograph/postcard. You may have to adjust your chain if you don't like where it sits on your covering (by making it smaller or larger--respectively, removing chain links with wire cutters or adding jump rings or more chain with your pliers).IMG_7280
  5. Next, make a decorative bow out of your ribbon. IMG_7282
  6. Using your needle & thread, sew your bow and fake flower in place onto the lace. Be sure to tie a sturdy knot. (Another option for this step if you don't like sewing--glue the bow and fake flower in place with your glue gun.)
  7. Last, clip together your photograph and lace with your paperclip. This helps the lace remain taut across the photograph/postcard rather than sag across it.
  8. Proudly display in your lovely home!

Steampunk Home Decor Catch All CollageAs always, happy making!

Steampunk Home Decor: Silhouette Pictures

D-I-Y-Samantha ExtanceComment

Steampunking your home can be a little pricey--especially if you are searching for antiques & oddities to display throughout; however, that doesn't have to be the case. Here is a simple DIY that can give your walls a little whimsy. Now, let's get creative! Here's what you'll need:

  • Oval picture frame & mat (I purchased mine from Michaels when they had a frame sale, full price this frame is $19.99)
  • Felt (1-2 pieces), the felt I choose had an ornate pattern which made it appear like leather. I recommend using a patterned felt to create your silhouette because it offers up another element of texture (.79 cents ea, $1.58)
  • 1 piece of Scrapbook paper (any color/pattern of your choosing) Personally, I love DCWV (they even have Steampunk scrapbook paper) (1 sheet, $1.00)
  • Tacky Glue
  • Scissors
  • Exacto Knife
  • Paper & Pencil (for tracing)
  • Black Sharpie Maker (optional)

Total Cost (excluding tools): $20.99 (per silhouette)

Steps:

  1. After you've purchased your supplies, download  the silhouette head (or feel free to draw your own). Re-size it to fit your frame. This is how I re-sized my silhouette: I eye-balled it and enlarged the image on my computer. I then pulled out the stock photo from the frame and placed it over the silhouette on the computer screen. If your silhouette fits inside of the stock photo's parameters (with a little room left over for the embellishments [the hat, bubble pipe, etc.] you'll be making), then you can print your image. (If the silhouette doesn't fit, keep re-sizing your image.) Here is the silhouette template:  Steampunkin Template--BohemianRomanceSilhouette
  2. Once you've printed your silhouette, trace her onto the wrong size of your felt with your pencil. Remember your silhouette will be flipped (facing the opposite direction once you've cut her out and flipped the silhouette over).
  3. Now it's time to draw her embellishments. Draw on a hat, or a pipe with bubbles, or anything else you fancy! For more intricate embellishments, for instance, the microscope, it's better drawn on paper. Keep that in mind as you are drawing on your felt.
  4. Once you are done drawing & tracing, use your scissors to cut out your silhouette & embellishments. Set aside.
  5. Grab your stock photo from the frame and your sheet of scrapbooking paper. On the wrong side of your scrapbooking paper, trace the stock photo's oval outline. Cut out and set aside. If your stock photo sheet fills the whole frame, and is not just a photo taped to the mat, be sure to trace lightly the photo's outline (on the right side of your scrapbooking paper) so you know where to place your silhouette and embellishments.
  6. Next, glue your silhouette and embellishments in place on your scrapbooking paper. Let it dry for 5-10 mins.
  7. Place your scrapbooking paper in your frame and close.
  8. Hang on the wall and brace yourself for the flood of compliments you'll be getting! (People love whimsy!)

To make the Microscope (or any other intricate embellishment or prop):

  1. Find an image of the object you desire, in this case a microscope. Be aware of copyright. I used an image of a microscope from The Graphics Fairy. Her images are free for creative use (and she has a steampunk collections of images).
  2. Re-size accordingly (as detailed in Step 1 above).
  3. Trace from your computer screen (or you can print it and cut it out). I choose to trace the image so that I could use heavy cardstock which jams in my printer.
  4. Once you've finished tracing, cut out the image.
  5. Color (optional). I colored my microscope with a sharpie marker so that it would also look like a silhouette.
  6. Glue in place.

If you don't want to make one of your own, you can also purchase a print of either of my silhouettes from me on my Etsy shop (coming soon). Then assemblage is super simple, 1. Purchase 2. Pull out of package 3. Place in frame! For all the rest of you, Happy Making!

DIY Steampunk Curtain Ties

D-I-Y-Samantha Extance1 Comment

6 Different Steampunk Curtain Tie DIYS to subtly transform your decor! Materials & Tools are listed below by project. So let's get to makin'! Spring & Gear Steampunk Curtain Tie

  • 8-12 springs (depending on the thickness of your curtain)
  • Grandfather clock gear
  • Flat nosed pliers & jump rings

Steps:

  1. Link the springs together. (My springs are open ended, but if yours are closed ended connect your springs with a jump ring using your flat nosed pliers.) Link 4-6 springs together then add your grandfather clock gear.
  2. Next, add the remaining 4-6 springs to your gear & spring chain.
  3. Gather your curtain and place your spring & gear chain around it, connecting the two spring ends. (Again, mine are open ended so connecting them was simple; however, if your springs are closed ended, use a jump ring as detailed in Step 1.)

Skeleton Key & Chain Steampunk Curtain Tie

  • Skeleton key
  • Chain
  • 4 jump rings
  • Flat nosed pliers
  • Measuring tape
  • lobster claw or hook

Steps:

  1. Gather your curtain and measure out how much chain you need. Cut the amount needed.
  2. Add your lobster claw or hook to the end of your chain using a jump ring and your flat nosed pliers.
  3. Next, attach your skeleton key to your chain wherever you desire using your jump rings and your flat nosed pliers.
  4. Last, gather your curtain and place the chain around it and secure by connecting your lobster claw or hook to the last loop of your chain.

Ribbon & Gear Steampunk Curtain Tie

  • Ribbon
  • Grandfather clock gear
  • Needle & thread
  • Scissors
  • Clamp-hook
  • Measuring tape

Steps:

  1. Gather your curtain and measure its gathered width. Add a 1/2 inch. This width will equal the length of your ribbon.
  2. Cut your ribbon to your needed length.
  3. Next, fold one end of your ribbon around your grandfather clock gear. This is where your 1/2 inch allowance is used.
  4. With your needle & thread, sew the fold in place. Be sure to tie a sturdy knot. Cut off the excess thread.
  5. Place your clamp-hook on the other end of the ribbon.
  6. Gather your curtain once again and wrap the ribbon around it. Secure the tie in place by fishing the hook onto your gear.

Lightbulb, Velvet Ribbon & Gear Steampunk Curtain Tie

  • Velvet ribbon (or an old choker: if you do use an old choker you can skip ahead to Step 3)
  • Grandfather clock gear
  • Chain
  • Wire & wire cutters
  • Flat nosed pliers
  • Scissors
  • Measuring tape
  • Lightbulb or (lightbulbs)
  • 2 ribbon ends (or crimps)
  • 4 jump rings

Steps:

  1. Gather your curtain and measure its gathered width. Next measure your gear. Subtract your gear's width from your curtain width. This width is equal to the length of your ribbon.
  2. On each end of your velvet ribbon, place a ribbon end (or crimp) using your flat nosed pliers.
  3. Attach your gear to one end of your velvet ribbon with a jump ring using your flat nosed pliers. Set aside.
  4. For this step you'll need wire and wire cutters. Grab your lightbulb and begin wire wrapping its base. Be sure to create a loop so that you can connect the lightbulb (or lightbulbs) to your gear (and/or chain). Cut off excess wire.
  5. Connect your lightbulb to your gear using a jump ring and your flat nosed pliers (through the wire loop). Optional: you can attach another lightbulb to your gear. I suggest attaching the 2nd lightbulb to chain and then attaching the chain to your gear. It will give your curtain tie another added dimension.
  6. Last, wrap your velvet ribbon (or choker) around your gathered curtain and secure by connecting the loose end of your ribbon to the other side of your gear with a jump ring using your flat nosed pliers.

Clamp, Chain & Gear Steampunk Curtain Tie

  • C-Clamp
  • Grandfather clock gear
  • Chain (approximately 1-2 inches)
  • 2 jump rings
  • Flat nosed pliers

Steps:

  1. Attach your grandfather clock gear to the middle of your c-clamp with a jump ring and flat nosed pliers.
  2. Next, attach your chain to the bottom of the gear with a jump ring and flat nosed pliers.
  3. Attach the loose end of the chain to the hoop part of the c-clamp with a jump ring and pliers.
  4. Gather your curtain and hook your c-clamp around it. Last, clamp your curtain in place.

Clamp Simply Steampunk Curtain Tie

  • C-Clamp

Steps:

  1. Gather your curtain and position your c-clamp around it.
  2. Screw closed!

Enjoy your fabulous Steampunked Curtains!


Steampunk Grandfather Clock

D-I-Y-, Flea Market Finds, ShowsSamantha Extance3 Comments

I had purchased a broken grandfather clock at a thrift store 2 months ago in the hope of making a display piece out of it. As a rule, I never upcycle anything that can be restored. This clock was in a sad state when I happened upon it--the wood panel in the back was entirely overtaken by mold & wood rot. Luckily, the majority of the clock was in tact. Though it is still a work-in-progress (I hope to fashion it with wheels & a working clock mechanism), the exterior is finally done! Here it is in its various stages. I used clock plates, bicycle gears, chain, metal erector set pieces, a clock spring, an old whisk, and lots of screws & nails.

Want to DIY?, here are a few tips! To make your own steampunk grandfather clock (out of an already broken one), you will need the following hardware: screws (of various sizes, fitting your collected pieces), chain & jump rings, metal brackets (for heavier pieces, like the bicycle gear pictured above), Gorilla brand wood glue, nails (for extra support at the base of your grandfather clock), and metal connector pieces (like the metal erector set pieces that I used--which are a rare find; however, at Lowes Home Improvement you can purchase similar metal pieces in their hardware section categorized under hardware designated for "Science Projects."). The tools I used are fairly common: hammers (one large & one small), an awl (for making starter holes for screws & nails), pliers (for opening jump rings & chain links), and screwdrivers (of various sizes depending on the type of screws that fit into your collected pieces).

After you have gutted your clock, I recommend cleaning it thoroughly before beginning to steampunk it. Murphy's oil is great for wood, soap & water, a wood-friendly scrub brush, & (if you are dealing with mold) rubber gloves & a protective mask. Once you have collected pieces that you would like to affix to your clock, I suggest laying everything out before beginning to screw & nail it in or sketching it out beforehand.

As a display, at RAW; Tulsa's Solstice event, it had the desired effect of drawing a lot of attention & foot traffic. In the home & at an event like this one, it certainly is a conversation piece.

Thank Yous Galore, I must take this moment to thank a fellow Make;Tulsan and graphic designer extraordinaire, Michael Chaplin, for helping me transport the grandfather clock to the show & back home again. Sadly, I was not able to affix the clock with teleportation capabilities (sigh, if only). Thanks to RAW; Tulsa for the opportunity to showcase my work, have professional photographs taken, & video--everyone was so nice & I had such an amazing night; Thanks to 33forty & their wonderful staff who helped me with lighting & moving furniture & last but not least, to all of you who came!

D.I.Y. Steampunk Flower Vase

D-I-Y-Samantha Extance1 Comment

Here is a simple & elegant way to steampunk your dinner table or wedding reception--a clock part vase!

Materials Needed: Bud vase (or any glass or metal vase that fits inside your clock's mechanism), flowers & clock (or machine) part.

1) Fit your bud vase inside of your clock mechanism. (If you want to conceal the vase, choose a metal one that blends in with your clock part's metal. Also for another variation, you can use test tubes too & fix them throughout your clock's mechanisms for a wilder, more overgrown look). Fill with water.

2) Arrange your flowers!

And for a completely different look for your wedding or dinner table, you can either make paper flowers or purchase beautiful fake bouquets and splay them across your clock mechanism.

As always, Happy Making!


Handmade Illumination: D.I.Y. Steampunk Candlestick Holder (3 ways)

D-I-Y-Samantha Extance2 Comments

These candlesticks are perfect for hosting an intimate dinner party for fantastical inventors, airship tinkerers, clockmakers' sons & daughters, and bicycle enthusiasts everywhere! D.I.Y.s and Materials needed for each candlestick are written below under their respective name. Before you begin, I would like to note that in each of these photos a tea candle is pictured. I did not have a candlestick on hand and so I substituted a tea candle for a candlestick in order to show each step completely. As always, happy making!

Atomventor's Candlestick Holder

Materials Needed:

Mason jar, medium sized bicycle gear (from a cassette), glass candlestick holder, a candlestick, and various odds & ends of your choosing to place inside your jar.

I used washers, springs, bicycle brakes, clock parts & gears.

A note on your mason jar & glass candlestick holder: These items must be able to stack inside one another. When purchasing your jar and candlestick holder, you should bring your bicycle gear with you to the store to ensure that you purchase the correct sizes.

Steps:

1) Fill your jar with your assorted odds & ends (also known bric-a-brac, couch treasure, & dumpster delights). Fill your jar about halfway.

2) Place your bicycle gear atop your jar. See also figures 2a & 2b below.

3) Place your glass candlestick holder on top of your bicycle gear. The candlestick I purchased (from Michaels) has a tiny "lip" on the bottom--this keeps the candlestick from falling off of the gear & sliding out.

4) Next, place your candlestick into the glass candlestick holder.

5) Enjoy your handmade illumination!

Simply Steampunk Candlestick Holder

Materials Needed:

Medium-sized bicycle gear, glass candlestick holder, and a candlestick.

A note on your glass candlestick holder: This item must be able to stack inside your gear. When purchasing your candlestick holder, you should bring your bicycle gear with you to the store to ensure that you purchase the correct size.

Steps:

1) Place your bicycle gear over your glass candlestick holder. You can see in figure 1a that the candlestick's "lip" keeps the gear in place.

2) Next, place your candlestick into the glass candlestick holder.

3) Enjoy your handmade illumination!

Simply Steampunk Easy Candlestick Holder

Materials Needed:

Medium-sized bicycle gear, glass candlestick holder, and a candlestick.

A note on your glass candlestick holder: This item must be able to stack inside your gear. When purchasing your candlestick holder, you should bring your bicycle gear with you to the store to ensure that you purchase the correct size.

Steps:

1) Place your bicycle gear on your table and then stack your glass candlestick holder on top of it. Again, the "lip" of teh candlestick holder keeps the gear in place & from sliding. See figure 1a.

2) Next, place your candlestick into the glass candlestick holder.

3) Enjoy your handmade illumination!

This D.I.Y. is versatile--once you have the materials you will be able to make each of these candlesticks. Since the candlesticks are made by stacking pieces into one another, you will also be able to change them to fit the mood or theme of your table setting.

Inspiration Begins at Home

InspirationSamantha Extance1 Comment

Happy New Year everyone! I would like to share a bit of my childhood home with you which I realized (over the holidays) is such a source of inspiration for my steampunk creations. So, welcome! One of the things everyone notices immediately is the vast number of antique sewing machines stashed in every corner of the house. I have never counted them, it would take a while, but my grams collects them. Some are encased in large, ornate wooden desks and others are tiny and fit on the fireplace mantle! Here is one of my favorite sewing machines--an 1882 Singer with gold embellishments. I grew up with the whirr of sewing machines and have (as some of you know from seeing it at Indie Emporium 2 years ago) an old Singer sewing machine of my own! Other antique sewing ephemera litter the house and among the most treasured are these crazy quilted pincushions (made by my mom).

In the living room hangs my mother's family crest (carved by my Uncle Jeff). The crest of the Crawfords--a shield with small trees (my family resided in Scotland and lived near the species of tree etched into the shield), a helmet, and adorned with looping scrolls. Below reads "Stant Innixa Deo," Latin for "They Stand Supported By God."

Upstairs you can find just as many old-world marvels, wooden ships, medicine jars, and water basins.

Scattered about the house are old clocks--ones whose chimes I can still hear if I close my eyes at the start of a new hour. Pictured left is a doll hand sewn by my mom. Her name is Cordelia, the Victorian Lady. She has a high collar and lace embellishments on her dress and a marvelous green sash. Her jet beads set of her jet hair amassed in a Gibson Girl bun atop her head.

The last treasure I will share with you is a painted picture of a ball. It rests in our living room. I can almost hear the rustling of the ladies' dresses as they are sashayed past by their beaus and the merry music of the orchestra.

These are just a few of the inspirations I have found around home. What are yours?