
Crossed off my crafty bucket list: make a book fort!
D-I-Y-
Halloween Costume DIY Round Up
D-I-Y-, UncategorizedCommentSteampunk Hallow's Eve Party~Decorations (Re-blogged)
D-I-Y-3 CommentsHaving a Halloween party? Want to Steampunk it up? Here are a few ideas that won't break your wallet (gotta have money for all that candy right?)! Jars of candy are a given for any Halloween party--to add just a touch of mystery & oddness you can attach labels like the one below from VectoriaDesigns. They are much classier than your average Halloween labels, indicating the jar's contents are brains, zombie boogers, blood, etc. VectoriaDesign's labels, for instance, help set a Steampunk/Sci-Fi mood with labels like: Anti-Time Tablets, Steam Engine Oil, Octopus Ink, and my favorite Time Traveler Pills to name a few.

The labels are a digital download. Total cost: $3.50 label images (15 total), $11.99 label printer paper...$15.49
Another great digital downloadable decoration for your party are Victorian style paper dolls with a Halloween & Steampunk twist. My favorite paper doll artist is RhondasOrignials. Her dolls are by far the most unique and strikingly odd. She has over 50 paper dolls for Halloween alone. These dolls make excellent centerpieces for your table or to fill up empty space on your mantle or shelves.

What makes Rhonda's paper dolls so special is the accessories that come with each doll and the characters that she creates. You can download her dolls on her Etsy shop, click here to follow the link. Rhonda also has specials where she bundles a number of her dolls together for Halloween. The bundle costs $23.25 or you can purchase individual doll patterns for $6.00 each. The instructions on how to assemble your dolls is very easy to follow and the colors are true to how they print on your home printer. Total Cost: (for a bundle) $23.25, brads (found in your local arts & crafts store in the scrapbooking aisle) $1.39, Aleene's Tacky Glue $2.50...$27.14
Aside from digital downloads, hit your local flea markets, garage sales, and estate sales for old jars & bottles. You can fill these bottles & jars with an assortment of items to fit the mood of your party. Inkling for a bit of twisted romance, dry some red roses beforehand and place them in your jars for a pretty bit of decay to display or paint them black (how very Alice in Wonderland of you to do so!). Want your party to look like a Mad Scientists Laboratory, fill those jars up with an assortment of colored liquids & place glow sticks inside so that they give off an eerie luminescence. There's also my DIY on steampunk candles--they're perfect for a Hallow's Eve Bash!

There are other items you can make to give your party a steampunk feel. Craft recently posted a DIY on how to make your own miniature hot air balloon.

You can suspend them from the ceiling to give your party-goers the feeling that they are on an airship deck among the clouds--you can even make clouds! Click here to find out how!

If you do not have a specific steampunk theme in mind, you can be more general and decorate using broken machines, machine parts, clocks, and other mechanicals you may already have or ones that you can thrift. Great items to pick up: tea cups & saucers, china, clocks of any kind (you can line them all up on your mantle, table, or along your stairs), jars of light bulbs, globes or old maps, or springs (to make a garland to hang in your doorway or off your fire place).
These are just a few ideas to get you started! Stay tuned for the rest of October for my Steampunk Halloween DIY series and get ideas on steampunkins and how to make your own steampunk halloween costumes for adults & kids.
Update an Old Pair of Gloves
D-I-Y-CommentWith Halloween coming up soon, I've been dreaming up new steampunk costume DIYS. The easiest way to create a Halloween costume is to simply update an older one. Many costumes include a pair of gloves. Gloves are a versatile accessory and easily updated. Here's what you'll need: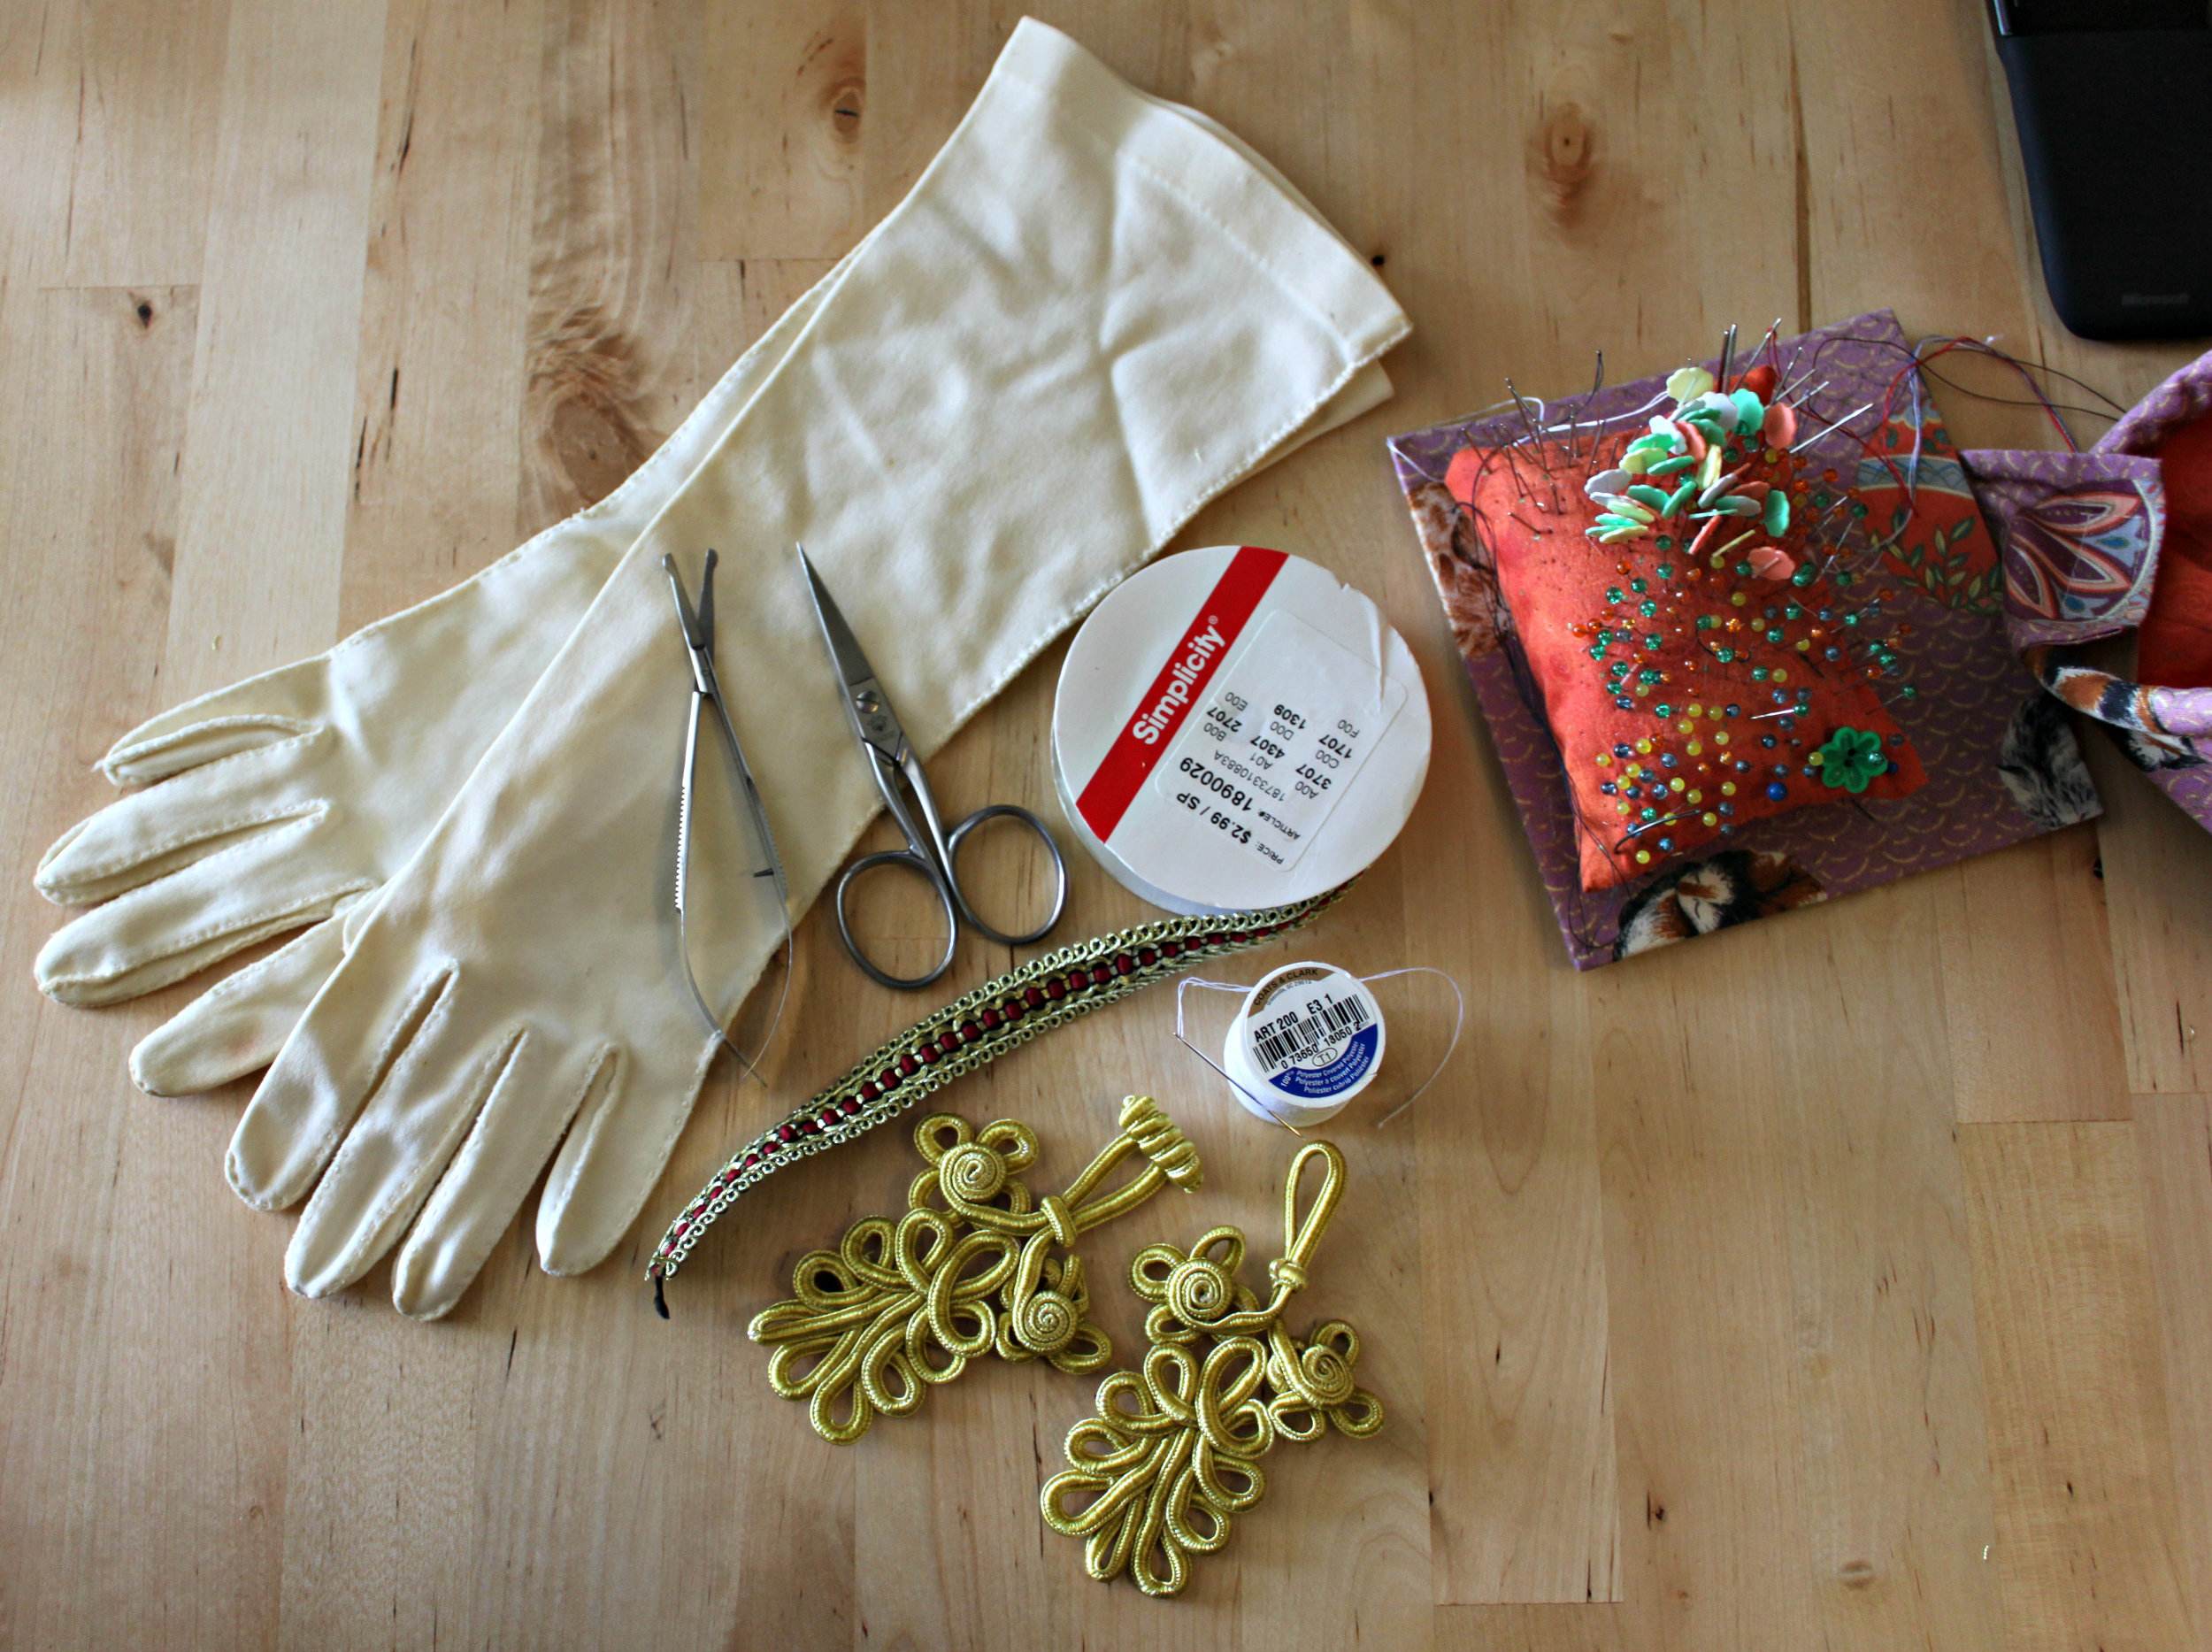
- Pair of gloves
- Scissors
- Needle & Thread (the thread should match the color of your gloves)
- Pins
- Decorative ribbon (I purchased mine from JoAnn's for just $2.99)
- Embroidered Ribbon Clothing Toggle (you can find these in any sewing or fabric store in the belt & fasteners aisle)
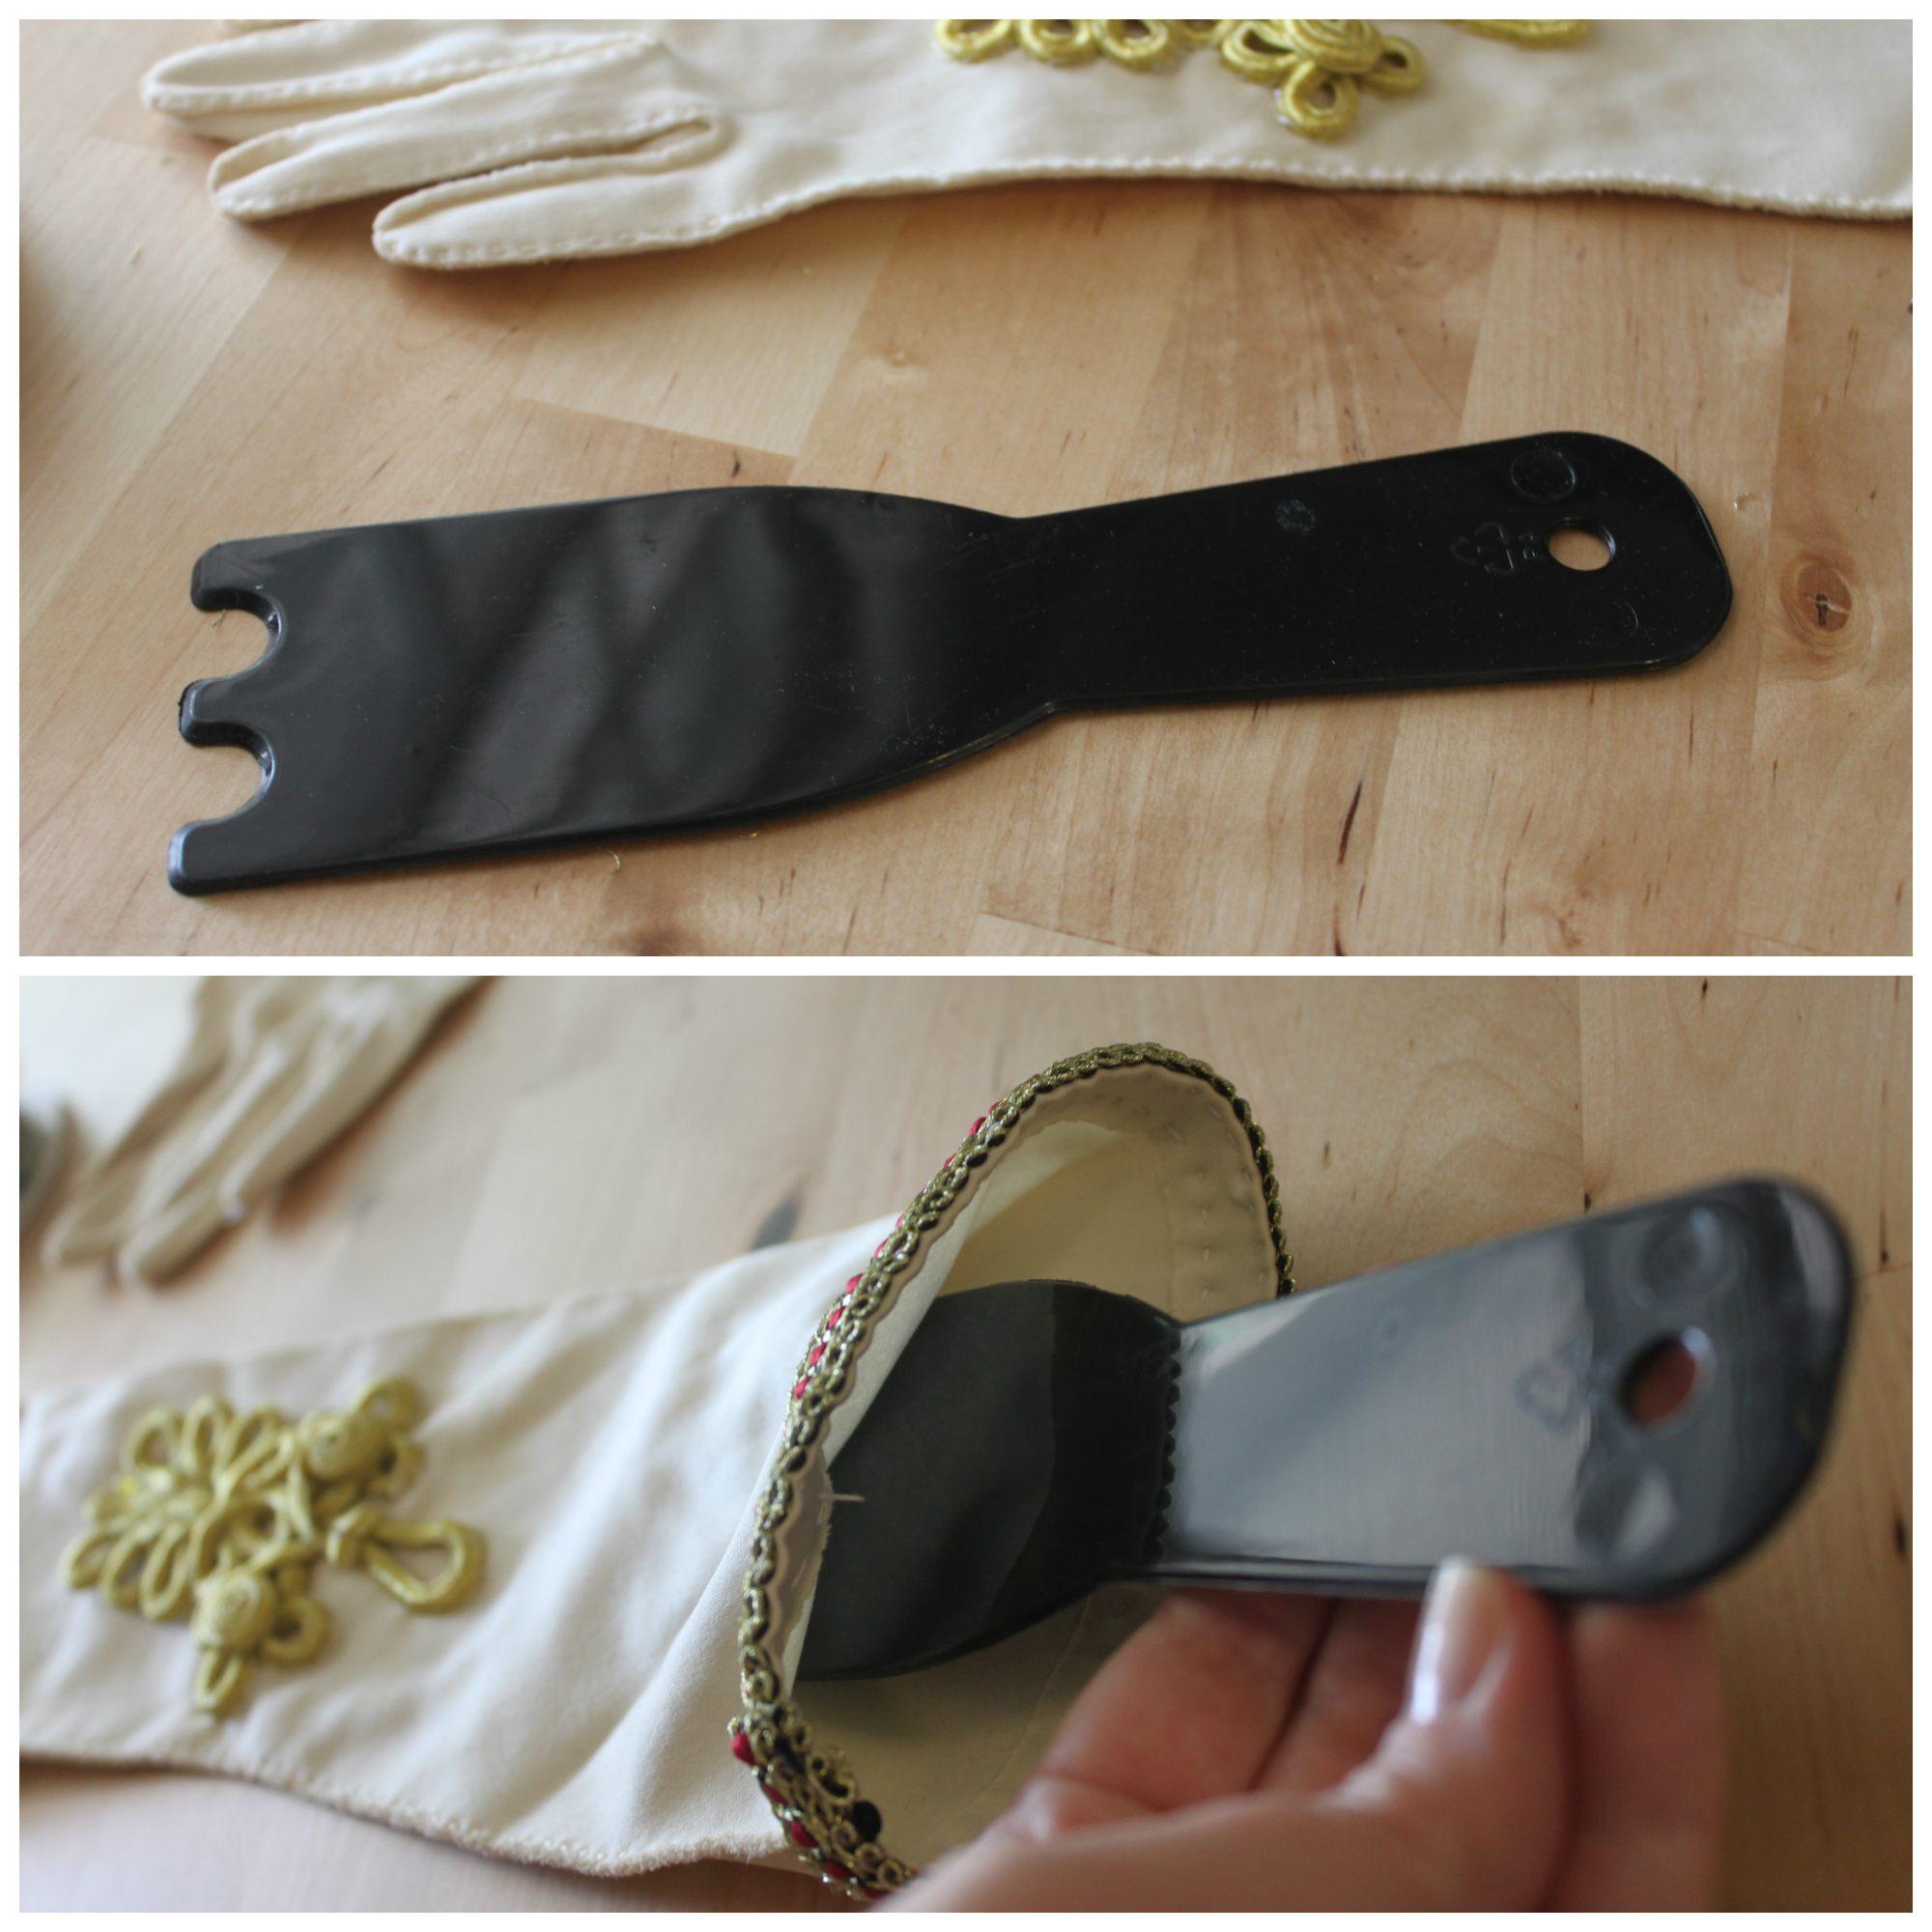
- Piece of plastic that fits inside your gloves (You may need to get creative with this supply--I used a kitchen utensil. You want something that will fit inside your glove & is preferably plastic so that you don't sew through both sides of your glove when attaching the clothing toggle. Plastic is smooth and so your needle will slide once it hits it)
Steps:
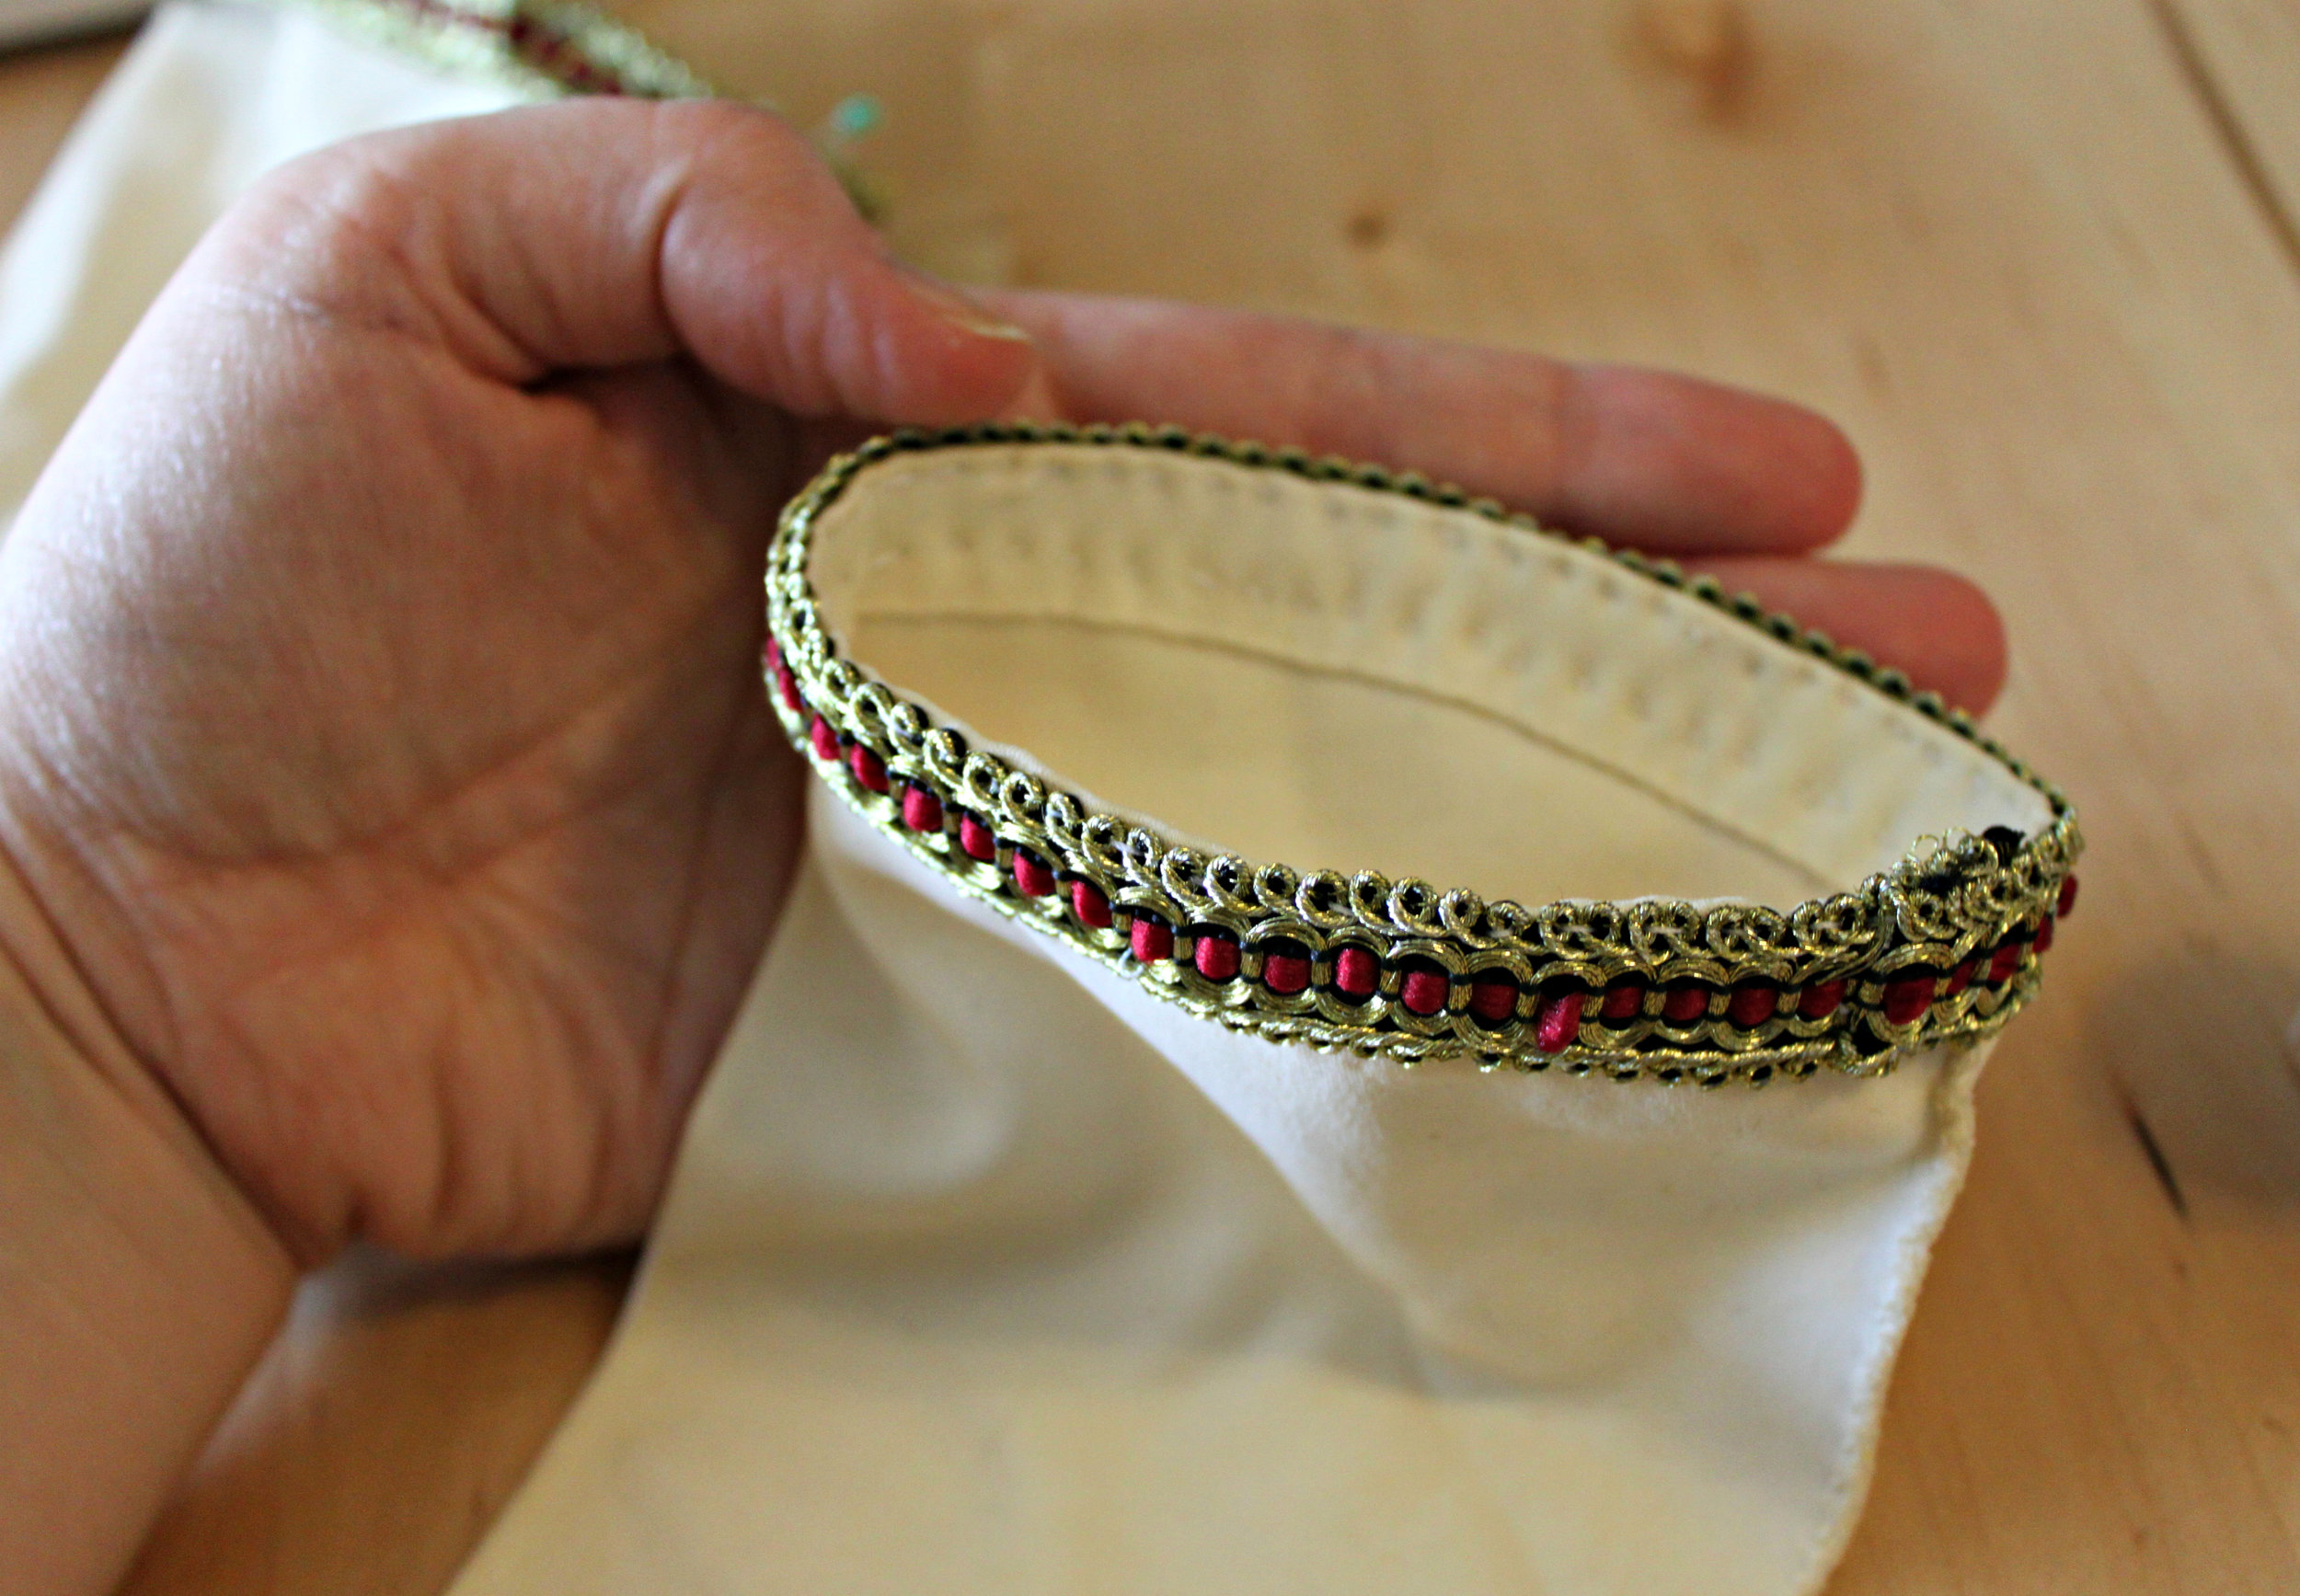
- Begin by pinning your decorative ribbon in place. To ensure that you place your ribbon evenly, line up the edge of your ribbon with the edge of your glove. Also, to hide your seam, begin pinning your ribbon on the part of the glove that will be closest to your body. Leave 1/4 inch of extra ribbon at the end. Fold this extra 1/4 inch of ribbon under & be sure that it covers up any raw edges. Pin in place.

- Using your needle & thread, sew your ribbon onto your glove. Any style of stitch will do. Be sure to keep your stitches neat & even. (Also, try to hide your stitches in the pattern of your ribbon or use a matching thread.) Remove the pins as you go.

- Repeat Steps 1 & 2 for the other glove.
- Next, put on the glove and determine where you would like to place your embroidered ribbon clothing toggle piece. (Do not pin the piece in place while you are wearing the glove...unless of course you want the Halloween gore to be real.)
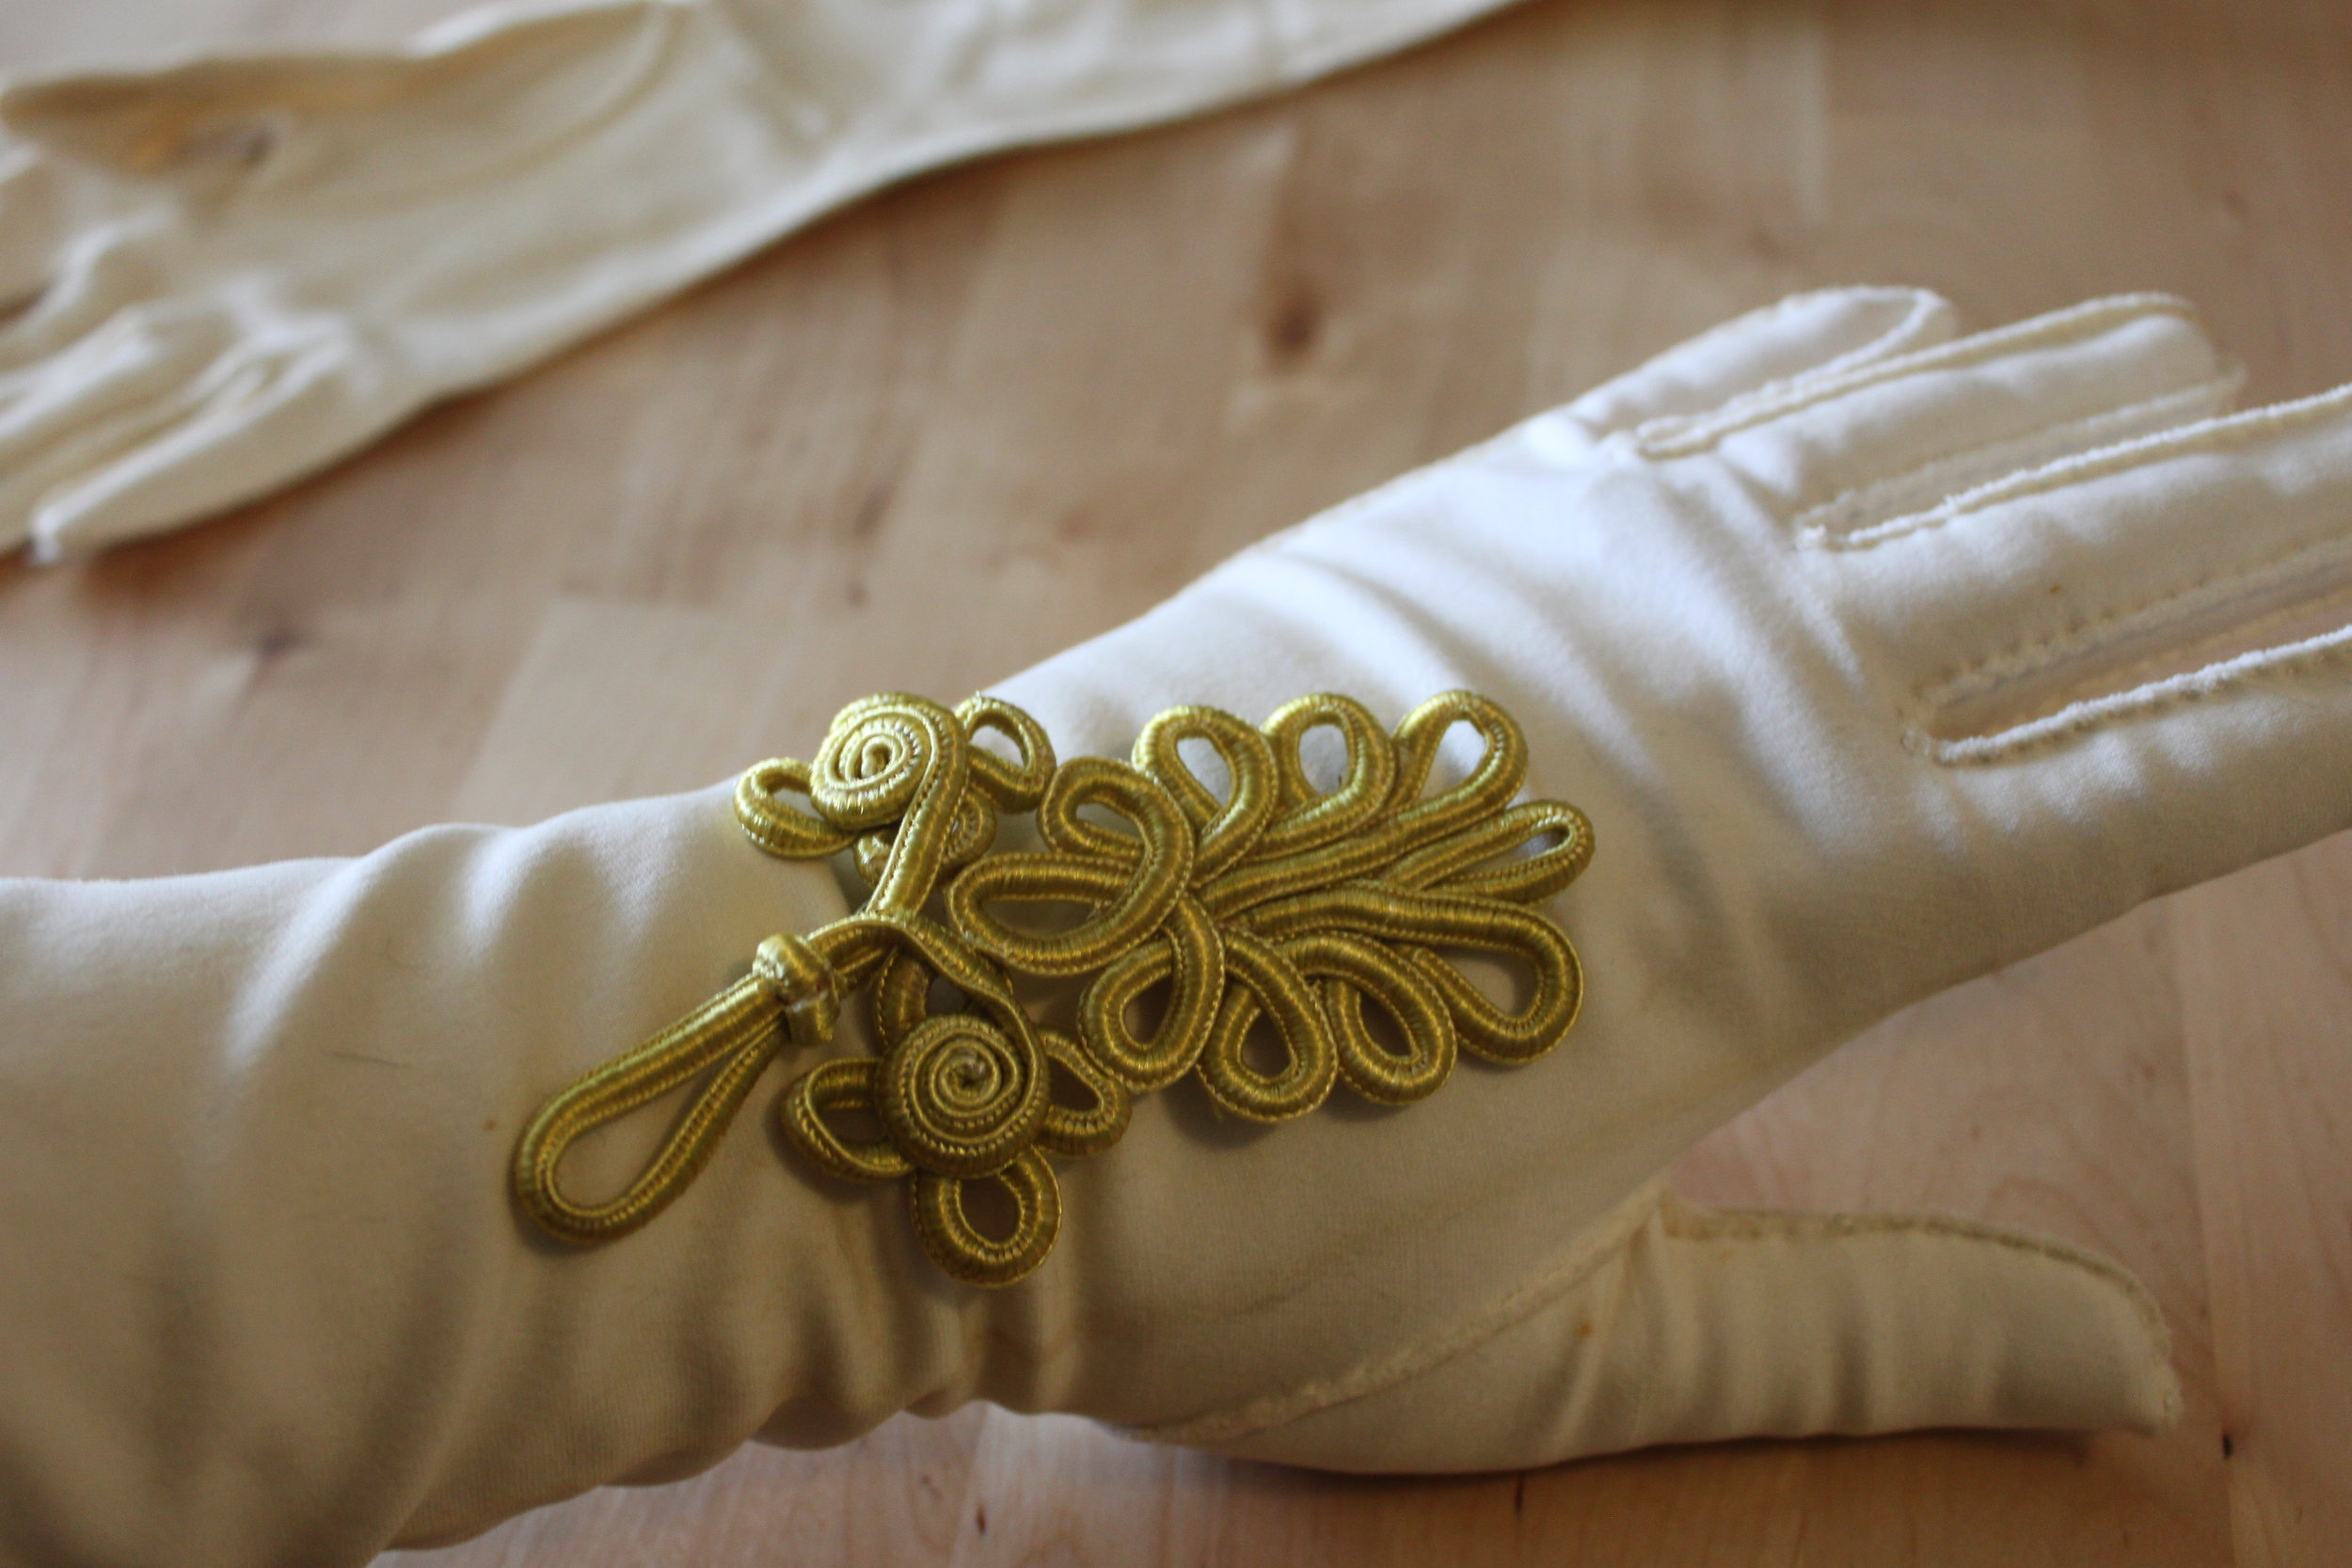
- After removing the glove, pin the toggle piece in place.
- Before sewing, insert the piece of plastic into your glove. This will ensure that you do not sew your glove shut/together.
- Using your needle & thread, sew your toggle piece to your glove. The best stitches to use are: slip stitch, blanket stitch, or an oversewing stitch.

- Repeat Steps 4-7 for the other glove.

- Now your gloves are like new! Hope they'll keep you warm & feeling fancy this Halloween!

As always, Merry Making! Check back again soon for more Steampunk Halloween Costume DIYS--I have 3 already in the works on how to steampunk a mask! 
Carve Your Own Steampunkins! (Re-blogged)
D-I-Y-1 CommentAs promised, here are a few ideas & DIYs (3 different DIYS) on how to Steampunk your Pumpkin this Halloween! Happy Carving! 1) Kid Friendly Steampunkins, or the "Mr. Potato Head" Approach
What You'll Need:
- Pumpkin Carving Tools (You can purchase a kit or gather up the following: A large knife, paring knife, toothpicks, a corn-on-the-cob utensil (optional but it makes poking holes so much easier), small & large metal spoons, newspaper or trash bags to protect your table from all the pumpkin guts, and a bucket or big pot lined with a trash bag for pumpkin guts & seeds)
- 2 gears, or as many as you prefer your pumpkin can have many cog & gear eyeballs (salvaged is preferable but if you cannot find any you can purchase reproduction gears from Michaels. Just look for the "Industrial Chic" or "Found Objects" items).
- 3 springs (use 5-6 springs if you have a large pumpkin)
- Accessories, goggles, a top hat, a monocle, pocketwatch, eyepatch--get creative! Create your very own Steampunk Pumpkin Character!
Steps:
- (For adults only) Carve a lid, scoop out the pumpkin guts, and poke starter holes where the gear eyes & spring mouth will be inserted. The holes for the spring-mouth should be relatively small because your springs will be held in place by 2 toothpicks (as shown below). The toothpicks should stick out approximately 1/2-1 inch.

- (For kids) Stick the eyeball gears into their pumpkin sockets and give that steampunkin the ghoulish grin it's been waiting for! Link the springs and place them on the toothpicks.
- (For kids) Last but not least, dress up your pumpkin with a pair of googles & a hat, an eyepatch, or a monocle on chain! Whatever your heart desires!


2) Painting on the Punk! Another kid friendly approach to pumpkin decorating!
What You'll Need:
- Various Acrylic Paints (any colors you choose. I like black, white, red, & metallics)
- Paintbrushes (or various sizes, at least 1 small paintbrush for details & 1 large brush)
- Water & Jar & Paper plate (or cardboard) for mixing your paints
Steps:
- Paint some Steampunk scenes, objects, or faces onto your pumpkins!
- (Option 2 for tiny tinker-tykes ) Cut out some gear shapes or pocketwatch shapes from some sponges & give them to your tyke to dip in paint and place on their pumpkin! Download a template for gears below!
3) Classic Carving & Pumpkin Poking
What You'll Need:
- Pumpkin Carving Tools (You can purchase a kit or gather up the following: A large knife, paring knife, toothpicks, a corn-on-the-cob utensil (optional but it makes poking holes so much easier), small & large metal spoons, newspaper or trash bags to protect your table from all the pumpkin guts, and a bucket or big pot lined with a trash bag for pumpkin guts & seeds)
- Template or Design, to trace or draw freehand on your pumpkin (you can download Steampunk ones here)
- Tea candle (I prefer electric, but that's up to you!)
Steps (for tracing your design):
- Carve a lid & scoop out the pumpkin guts.
- Next, place your design over your pumpkin and trace using your special pumpkin poking tool (in your kit). I used a corn-on-the-cob utensil instead. It worked really well and had the added benefit of creating 2 holes instead of just one per punch so I was finished poking holes a lot sooner.
- Once you're done tracing your design, place your tea candle inside and affix your lid! Enjoy your steampunkin's ghoulish glow!

Steps (for carving your design):
- Carve a lid & scoop out the pumpkin guts.
- Next, free hand sketch the design or template of your choice onto your pumpkin. I recommend using a pencil as pen can smudge and show on the skin.
- Carve out your design!
- Once you're done carving, place your tea candle inside and affix your lid. Enjoy your steampunkin's eerie luminescence!

Templates: (Free to download, my gift to you! Happy Halloween!)
- To download Gears, click Steampunkins Template--Gears
- To download Bohemian Romance's Silhouette, click Steampunkin Template--BohemianRomanceSilhouette
- To download a Lady Promenading with a Parasol, click Steampunkin Template--LadywithParasol
- To download "Happy Halloween" (in Gear Letters), click Steampumpkin Template--Happy Halloween in Gear Letters
Don't forget to post pictures of your steampunkins! I'd love to see 'em! Happy Carving!
DIY Steampunk Monocle Bowler
D-I-Y-CommentA fun DIY for Halloween! Great for a steampunk Sherlock Holmes or Watson!
 This DIY is relatively simple though it can be expensive (if you can't find a bowler for cheap). Here's what you'll need:
Bowler hat (preferably thrifted); Thick Chain (I used 4 inches); Safety Pin; Needle & Thread; Ribbon (mine was ribbon made to look like measuring tape); Small leather pouch; Magnifying glass; Game Spinner; Clock Gear; Jumps Rings; Pliers; Scissors, an Awl; Pins; and a medium Bike Gear (from a cassette)
Steps:
- Measure the amount of ribbon you'll need to fit snugly around the base of your bowler hat. Be sure to leave at least a 1/2 inch on each side to fold over your bike gear. Once you've measured the amount of ribbon you'll need, cut it. Set aside.
- Pick up your leather pouch, using your scissors (or an exacto knife), cut 2 slits on the back of your pouch (about 1/4 inch from one another in the same direction--either horizontally or vertically), then thread your ribbon through the slits. Next, using your awl, poke a hole in the front of your leather pouch (so that you can affix your chain to the pouch with a jump ring). Using your flat nosed pliers, attach the chain and the magnifying glass with a jump ring. Optional, also add a game spinner and a clock gear with jump rings for further decoration.

- Next, thread your ribbon (with the right side facing up) through your bike gear's holes on one side. Pin in place. Hold your bike gear in place (where you want it situated on your bowler hat and then wrap the ribbon around the base of your hat. Thread the end of the ribbon through the bike gear and pin in place. When you are pinning your ribbon, be sure that you are only pinning the ribbon together and not the ribbon to the hat.

- Next, slide the ribbon off of the base of your bowler hat and sew the ribbon in place. Keep your stitches small and close together. Be sure to tie a sturdy knot and hide that knot on the side of the ribbon that will go against your hat (and therefore not be seen). Cut off any excess ribbon in the back. Repeat for the other side.
- Slide your ribbon down onto your bowler hat in place around the base. Place the magnifying glass inside the leather pouch and see how far the chain dangles off of the hat's brim. If desired, using your safety pin, pin the chain to the opposite side of your bowler hat's brim until you want to use the "monocle"/magnifying glass.

- Wear proudly!
 As always, happy crafting!


DIY Steampunk Medals
D-I-Y-1 Comment Make your own steampunk medal! A perfect, easy addition to any Halloween costume!
Materials & Tools Needed:
Make your own steampunk medal! A perfect, easy addition to any Halloween costume!
Materials & Tools Needed:
- Medal Ribbon (any length you desire)
- Bicycle Gear (from a cassette)
- Pocketwatch part (preferably one of the cover pieces which are more ornamental)
- Pin
- Safety pin
- EE3000 or 5000 glue
- Needle & Thread (if you prefer to hand sew) or Sewing Machine (which I'd suggest)
- Scissors
Steps:
- Cut ribbon for the medal.
- Place your bike gear in the middle of your ribbon.
- Grab your pocketwatch part (the piece I used is the cover which you can detach by removing the hinge pin which attaches the cover to the rest of the watch).
- Glue a pin to the back of your pocketwatch part with EE3000 or 5000 (or another kind of glue that fuses to metal).
- Fold your ribbon (lining up the 2 ends evenly).
- Fold over the top of your ribbon (toward the back side of your medal ribbon). Place your safety pin inside the fold.
- Sew (by either hand stitching or machine sewing) along your fold. Be sure to stitch and back stitch if you are using a sewing machine.
- Cut off the excess thread.
- Pin your pocketwatch part to the front of your ribbon.
You're finished! Wear with pride!
DIY Steampunk Gun Holster
D-I-Y-1 CommentFor those who know me, my fetish for hip holsters (regardless of who's wearing them--men & women alike are somehow more attractive to me with a hip holster strapped around their waist & leg-I blame Han Solo for this) but I digress. I've always wanted a hip holster and this Halloween I was determined to steampunk one of my very own.
 Steampunking on a budget can be tricky and oftentimes we have to sacrifice quality for fit. I found a really great holster for 9.99 at a local Halloween store. It was imitation leather, but that worked to my advantage. I was able to easily manipulate the fabric and sew on accessories.
  So let's get started! Here's what you'll need:
- Imitation leather gun holster (sourced from your local Halloween store; mine is a kid's Indiana Jones holster--very appropriate, since I seriously love both Solo & Dr. Jones!) Mine came with a gun too; if yours does not, then you will need to purchase a toy gun. Water guns make excellent steampunk guns when painted. Here is a DIY that I love on steampunking toy guns.
- Needle & Heavy thread (to match your leather and preferably, the kind used for coats)
- Long Springs (upcycled from a local flea market)--You can substitute any straight metal material here: wire, typewriter keys, or even chain
- Medium Grandfather clock gear (or reproduction gear)
- 2 large jump rings (and flat nosed pliers)
- 15-20 small Clothing Snaps (sourced from flea markets, but you can also go to any Fabric or Sewing store)--Mine are black, but you can also use silver
- 1 large Clothing Snap (optional)--I used mine to disguise the modern plastic snap on my holster. You could also substitute an ornate button here if you wish
- 1 Long metal pin (optional)--This gives your holster a little feminine flair. Choose any pin or brooch you like.
Steps:
- Before sewing, lay out your springs on your holster & figure out their placement. I wanted mine to create a striped pattern so I spaced them a 1/4 inch apart. Once you've got all of your springs placed, sew your springs onto your holster. Be sure to tie sturdy knots & cut off any excess thread. Hide all of your knots on the inside of your holster.
 (Side note: I wanted one of my springs to curve a bit, and so I placed a couple of stitches in the middle of the spring so that it would keep a curved shape.)
- Place your pin above your springs. A large, long pin works best because it covers the tops of your springs.


- Next, sew on your clothing snaps. Sew them in a pattern that you like. I alternated larger & smaller clothing snaps for a more textured look.


- If desired, sew on your large sewing snap or button (over the holster's plastic snap to hide it). This step is optional.

- Last, using your flat nosed pliers--attach your gear to your pin with your 2 jump rings.

 Now hook to your belt & rustle up some trouble like the airship cowgirl (or cowboy) you are!


 Have a Happy Halloween everyone!
DIY Steampunk Halloween Candelabra
D-I-Y-CommentI love Halloween! It's a great excuse to go over-the-top and get a little campy. This year I made a cool Steampunk Candelabra that you could easily make for yourself. It's easy to make, relatively inexpensive (if you're making only one), and you can use either re-purposed materials or reproduction materials and the outcome is still impressively spooky! Perfect for any Halloween decor!
Materials & Tools:
- 2 bike gears, cleaned (free)
- 1 candelabra (I purchased mine from Michaels for 24.99)
- 2 skeleton keys (mine are fake metal keys, also purchased from Michaels in the dollar section: 4.00)
- Chain (1 pkg., 2.99)
- 4 large swivel hooks (1 pkg. of 4, 1.99) *Be sure to purchase hooks that are: easy to open (like a partial split ring) and large enough to fit around your candelabra's arm with enough space leftover to dangle your skeleton key comfortably
- Ideology brand reproduction gears (2 pkgs., 4.99 ea.)
- Jump rings
- 4 candlesticks (1.00 ea.)
- Wire cutters
- Flat nosed pliers
Note on the materials: You can use actual gears & keys that your re-purpose, but for those looking for a cheaper version reproduction gears & keys are fine too.
Steps:
- Measure the amount of chain you need by taking a piece of string and configuring it to hang in between your candelabra's arms. Keep in mind how far down you'd like your chain to hang. Cut and then measure against a ruler. You may even want to bring the piece of string with you to the store to purchase your chain.
- Cut your chain pieces using your wire cutters. You want 4 total.
- Once you've cut your chain, decorate it with your gears. To fasten a gear to a chain link, use your flat nosed pliers. Open a jump ring, load the gear onto it, and then load the chain link onto the jump ring. Close your jump ring. Do the "shake test" to make sure your jump ring is firmly closed. Repeat for all chain pieces. (I put 6 gears on each chain piece.) Once you are finished, set your chain links aside.

- Next, attach your large swivel hooks onto your candelabra's arms.

- After all of your hooks are in place, load your skeleton keys onto your swivel hooks.

- Once your keys are in place, attach your decorated chain pieces to the swivel hook with a jump ring. You are connecting your chain to one hook as well as the hook across from it. Repeat for each chain piece.

- Next, place your bike gears onto your candelabra. Mine fit comfortably over the middle candelabra arm and pedestal. Place yours where you like.


- Last, affix your candlesticks in their holders.


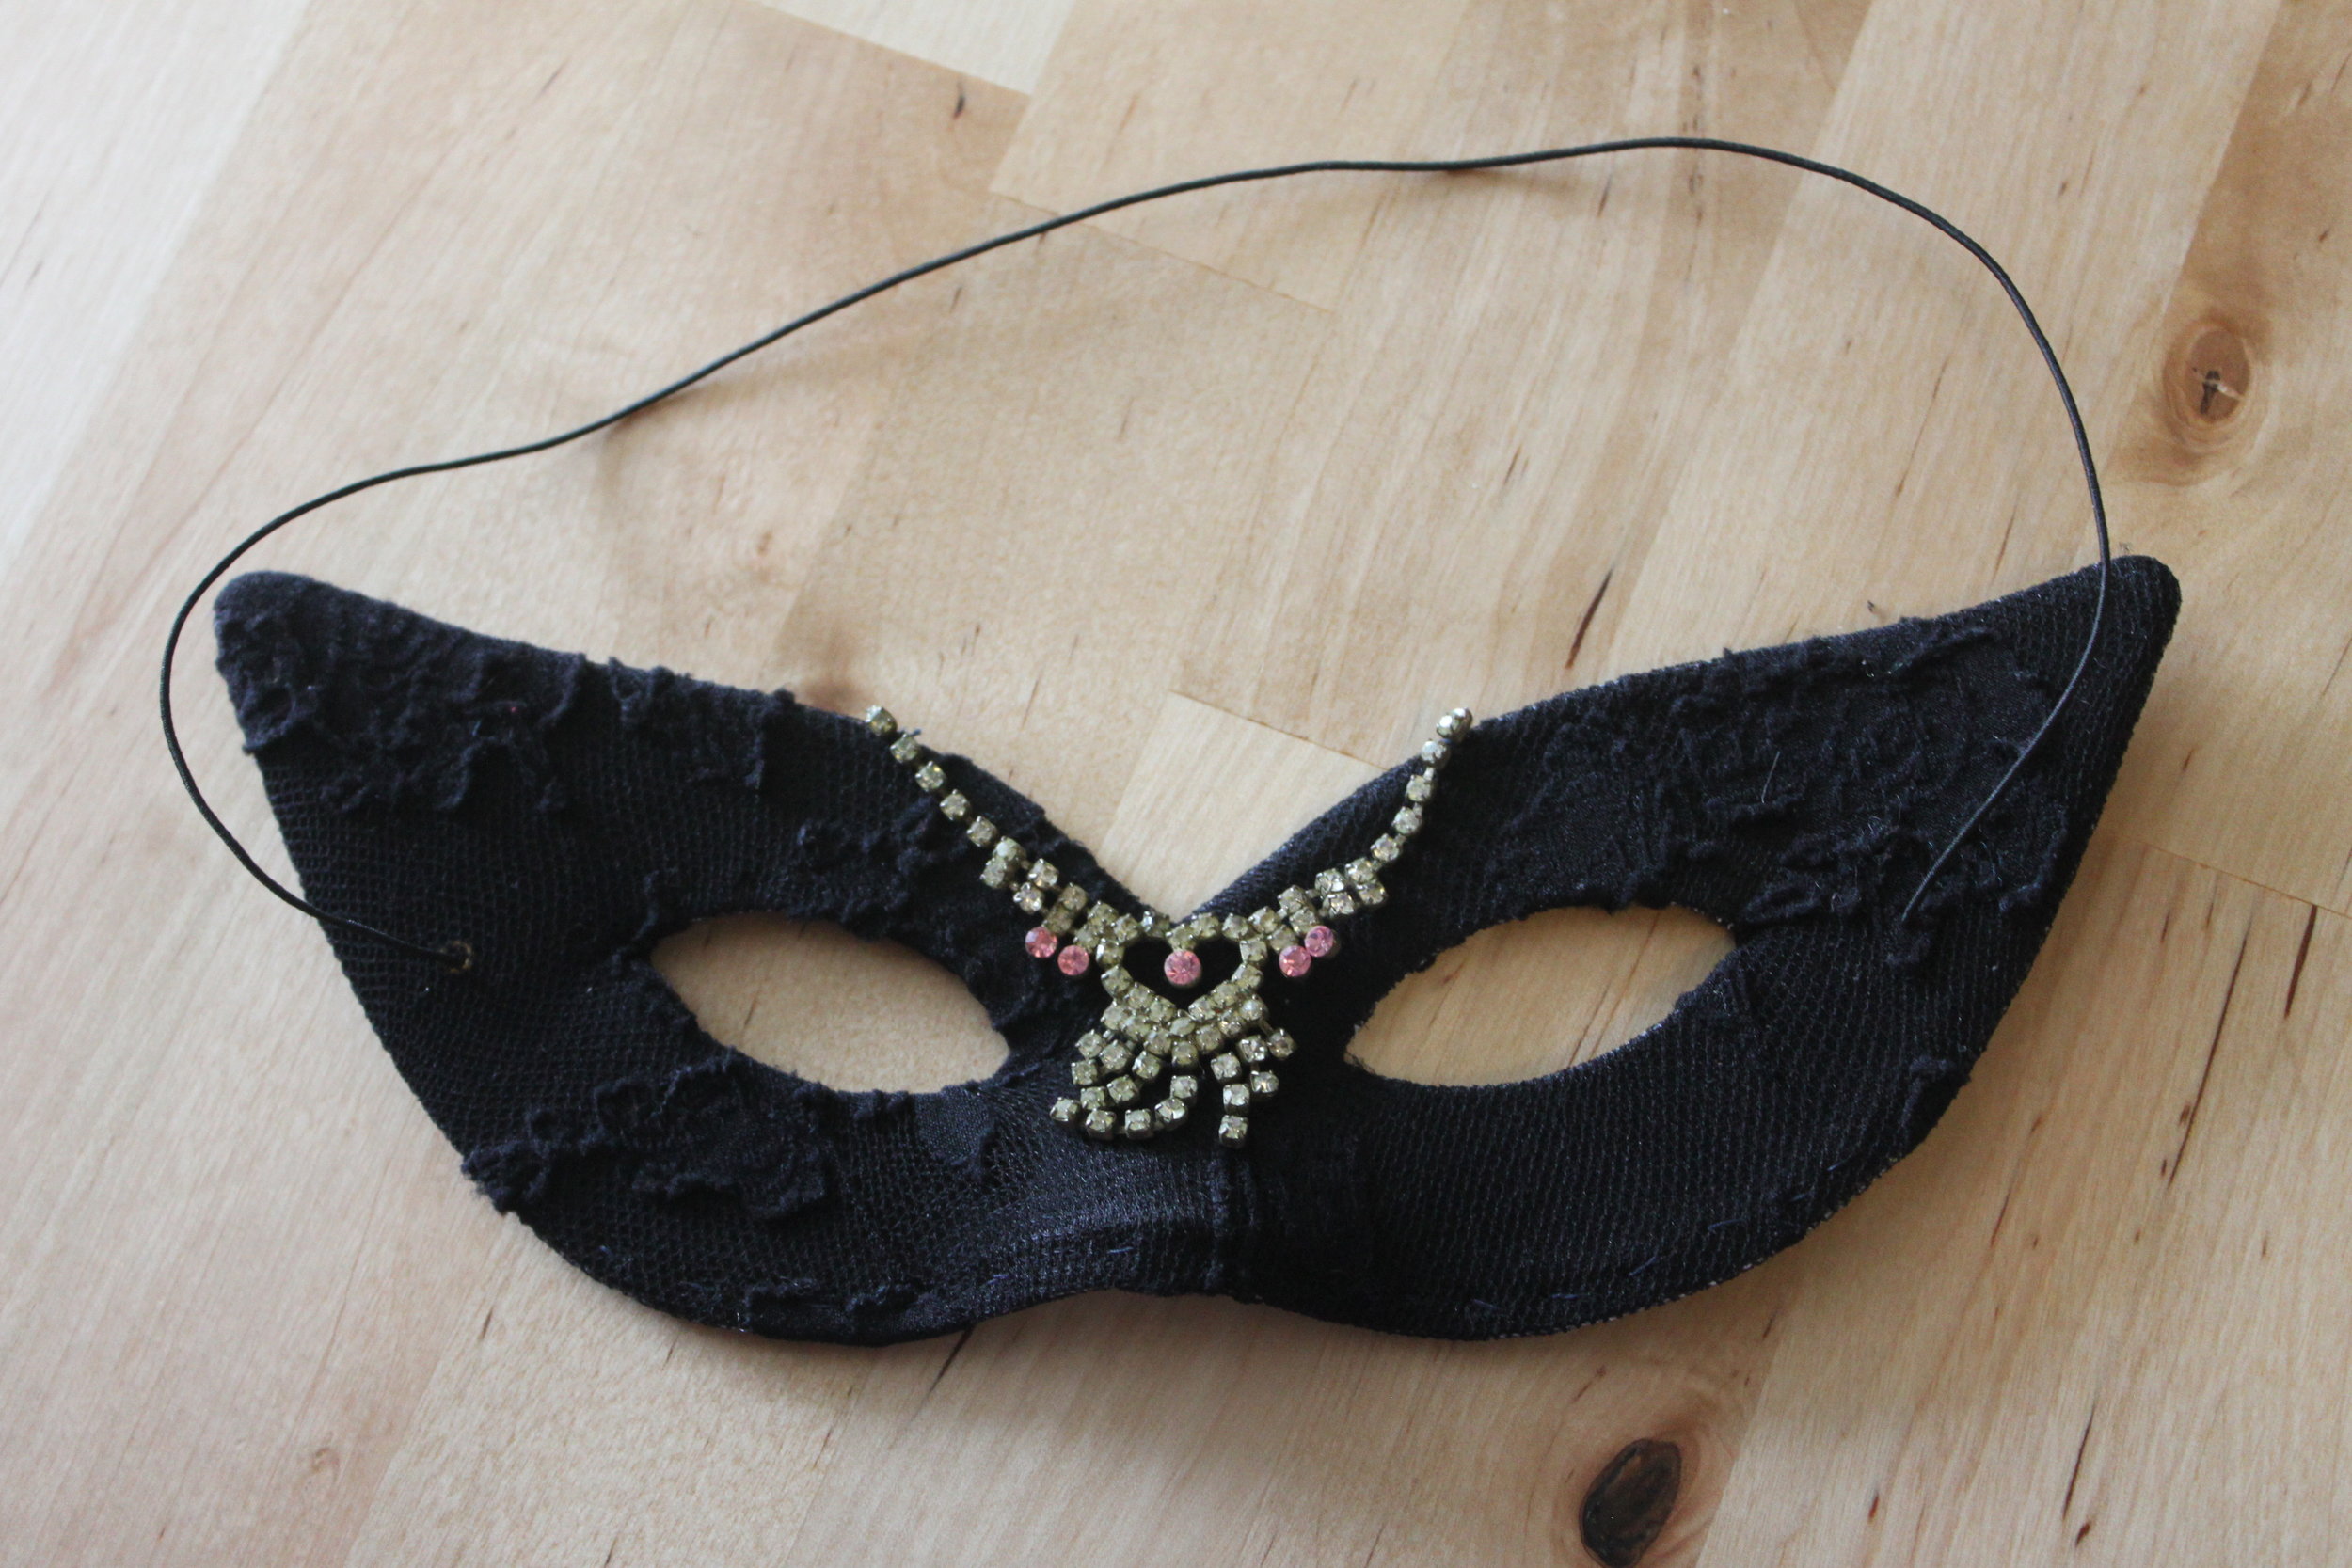
DIY Halloween Mask
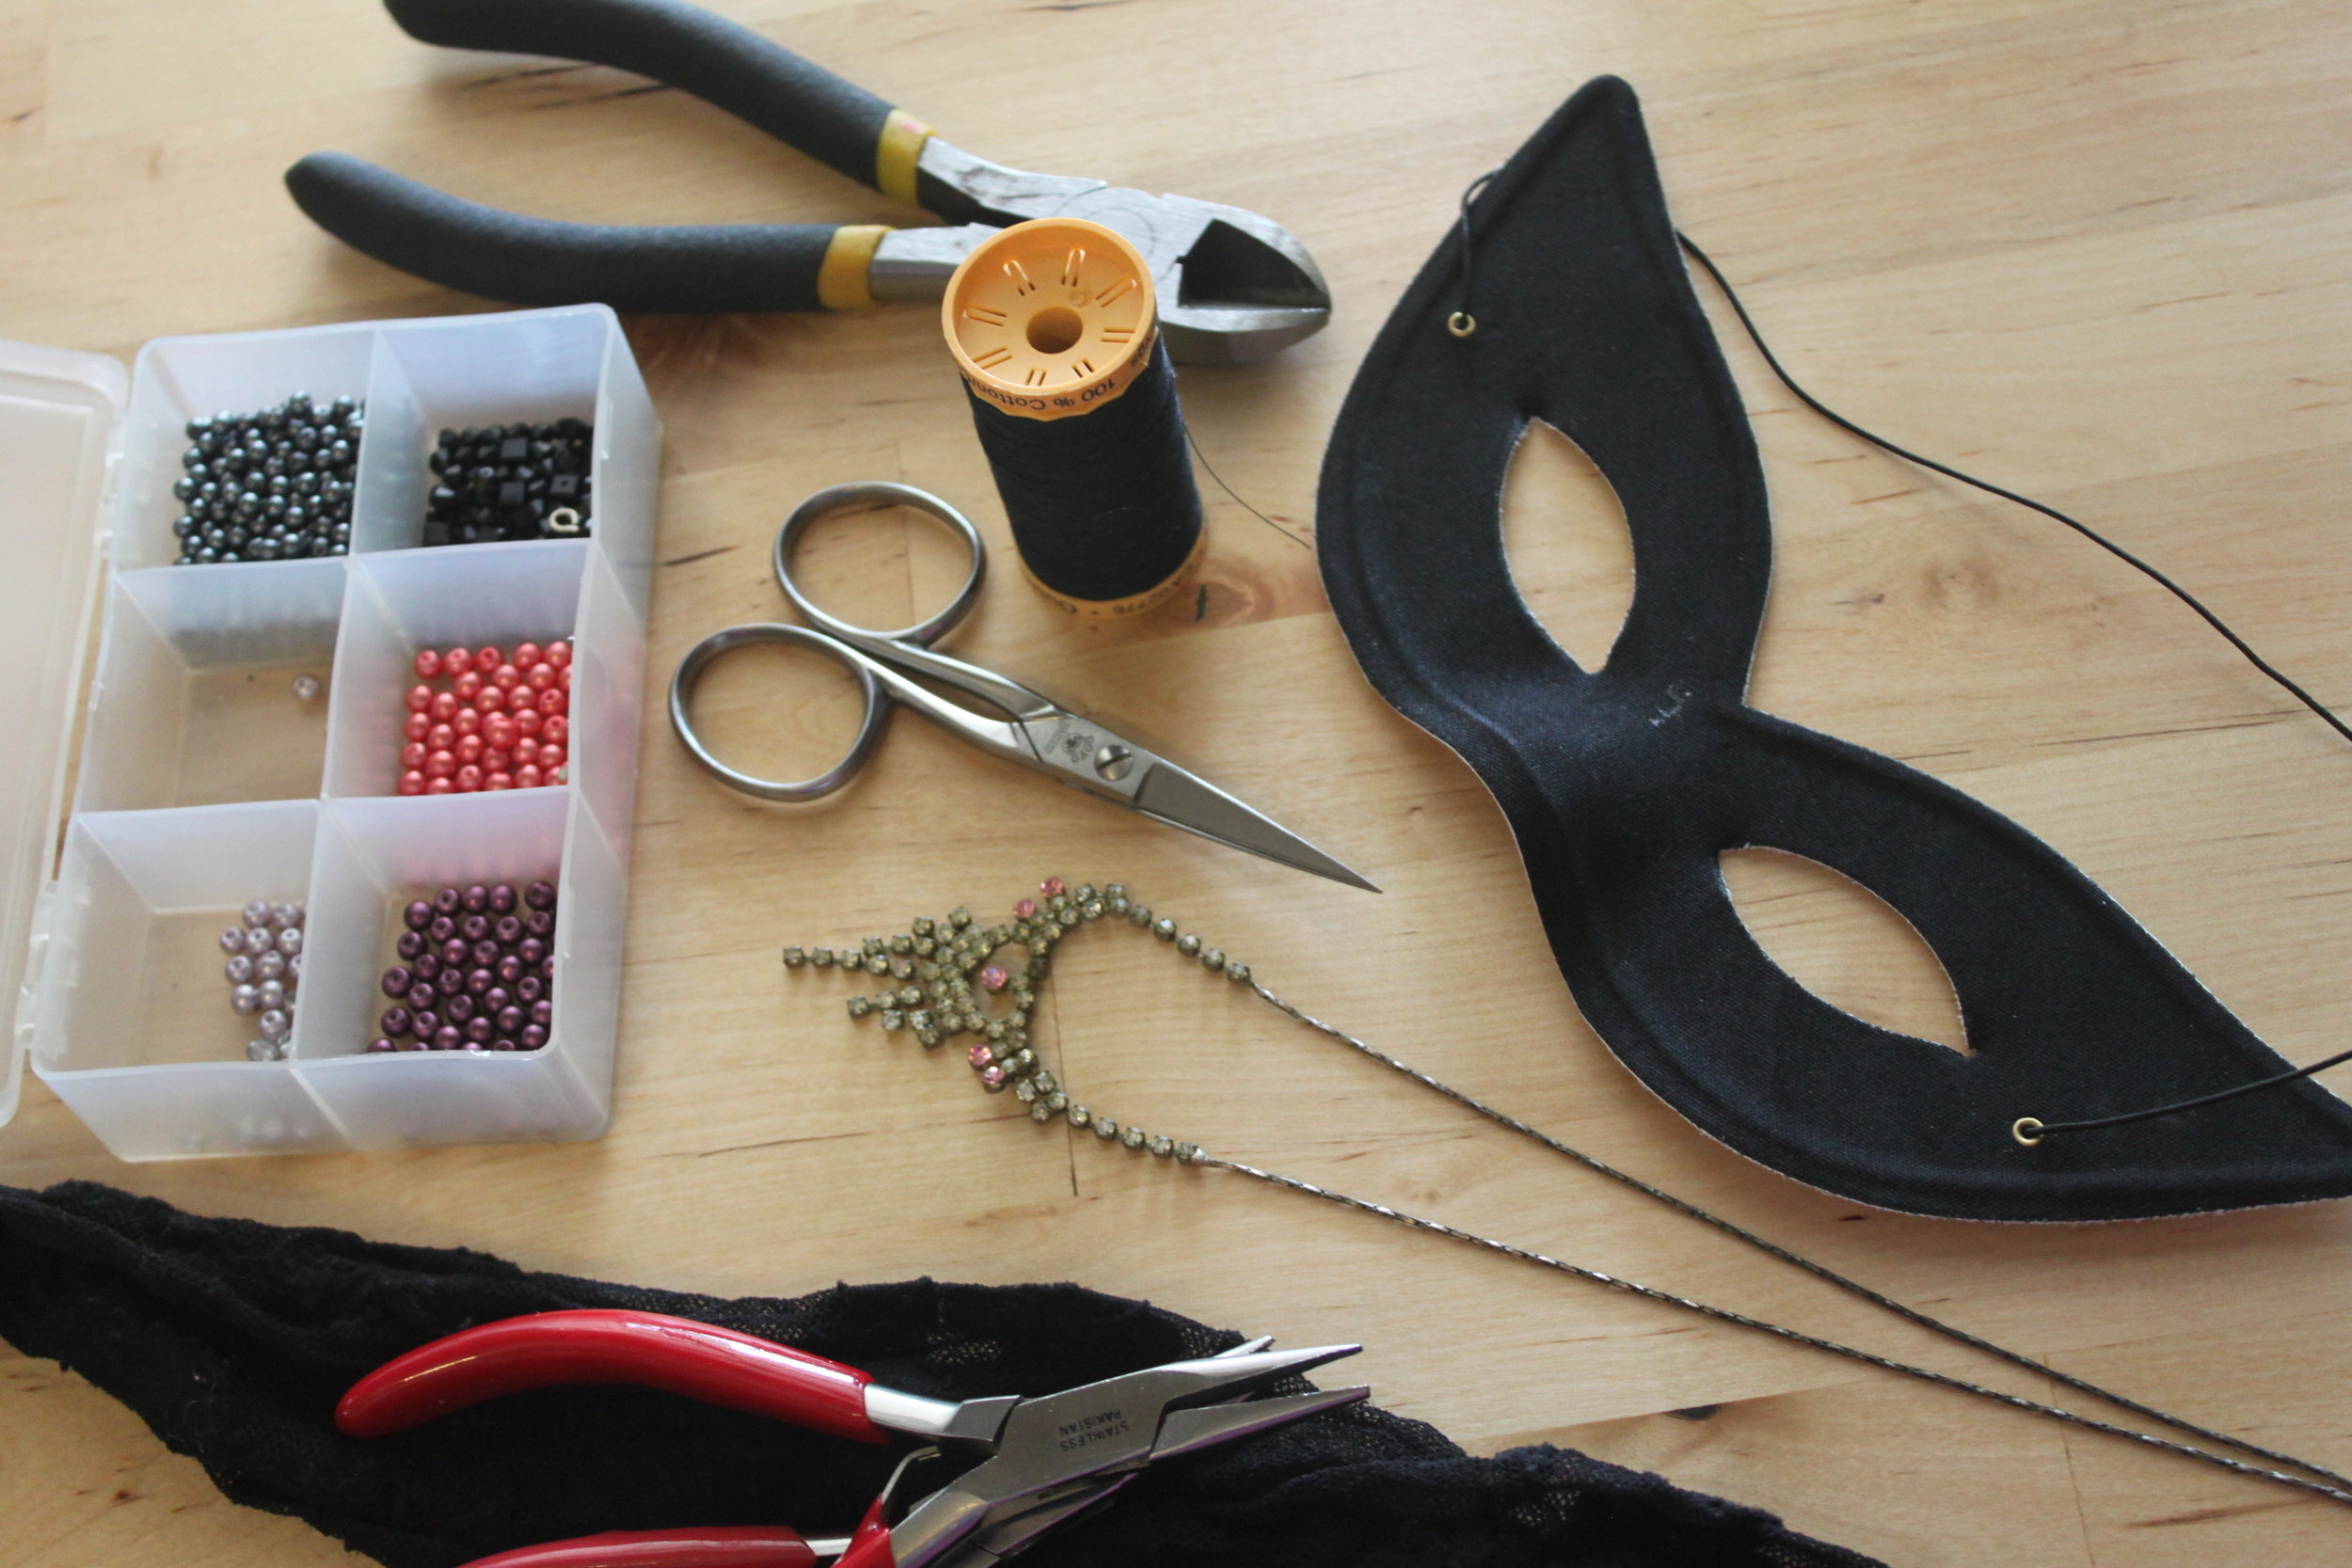
D-I-Y-CommentI love Halloween! I look forward to it every year because it is such a source of creative energy. Perhaps that is because Halloween is more transparently handmade. Here is the first of 3 Halloween mask DIYs that I have dreamed up for this year! It's elegant, inexpensive, and can be made with a majority of salvaged materials! 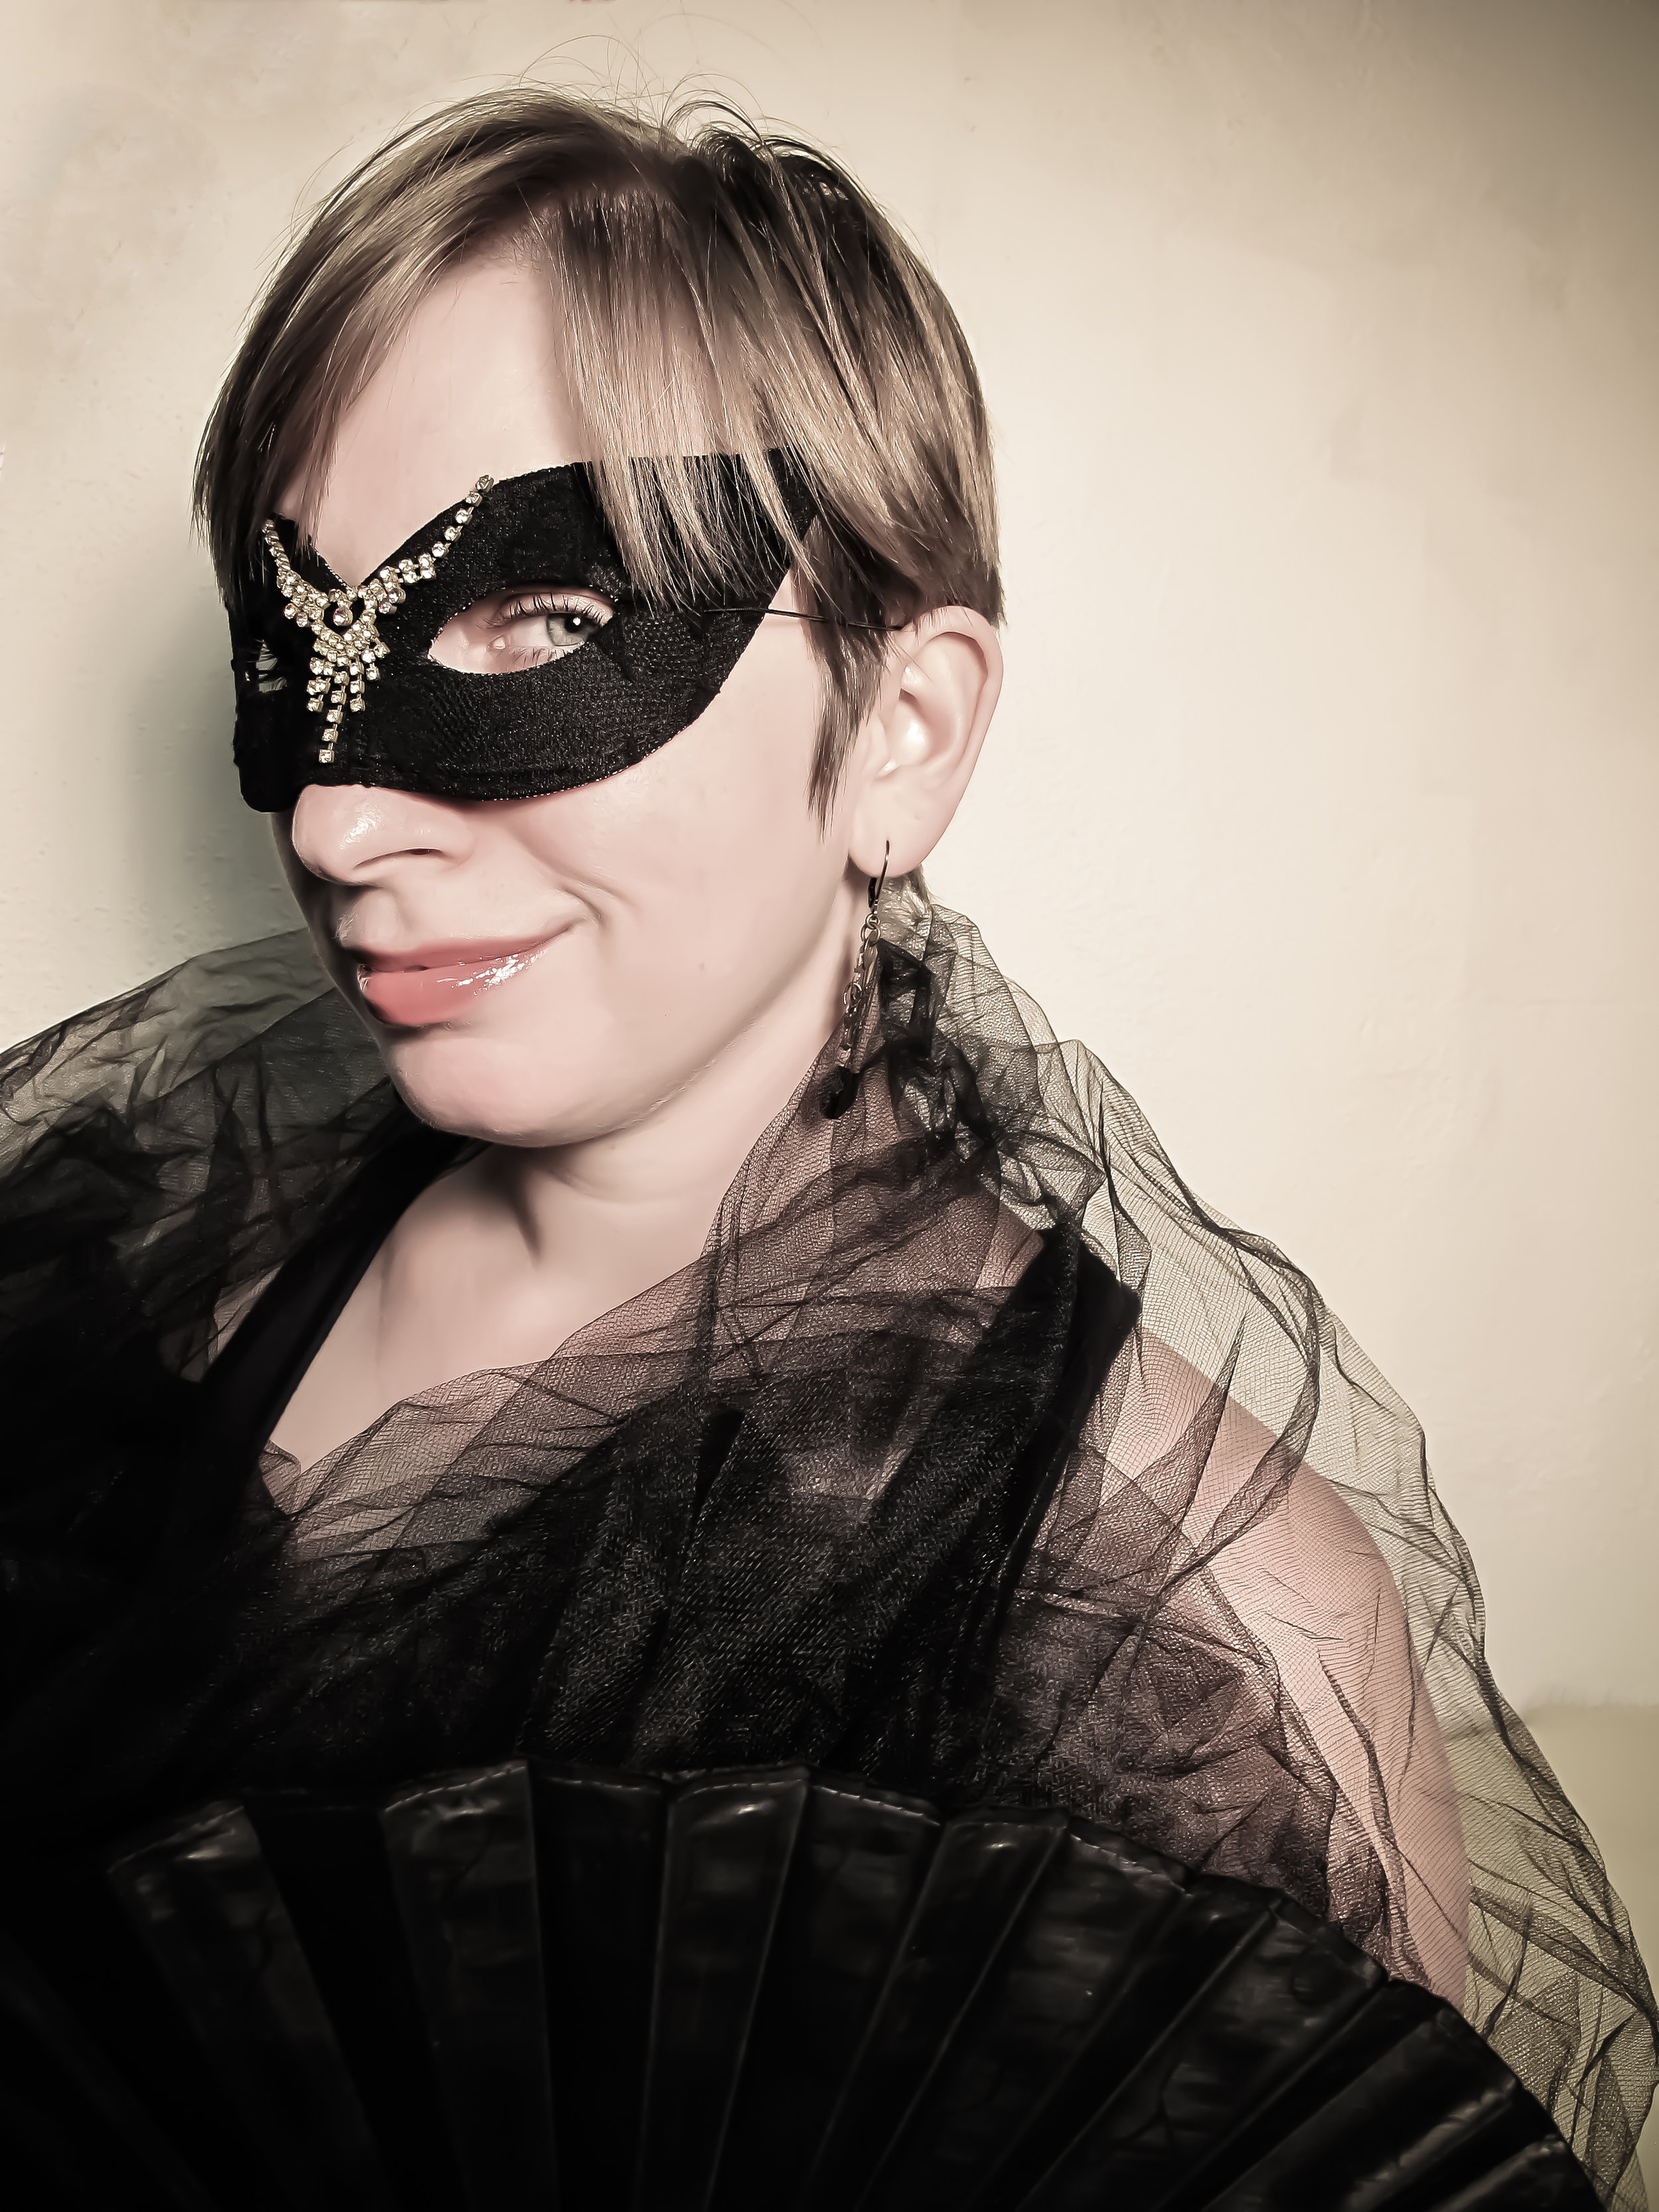 Here's what you'll need:
- Mask (mine was $2.99 from Party City)
- Lacy tights (mine were a pair that I had to stop wearing because of a huge tear--this is a great DIY for reusing ruined fancy/patterned tights)
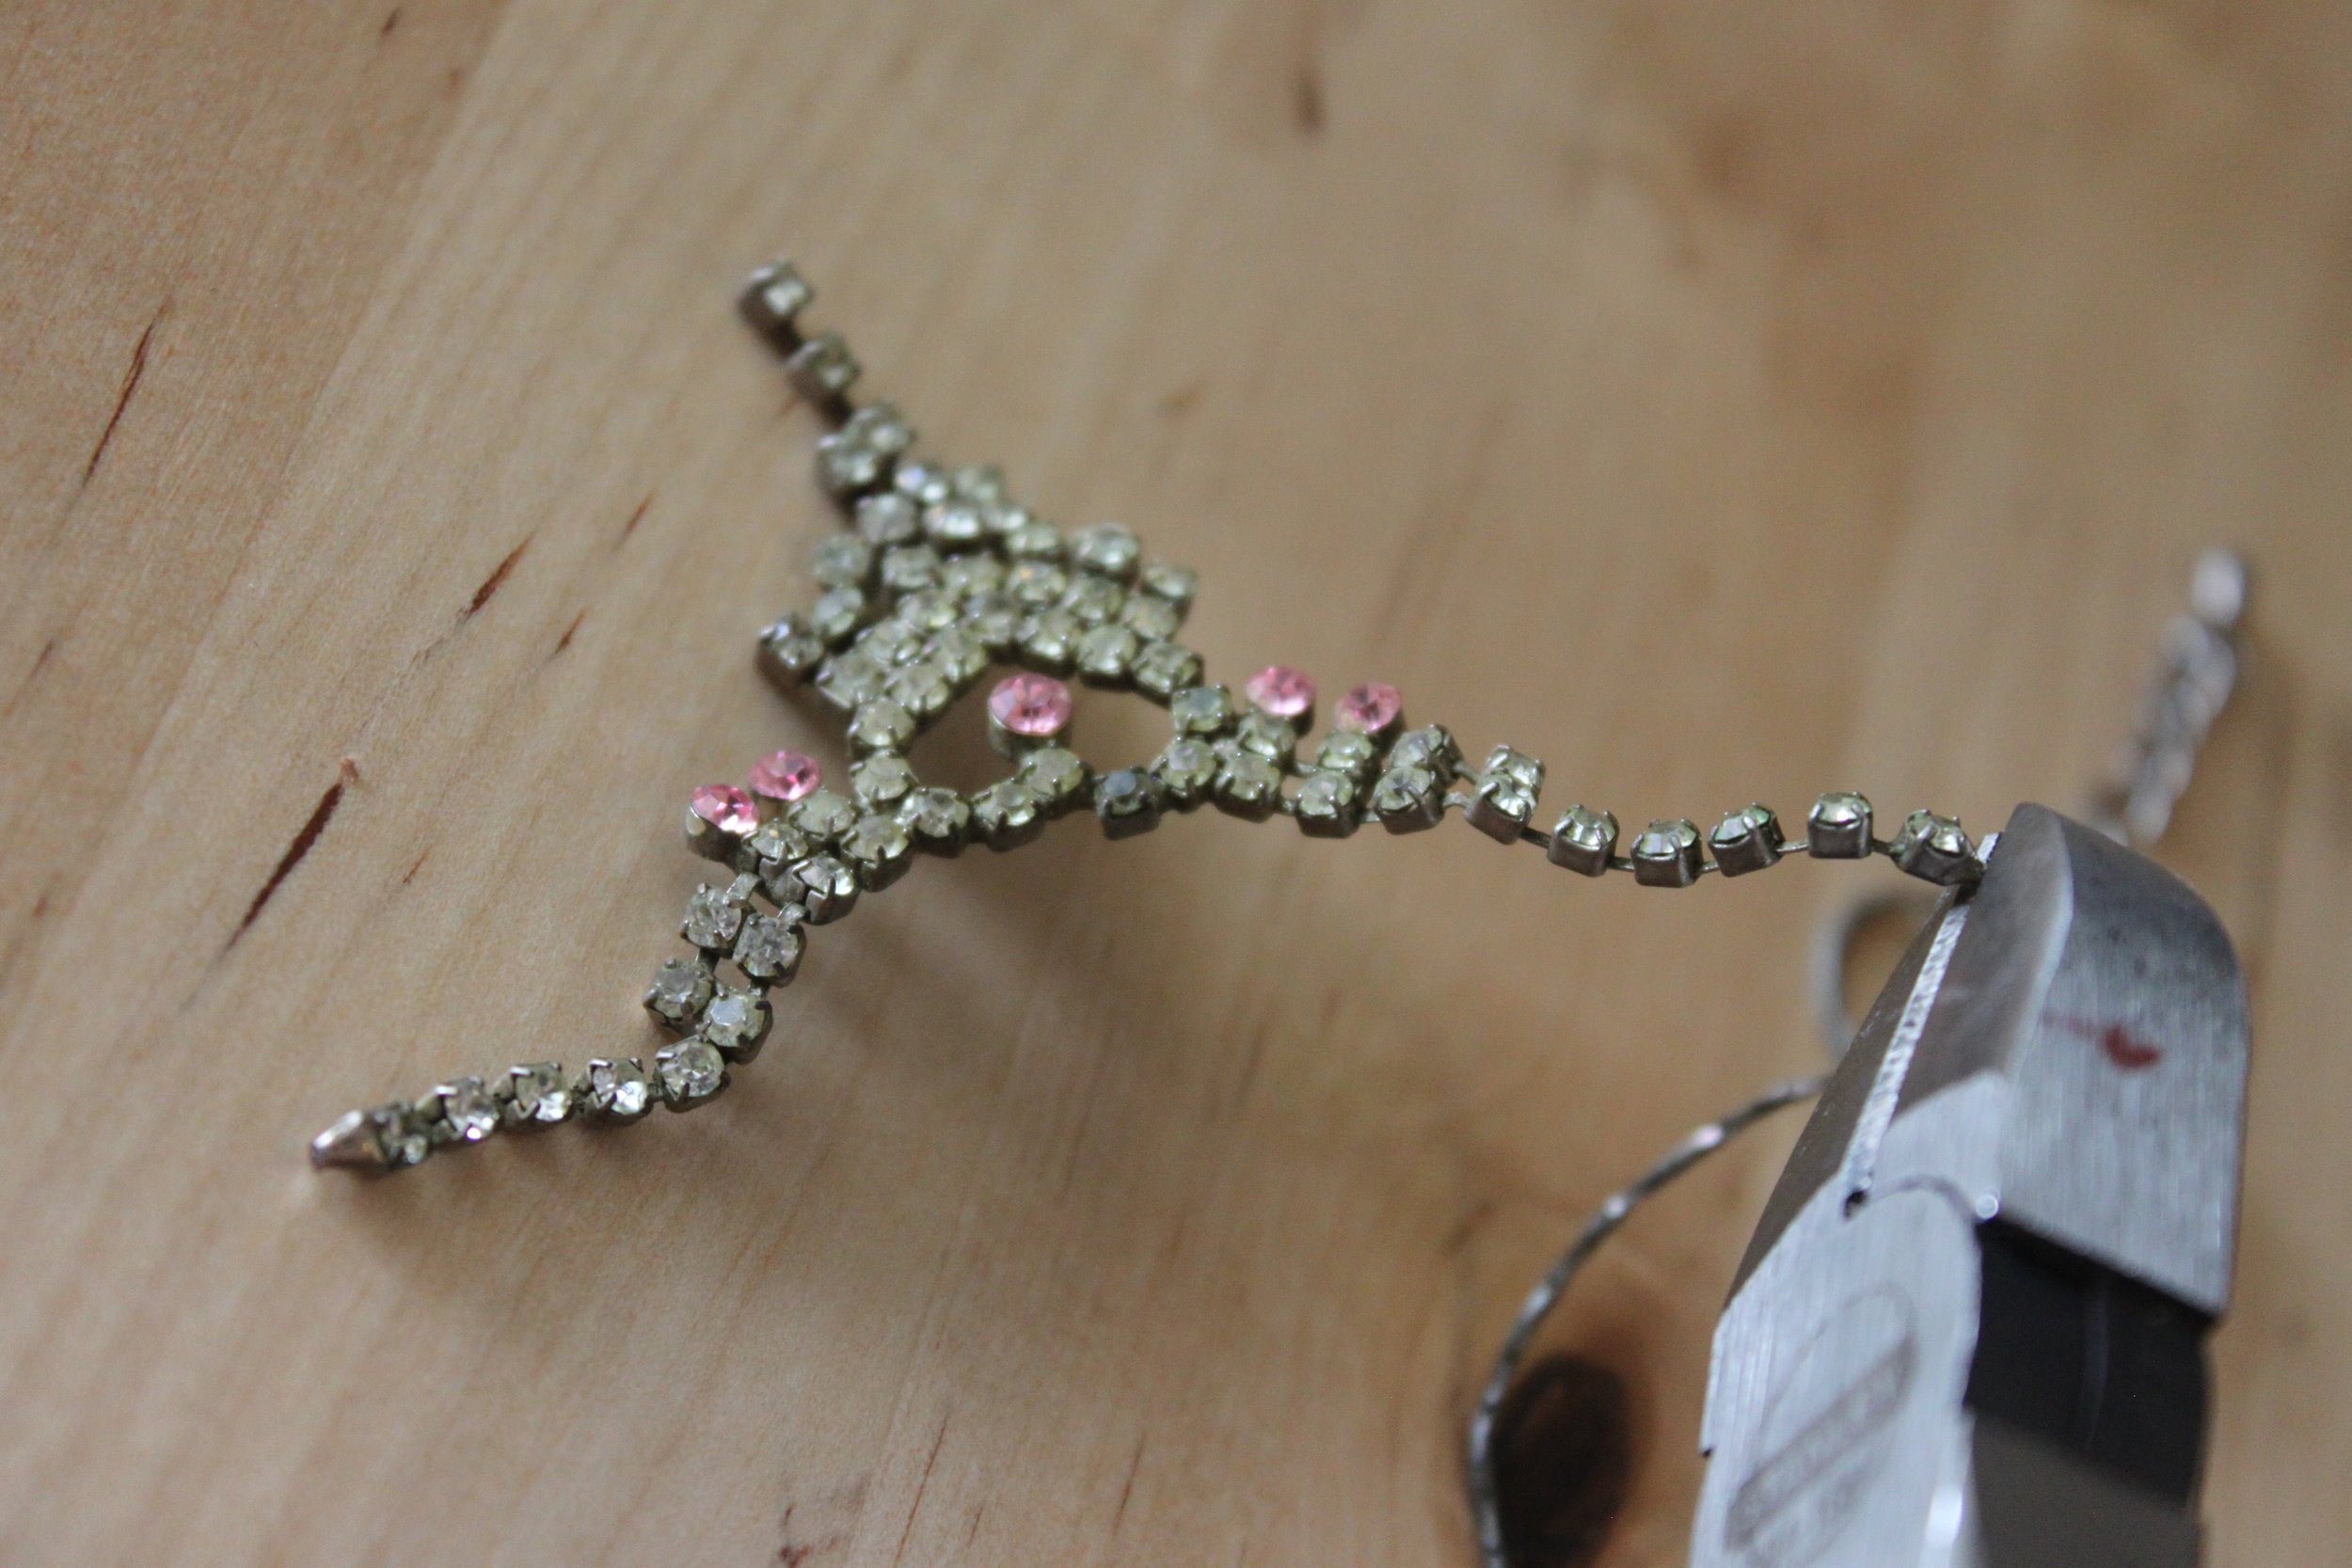
- An old rhinestone necklace
- Needle & thread (in a color that matches)
- Wire cutters (or toenail clippers)
- Pliers (if needed)
- Embroidery needle
- Pins
- Scissors
- Beads (optional, if desired)
 Steps:
- Untie your elastic head strap from your mask. Set elastic aside for later.

- Next, cut a hole in the foot of your tights. The foot & lower leg areas are the best spots because they are smaller and less stretched out.
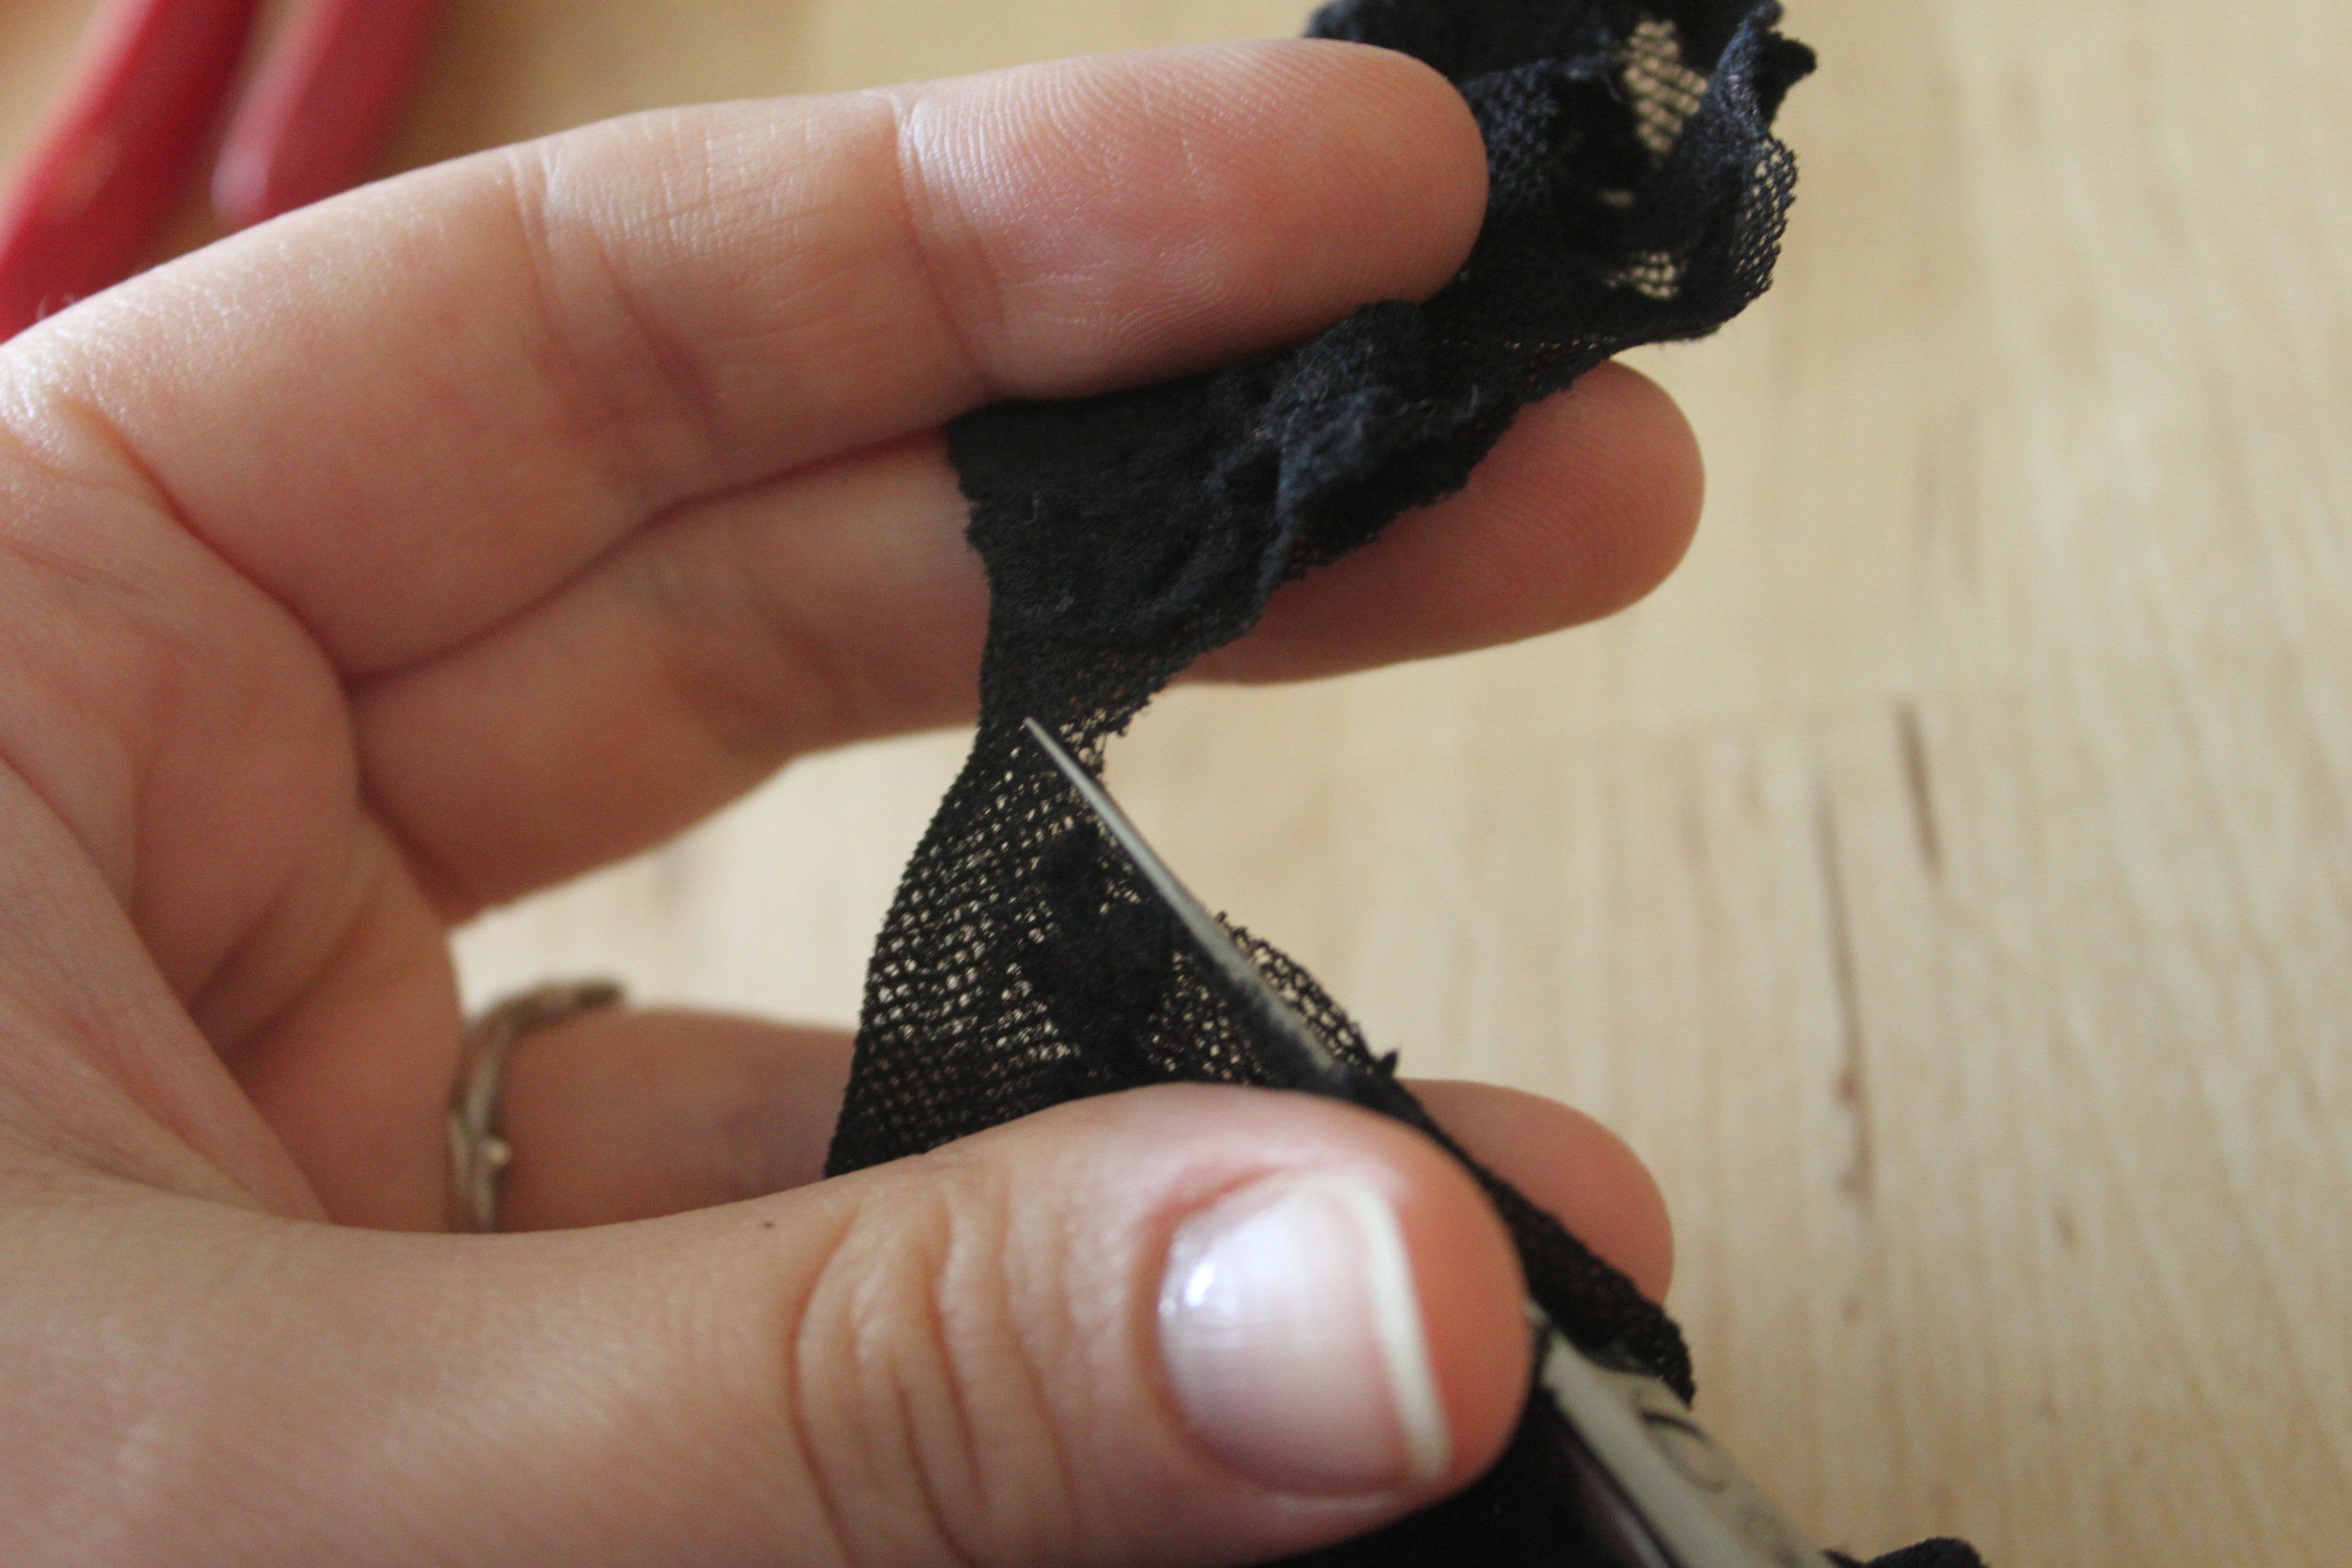
- Insert your mask into the tights. Once you've got your mask completely covered and the pattern/lace positioned as you like it, cut the other end of the tights (opposite your initial entry point detailed in Step 2). Then cut a slit in the back of your tights (and the back of your mask).

- Pin the tights in place. Be sure to pull the fabric taut over the front of your mask & over to the back of your mask.
 When you've finished pinning, your tights should be firmly taut around your mask (as pictured below). If you have any loose fabric, re-pin that area.
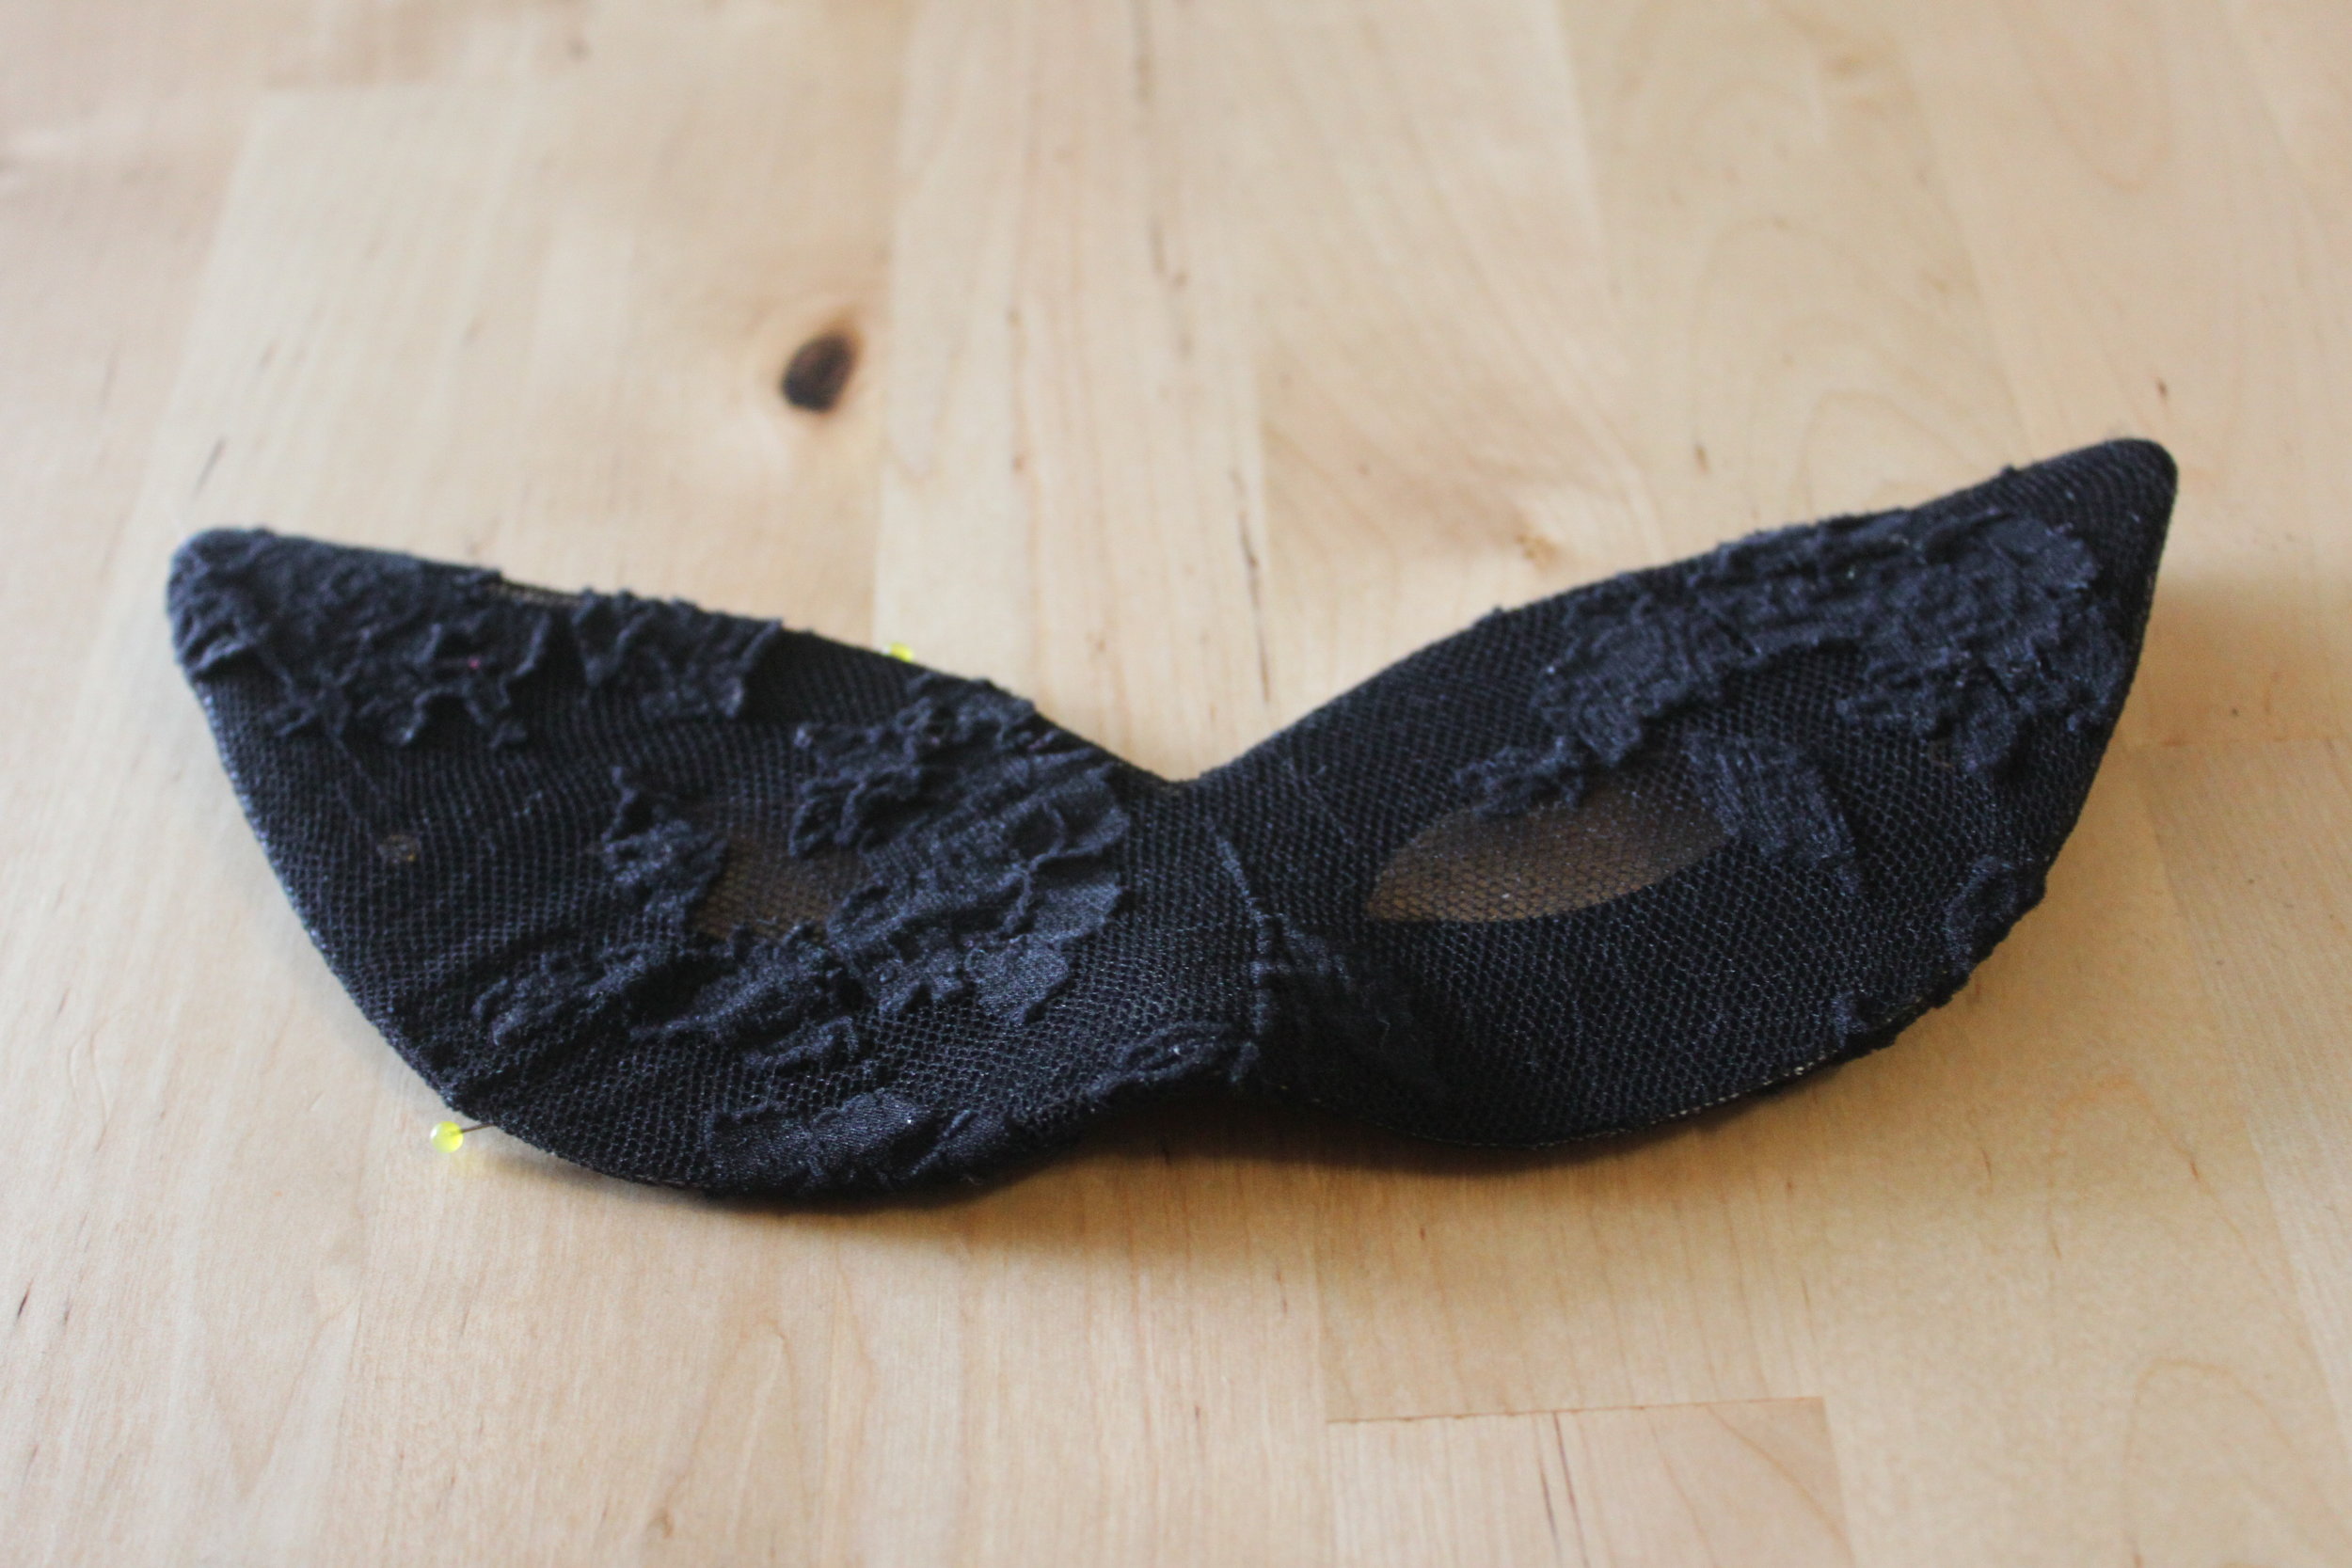
- Next sew the tights in place by stitching around the perimeter of the mask. (If your mask is shaped, as this one is, be sure to hand stitch the tights in place otherwise your machine will crack the mask or break/ruin the molding & shaping. If you have a simple cloth mask without any shaping, you can use a machine for this step.) Be sure to keep all of your stitches even and small. Tie sturdy knots.

 Be sure that as you go, you are continuing to pull the tights taut. As you sew, feel free to trim any excess fabric. You don't want too much fabric in one place or it will cause your mask to lay crooked on your face.
 - Next, cut slits in the fabric in the middle of the eye holes of your mask. Pull these taut around to the back of your mask. Pin if needed.


- Sew the tights in place by stitching the fabric you've pulled to the back of your mask (from the slit) to the fabric above it/below it (above, if stitching the top of the eye; below, if stitching the bottom of the eye).

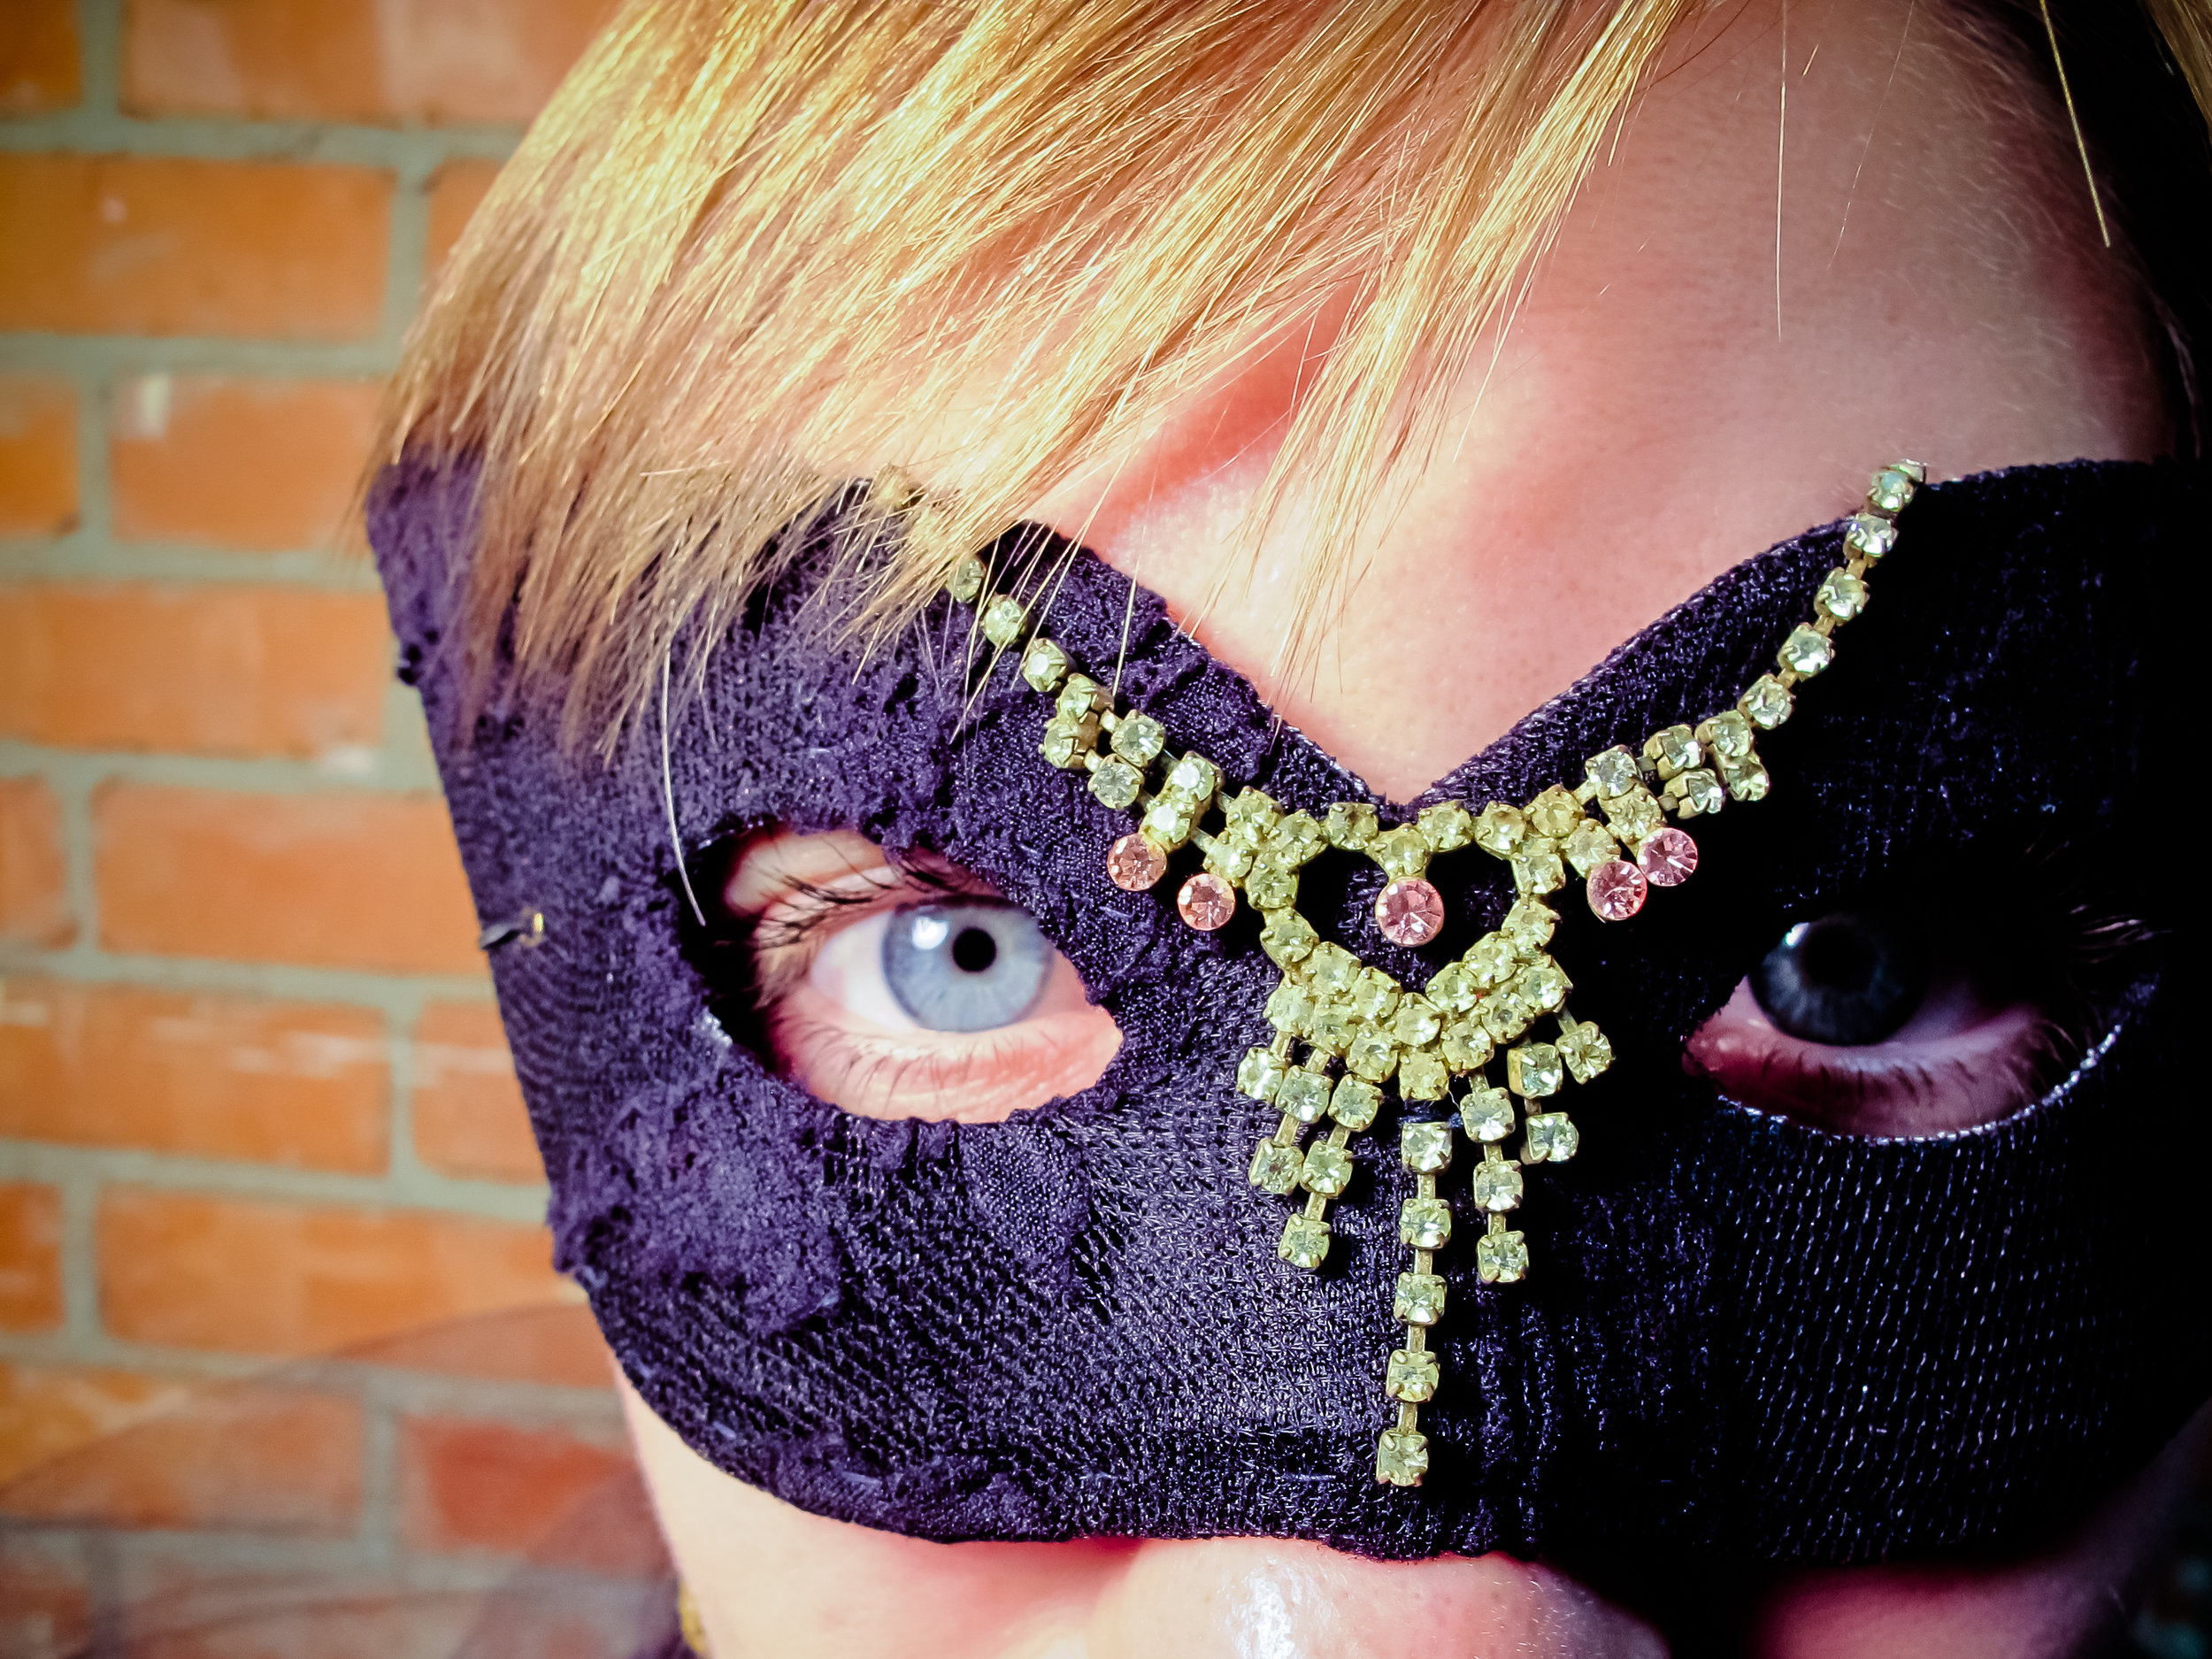
- You've successfully covered your mask! On to the fun part, accessorizing it!
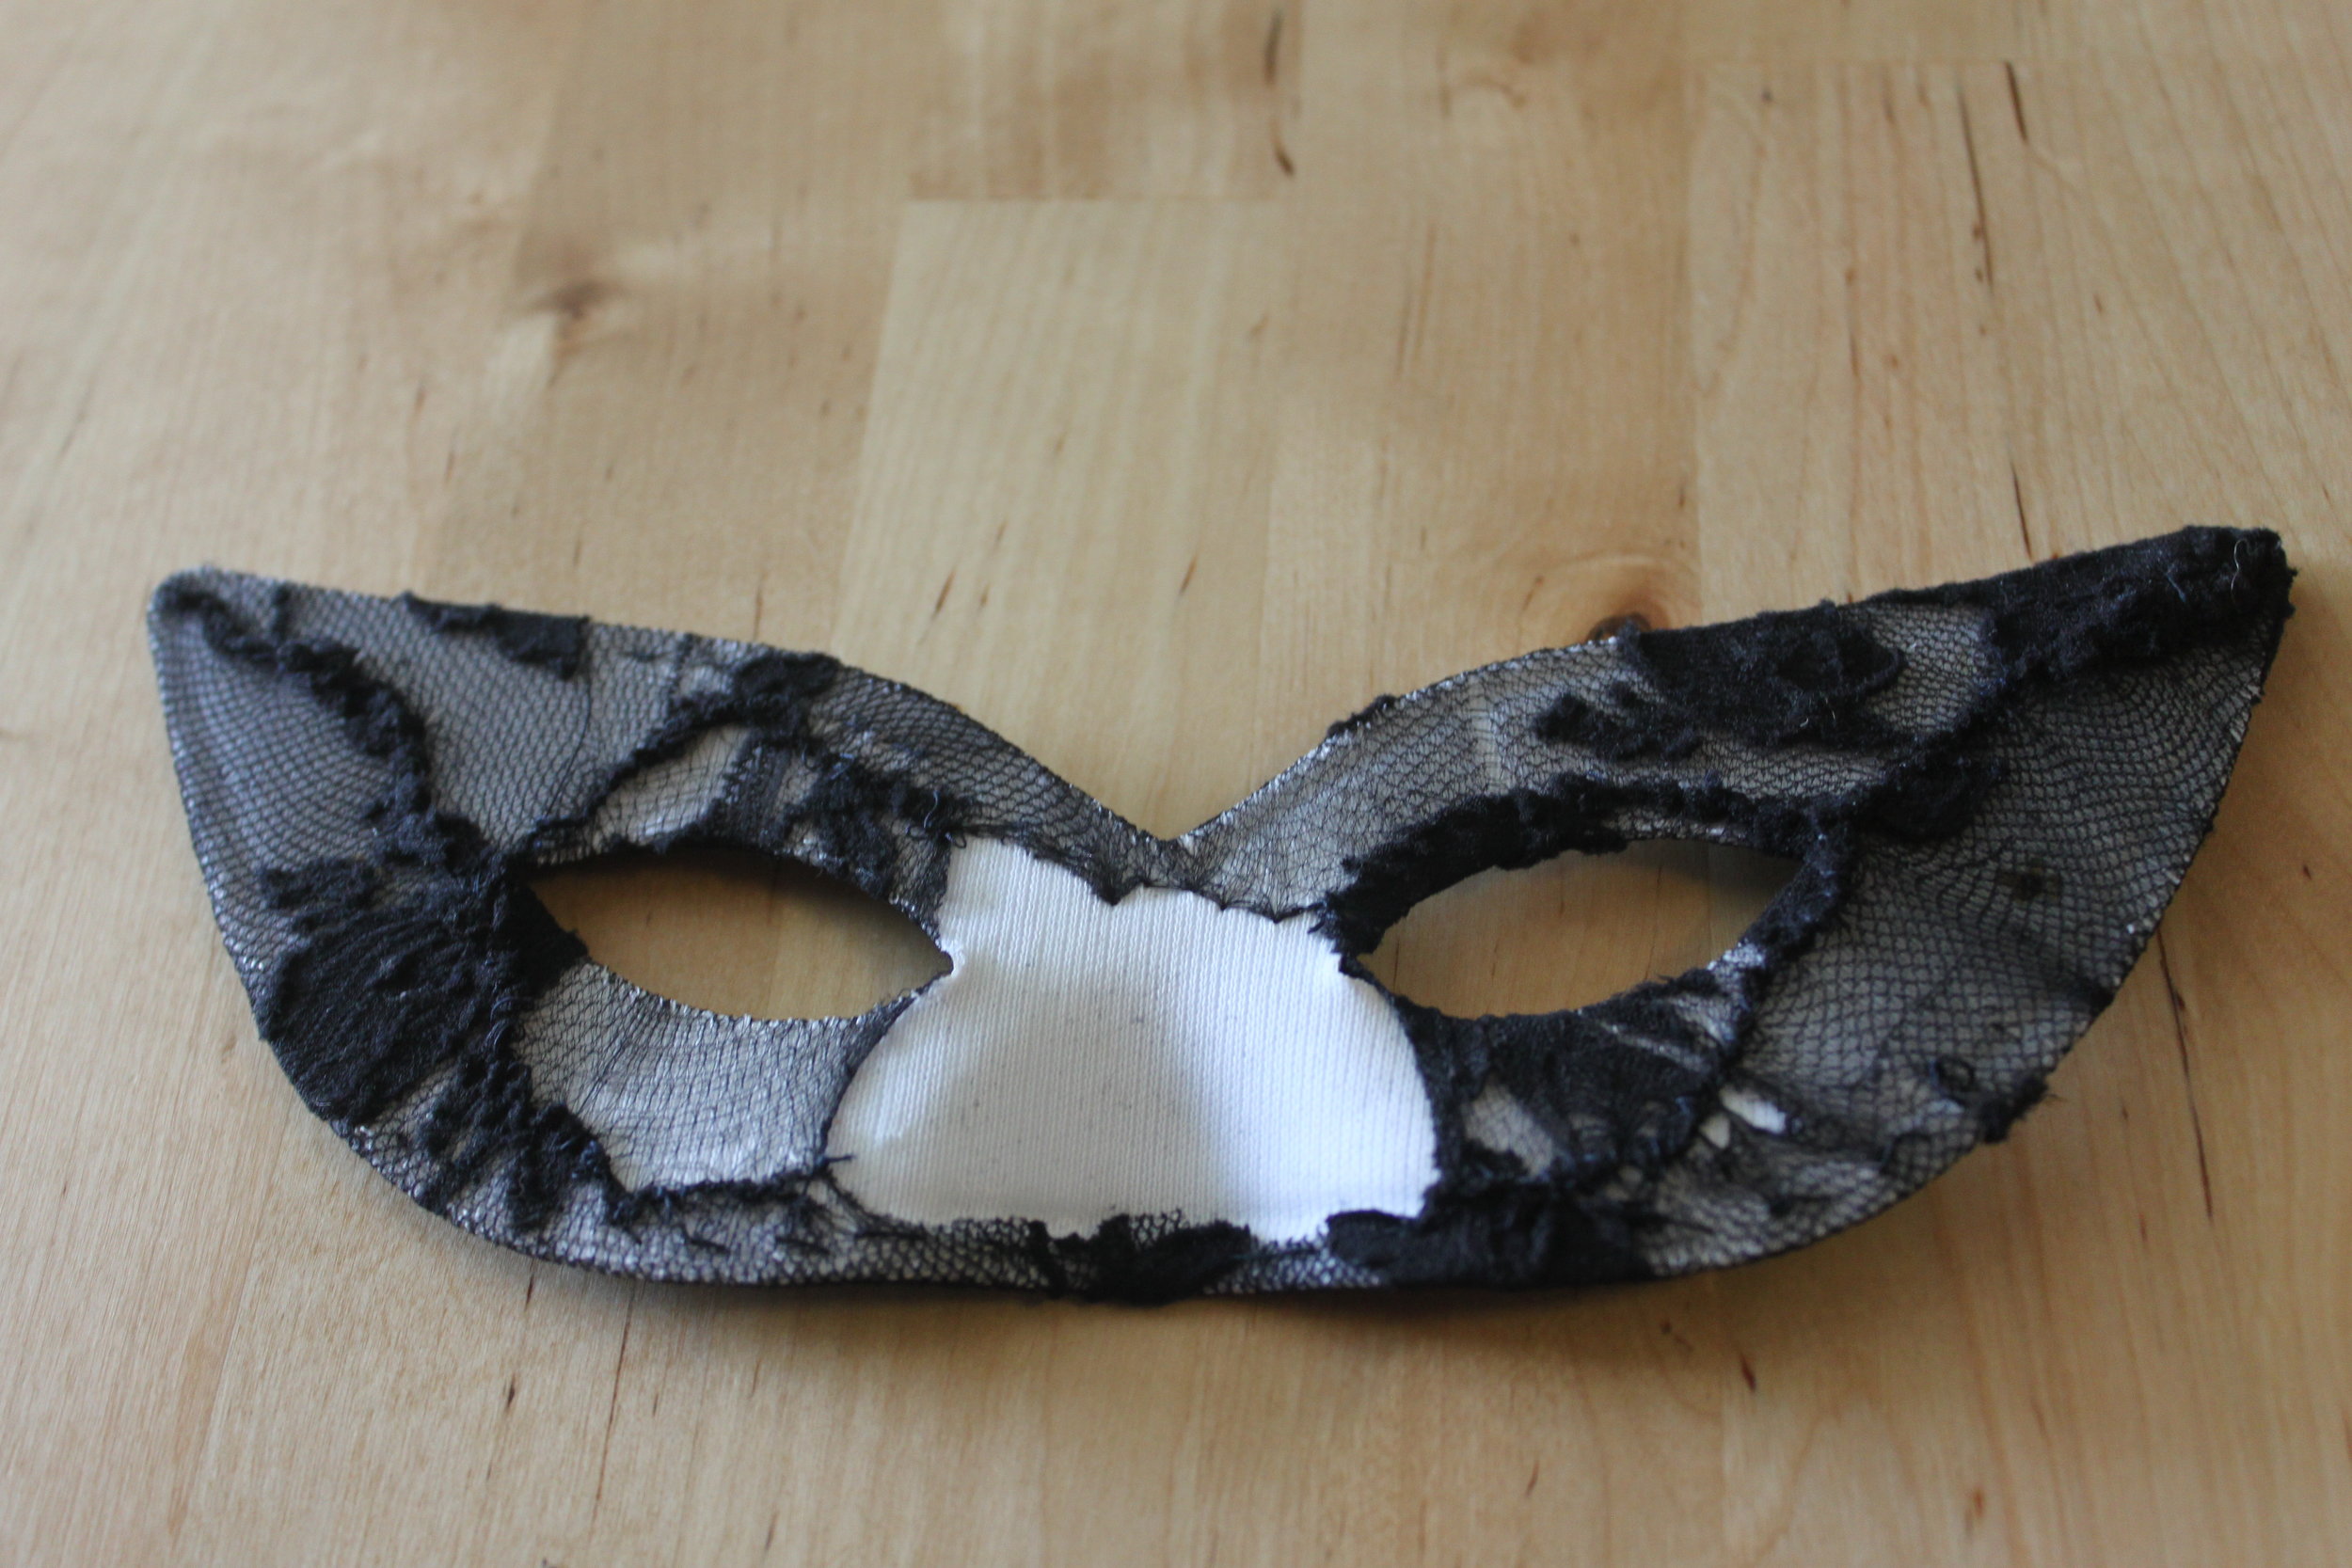

Adding fabric to a simple mask gives it texture & a bit of romance!
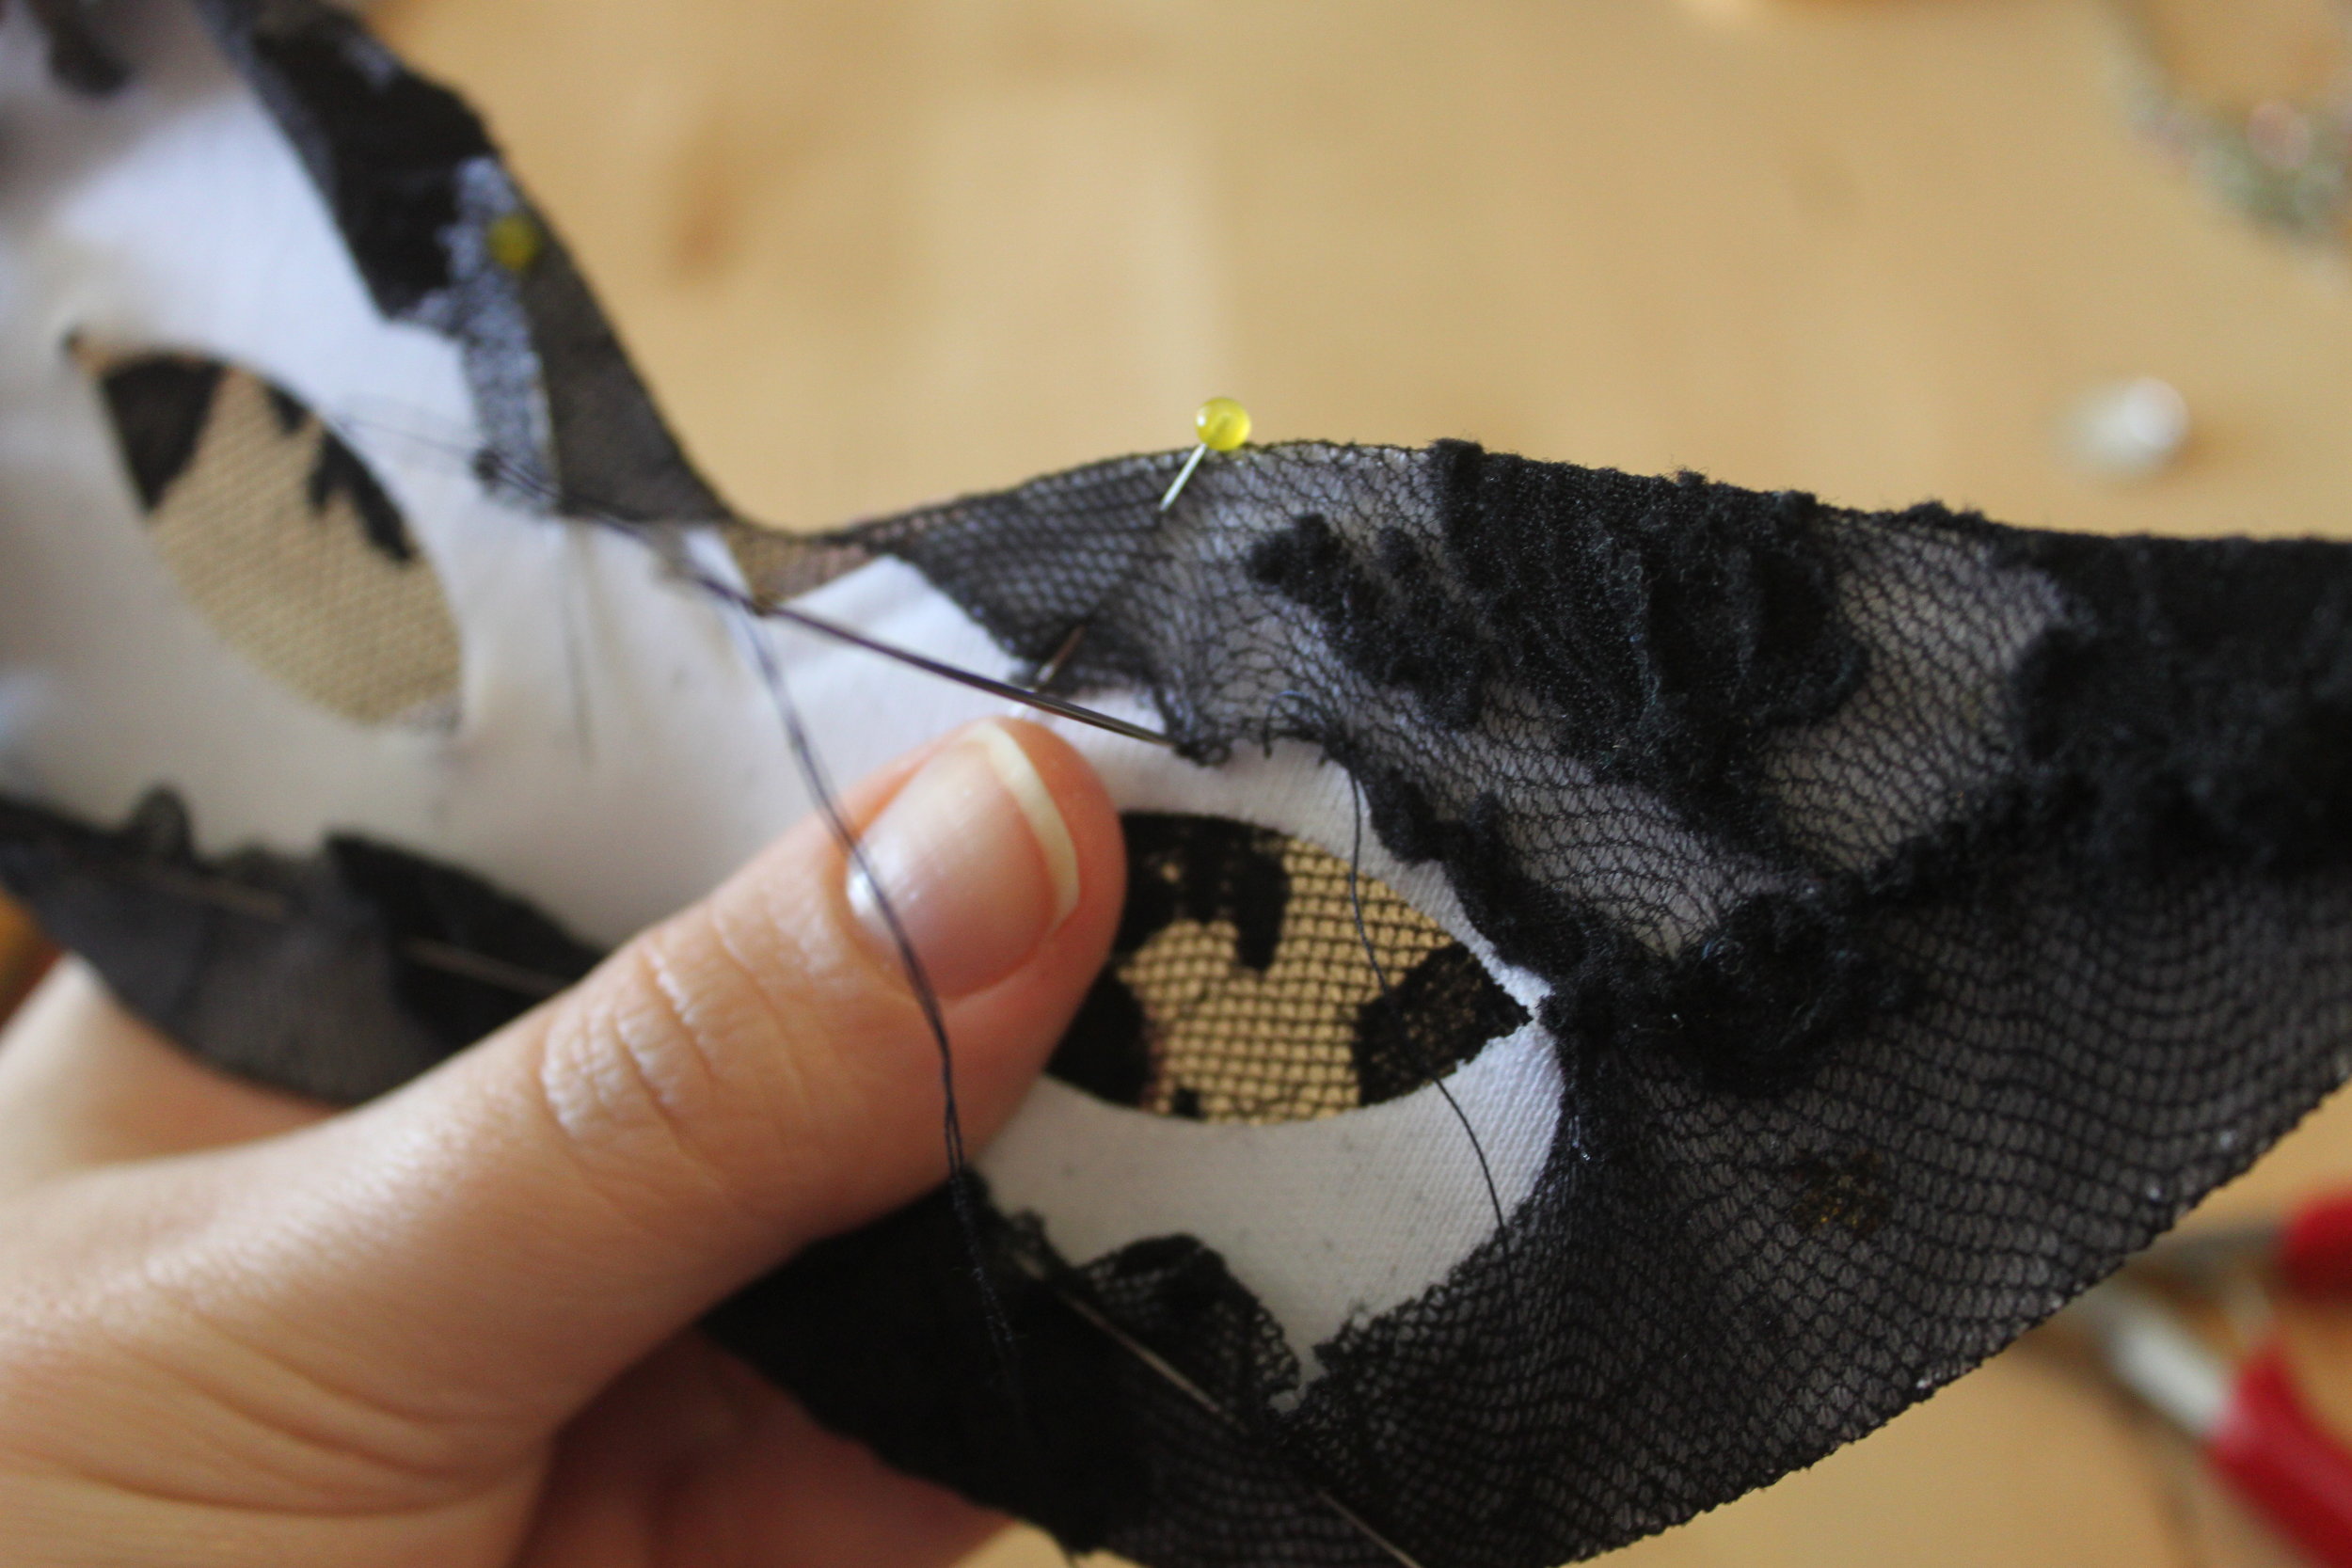
- Figure out the placement of your necklace piece & how much of the necklace you want to use on your mask. I liked mine just over the nose & at the start of the eyebrows on each side.

- Once you've figured out the placement, cut off any excess chain with your wire cutters (or toenail clippers, if you do not own a pair of wire cutters).
- Sew your necklace piece in place. Be sure to hide your knots on the back side of your mask. Sew between two rhinestone links; onto a jump ring; or onto a chain link.
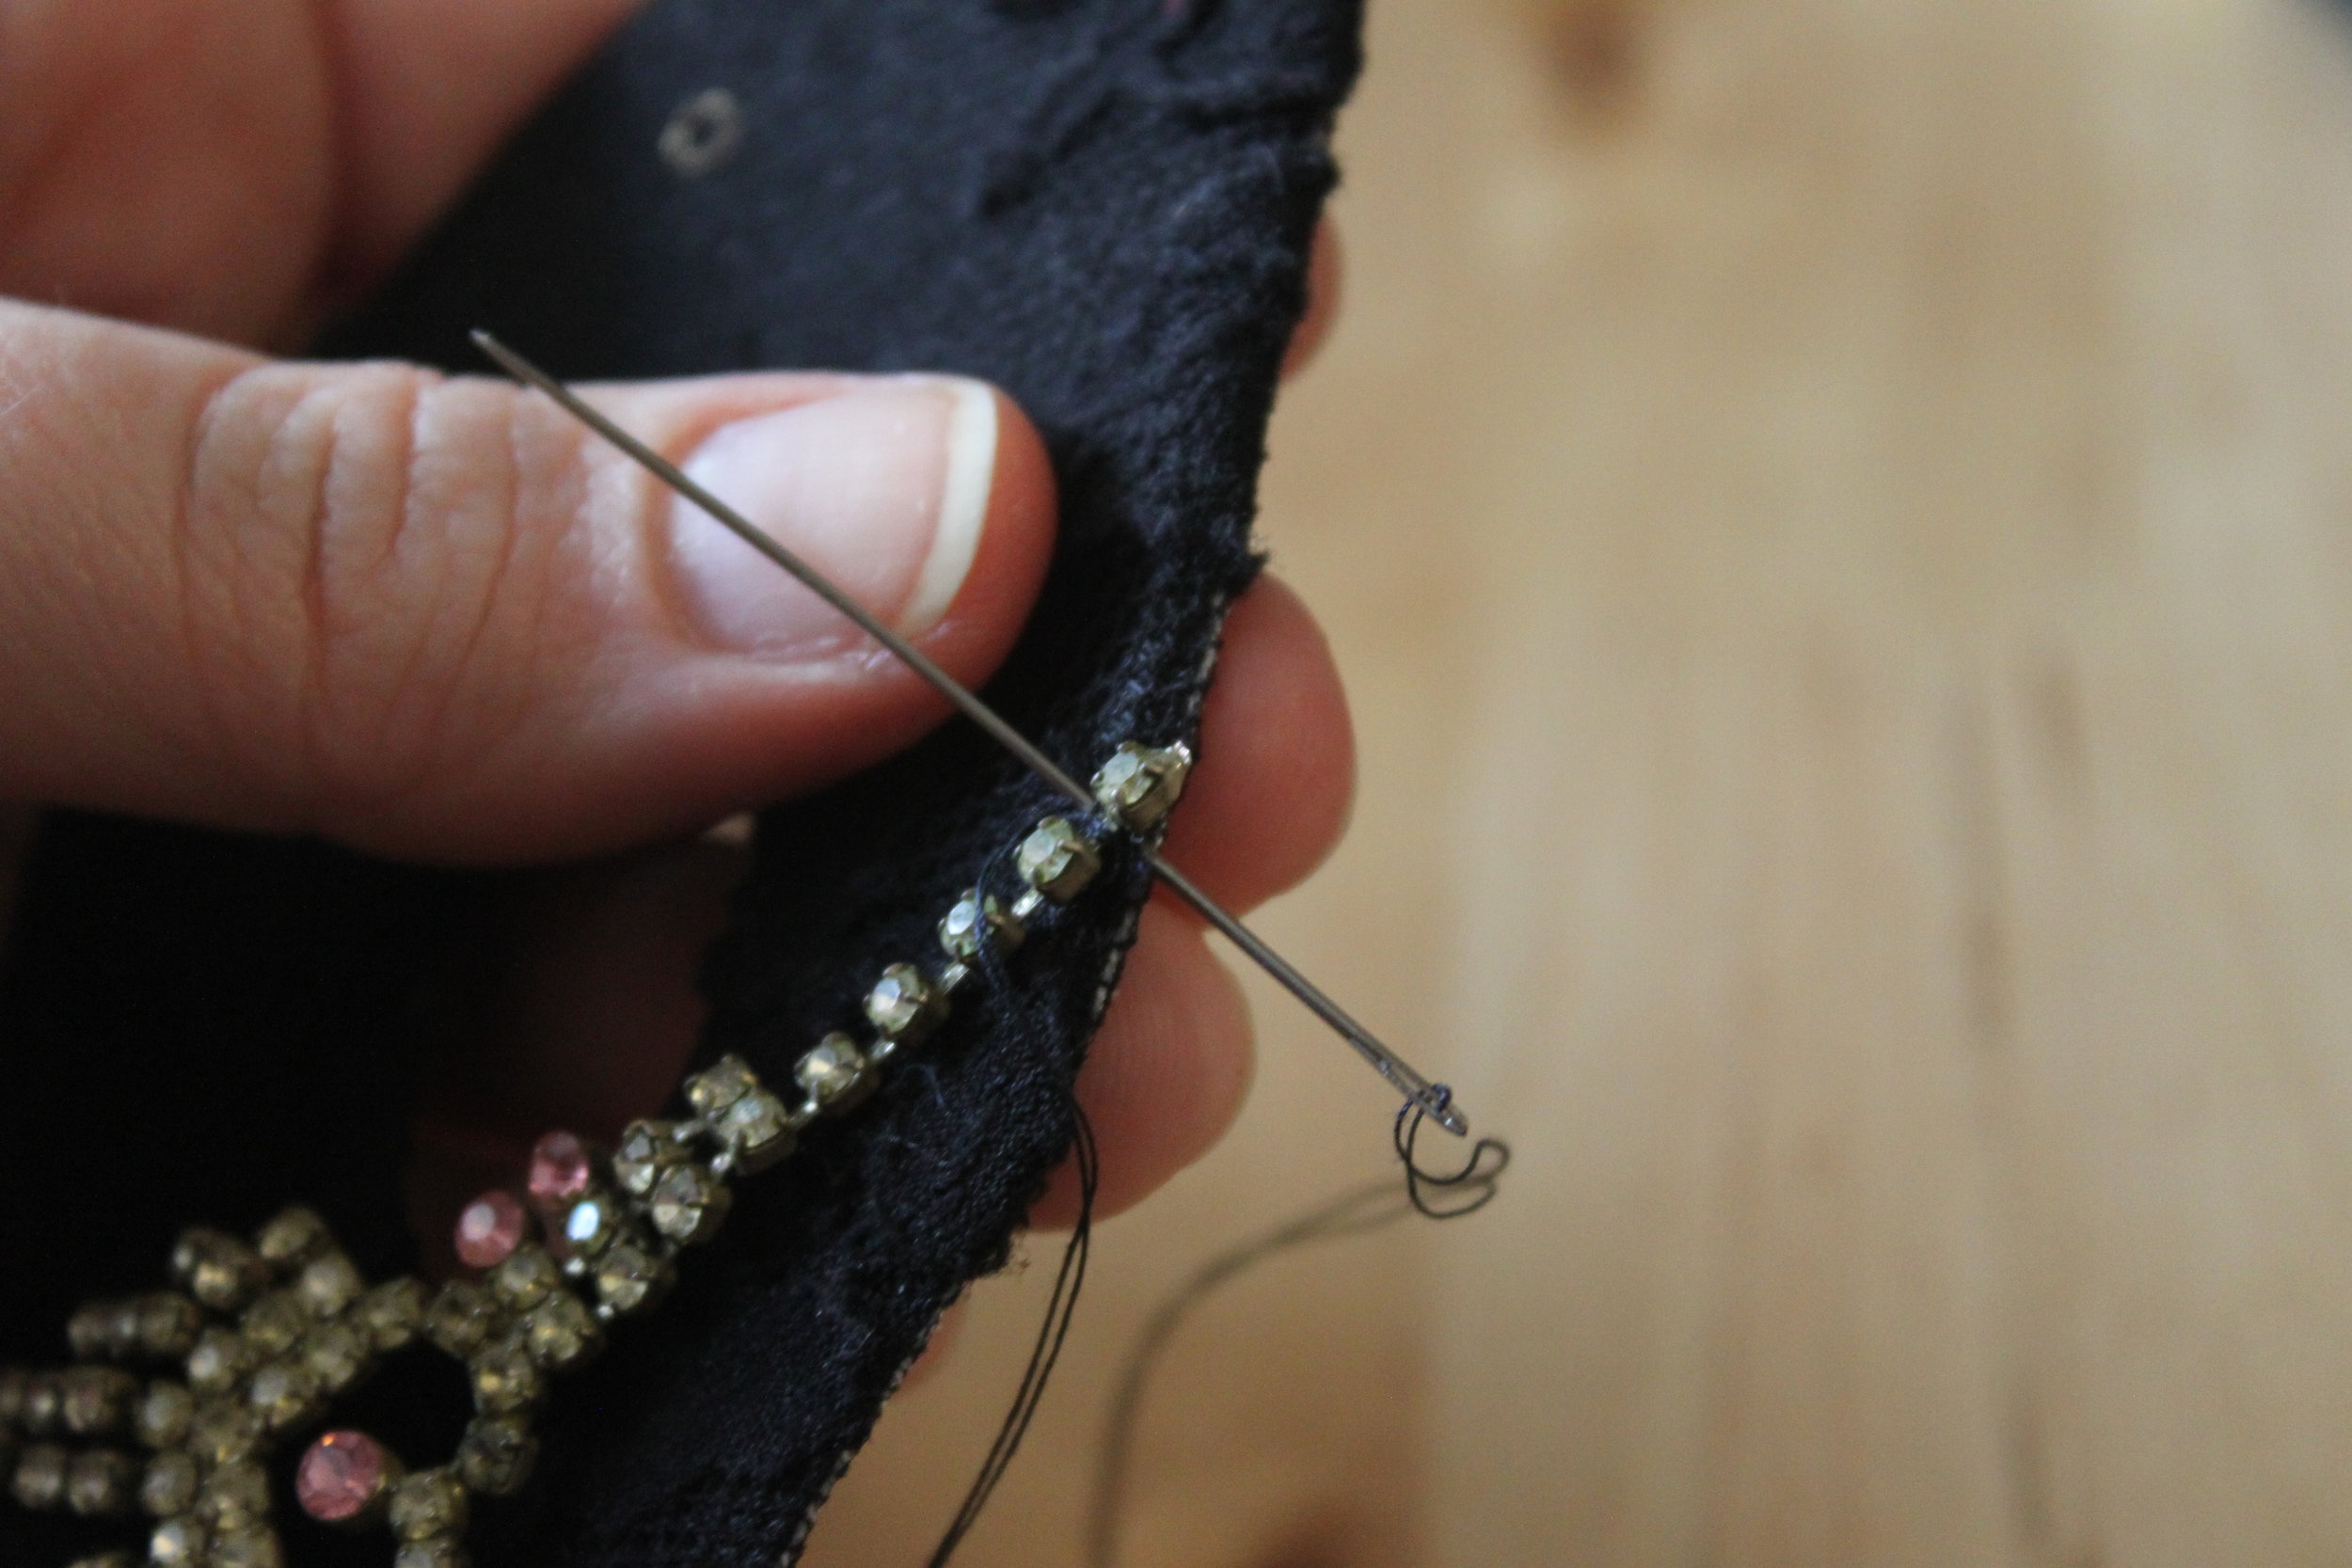
- If needed, also sew the middle of your necklace piece in place. (This is especially important if your piece moves a lot. You don't want it to hit you in the eye all night if you're dancing).

- Grab your elastic that you set aside earlier. To re-attach it, thread it onto an embroidery needle & pull it through the existing hole. Be sure to pull the elastic from the front of the mask to the back.

- Remove the elastic from the embroidery needle & knot it.

- Repeat Steps 13 & 14 for the other side.
- Wear proudly!
 To Make this a Full Costume: Put on one of those fancy dresses you hardly get to wear, wrap some tulle around your shoulders, grab a fan, and don some femme fatale makeup! Perhaps you are a spy at a masquerade, or a jilted tango dancer, or even a princess incognito--whoever you are--Happy Halloween & as always, Merry Making!
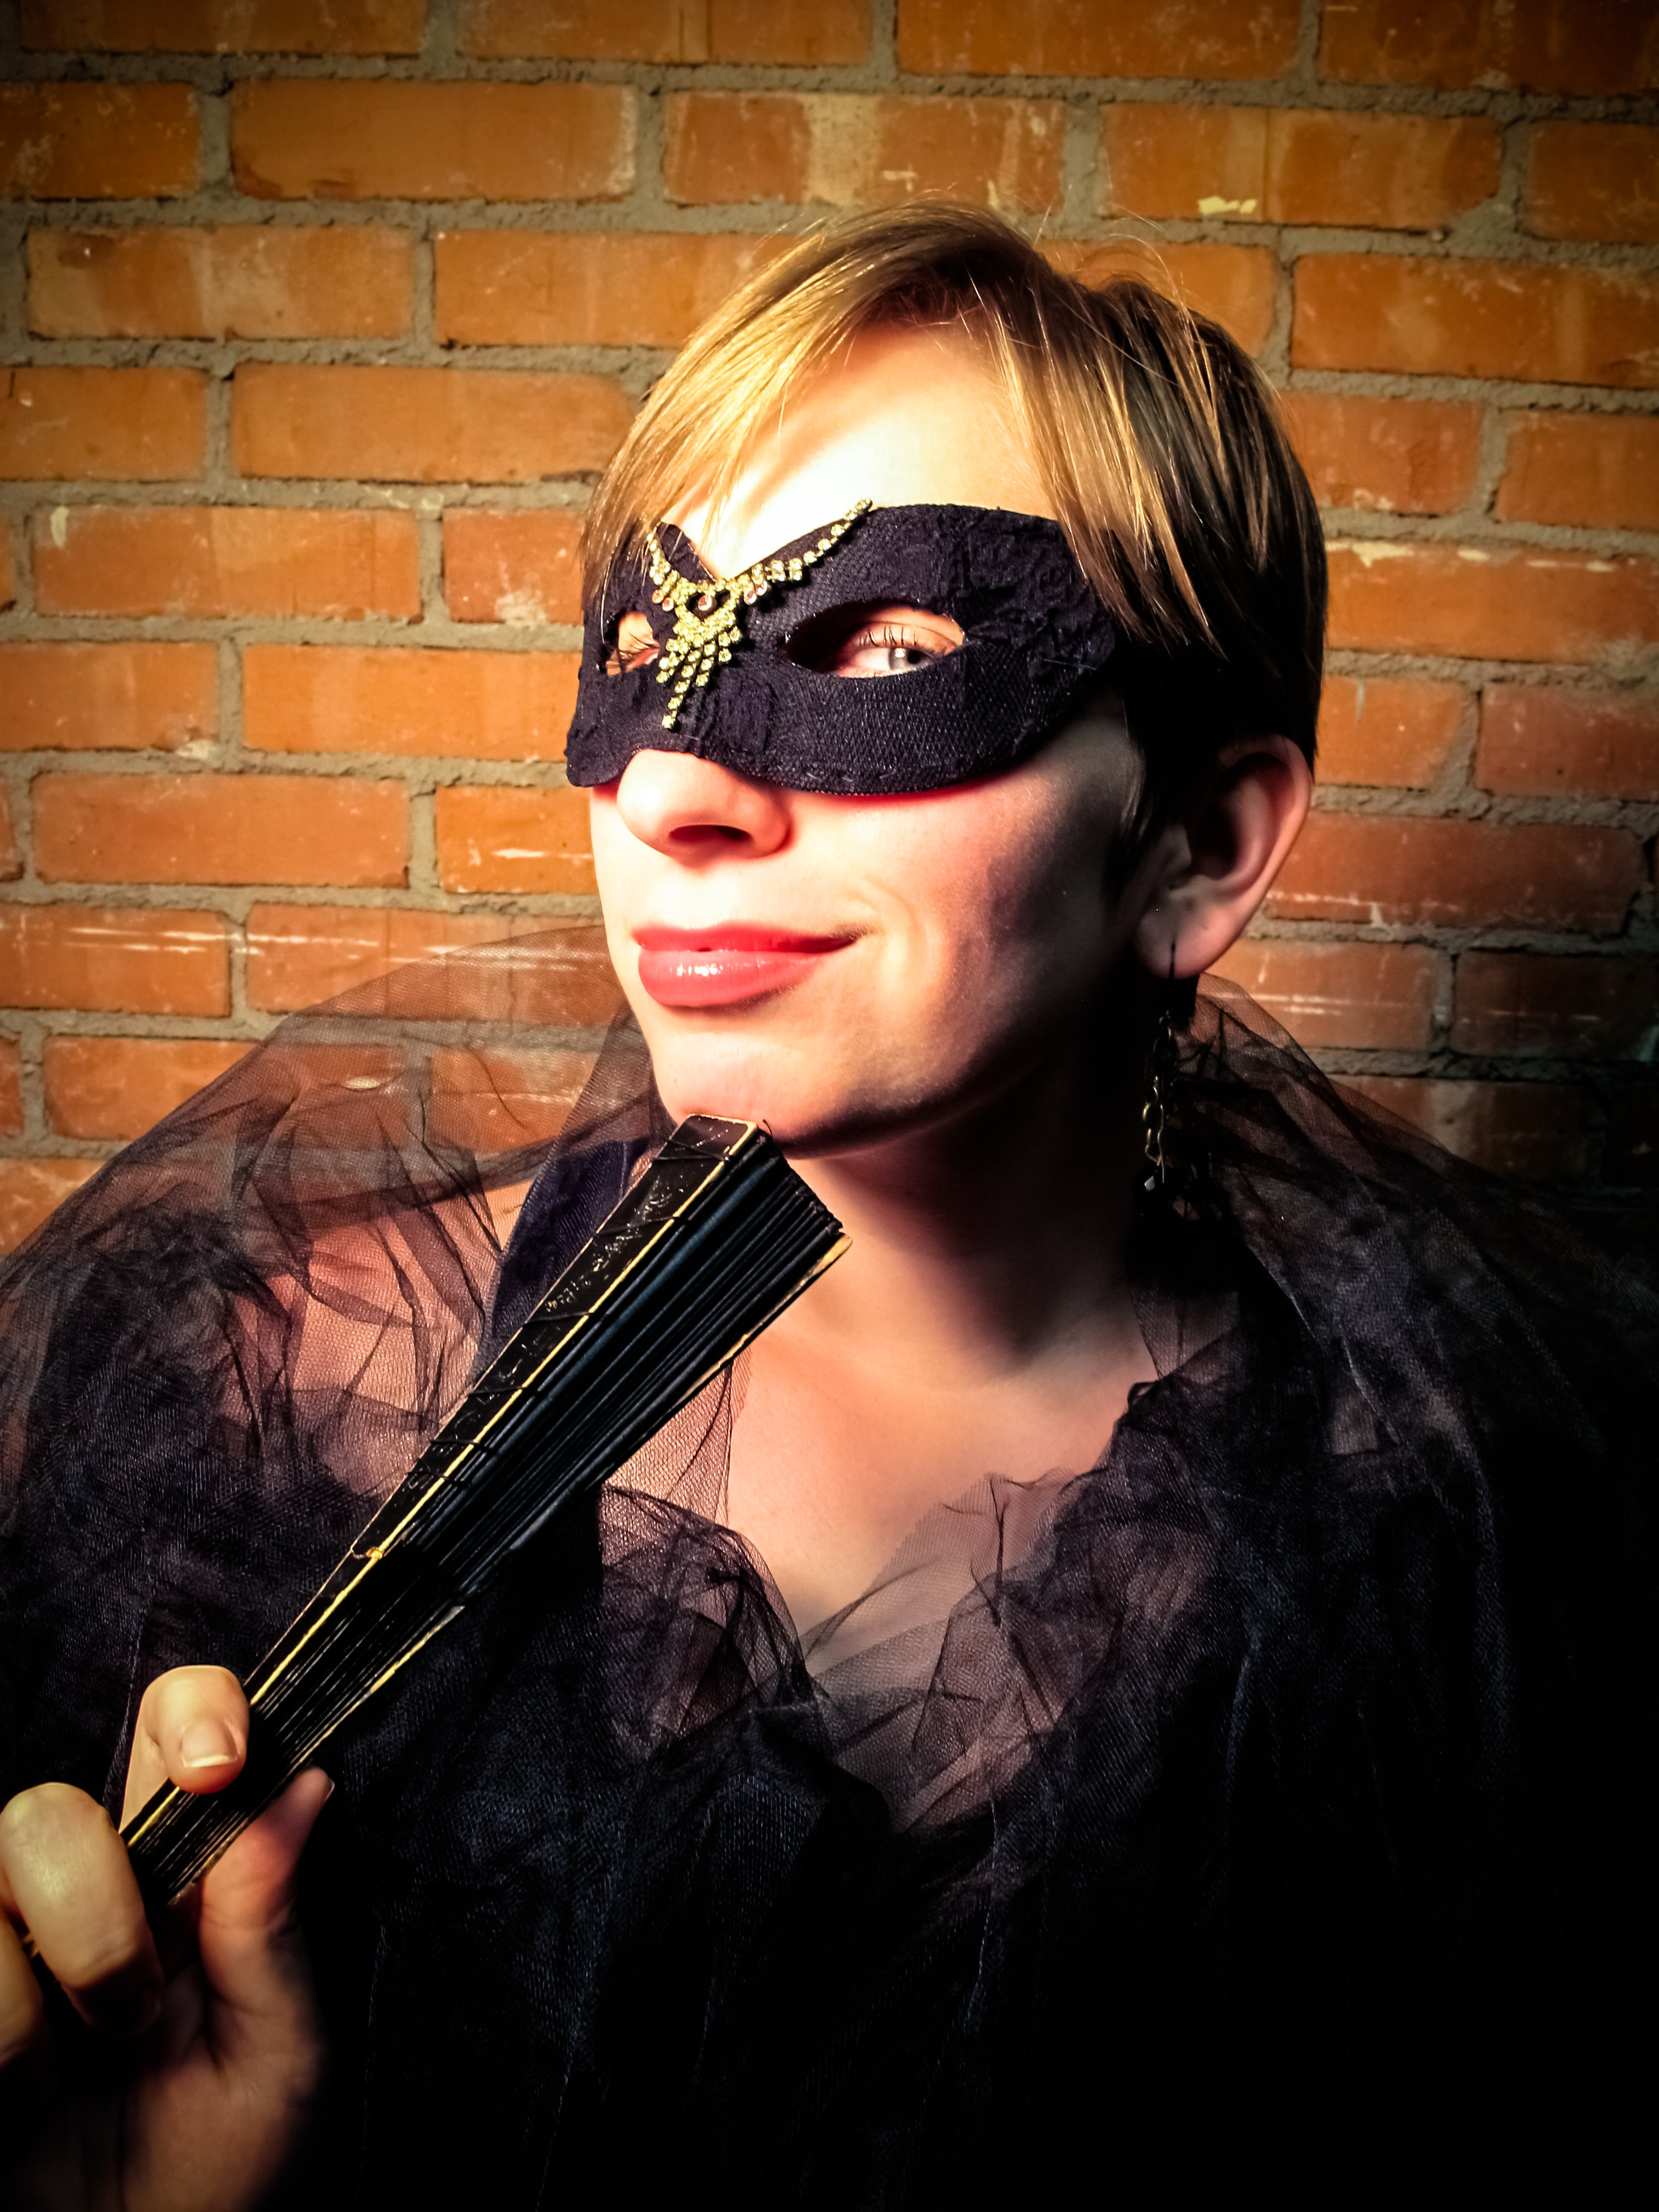
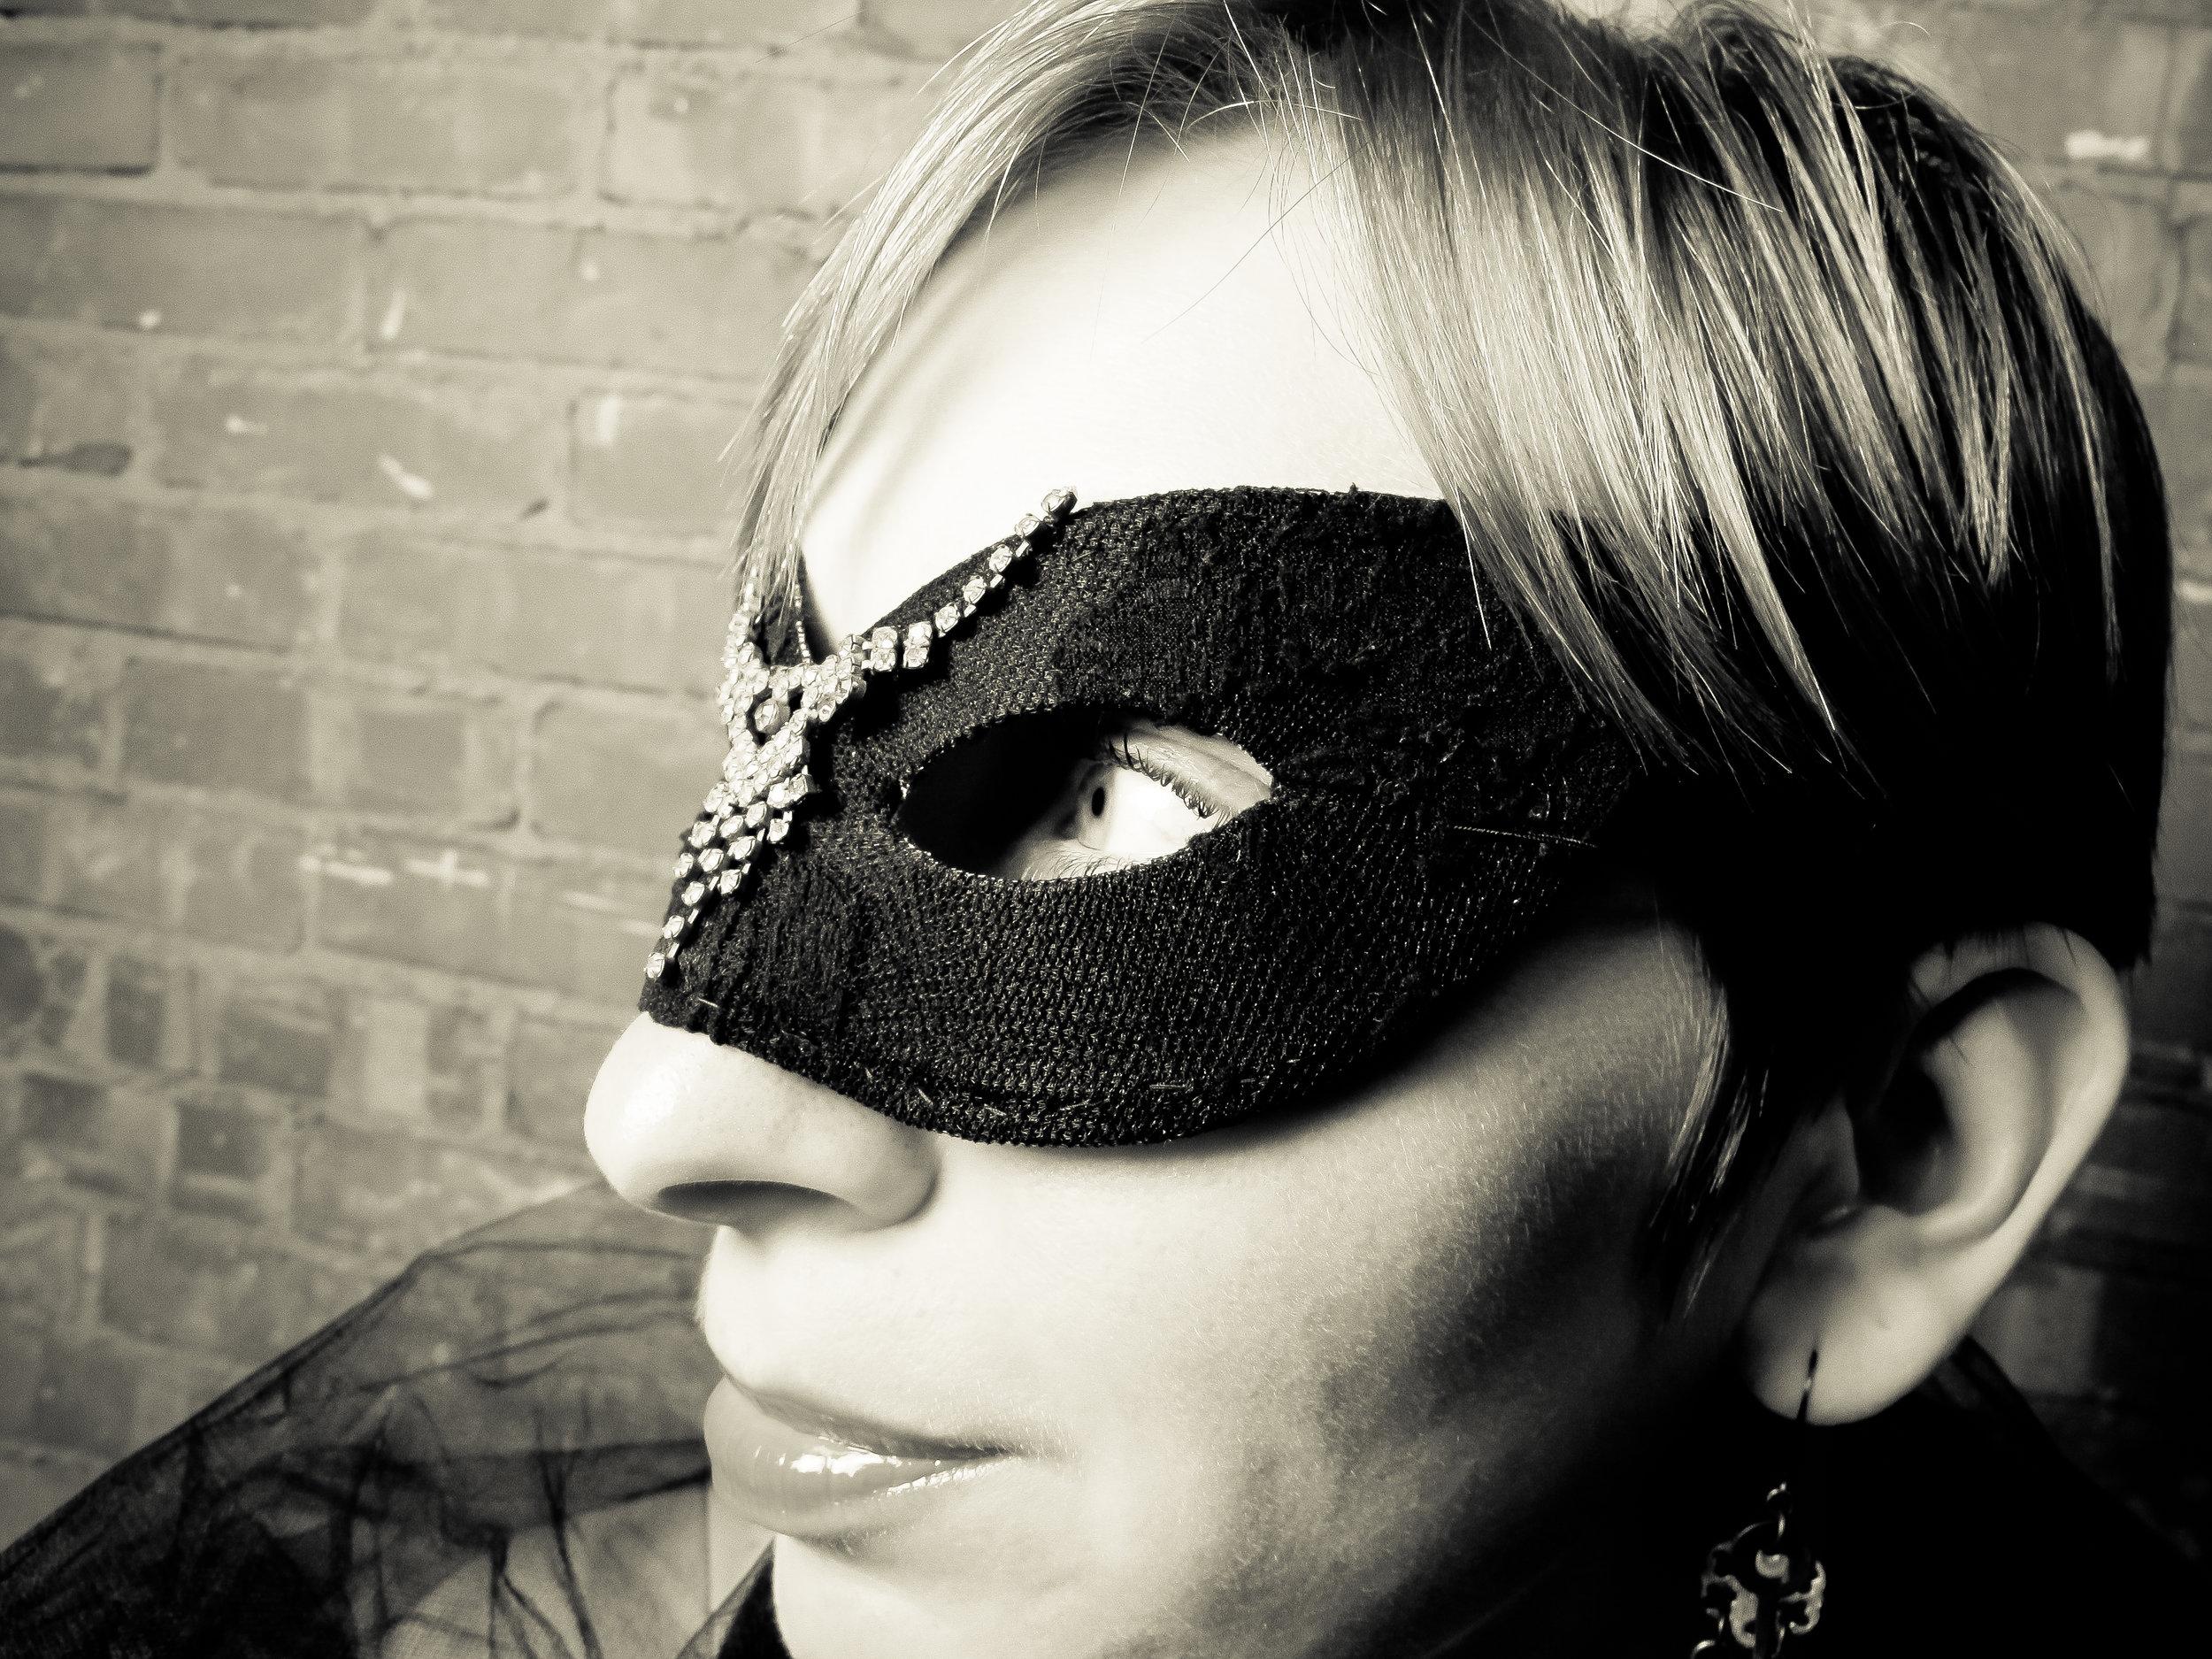 A special thanks to my lovely fiancee, Rhys, for the wonderful pictures of me wearing the mask I just made. Love you, shutterbug!
DIY Steampunk Cupcakes
D-I-Y-5 CommentsI am fascinated with steampunk cakes! I am an amateur baker myself and I recently purchased some great silicone food molds from an Etsy seller, MoldMuse. She has a bunch of molds available--a ton of which are steampunk! I love the ones that I purchased and I highly recommend them! They were super easy to use and yielded perfect geary confections. 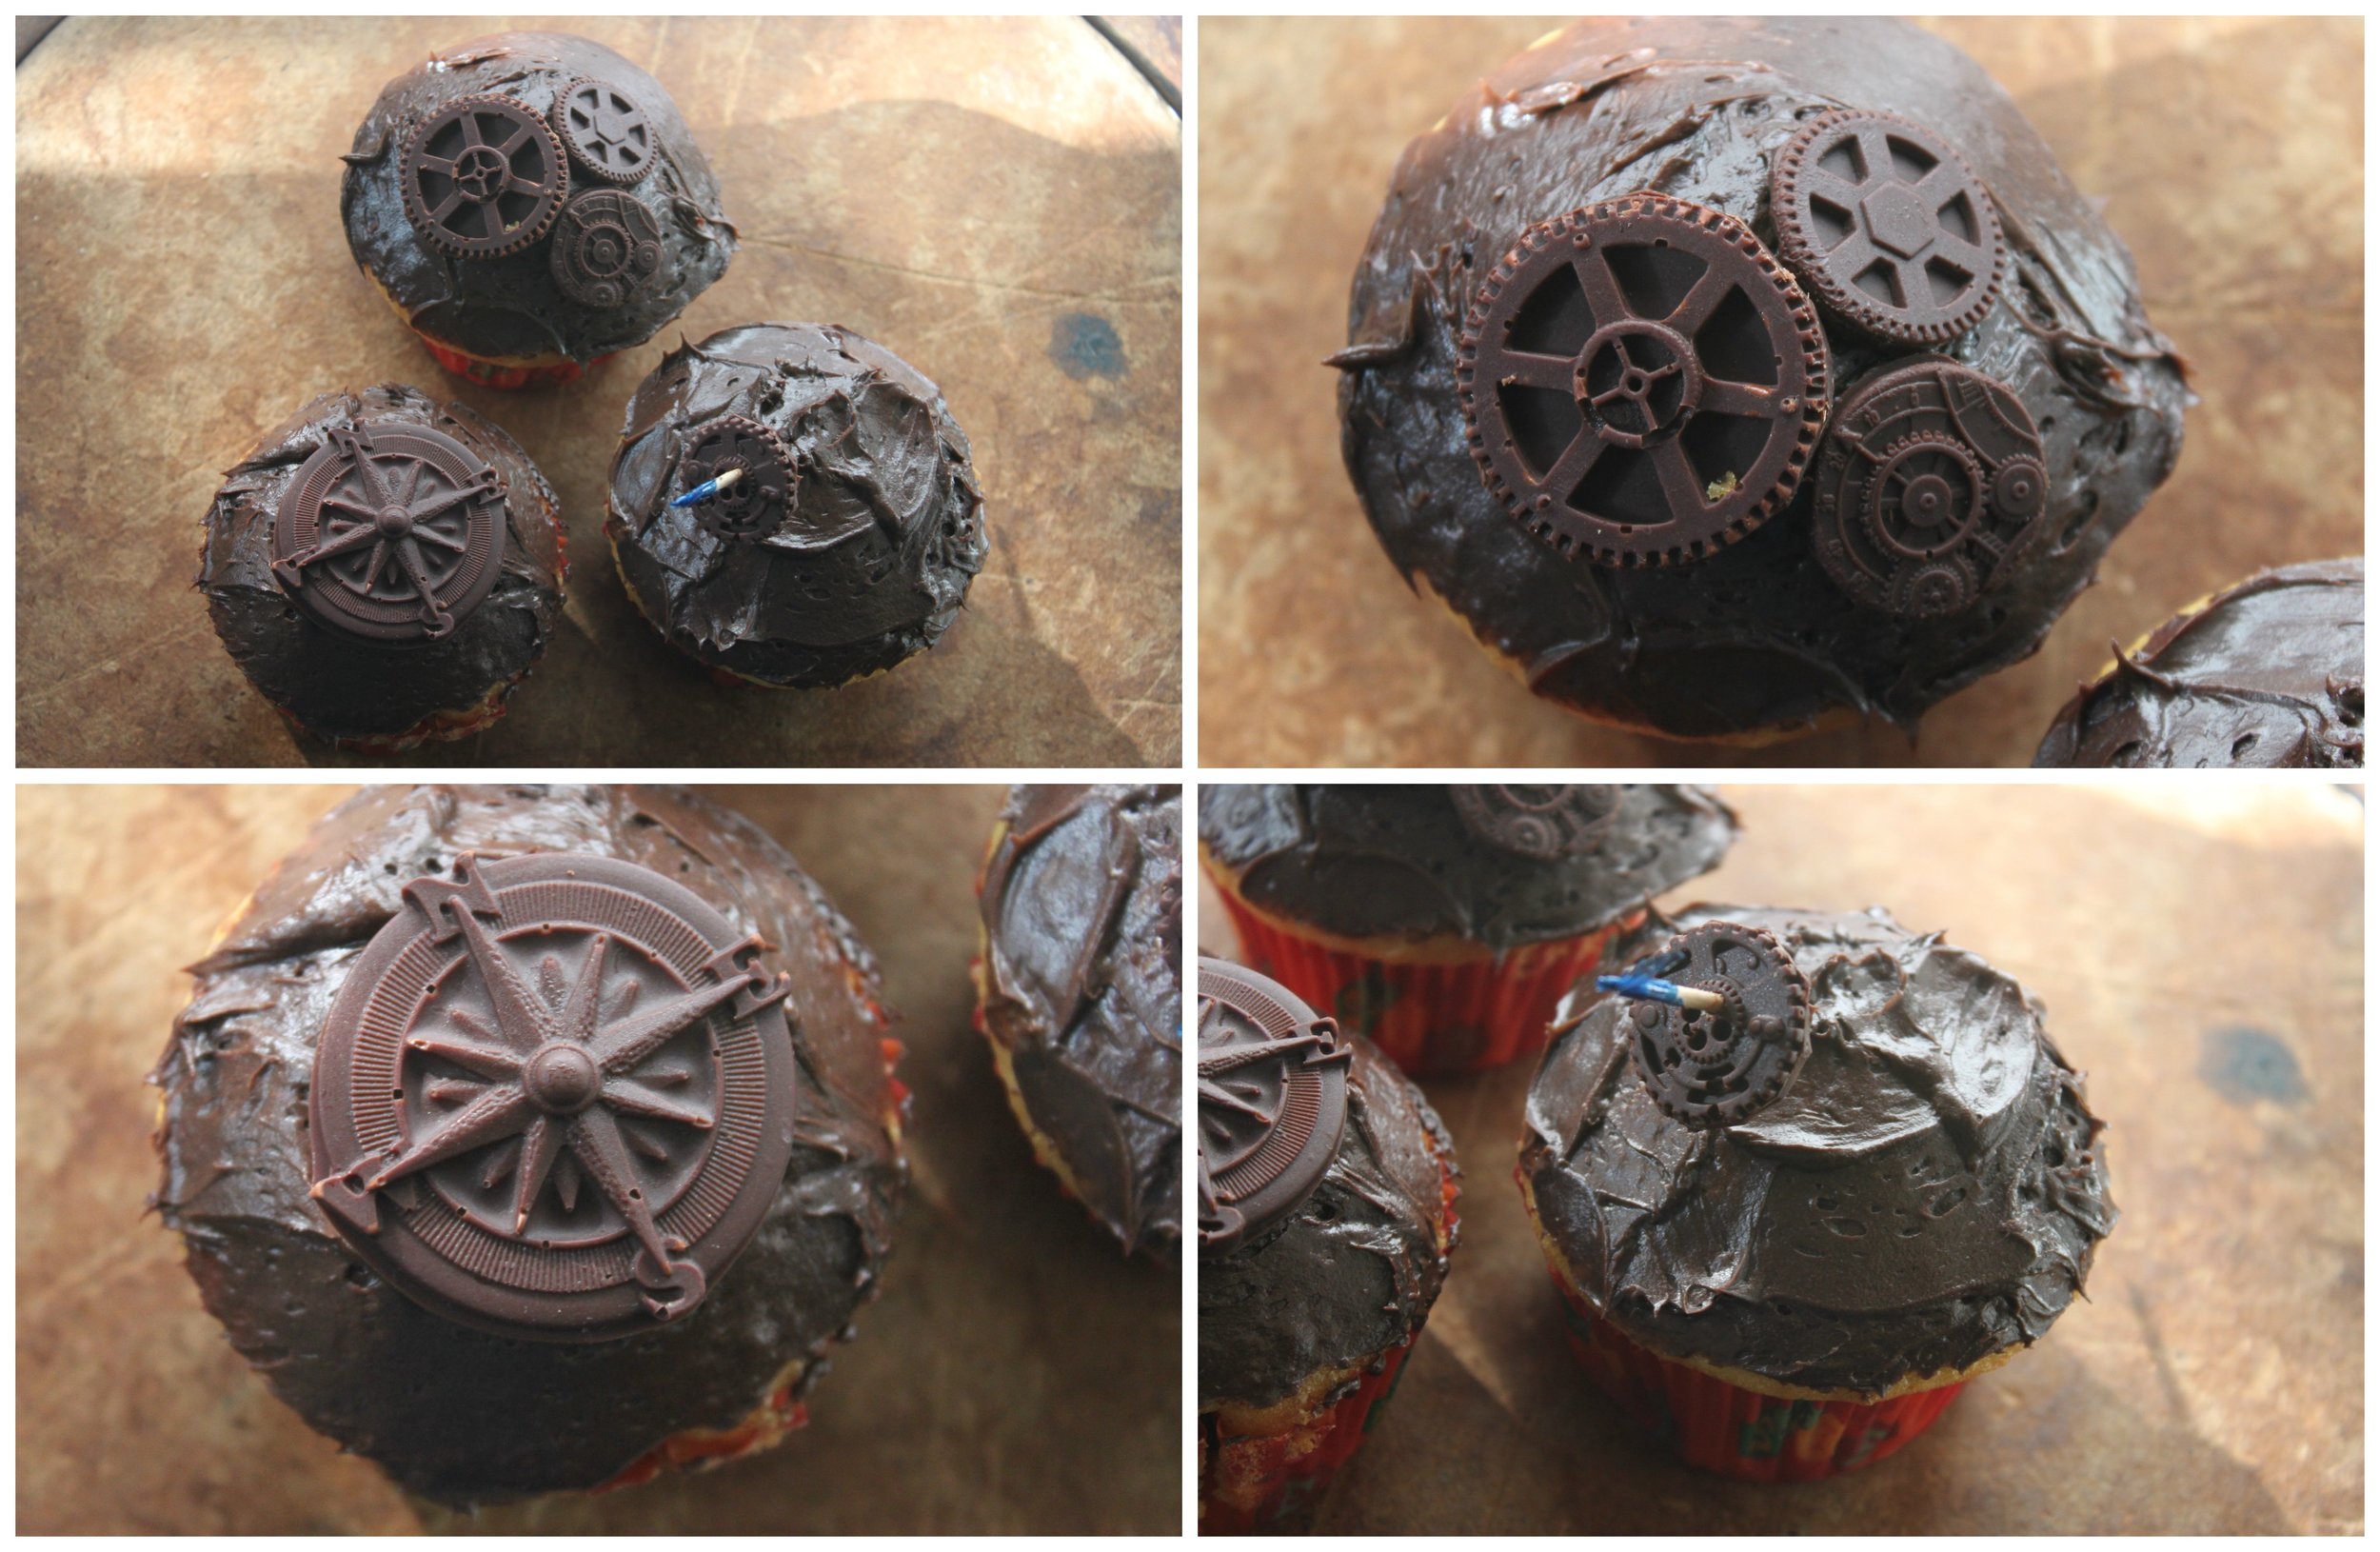 You'll need:
- Steampunk molds, safe for food. I highly recommend MoldMuse.
- Cake mix (or a cake recipe that you love)
- Frosting
- Bittersweet chocolate
- Pyrex measuring cup
- Sauce pan
- Vanilla extract (optional)
- Finely shaved orange peel (optional)
- Sandwich Toothpicks (optional)
- Oven and other baking supplies--bowls, spoons, etc.
 Steps:
For your steampunk chocolate pieces:
- Melt your bittersweet chocolate in a double-dutch pan (or if you don't own one, in a Pyrex measuring cup placed in the middle of a sauce pan filled with water). This prevents your chocolate from burning.
- Once your chocolate has melted, add vanilla extract and finely shaved orange peel if desired. Add to taste.
- Next, pour your chocolate into your molds. Be careful not to overfill your molds otherwise you will have to cut them down to shape.

- Once your molds are filled, place them in your refrigerator to set.
- Once your chocolate has hardened (about an hour or so), pop them out of your molds. Mine were very easy to pop out because MoldMuse's molds are flexible.
- If you did overfill your molds, grab a sharp knife and trim around the edges of your chocolate gear.
- Set aside in refrigerator while you bake your cupcakes.
Cupcakes:
- Bake as directed by your cake recipe or box instructions.
- Frost when cooled.
Steampunking your Cupcakes:
There are 2 ways you can steampunk your cupcakes: 1) By arranging your chocolate molds on top of your cupcakes and, 2) Making a gear rotatable with a sandwich toothpick through your cupcake.
Option 1:
- Arrange your chocolate gears on top of your cupcakes artfully.
Option 2:
- Poke a hole in your chocolate gear (large enough for your toothpick to go through).
- Slide the toothpick through the hole in the chocolate gear and then diagonally through your frosted cupcake (so that the toothpick comes out of the side). Clean any icing off of the toothpick with a wet cloth.
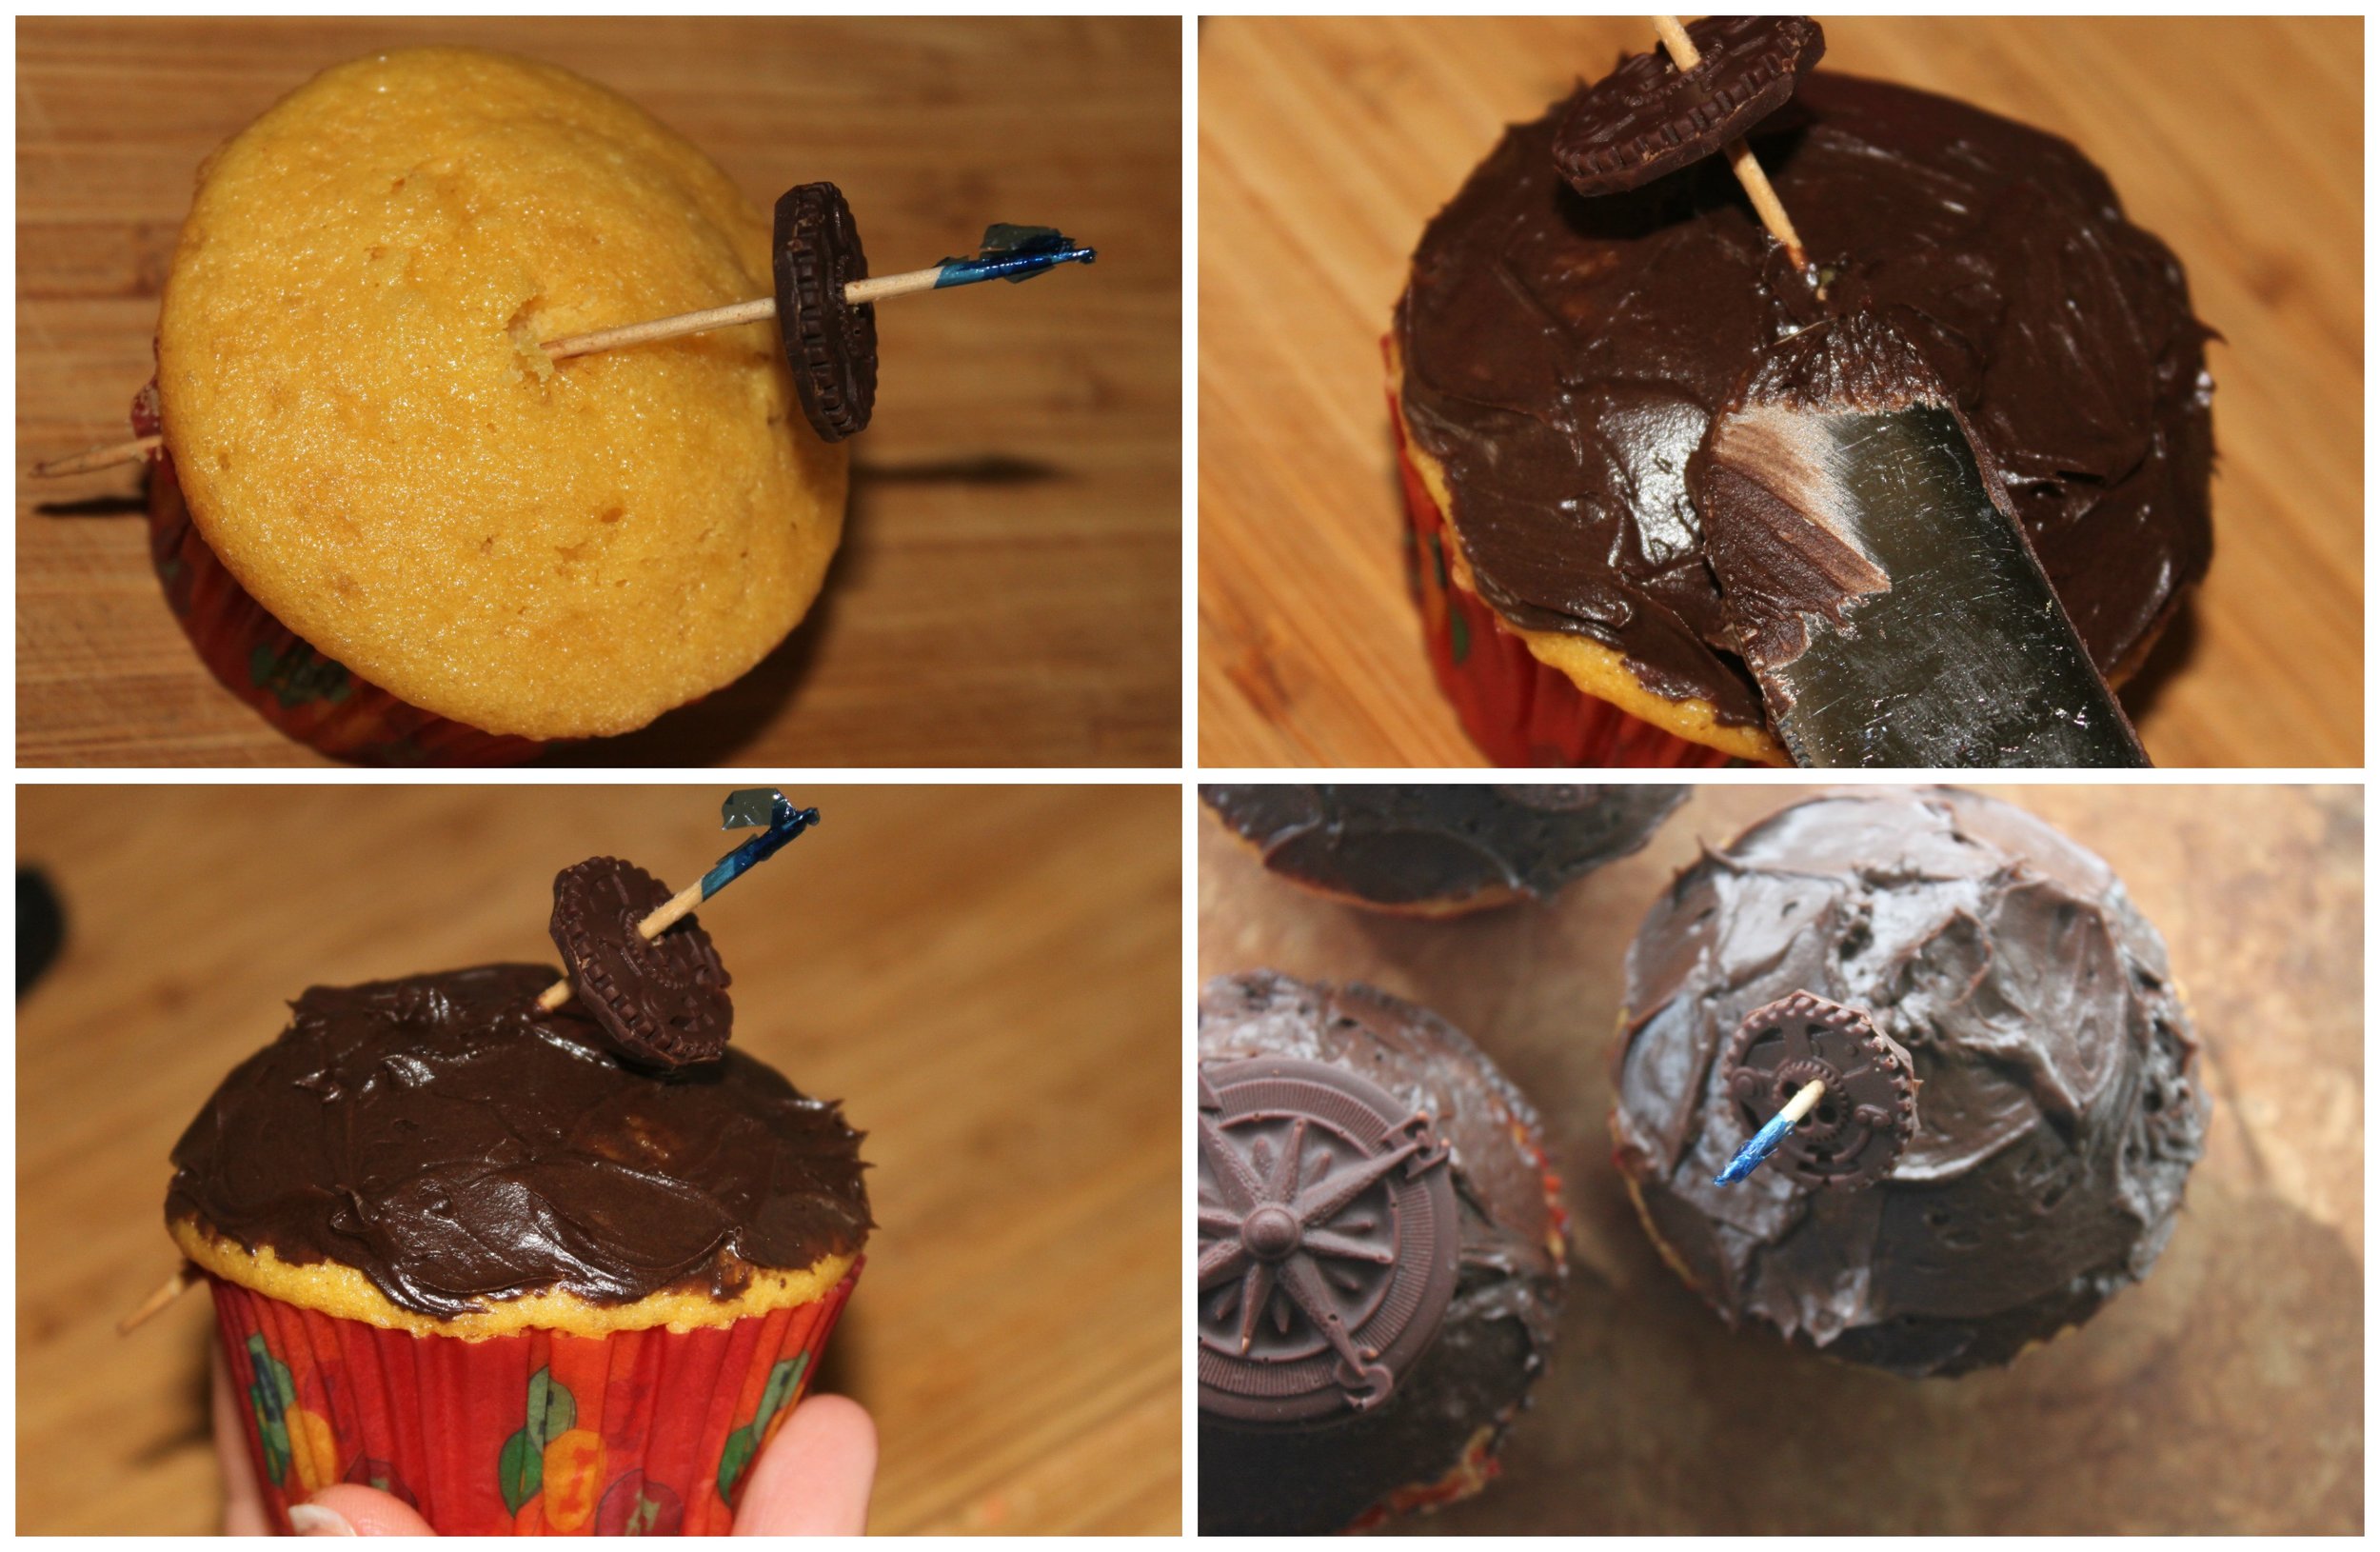
- Now your cupcake's gear turns! Watch the video to see![youtube=http://www.youtube.com/watch?v=C4PA6fucCqk]
It's Craftastic! Steampunk Halloween Candelabra
D-I-Y-CommentThanks to Laura Moss and KTUL's Good Day Tulsa for having me on their show! Here's a video demo of how to make your own steampunk candelabra for Halloween! It's Craftastic! Steampunk Halloween Candelabra.
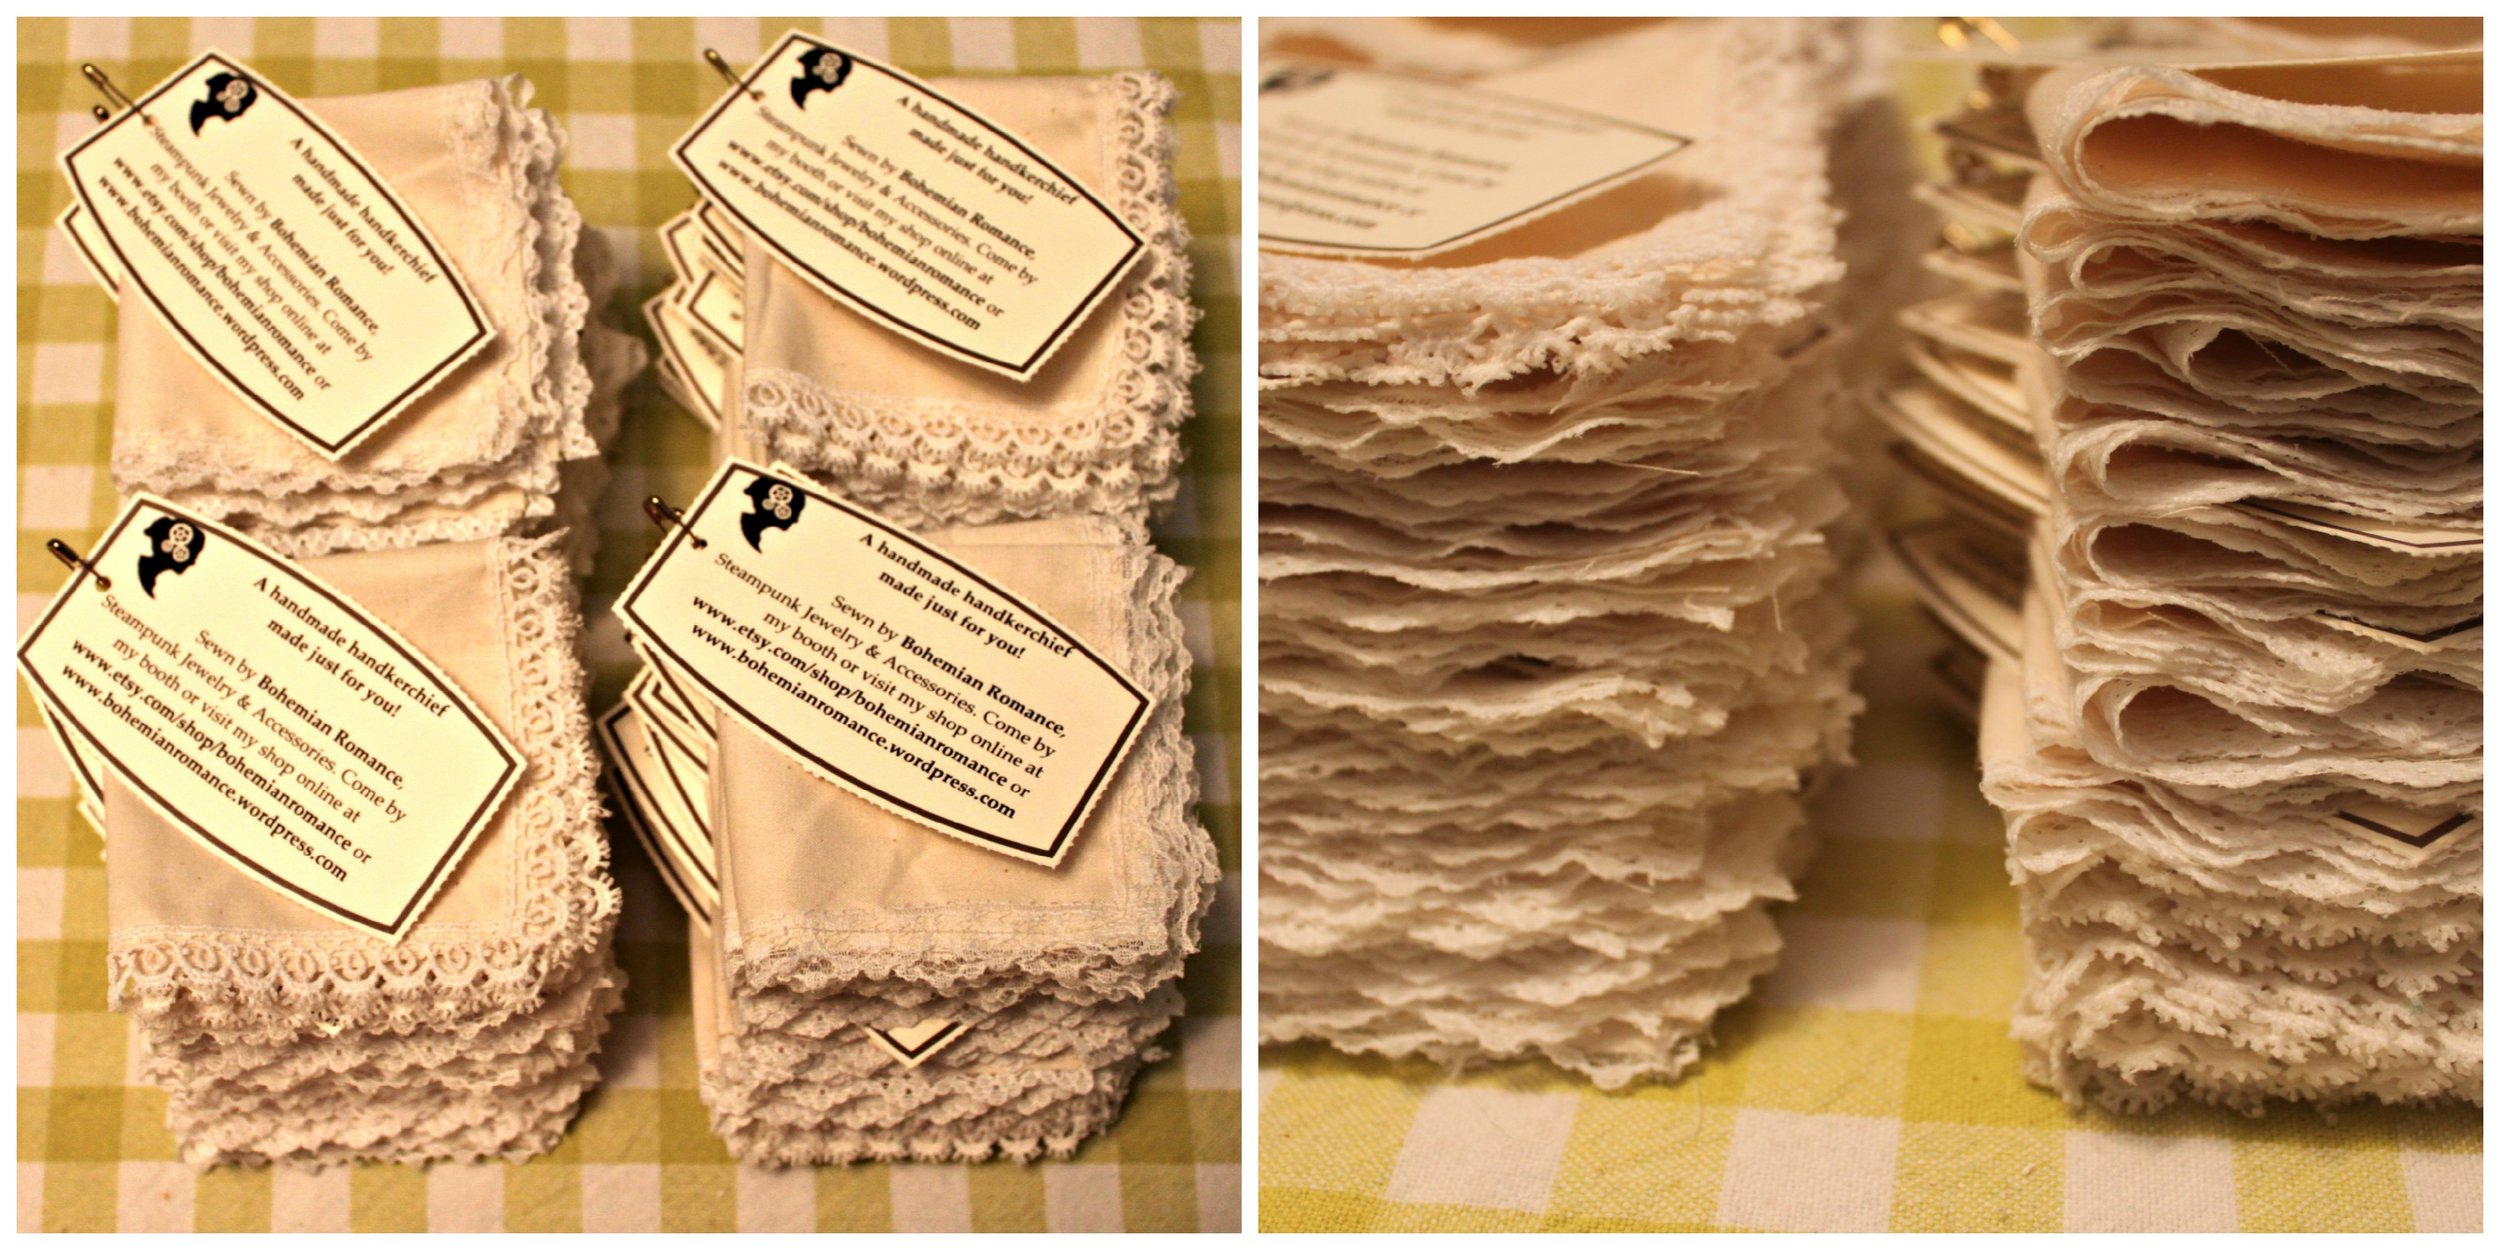
DIY Handkerchief
D-I-Y-4 CommentsAll ladies need a handkerchief, so why not make your own? Here's what you'll need:
- Square of Absorbent fabric (my fabric is a piece of 5x5 muslin)
- 20 inches of lace
- Pins
- Sewing machine
- Scissors; Olfa cutter
- Omnigrid ruler (or any other kind of fabric ruler)
- Embroidery thread & needle (optional)
 Steps:
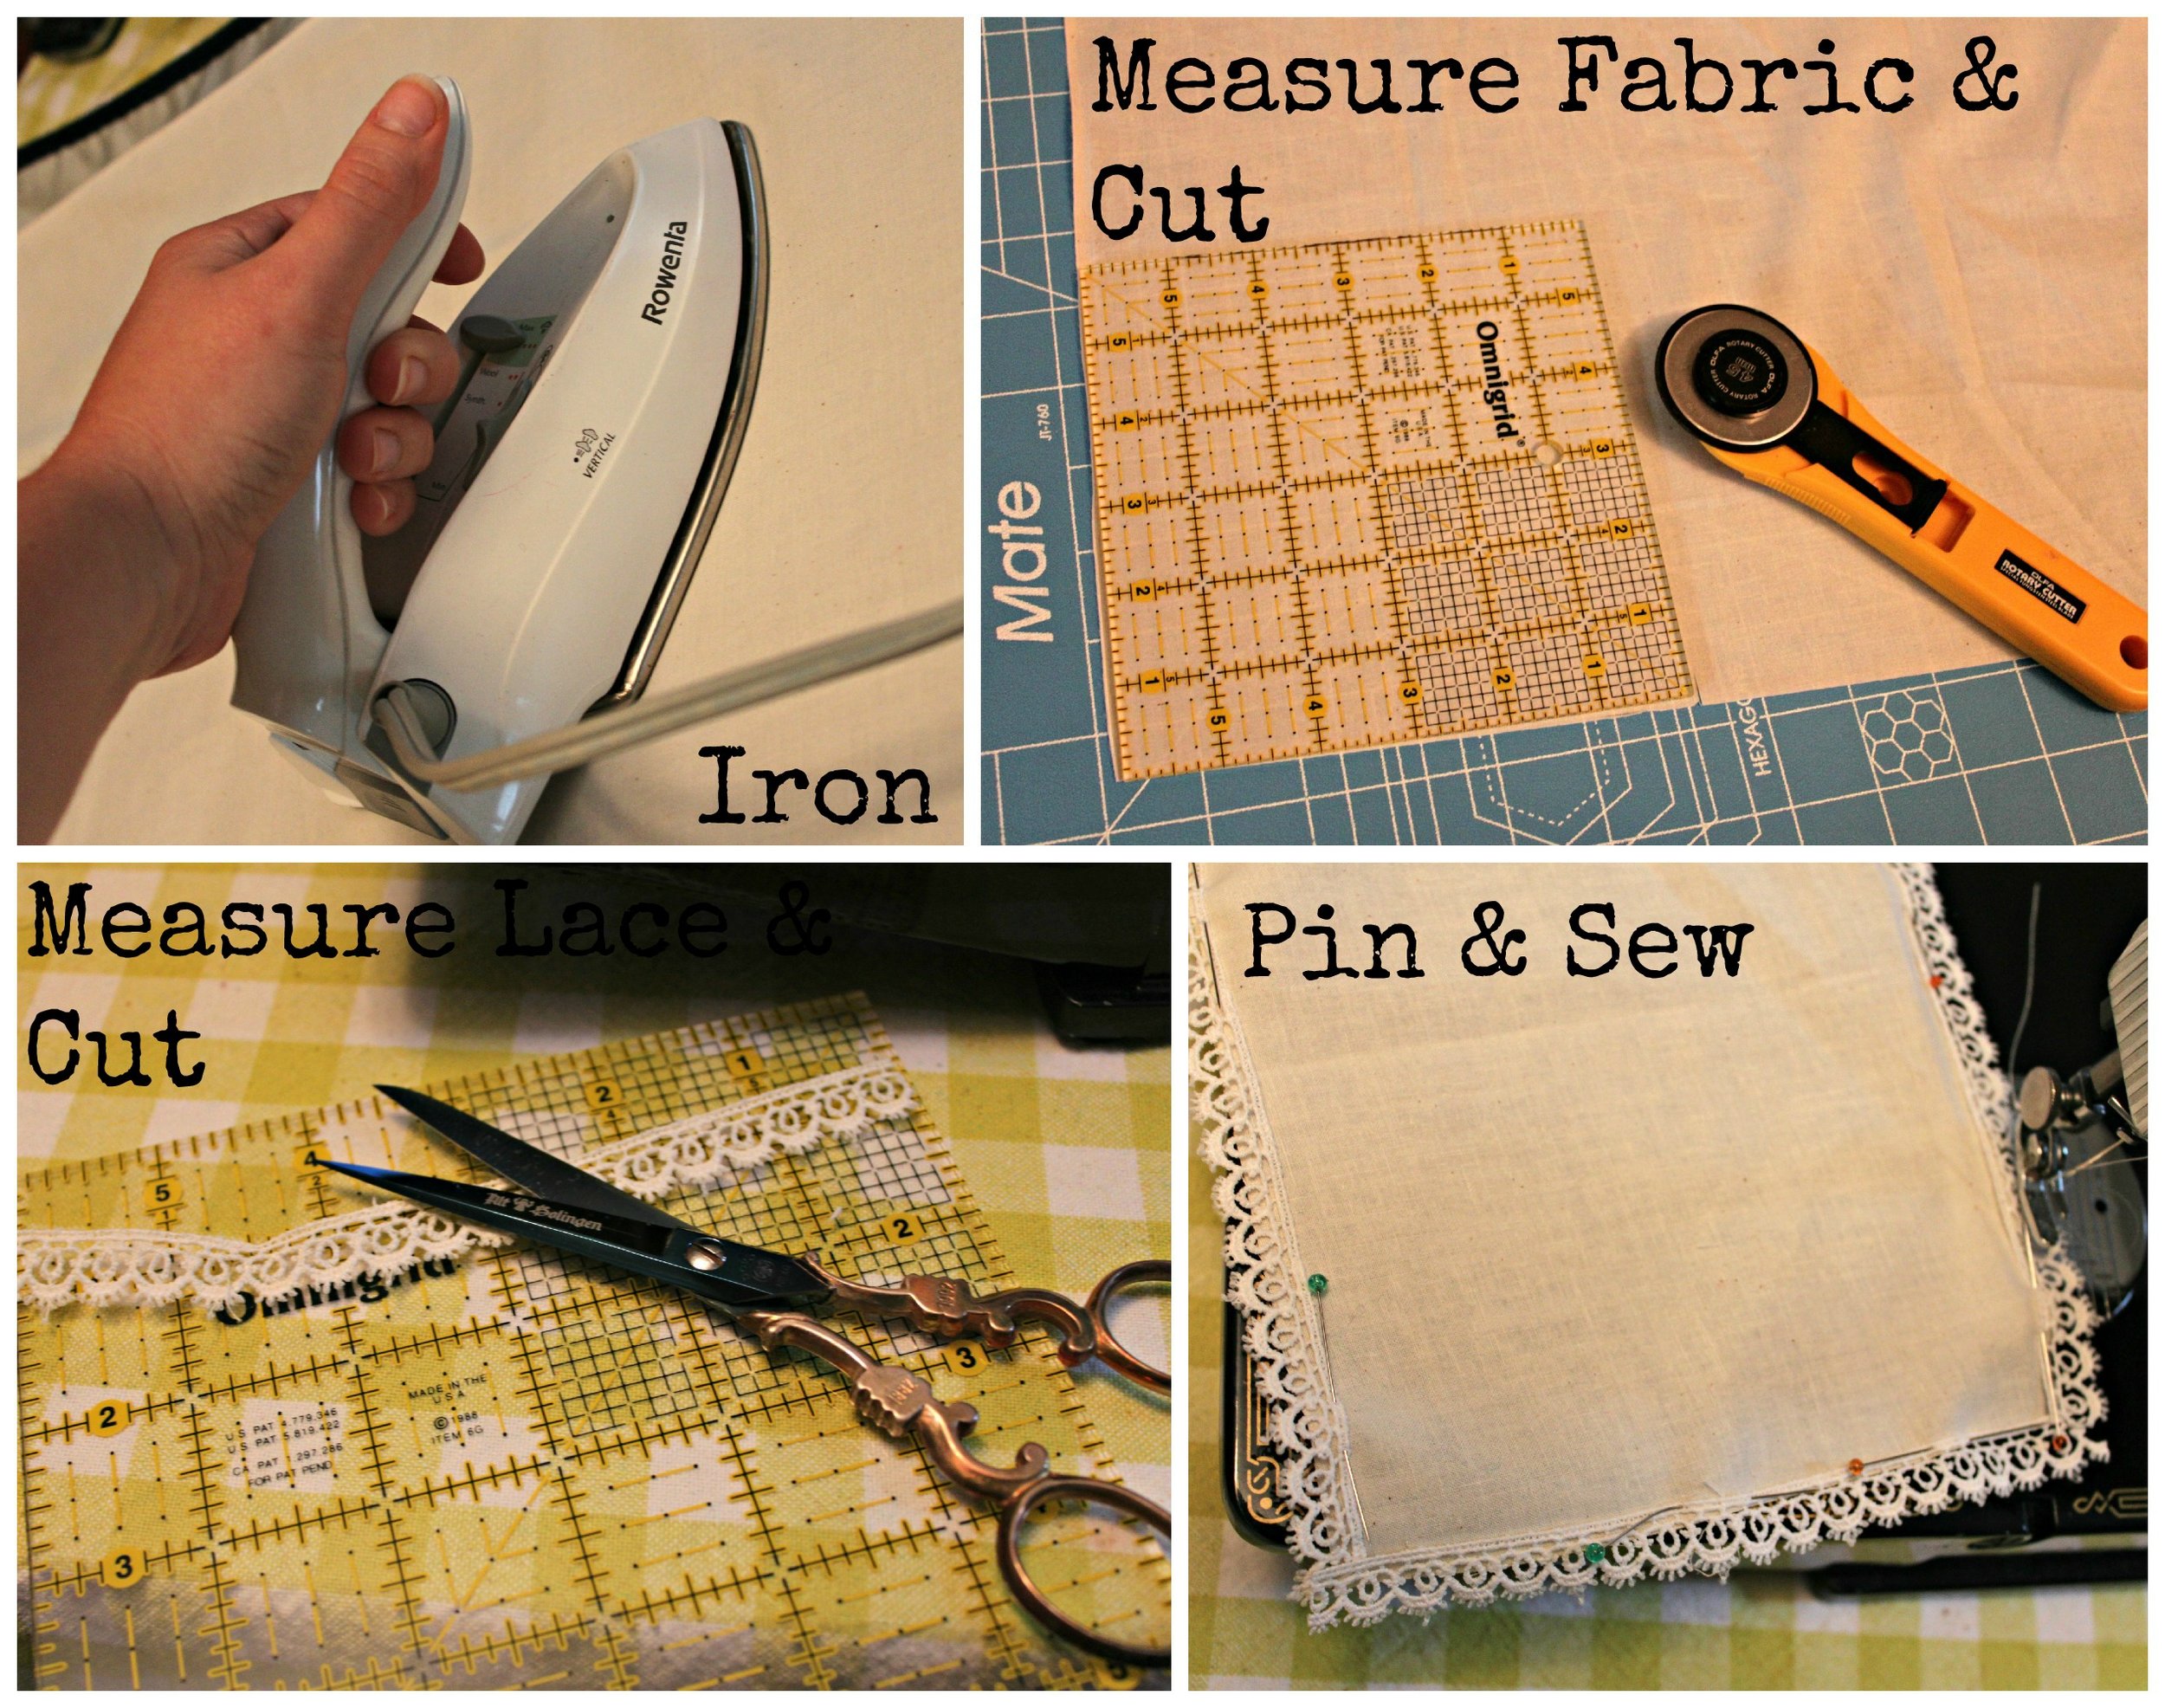
- Iron your fabric.
- Measure your fabric with your omnigrid (or other fabric ruler). I wanted a tiny handkerchief so that I could pin it inside my dress or tuck it inside my bodice. I measured it to be a 5x5 square. Equal sides work best (so 6x6, 8x8, 10x10, 12x12 for example) is best. Once you've measured your fabric, cut it out using your olfa cutter or scissors.
- Next measure your lace. You want 4 pieces all equal to the length of your handkerchief sides. I measured and cut 4 pieces of 5 inch lace since I have a 5x5 handkerchief.

- Pin your lace in place. Make sure that your lace overlaps at the edges. Then sew. You can sew continuously by lifting up your machine's foot and pivoting your handkerchief. Cut off any excess threads.
- (Optional) Embroider your initials or an elegant design on your handkerchief. You can also both embroider & draw on your handkerchief (as I've done above. I embroidered the initial "C" and drew a pretty floral design using a micropoint fabric pen).
These handkerchiefs are elegant & easy to make. They are a perfect bridesmaid gift! I am making handkerchiefs as a giveaway for Marry Me Indie! The first 50 brides to attend will receive a bag full of free goodies from each of the vendors. So if you want a handmade muslin & lace handkerchief of your very own--come by the show early!
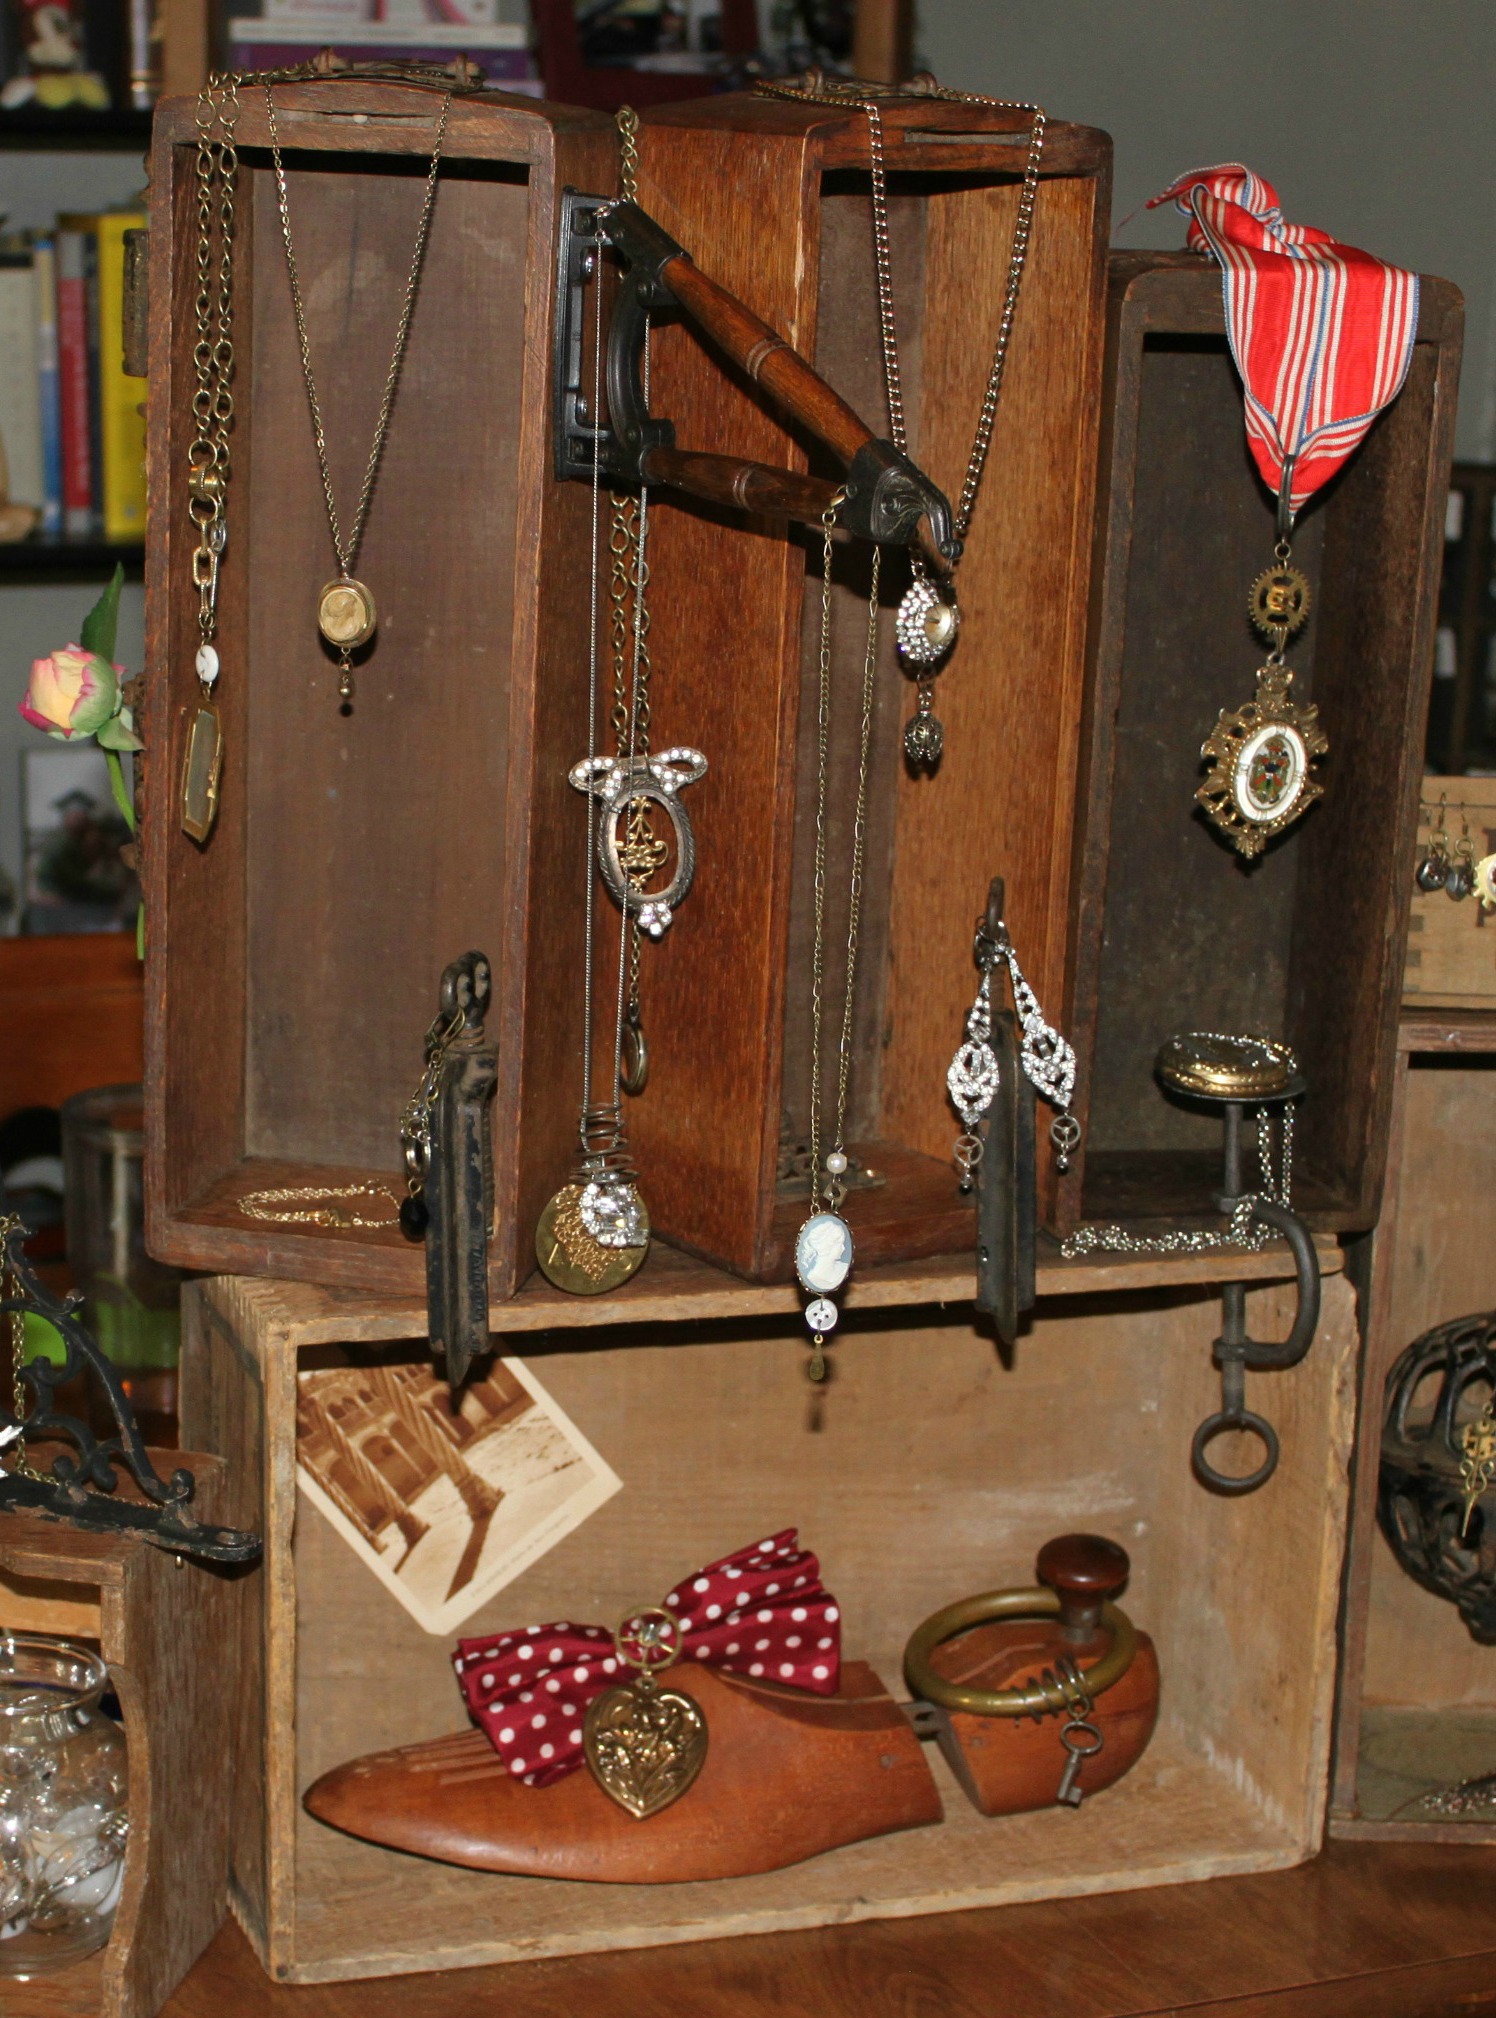
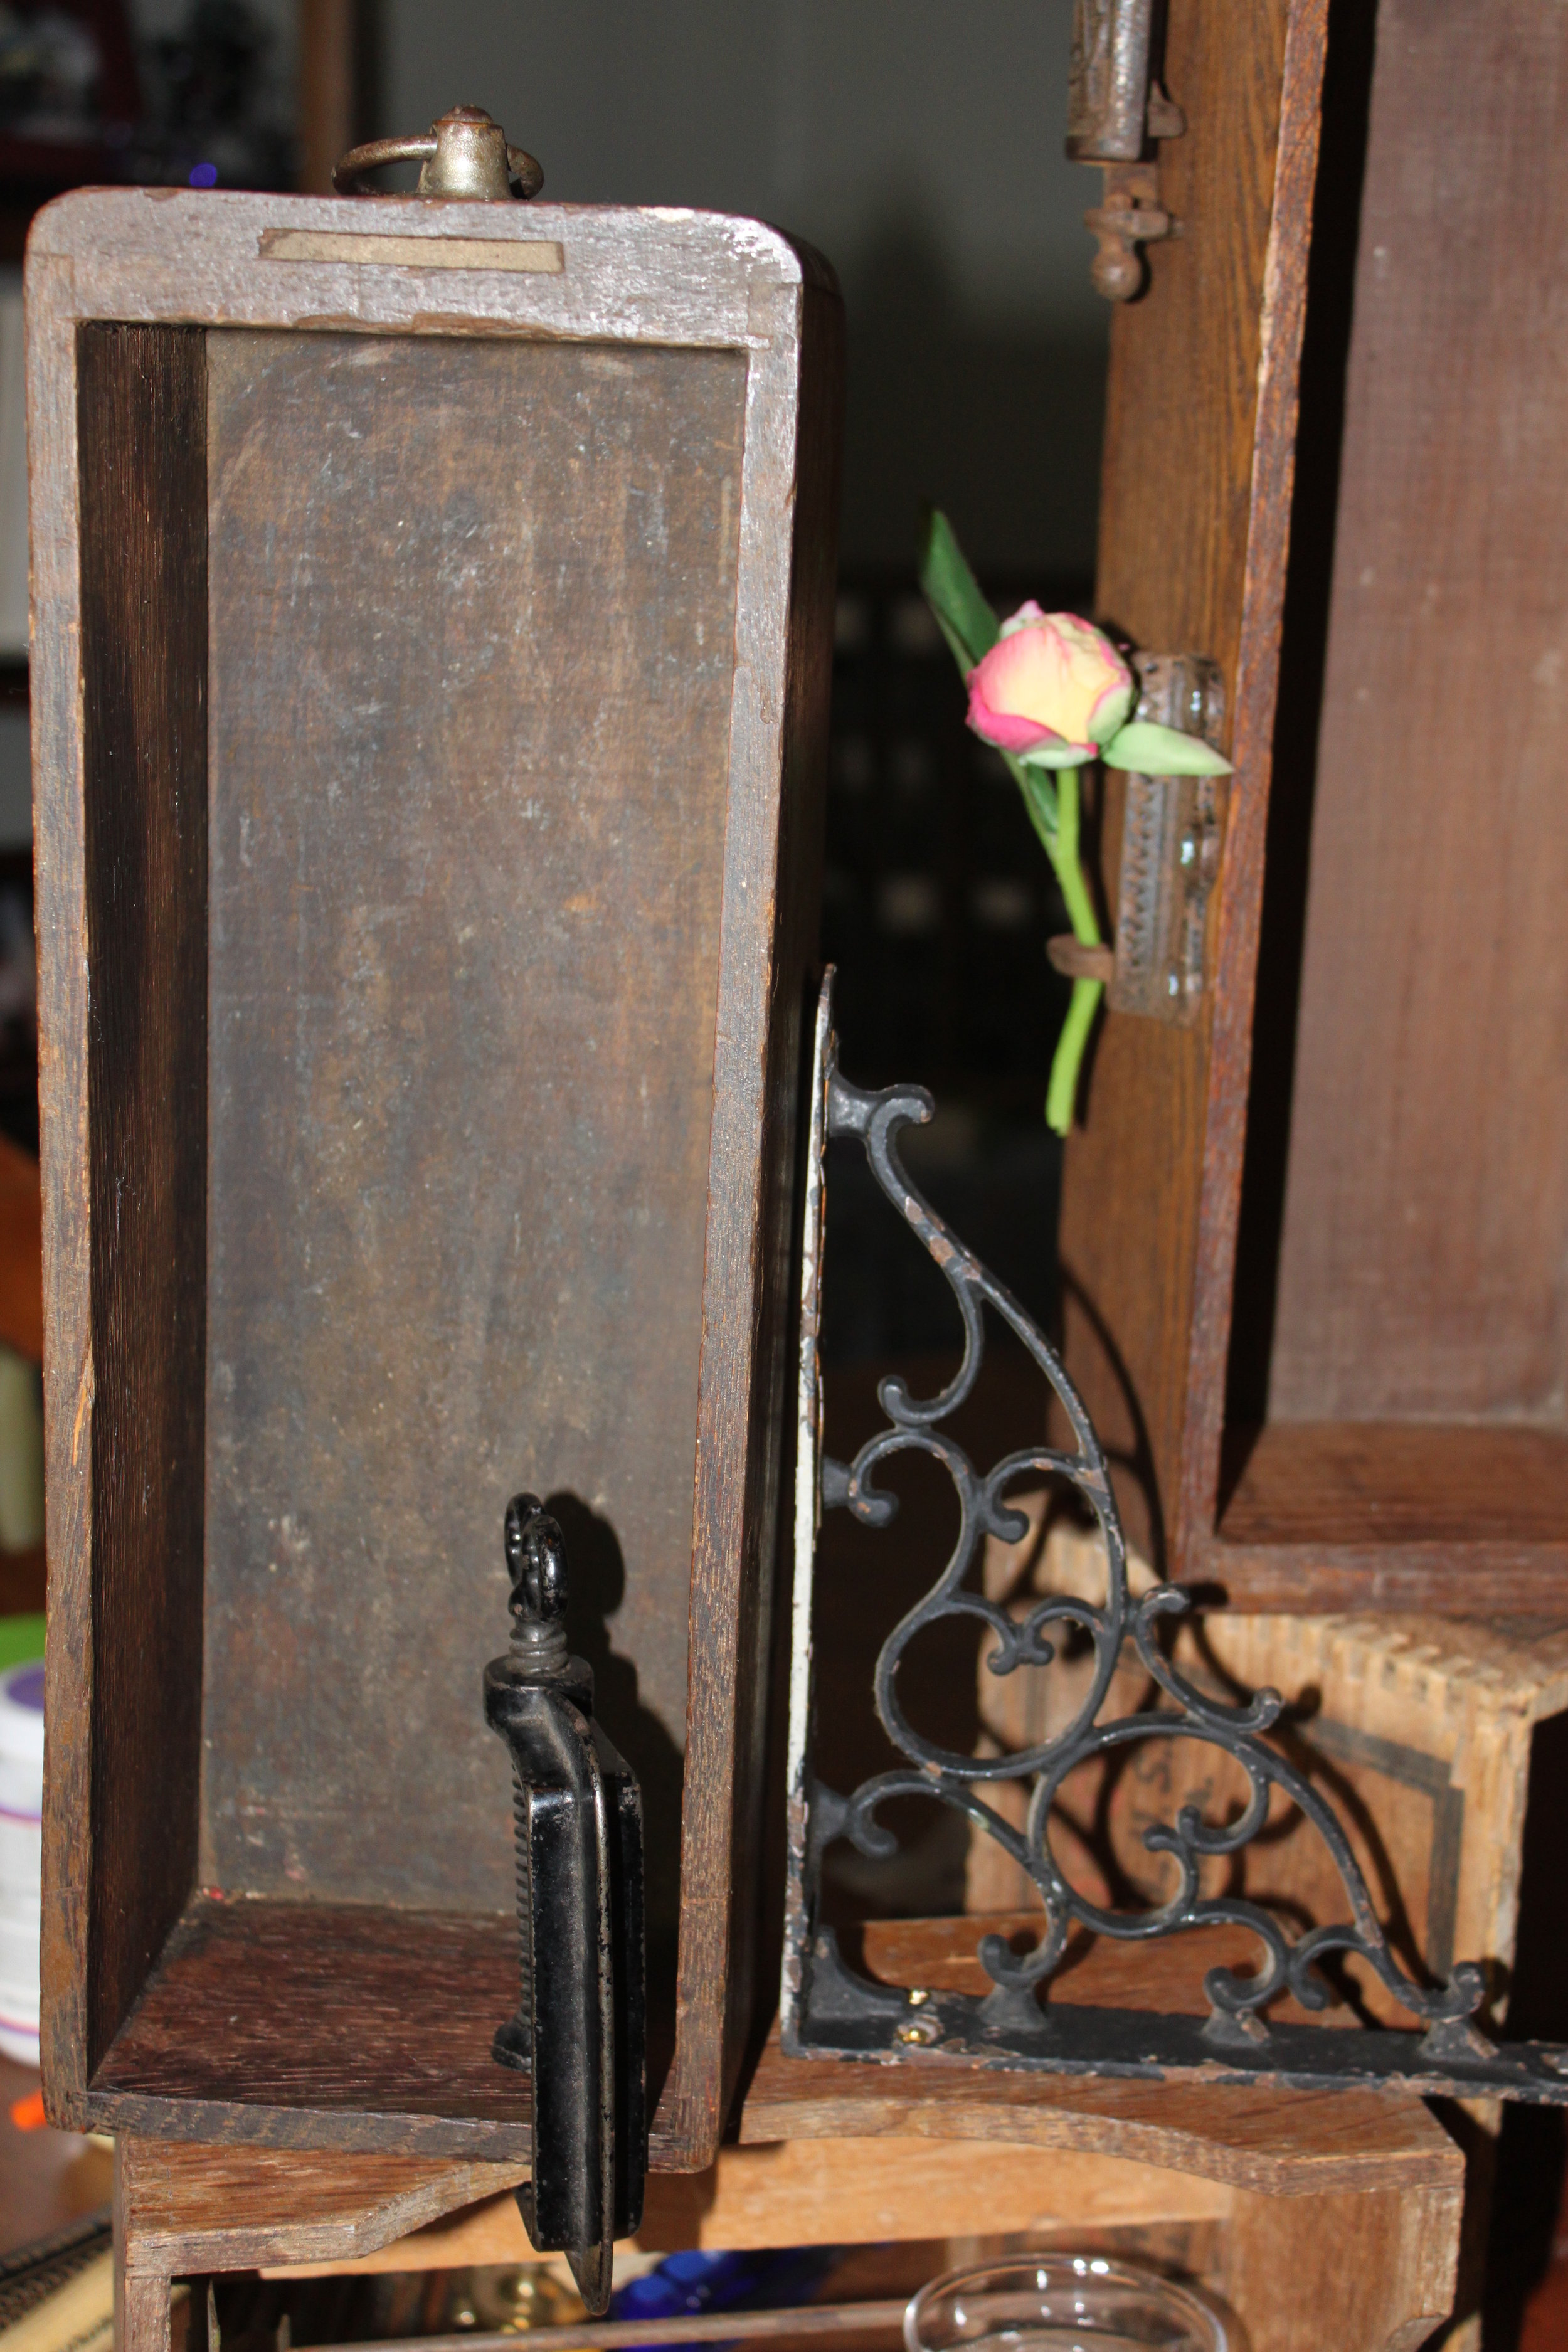
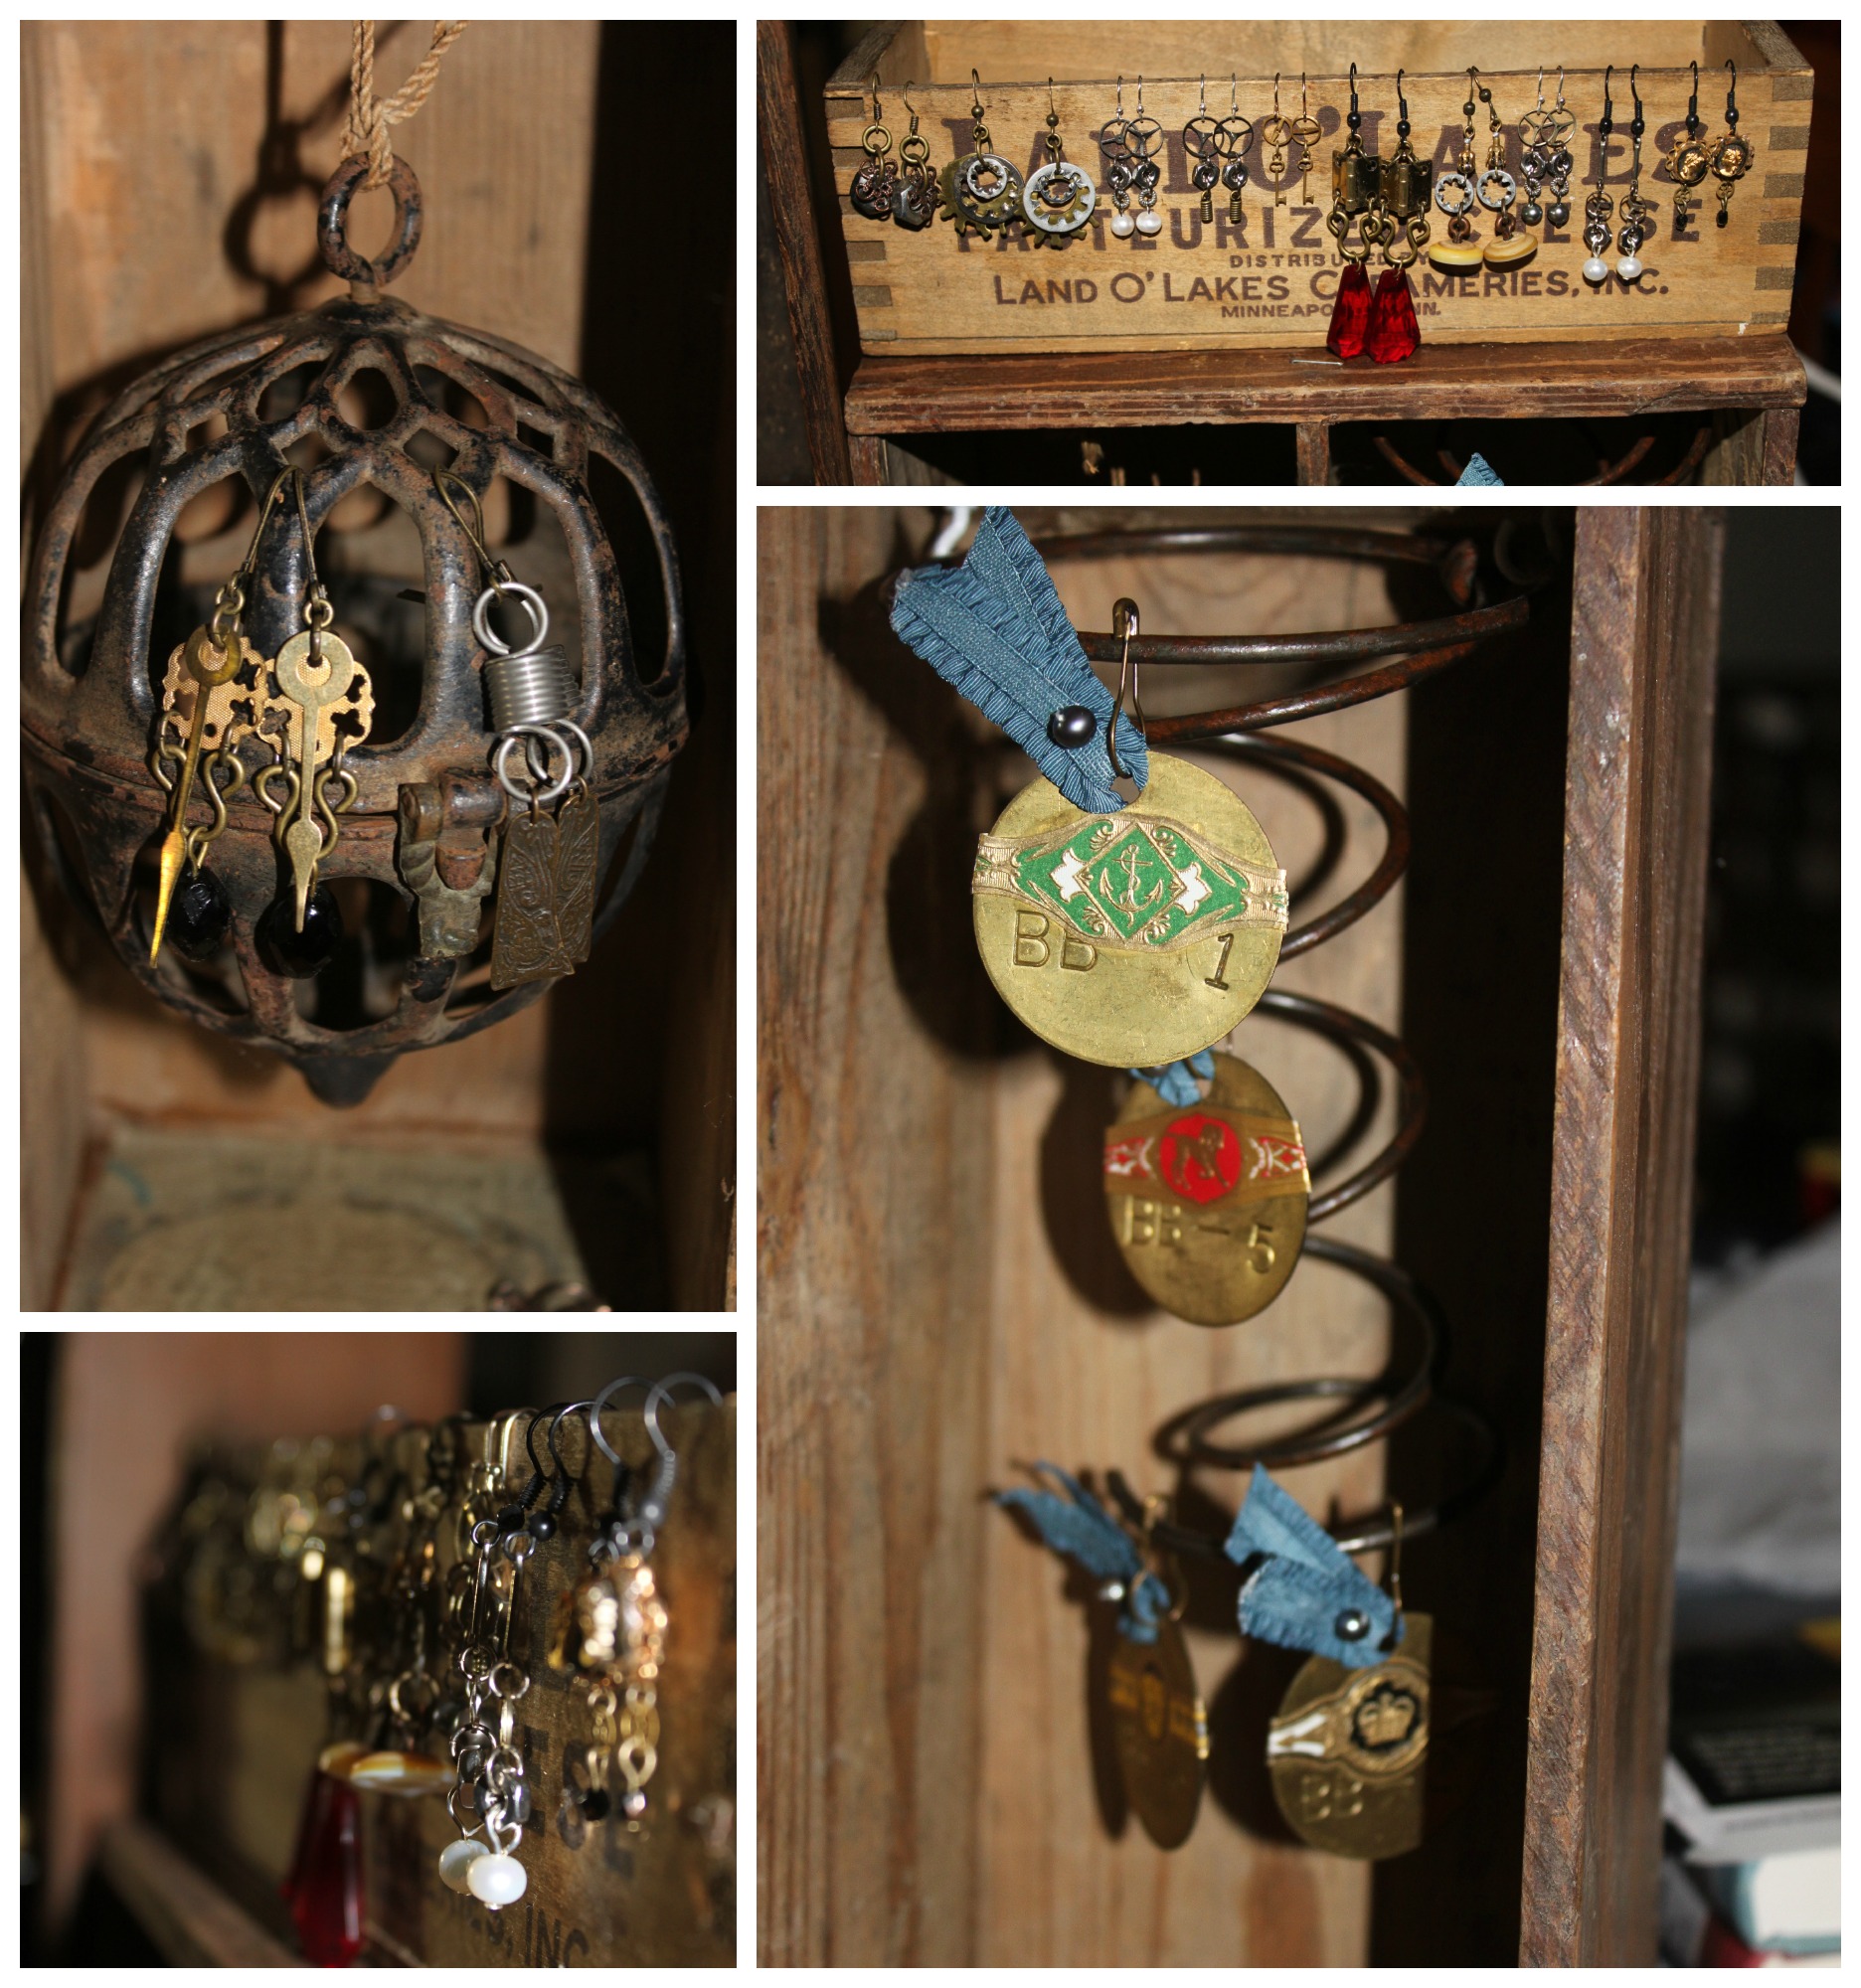
DIY Jewelry Display, Style No. 3
D-I-Y-CommentIf you have a steampunk crafty business, or perhaps an old-timey aesthetic, your booth should convey the feeling of your products. This is something I feel that I do quite well and I am quite proud of. Many people stop by my booth just to look at the curiosities inside. This is the last in a series of 3 blog posts on how to recreate 3 of my newest displays for yourselves! Too see Style No. 1, click here & Style No. 2, click here. For Style No. 3, read on!
Style No. 3
What You'll Need: 4 boxes (1 large and 3 small); 4 screws; drill & screwdriver; Murphy's Oil; medium-large cup hooks, as many as preferred; awl; 3 c-clamps; photo; shoe horn; decorative hook (mine's actually part of an old naval navigation piece); and decorative metal bracket
A Note on Where to Find Boxes: Flea Markets; Garage Sales; Antique Malls; and ReStores (which benefit Habitat for Humanity)--Look for sewing machine drawers & old produce crates especially. Avoid any boxes with mold, badly split sections of wood, or water damage. They will not be as structurally sound and may break with minor hammering.
Instructions:
- Clean your boxes with soap and water (be careful not to soak your boxes). Shine them with a little bit of Murphy's Oil. Let dry completely.
- Place your sewing drawers (or small boxes), hook/navigation piece and metal bracket where you'd like them. Mark with pencil where you need to screw your metal bracket in place. Also, mark the corners of your sewing drawers so if you choose for it to be removable you can place it back in the same spot. (I would suggest making your drawer removable because when you transport these kinds of displays, they can shift and it is much easier to adjust a c-clamp than having to re-screw the box on location).
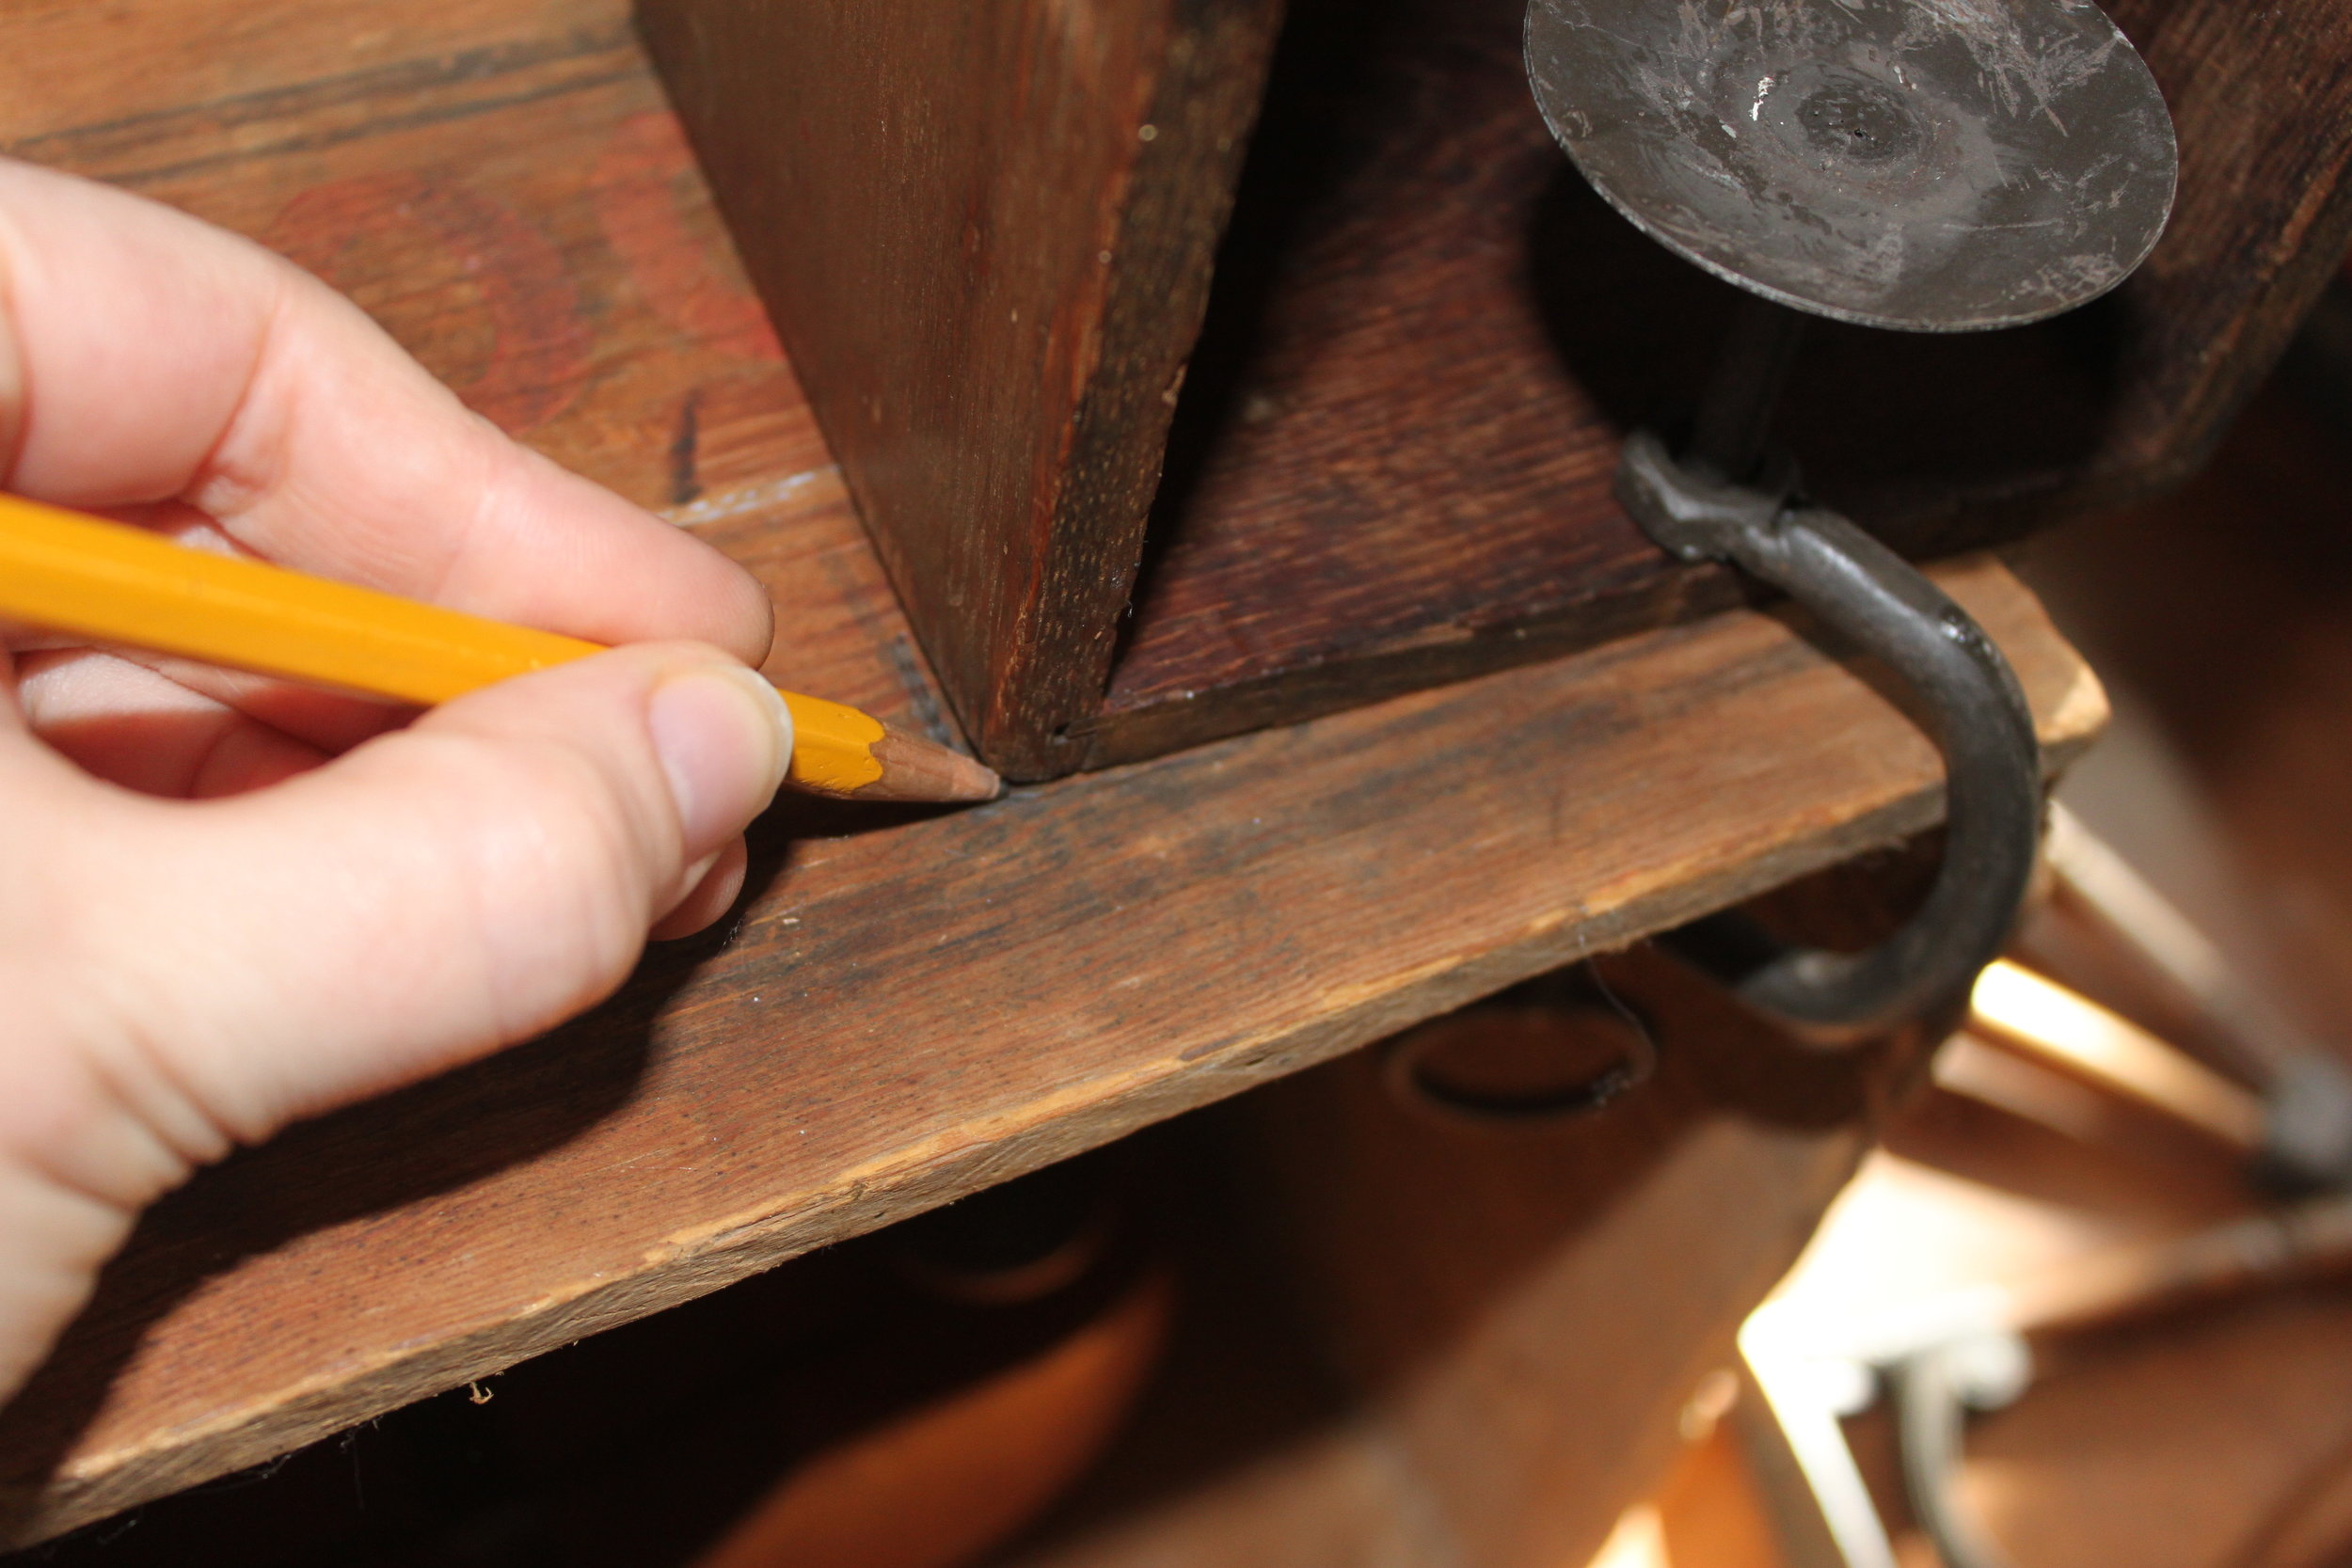
- The Box that you want the hook/navigation piece on: Make starter holes where you've marked using your awl (for softer woods) or your drill (for harder/thicker woods). Then screw your hook/navigation piece in place. Set aside.
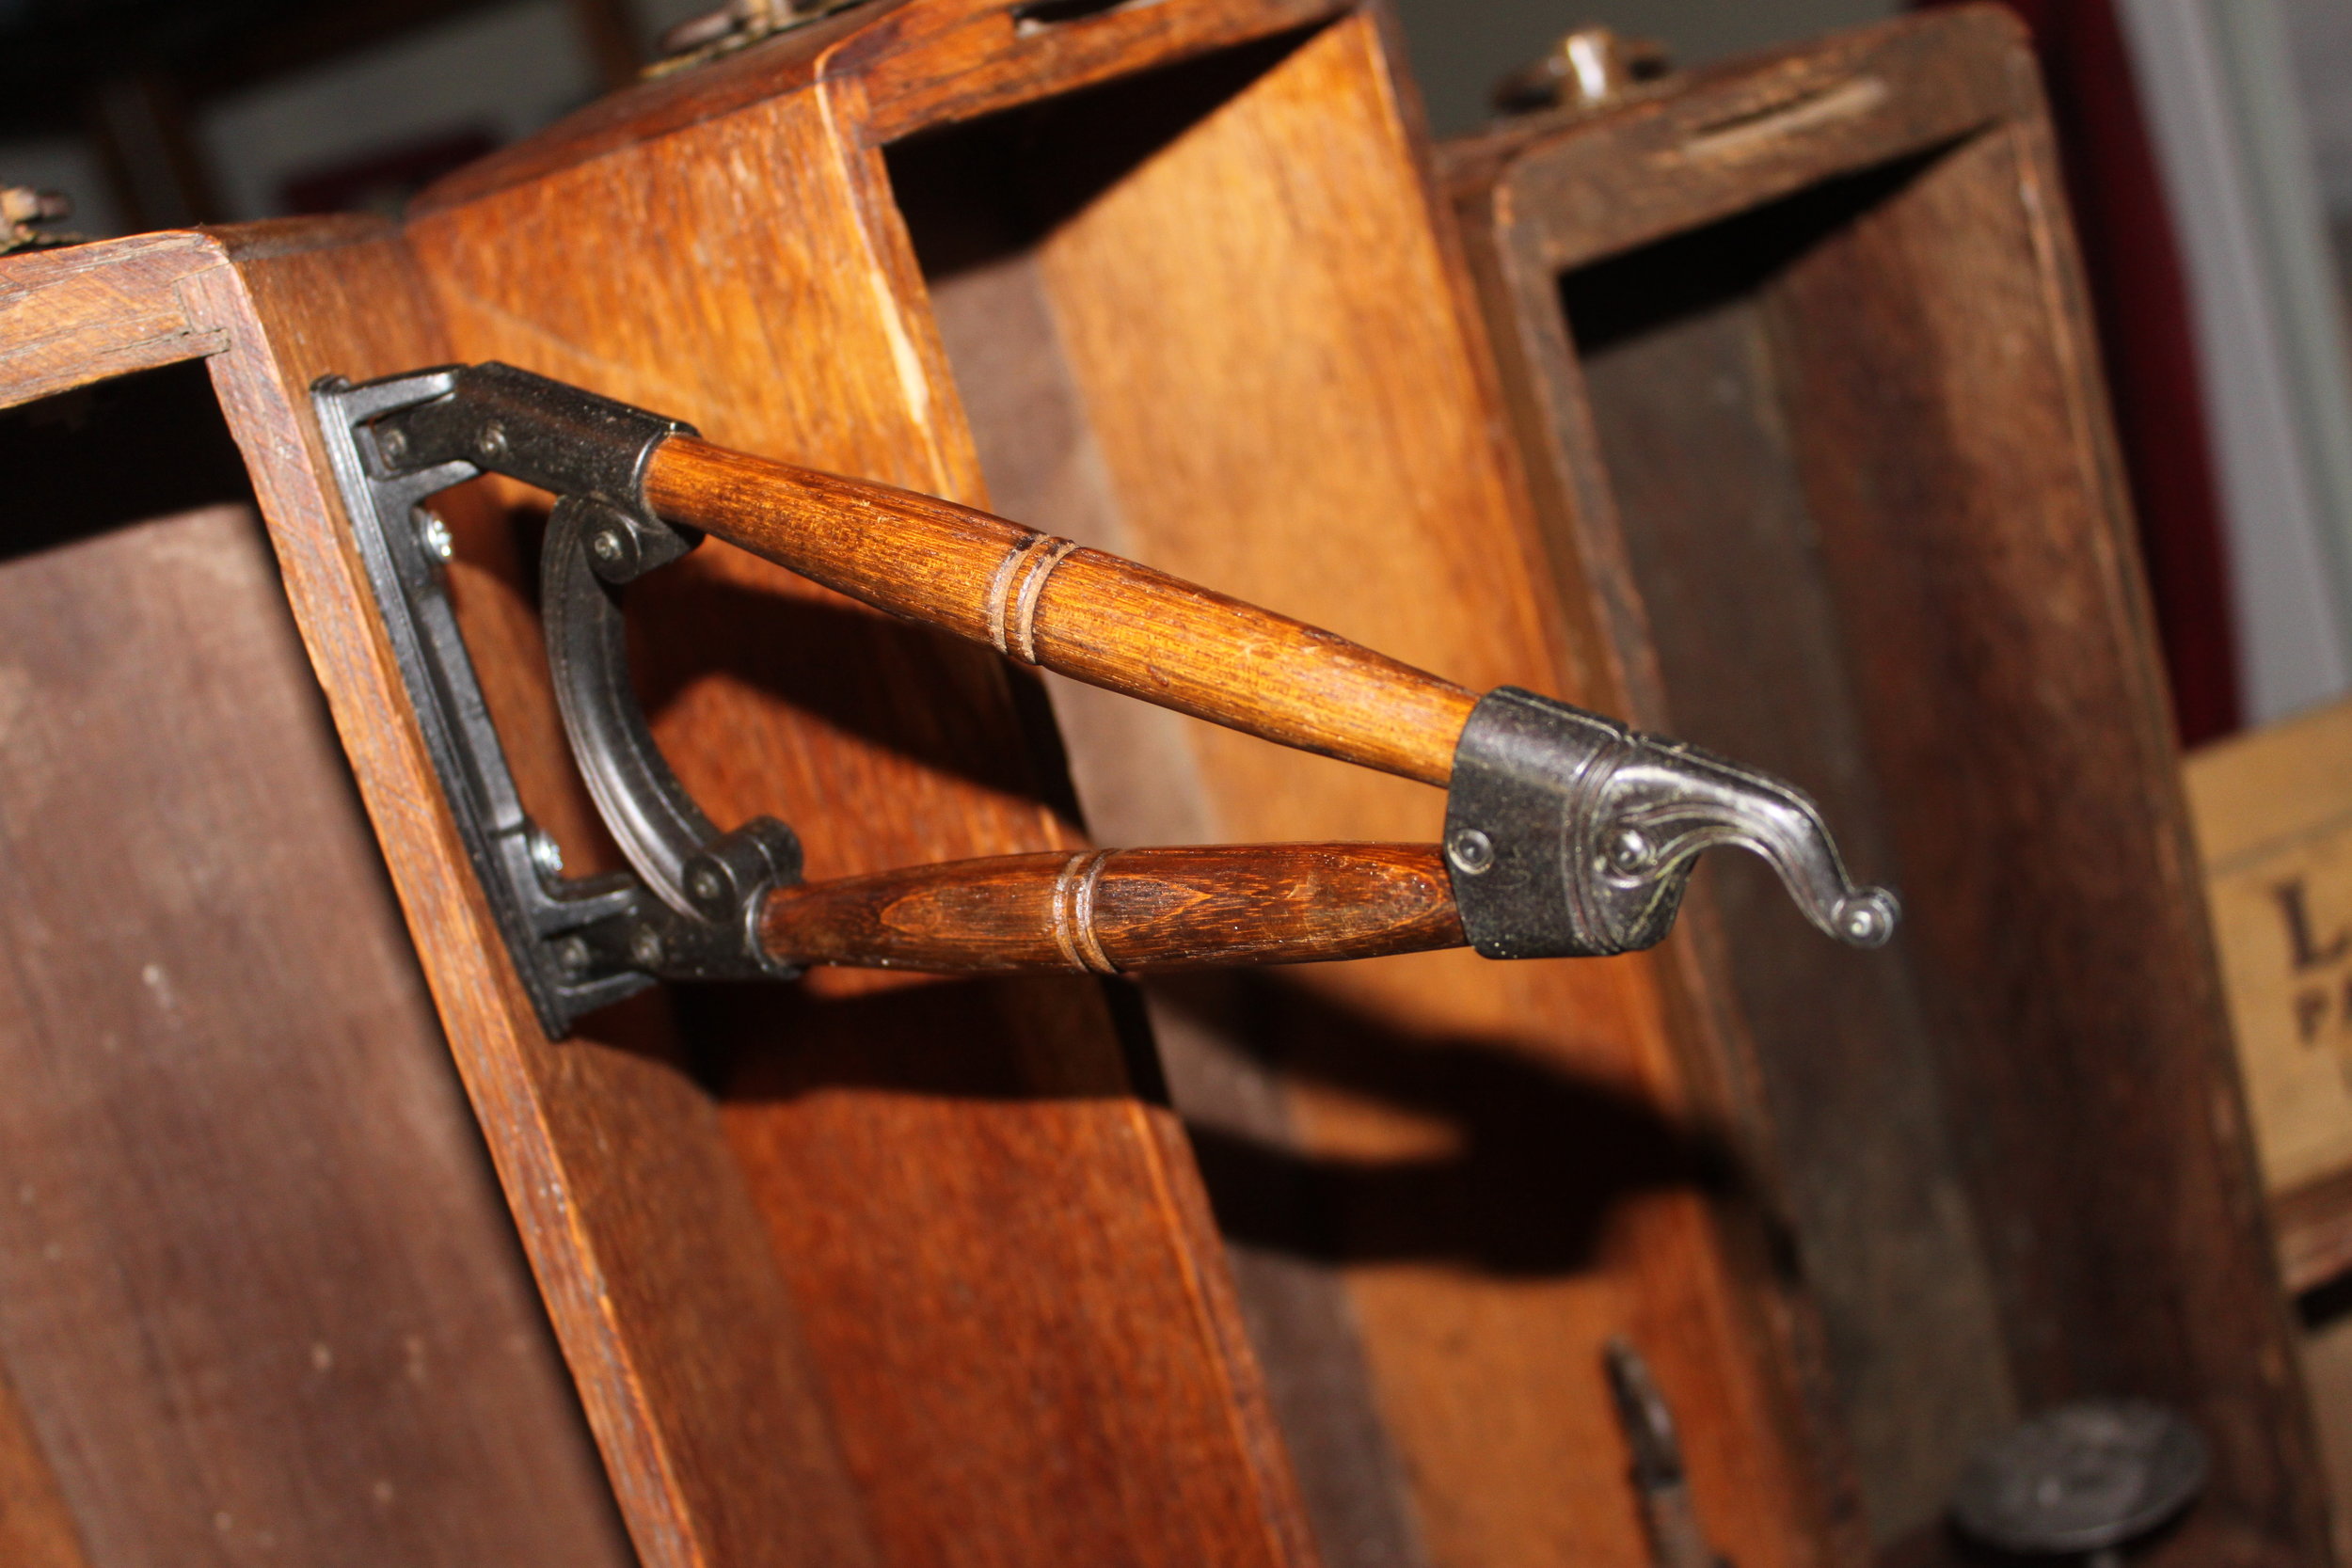
- The Box that you want the decorative metal bracket in: Repeat step 3.

- Clamp your sewing drawers in place using your c-clamps.

- Make starter holes for your cup hooks and then screw your cup hooks in place to hang your jewelry off of.

- Place your shoe horn in the bottom box (optional).
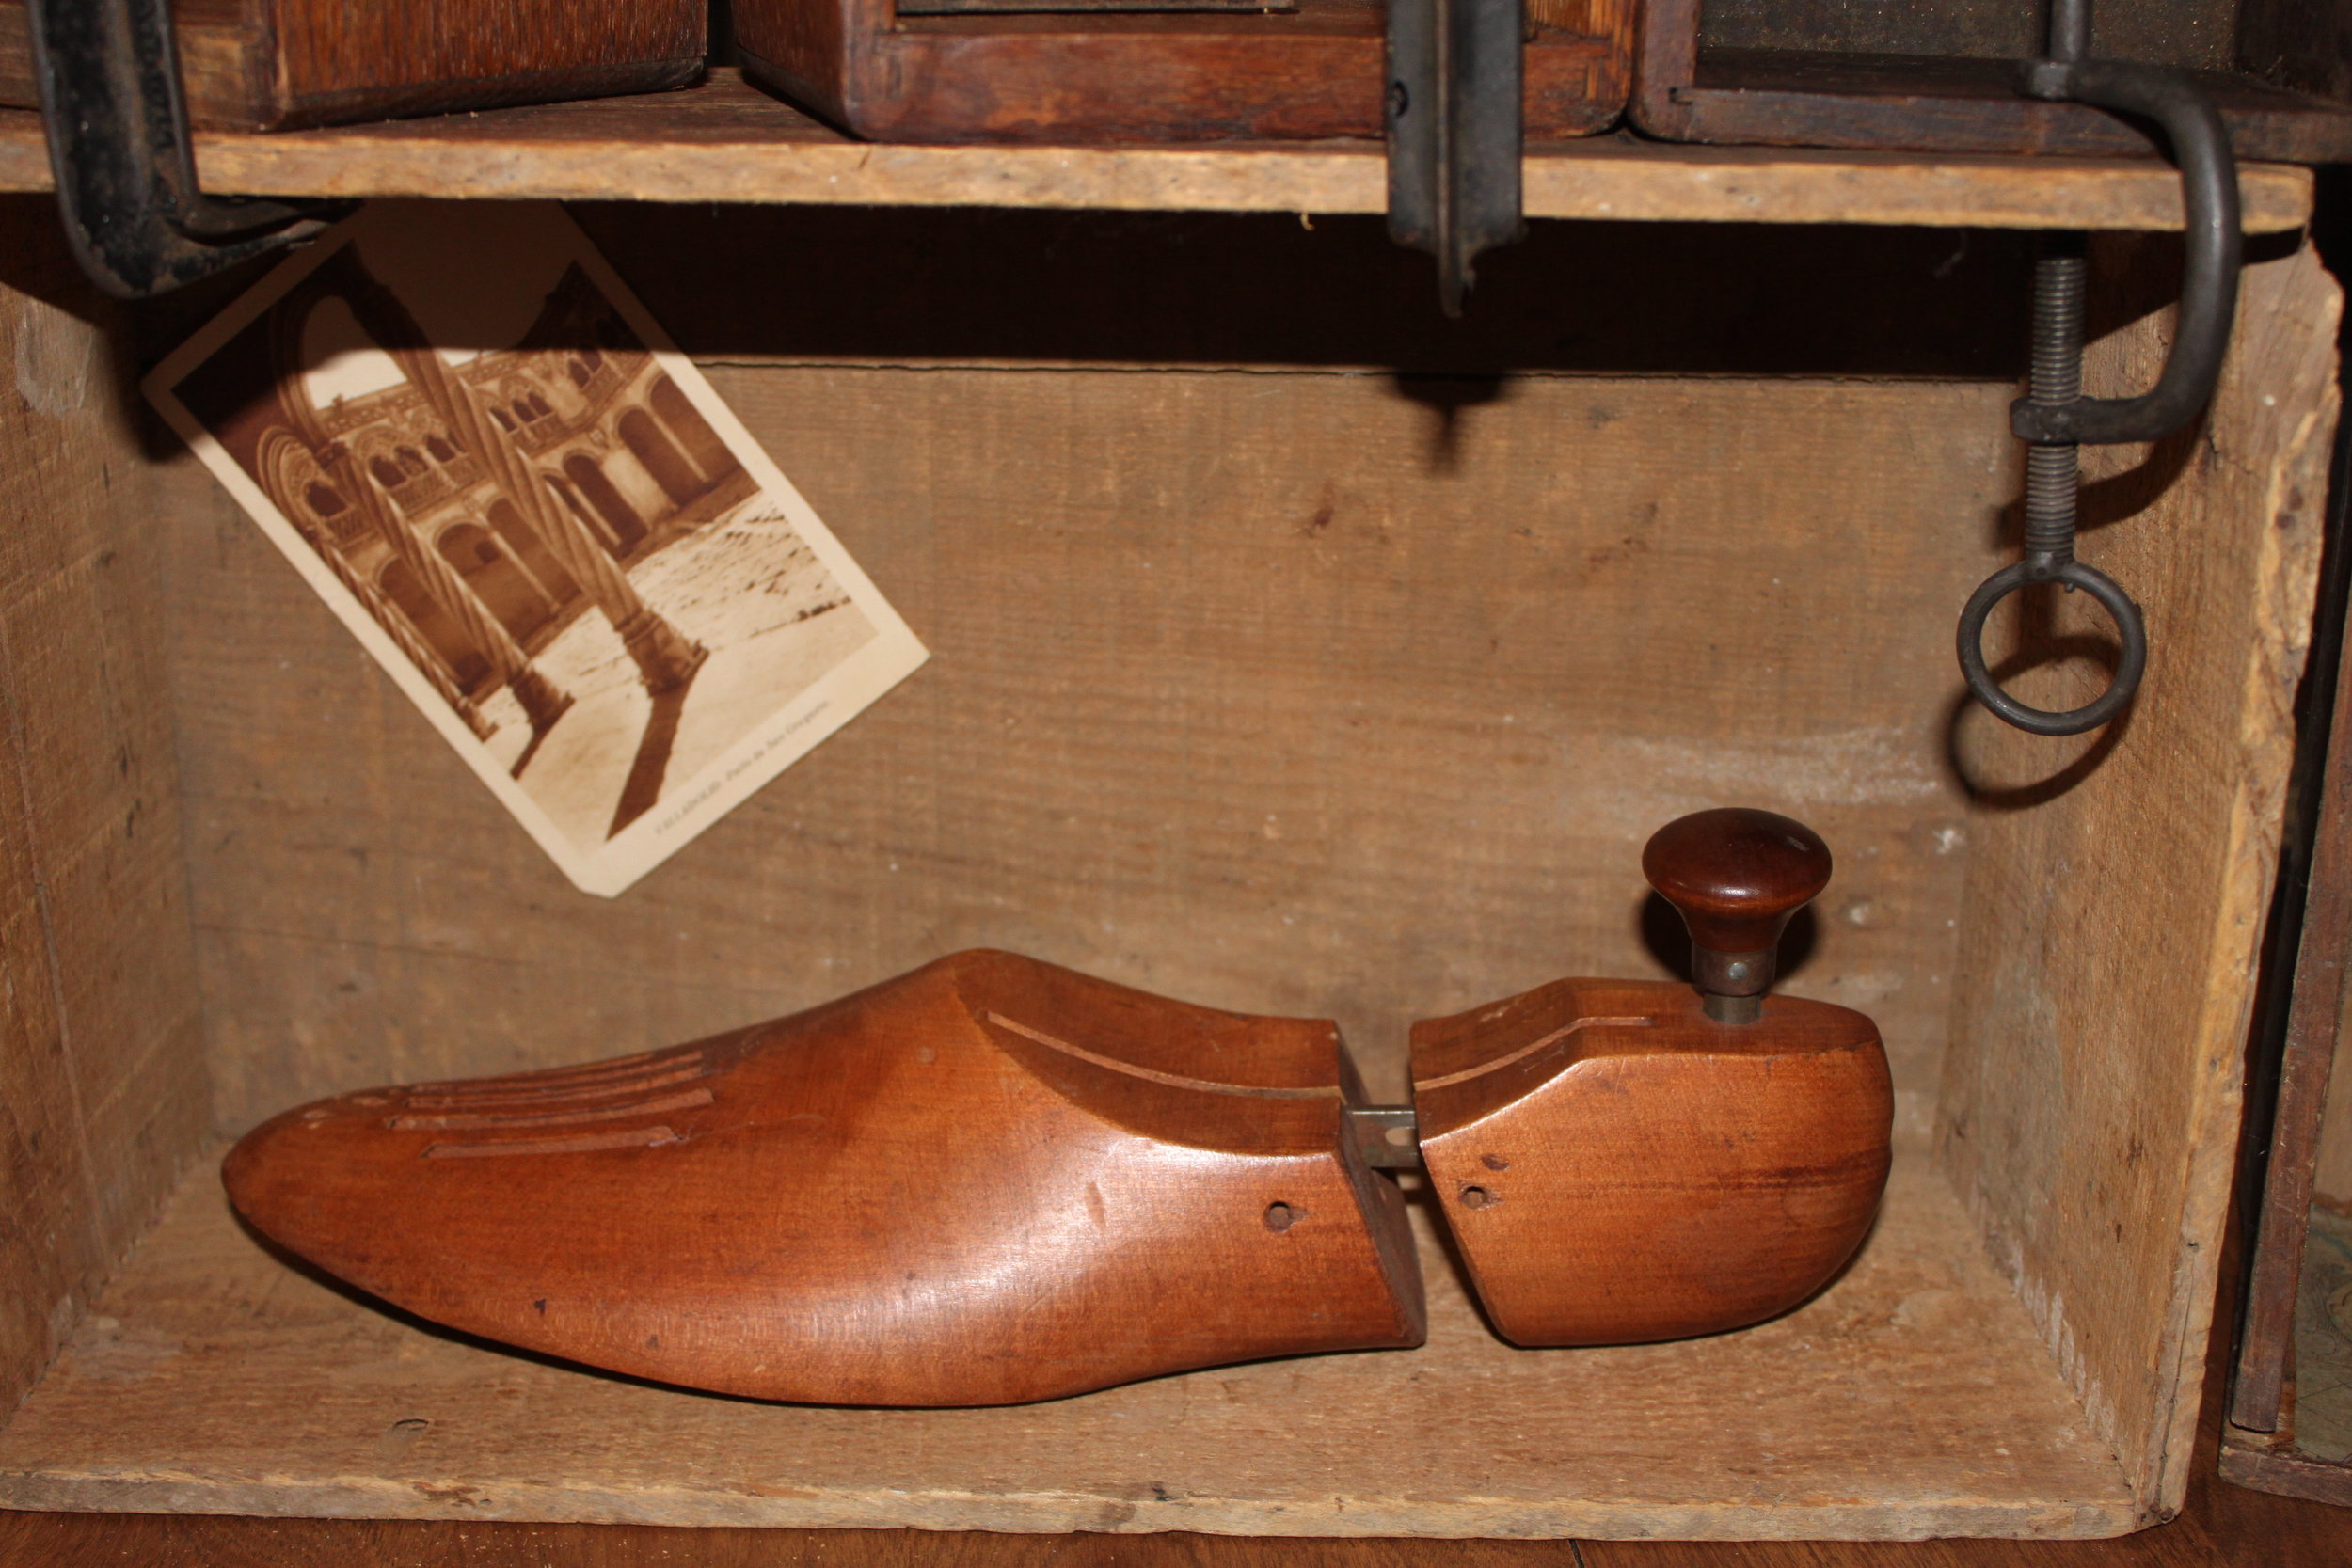
- Place the photo in your bottom box (optional).
- Hang your product proudly inside!
DIY Steampunk Jewelry Display, Style No. 2
D-I-Y-CommentIf you have a steampunk crafty business, or perhaps an old-timey aesthetic, your booth should convey the feeling of your products. This is something I feel that I do quite well and I am quite proud of. Many people stop by my booth just to look at the curiosities inside. This is the second in a series of 3 blog posts on how to recreate 3 of my newest displays for yourselves! Too see Style No. 1, click here. For Style No. 2, read on!
Style No. 2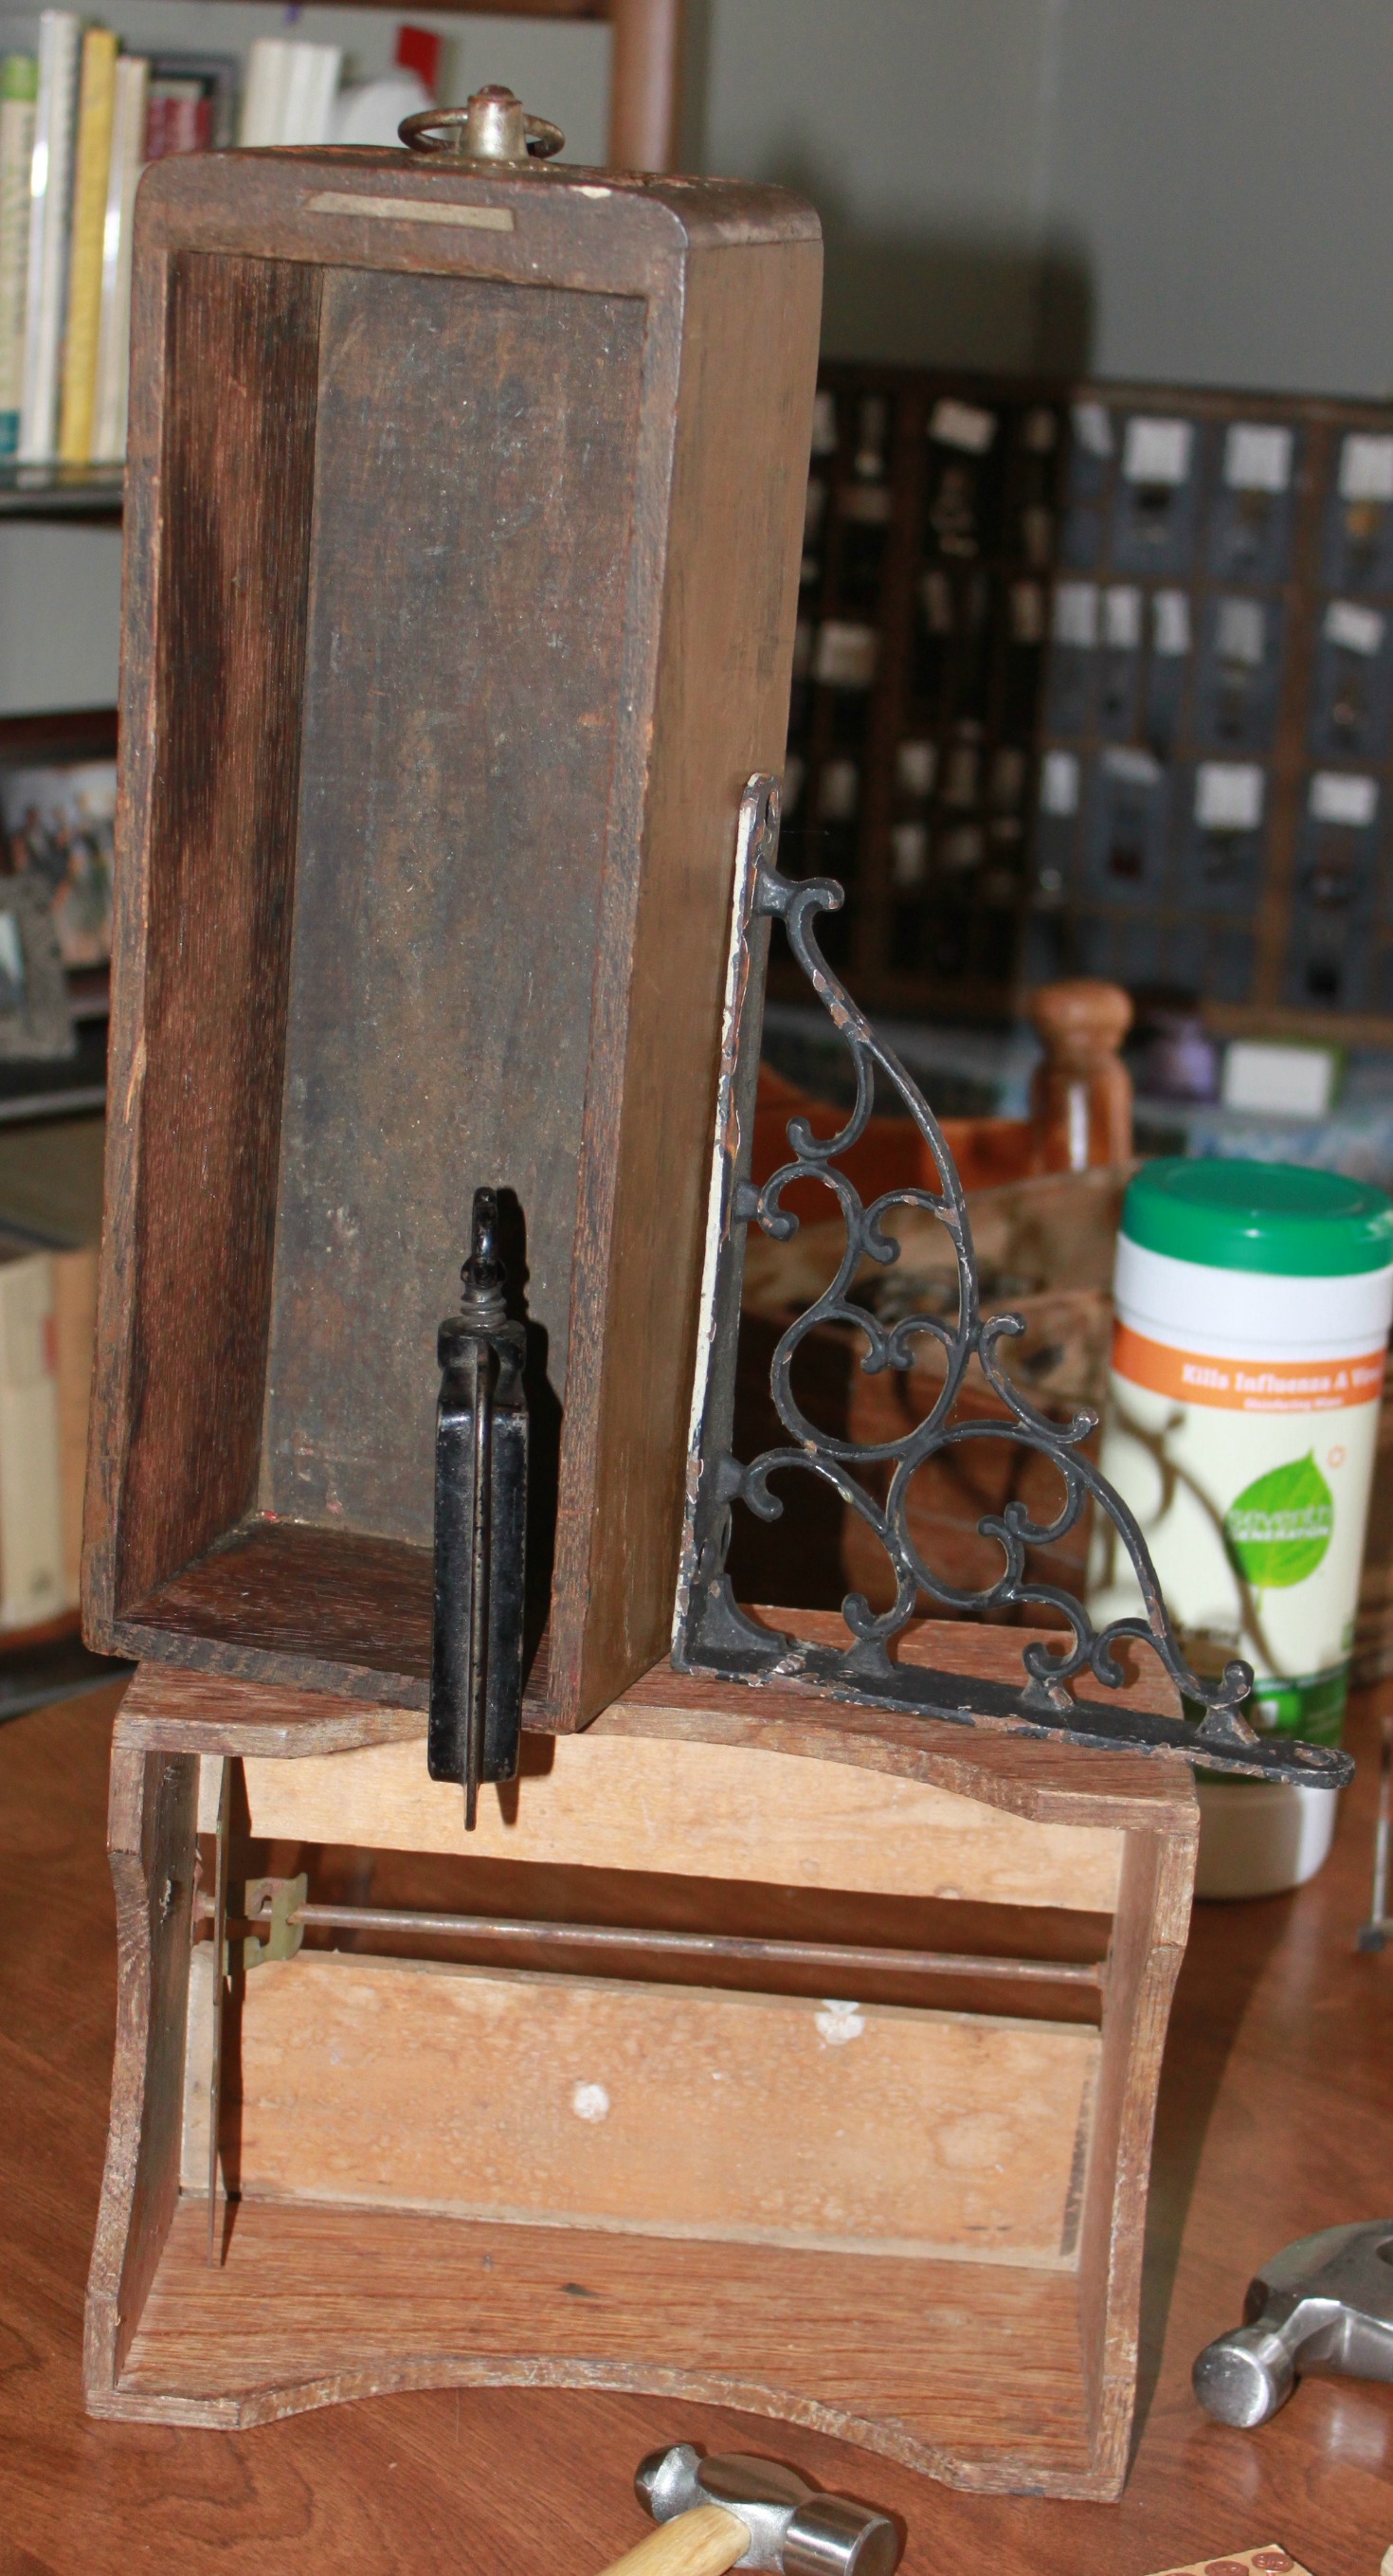
What You'll Need: 2 boxes (1 large and 1 small); 2 screws; drill & screwdriver; Murphy's Oil; medium-large cup hooks, as many as preferred; awl; c-clamp; and decorative metal bracket
A Note on Where to Find Boxes: Flea Markets; Garage Sales; Antique Malls; and ReStores (which benefit Habitat for Humanity)--Look for sewing machine drawers & old produce crates especially. Avoid any boxes with mold, badly split sections of wood, or water damage. They will not be as structurally sound and may break with minor hammering.
Instructions:
- Clean your boxes with soap and water (be careful not to soak your boxes). Shine them with a little bit of Murphy's Oil. Let dry completely.
- Place your sewing drawer (or small box) and metal bracket where you'd like them. Mark with pencil where you need to screw your metal bracket in place. Also, mark the corner of your sewing drawer so if you choose for it to be removable you can place it back in the same spot. (I would suggest making your drawer removable because when you transport these kinds of displays, they can shift and it is much easier to adjust a c-clamp than having to re-screw the box on location).
- Clamp your sewing drawer to your large box with your c-clamp.
- Next, make starter holes in your large box for your screws. If your box is oak or another hard wood use a drill rather than your awl. And vice versa for a more pliant or less sturdy wood.
- Affix your metal bracket to your large box with your screws.
- Last, make starter holes on your display where you'd like to place your cup hooks. Screw your cup hooks in.
- Hang your jewelry with pride!

DIY Steampunk Drawer Displays, Style No. 1
D-I-Y-1 CommentIf you have a steampunk crafty business, or perhaps an old-timey aesthetic, your booth should help convey the feeling of your products. This is something I feel that I do quite well and I am quite proud of. Many people stop by my booth just to look at the curiosities inside. In my next 3 blog posts, I will be sharing 3 of my newest displays with instructions & tips on how to recreate them for yourselves! Here's no. 1.
Display No. 1:

What You'll Need: 2 boxes (1 large and 1 small); 2 nails; hammer; Murphy's Oil; 3 medium-large cup hooks, or more if preferred; 1 large spring; modge podge; paintbrush; scissors; awl; map tissue paper (or regular paper) cut to fit the bottom of your box; twine; and a metal filigree globe (this can be substituted for anything else you'd like or can find that fits your box that you can hang jewelry from)
A Note on Where to Find Boxes: Flea Markets; Garage Sales; Antique Malls; and ReStores (which benefit Habitat for Humanity)--Look for sewing machine drawers & old produce crates especially. Avoid any boxes with mold, badly split sections of wood, or water damage. They will not be as structurally sound and may break with minor hammering.
Instructions:
- Clean your boxes thoroughly with soap & water (though do not soak the box) and shine up with a little Murphy's Oil. Let dry completely.
- Affix your small box on the top of your large box with your 2 nails. Hammer the nails in the bottom of the small box. Next, cut a piece of your map tissue paper to fit the bottom of your box. Apply a generous layer of modge podge to the bottom of the small box and then place the map tissue paper over it. Apply another layer of modge podge and let dry, approx. 15-20 mins. (Side note, map tissue paper, which you can find at Barnes & Noble BookStores in their gift wrap section, looks more antique when modge podged into your box than regular map paper).
- Next, cut a piece (or pieces if your large box is divided like mine) of map tissue papers to fit the bottom of your large box. Apply a generous layer of modge podge to the bottom of the box. Place the map tissue paper to the bottom of the box and then modge podge on top of it. Let dry, approx. 15-20 mins.
- Next, place your spring where you want it to hang in your box. Mark 2 spots with your pencil (where your cup hooks will go). Using your awl, create 2 starter holes over your pencil marks.
- Screw your cup hooks in place. Hang your spring from the cup hooks.

- Place your metal filigree globe in the box. Figure out where you would like it to hang. Mark it with pencil and create a starter hole with your awl. Next, cut the length of twine you need. Attach the twine to your filigree globe.
- Screw your cup hook in place. Hang your filigree globe.

- (Optional) Screw in more cup hooks for additional places to hang your jewelry. Remember to first create starter holes before screwing in the cup hooks so that you do not split the wood.
- Display your amazing product!
DIY Steampunk Home Decor: Clock Face Catch All
D-I-Y-Comment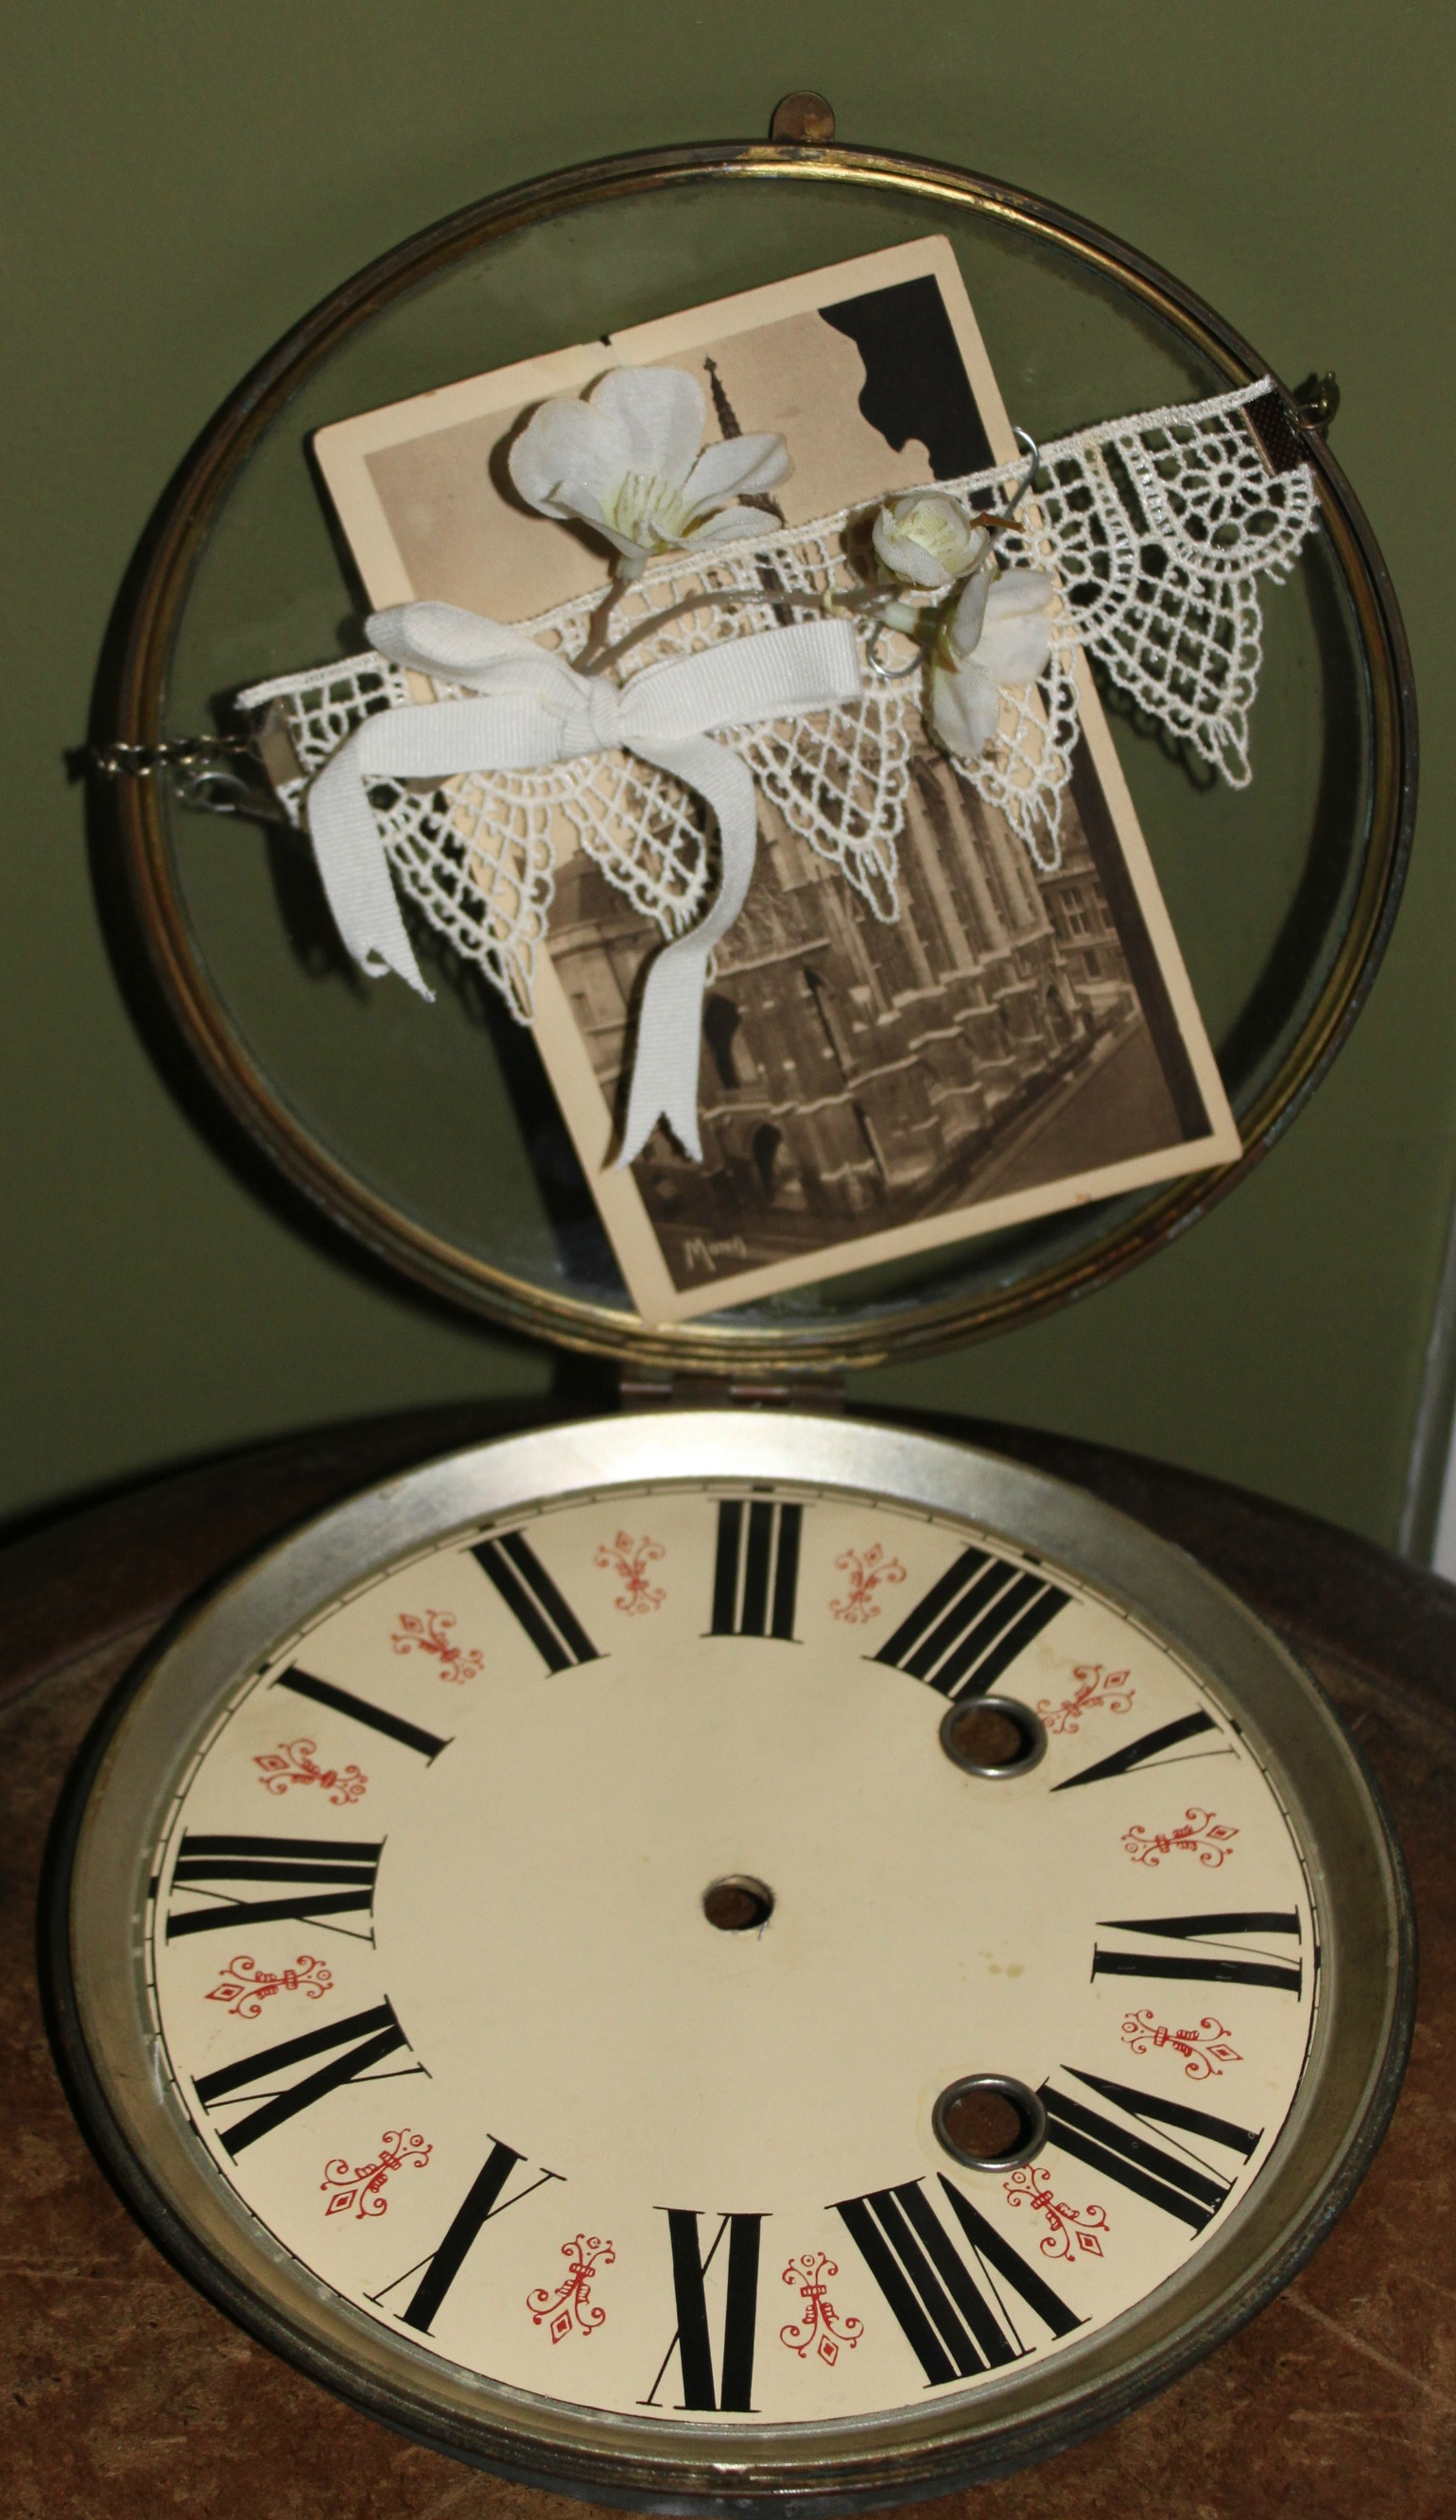 Steampunk your home with this simple & elegant clock face catch all. Perfect for holding your loose change, keys, sunglasses, stamps, or jewelry--your catch all will not only be beautiful, but also be another conversation piece to add to your home! Here's what you'll need:
 Materials & Tools:
- Clock Face (oversize or large) that has a protective covering. If you cannot find a clock face then try looking for a sundial instead.
- Vintage Photograph or Postcard (that fits inside your covering)
- Ribbon (any color of your choice)
- Fake Flower (any kind of your choice)
- Lace (the amount will depend on the size of your covering. Your lace should equal the length [circumference] of your covering)
- Paperclip
- Scissors
- Needle & Thread (or glue gun)
- Chain (also measured to equal the circumference of your covering)
- Jewelry pliers & wire cutter
- 2 Ribbon Crimps
- 2 jump rings
Steps:
- Open up the covering of your clock face & leave open. Place your vintage photograph inside. Set aside.
- Measure your lace (it should be the same length as your covering) and then cut. Next, place 1 ribbon crimp at the end of your lace and crimp in place with your jewelry pliers. Repeat for the other end.
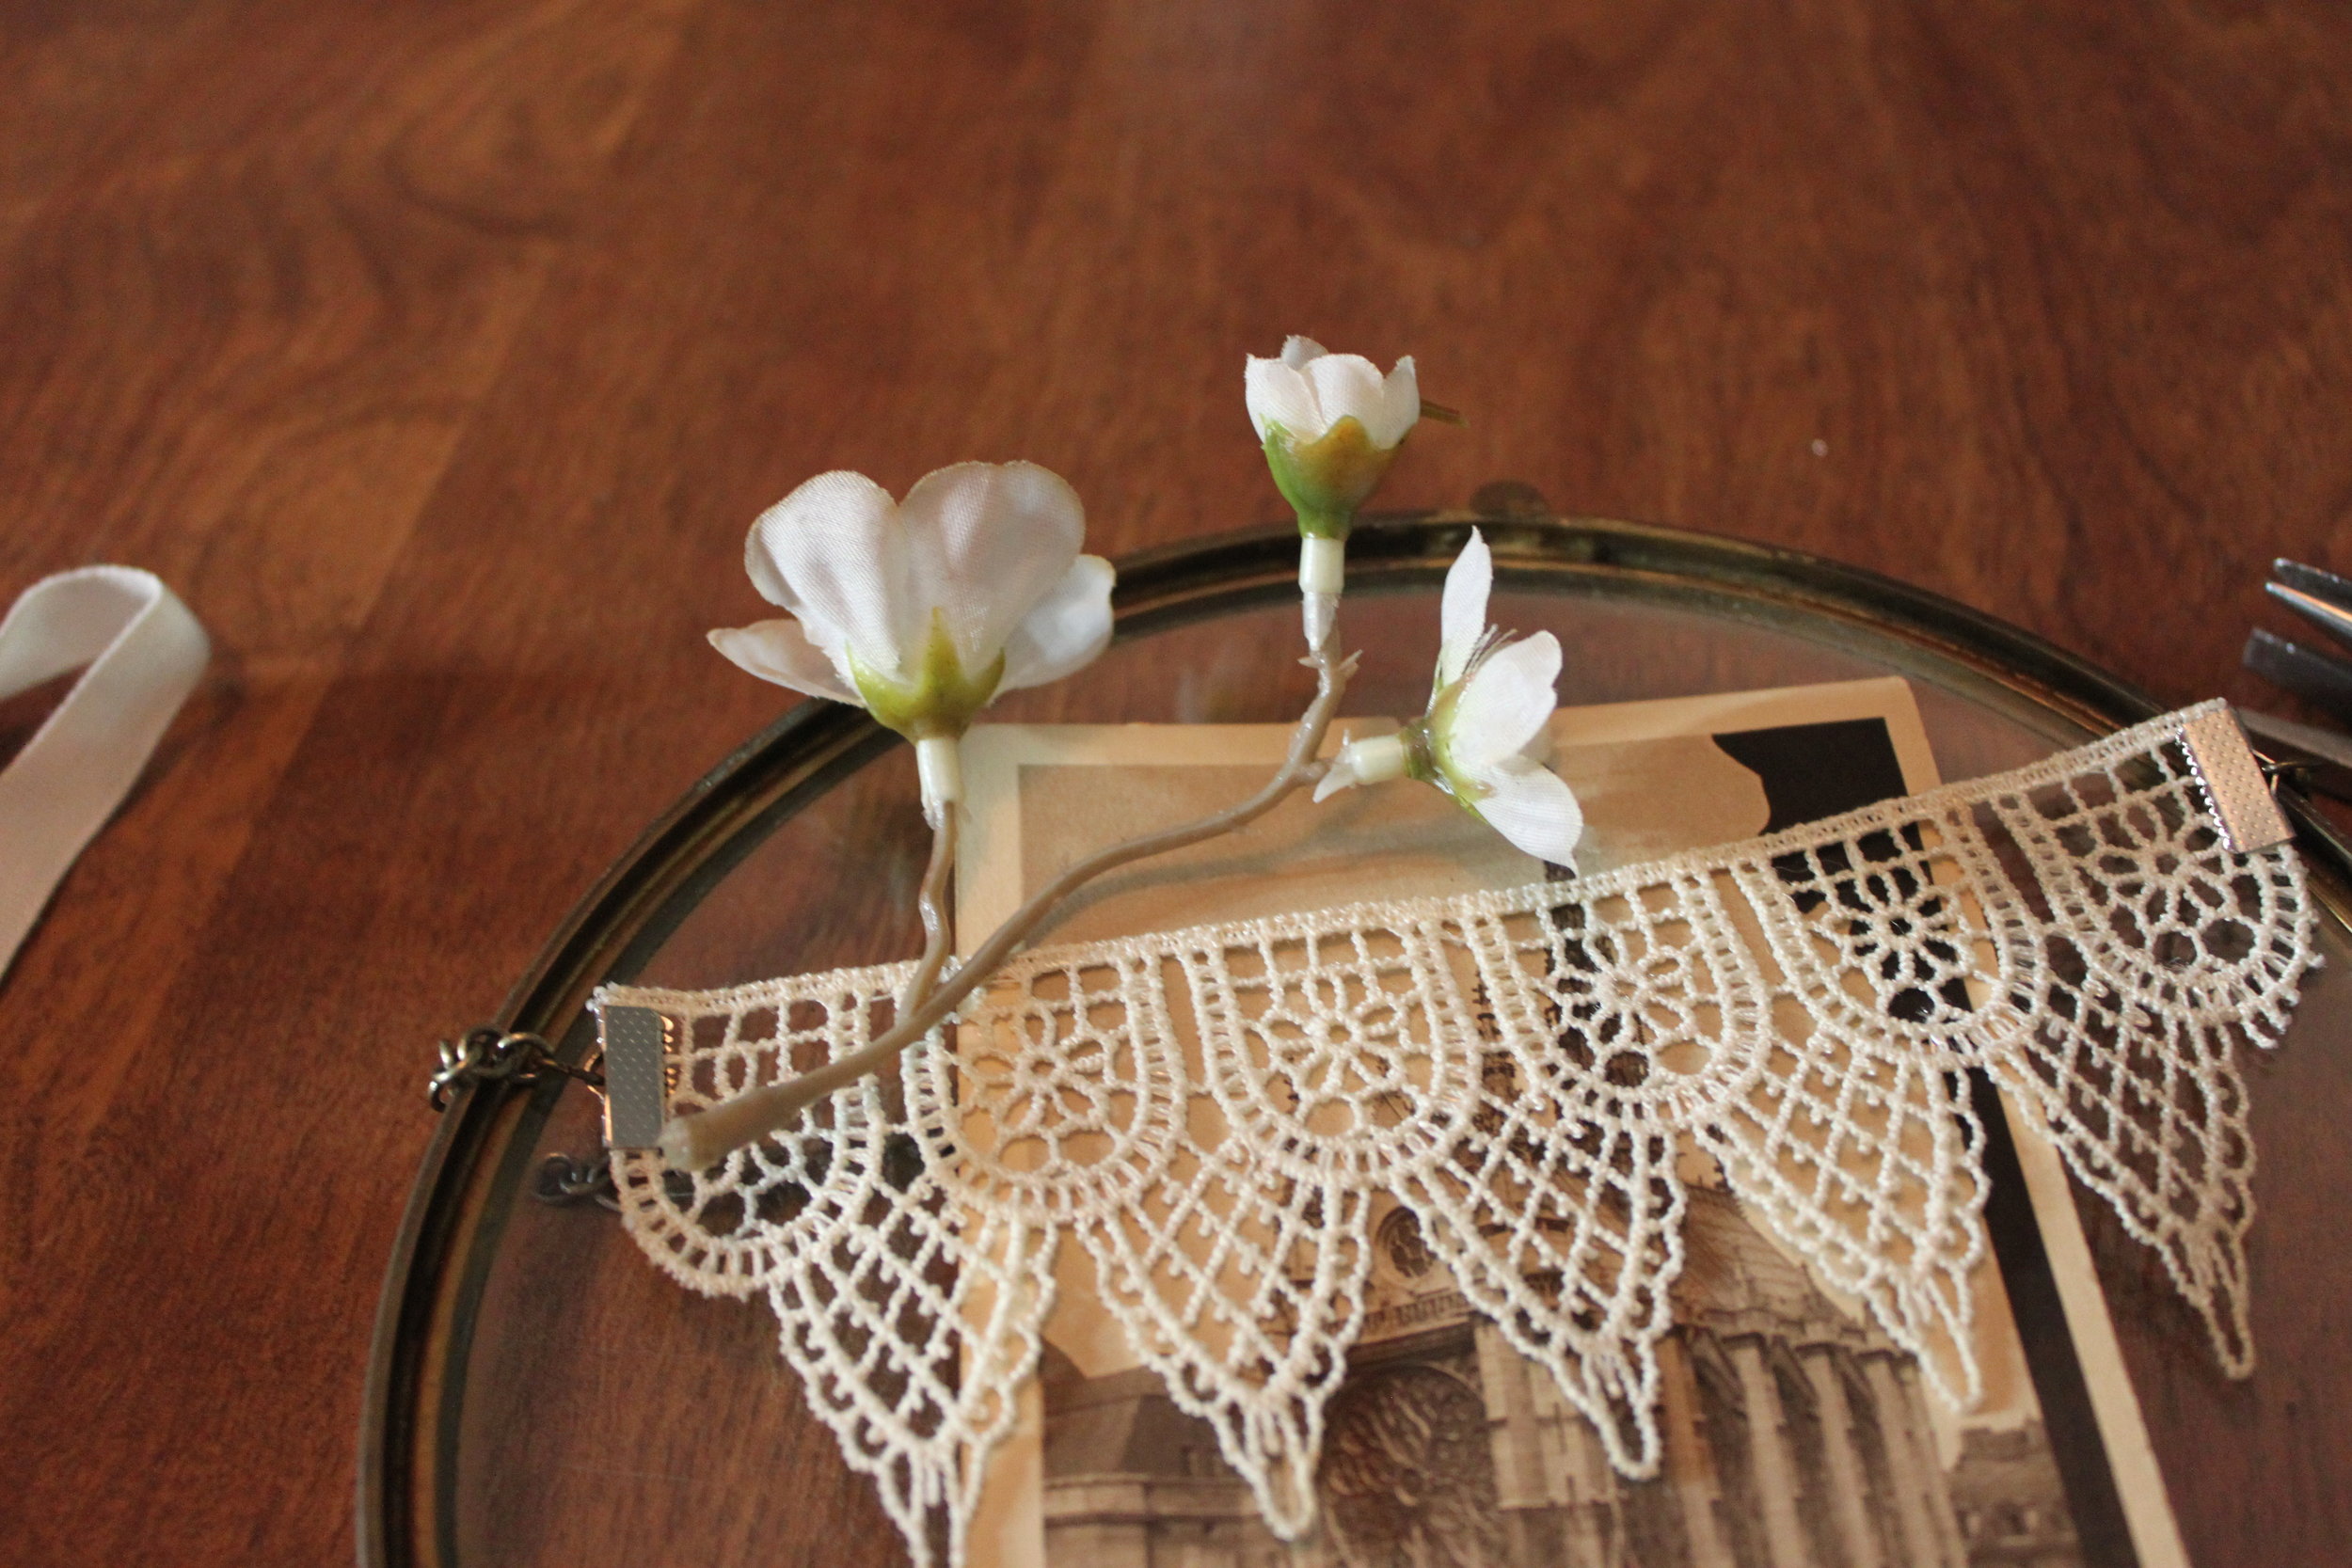
- Now measure the amount of chain you need. (It should be the same length as your covering too.) Cut your chain with wire cutters, or toenail clippers if you do not own a pair of wire cutters. Next, using your jewelry pliers (2 flat nosed pliers are best) connect your chain to your lace by hooking the jump ring through the ribbon crimp. Repeat for the other side.
- Place your lace & chain over the covering--the lace should be placed in front over the photograph/postcard. You may have to adjust your chain if you don't like where it sits on your covering (by making it smaller or larger--respectively, removing chain links with wire cutters or adding jump rings or more chain with your pliers).

- Next, make a decorative bow out of your ribbon.

- Using your needle & thread, sew your bow and fake flower in place onto the lace. Be sure to tie a sturdy knot. (Another option for this step if you don't like sewing--glue the bow and fake flower in place with your glue gun.)
- Last, clip together your photograph and lace with your paperclip. This helps the lace remain taut across the photograph/postcard rather than sag across it.
- Proudly display in your lovely home!
 As always, happy making!
DIY Steampunk Illumination, Live Demo
D-I-Y-CommentI had so much fun Thursday morning on Great Day Green Country filming a live DIY! I made 2 versions of Steampunk Candle Holders (one for tea candles & one for candlesticks). They are easy, elegant, and cheap to reproduce (bet. $5-10 to make). In case you missed it, here it is! Enjoy! And as always, Happy Making! http://eplayer.clipsyndicate.com/embed/iframe?aspect_ratio=3x2&auto_next=1&auto_start=0&page_count=4&pf_id=9204&pl_id=26017&rel=3&show_title=0&tags=GDGC&va_id=3969819&volume=8&windows=1
Make your own Steampunk Valentine's Day Cards
D-I-Y-6 CommentsI love Valentine's Day, mostly because it's one of the few times I see handmade cards exchanged. Here a a couple of DIY Stemapunk Valentine's Day cards that are easy & cheap to reproduce. As always, merry making!
 The Valentine's Day Magnifies My Love for You Card
- Plain card & envelope (your choice of color)
- Bakers Twine (your choice of color)
- Small Magnifying Glass
- Small Heart Stamp (or you can draw your heart)
- Scissors, pink or red marker & Pen
Total Cost: approximately: $3.50
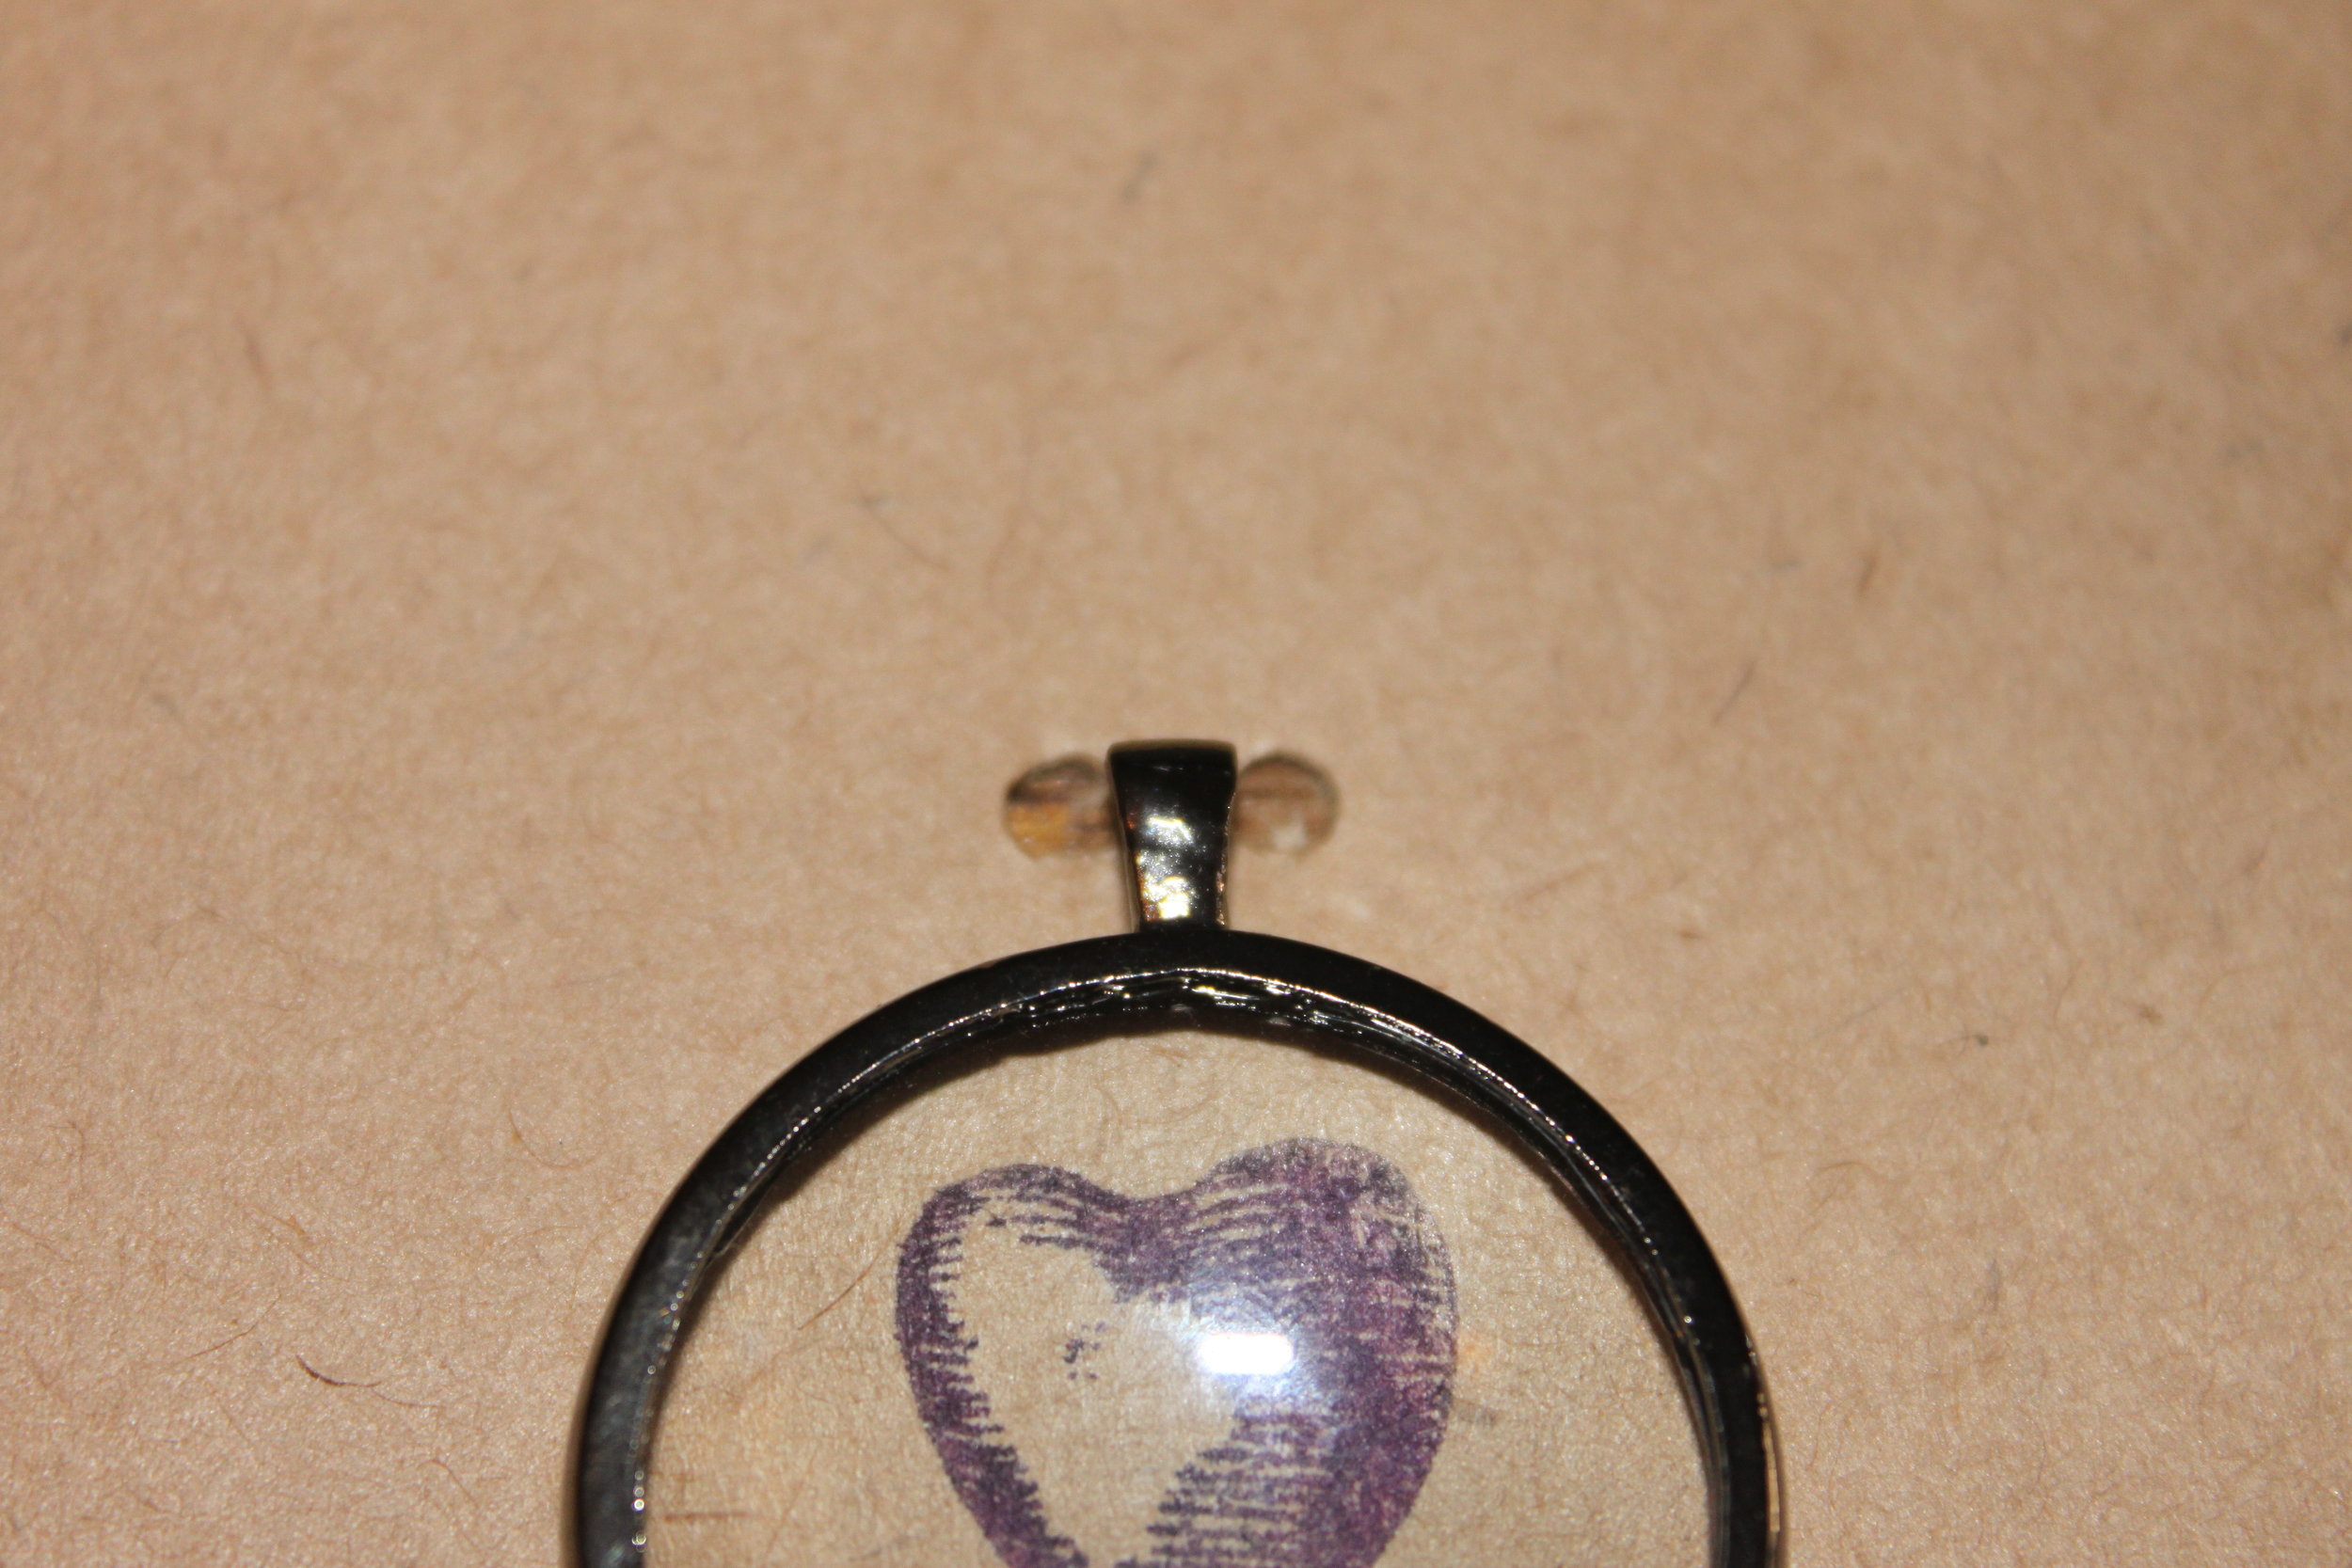
- Using your pink or red marker color in your heart stamp and then place the stamp firmly onto the middle of your card. If you are drawing your heart, draw it in the center of your card. Be careful not to draw your heart larger than your magnifying glass.

- Place your magnifying glass on the card over your stamped/ drawn heart. Make two tiny dots with pen on both sides of the magnifying glass. This tells you where to poke holes in the card. You want your holes to be close to your magnifying glass's hook or ring.
- Poke out your holes where you've already marked.
- Cut a length of bakers twine (approximately 1 inch) and thread it through your paper so that both ends meet at the front of your card.

- Next thread the twine through your magnifying glass's hook. The twine on the left should thread to the right and vice versa.
- Tie a knot securely on the front of the magnifying glass's hook. And then tie a decorative bow. Cut off any excess twine.
- Last, write your message & the card's quirky phrase: "Valentine's Day magnifies my love for you."
The You Really Get My Gears Going Card
- Plain card & envelope (your choice of color)
- 3 gears (I used reproduction gears which you can purchase at Michaels in their jewelry section)
- 3 brads (also available at your local craft store in the scrapbooking section)
- Scissors & Pen
Total Cost: approximately $1.75 
- Place your gears on your card. Figure out which placement you like best.
- Once you've got your gears where you want them, mark the center of each gear with your pen. A small dot will do.
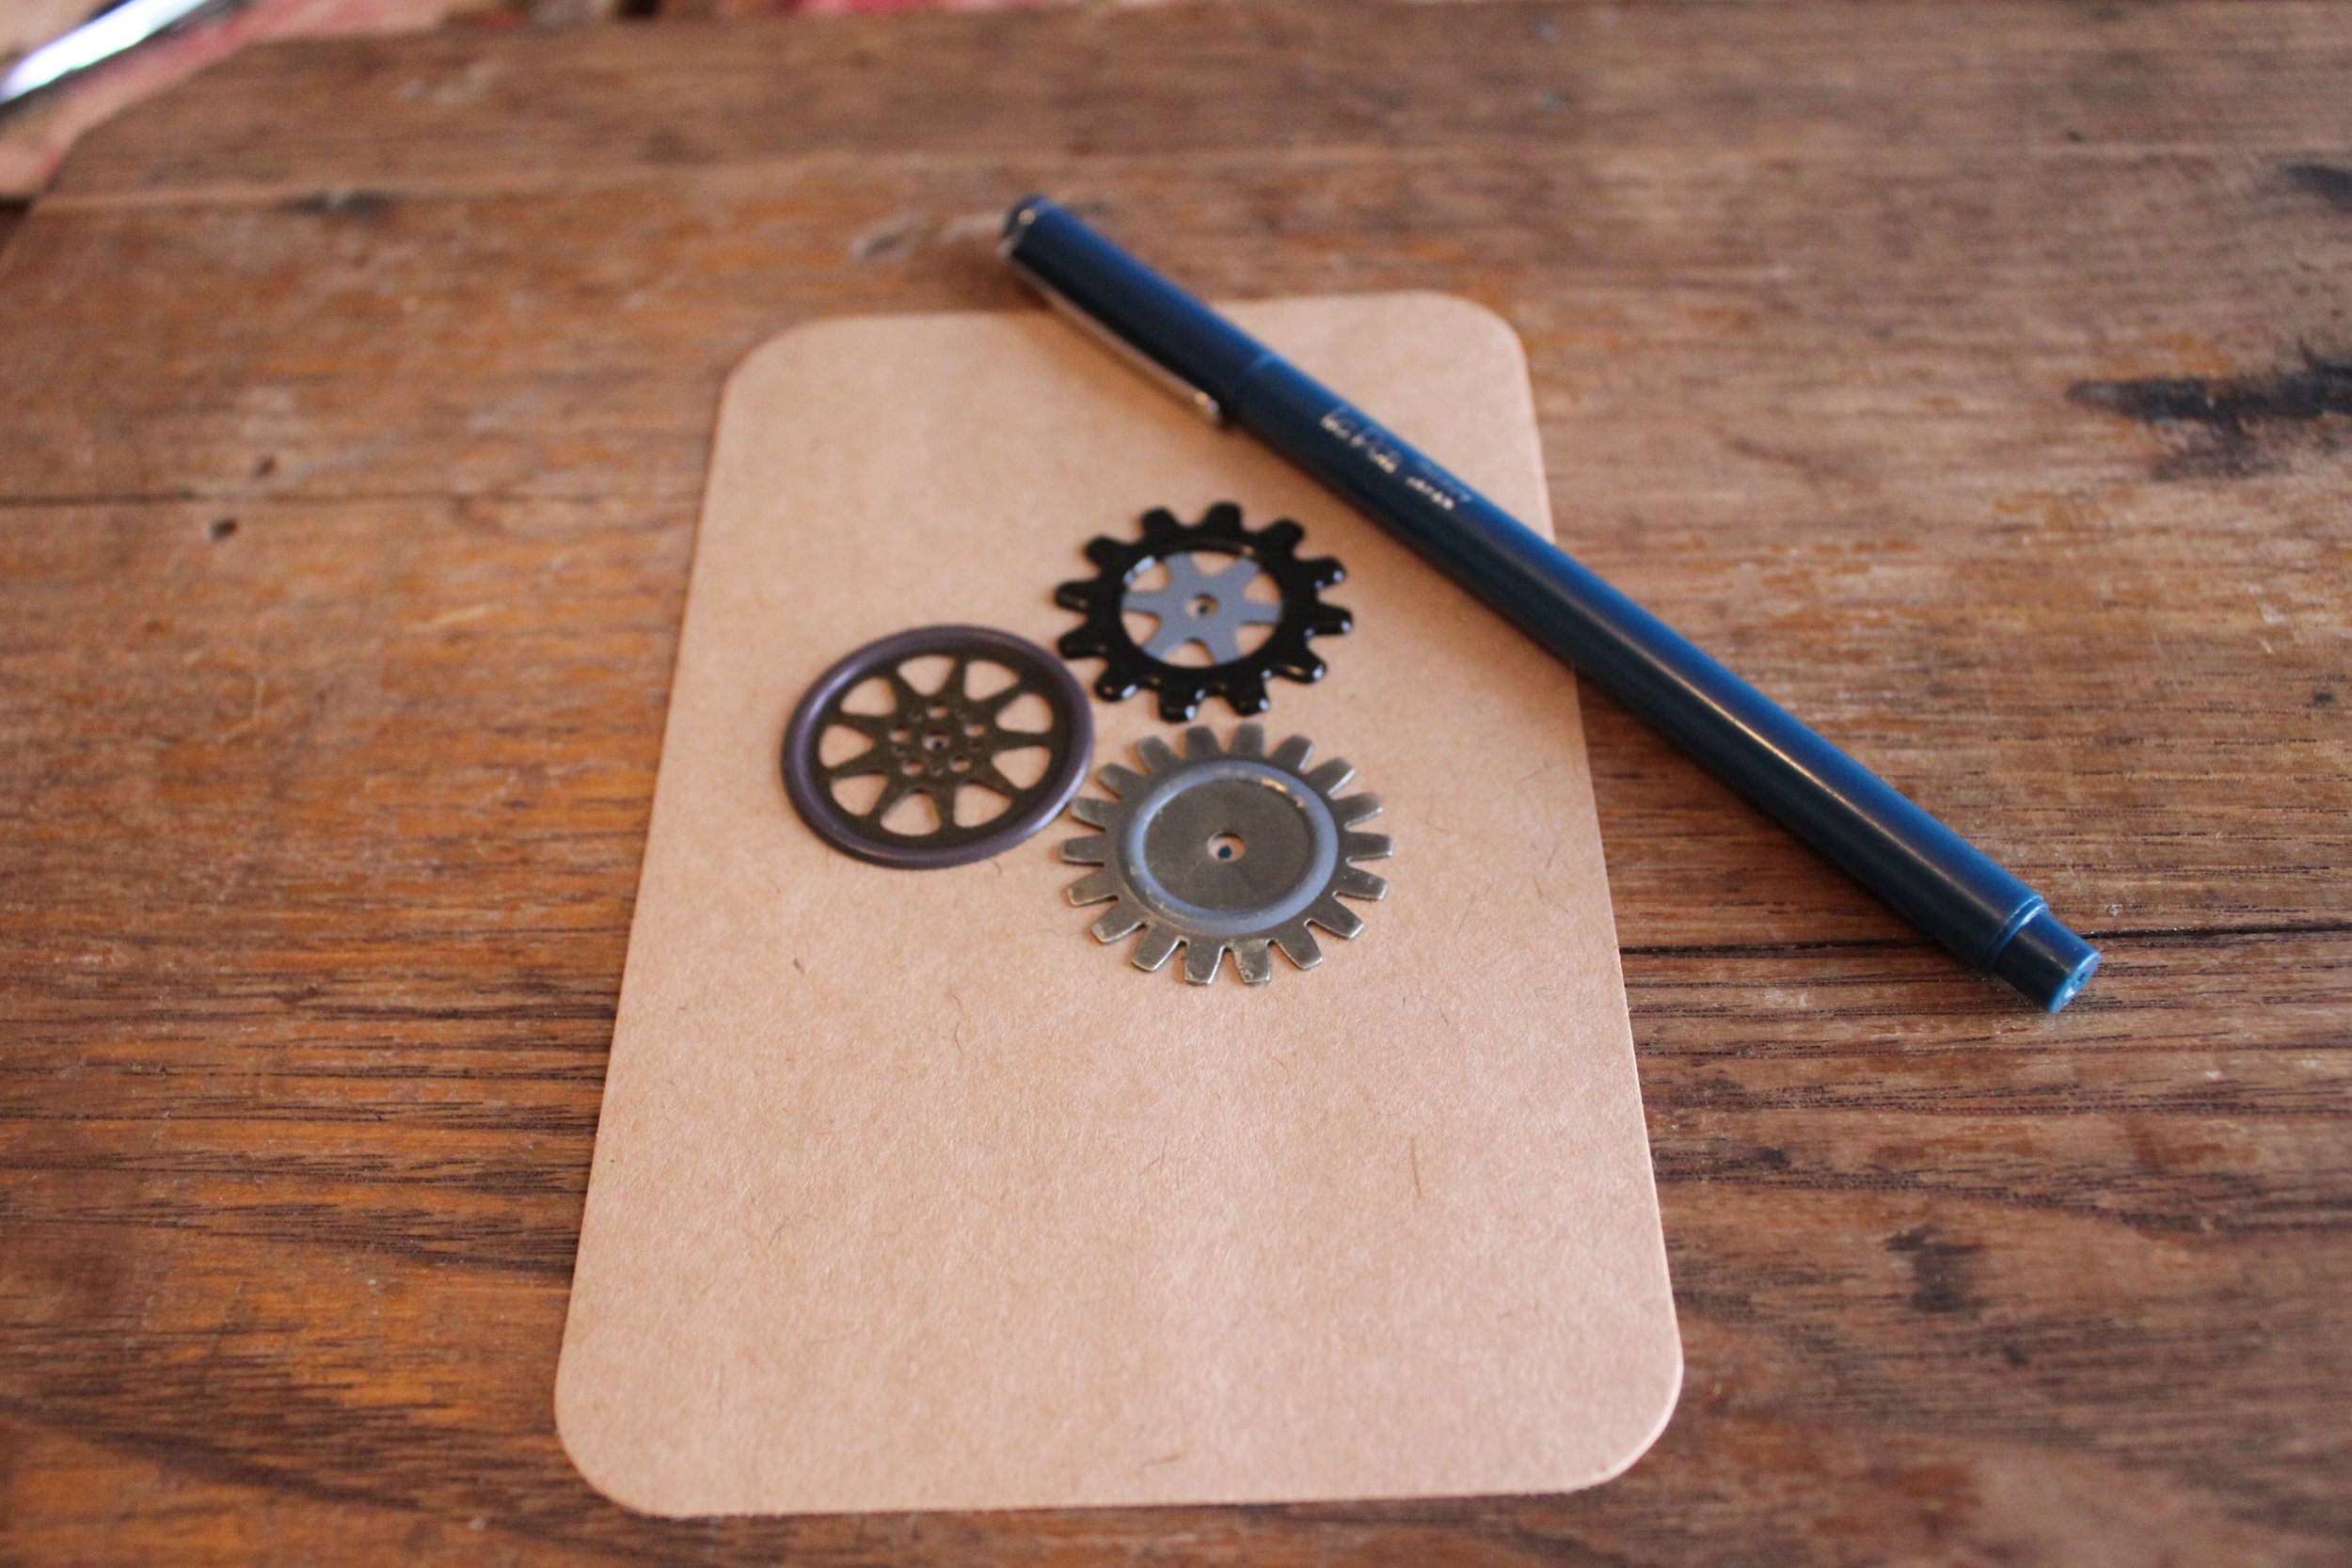
- Next, poke holes in your card with your scissors. Be sure not to make a large hole, a small one is sufficient.

- After you've finished making all of your holes, affix each gear to the card with a brad. To do so, place your gear (face up) onto your bard and then through your card. Place your thumb over the brad to hold it firmly in place and pry the brad's 2 metal prongs out. Repeat for each gear.

- Last, write your message of love and the card's fun little phrase: "You really get my gears going."
The You are the Gear that Keeps my Heart a Pumping Card
- Plain card & envelope (your choice of color)
- 1 gear (I used a reproduction gear which you can purchase at Michaels in their jewelry section)
- 1 brad (also available at your local craft store in the scrapbooking section)
- A Heart Stamp (or you can draw your own heart)
- Scrap piece of paper (to stamp the heart on)
- Scissors, pink or red marker & Pen
Total Cost: approximately 80 cents
- Stamp (or draw) the heart onto your scrap piece of paper. Once you are done, cut it out. Poke a hole in the center of your heart using your scissors. Set aside.
- Poke a small hole in the center of your card.
- Next load your brad with the following (in this order): heart cut out, gear, and card.

- Close the brad by placing your thumb over it to keep it firmly in place and pry the brad's 2 metal prongs out.
- Last write your message of affection and the card's fun phrase: "Happy Valentine's Day" and "You are the gear that keeps my heart a pumping."
The I Only Have Eyes for You Card
- Plain card & envelope (your choice of color)
- Glasses (just the front piece of the frame, or a monocle would work too)--local thrift stores have tons of old frames so check them out first if you don't have a broken pair lying around the house
- Embroidery thread & needle
- An "XOXO" Stamp (or you can write "XOXO" yourself)
- Scissors, pink or red marker & Pen
Total Cost: (depends entirely on the glasses you chose and their cost) for mine, $8.00 
- Place your glasses on your card.
- Once you're happy with the placement of your glasses color one half of your "XOXO" stamp with your pink or red marker (so only one "XO"). Flip up your frame and stamp the "XO" where the lens is on your card. Repeat for the other lens.

- Next, thread your needle and secure your eyeglasses frame to the card by threading it through available holes. Be careful to keep your stitches neat, small, and close. Knot on the back side of your card. Repeat for another hole on your eyeglasses frame. You should stitch your frame securely in at least 2 places.
- Last write your message of adoration and the fun little phrase: "I only have eyes for you."
Have fun telling those you love just how much you love 'em. If you want more ideas for DIY Valentine's Day Cards check out my post from last year where I use upcycled items readily available around your home.
2 Simple Ways to Steampunk Your Christmas Balls!
D-I-Y-, UncategorizedComment Christmas Ball Compass: (Materials Needed: Christmas tree ball, length of chain--appropriate to your ball's size, snowflake sequin, game spinner, and 2 jump rings) Tools Needed: An awl and a pair of flat nosed pliers.
- Using your awl, poke a hole in your snowflake sequin.
- With your flat nosed pliers, open your jump ring and load your game spinner, snowflake sequin, and chain onto the ring and close securely.
- Then attach the other end of your chain to the hook of your ornament with the second jump ring.
- Now your ornament is ready to hang on the tree so get to decorating!
 Christmas Key Ball: (Materials Needed: Christmas tree ball, tiny key, and a tree hook) No tools needed.
- Load your tree hook with the tiny key and then the Christmas ball.
- Then close the hook securely and hang on your tree!
As always, Merry Making!